Bilješka
Pristup ovoj stranici zahtijeva provjeru vjerodostojnosti. Možete pokušati da se prijavite ili promijenite direktorije.
Pristup ovoj stranici zahtijeva provjeru vjerodostojnosti. Možete pokušati promijeniti direktorije.
This article describes how to troubleshoot small form factor deployments of Azure Local.
Important
This feature is currently in PREVIEW. See the Supplemental Terms of Use for Microsoft Azure Previews for legal terms that apply to Azure features that are in beta, preview, or otherwise not yet released into general availability.
Collect a support package from the app
A log package is composed of all the relevant logs that can help Microsoft Support troubleshoot any device issues. You can generate a log package via the local web UI. Follow these steps to collect a support package from the app:
Select the help icon in the top-right corner of the app to open Support + troubleshooting.
Select Create to begin support package collection. The package collection could take several minutes.
After the support package is created, select Download. A zipped package is downloaded on your local system. You can unzip the package and view the system log files.
Infinite USB boot loop with “Boot USB Devices First” enabled (Intel NUC)
Problem:
If the BIOS option Boot USB Devices First is enabled on an Intel NUC device, the system can enter a continuous USB boot cycle.
This setting overrides the configured boot order and keeps prioritizing connected USB media. As a result, even after ROE is installed successfully, the device keeps booting from the USB drive instead of the internal disk.
The device can appear stuck in a cycle where it:
- Boots from the USB device
- Reinstalls Azure Linux
- Reboots
This cycle usually repeats about every 10 minutes.
Cause:
The BIOS option forces the system to prioritize USB boot media over the internal disk.
Because the installation media stays connected:
- The system keeps detecting the USB drive as the highest-priority boot device.
- The configured internal boot order is ignored.
- The installation flow restarts after every reboot.
Recommendation:
Disable Boot USB Devices First, or the equivalent BIOS setting for your hardware model.
After you disable the setting:
- The system boots from the internal disk after installation finishes.
- The boot loop stops.
- Normal startup behavior returns.
TPM isn't writable during provisioning
Problem:
Provisioning can fail if the device Trusted Platform Module (TPM) isn't writable. Some OEM systems ship with TPM settings that block write operations until you clear the TPM in BIOS.
If TPM write access isn't enabled:
- Provisioning won't complete successfully.
- The device can't continue through the expected setup flow.
Cause:
The TPM is in a non-writable state because of the platform BIOS configuration. This isn't an installer issue.
Recommendation:
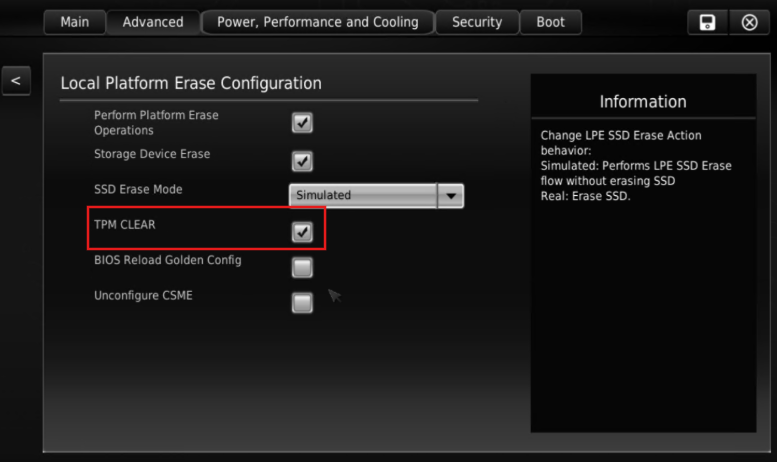
Perform a one-time TPM clear in the system BIOS for each device. You only need to do this once per device, not once per installation.
Note
Remove all USB storage devices before you clear the TPM. On some systems, including ASUS NUC devices, leaving USB storage connected can make the USB device unusable.
TPM clear options vary by hardware vendor and BIOS version. Look under Advanced or Security for settings such as:
- Pending Operation
- Local Platform Erase Configuration
Example: ASUS NUC
Remove all USB storage devices.
Boot the device and repeatedly press
F12to enter BIOS.Go to Advanced > Local Platform Erase Configuration, then apply the TPM clear option.
SSH login prompts for a password when using a .pem file
Problem:
When connecting to a provisioned machine over SSH using a .pem file, the connection prompts for a password instead of signing in automatically.
For example:
ssh -i mykey.pem clouduser@<ip-address>
Instead of connecting successfully, SSH prompts:
clouduser@<ip-address>'s password:
Cause:
The clouduser account doesn't have a password configured.
If SSH prompts for a password, it means the .pem key authentication failed and SSH is falling back to password authentication.
The most common causes are:
- The wrong
.pemfile is being used. For example, using:- A
.pemfile downloaded for a different device. - The wrong .pem file is being used for the target device.
- A
- The
.pemfile permissions weren't restricted withchmod 600.
If the file permissions are too open, SSH rejects the key for security reasons.
Recommendation:
Verify that you're using the correct
.pemfile downloaded from the Azure portal for the specific device you're connecting to.Confirm that the key file permissions are configured correctly.
- On Linux, restrict the key permissions with:
chmod 600 <your-key>.pem- On Windows, you can restrict the key permissions using:
icacls <your-key>.pem /inheritance:r
icacls <your-key>.pem /grant:r "%username%":R
Then retry the SSH connection.
If the issue persists, run the Azure Arc SSH command with verbose logging enabled to view detailed authentication errors:
az ssh arc --verboseReview the verbose output for key authentication failures, permission issues, or mismatched key errors.
Reattempt failed Azure Linux OS provisioning
Problem:
OS provisioning fails for a small form factor deployment, leaving the Edge machine in a Transitioning state and preventing the deployment from progressing. This problem commonly occurs during the InstallExtensions phase when the LinuxEdgeObservability extension fails to install on either the Edge machine or the target Arc machine. As a result, the overall deployment is marked as failed and no further provisioning operations are performed.
Typical symptoms include:
- Deployment status shows Failed.
- Edge machine remains in Transitioning state.
- ProvisionOS operations can't continue.
- Extension installation failures are reported, often referencing LinuxEdgeObservability.
- Standard recovery guidance recommends restarting deployment from the beginning.
Cause:
This problem occurs when extension installation fails during the target OS provisioning workflow. The provisioning service marks the Edge Machine as failed while still in the Transitioning state and doesn't continue with subsequent deployment steps. In earlier releases, recovery options were limited and often required a complete redeployment.
Recommendation:
When the failure occurs during target OS provisioning, try manually resubmitting the ProvisionOS job before performing a full redeployment.
- To resubmit the ProvisionOS job, download and run the
troubleshoot-os-provisioning-failure.shscript. Replace the<subscription-id>,<resource-group>, and<edge-machine-name>placeholders in the input parameters section with your actual values.
Known limitations:
- This recovery mechanism is intended for target OS provisioning failures.
- Failures occurring during ROE extension installation might still require more disruptive recovery actions, including redeployment.
- Retry and rollback capabilities aren't currently available for every provisioning stage.
Troubleshoot VM setup
The VM doesn't get an IP address
- Confirm the virtual machine (VM) uses the
HV-Internal-NATswitch created byset-network.ps1. - Confirm the host has internet connectivity.
- Rerun
set-network.ps1from an elevated PowerShell session.
The Configurator App can't connect
- Confirm the VM reached one of the success messages in the Hyper-V console.
- Use the IP address shown in the VM console.
- Confirm Windows Firewall or VPN settings aren't blocking local host-to-VM traffic.
You need to debug from the VM console
For the normal flow, don't sign in to the VM console. If the setup fails or you need diagnostics, sign in with the maintenance environment credentials:
- Username:
edgeuser - Password:
Password1
Use local console access only for troubleshooting. After the VM is successfully provisioned and the target OS is installed, use the SSH connection flow in Connect a provisioned machine from the Azure portal.