Bilješka
Pristup ovoj stranici zahtijeva provjeru vjerodostojnosti. Možete pokušati da se prijavite ili promijenite direktorije.
Pristup ovoj stranici zahtijeva provjeru vjerodostojnosti. Možete pokušati promijeniti direktorije.
This article describes how to monitor Microsoft Azure Backup Server (MABS). You can monitor a single MABS instance from the MABS Administrator console, or monitor multiple MABS from the Central Console. You can also monitor MABS activity by using System Center Operations Manager.
Monitor with the MABS console
To monitor MABS in the console, sign in to the MABS server with a local administrator account. Here's what you can monitor:
Alerts tab: You can monitor errors, warnings, and general information for a protection group, for a specific protected computer, or by message severity. You can view active and inactive alerts and set up email notifications.
Jobs tab: You can view jobs initiated by MABS for a specific protected computer or protection group. You can follow job progress or check resources consumed by jobs.
Protection task area: You can check the status of volumes and shares in the protection group and check configuration settings, such as recovery settings, disk allocation, and backup schedule.
Management task area: You can view the Disks, Agents, and Libraries tabs to check the status of disks in the storage pool, deployed MABS agent status, and the state of tapes and tape libraries.
Configure Microsoft 365 email notifications for MABS
Microsoft Azure Backup Server (MABS) v4 UR2 and later can send email notifications through Microsoft 365 by using OAuth 2.0 client credentials. This section explains how to register a Microsoft Entra application, grant the required permissions, configure a mailbox, and enter the OAuth credentials in MABS. Use the Exchange Online SMTP endpoint smtp.office365.com, port 587, and STARTTLS, together with the application's tenant ID, client ID, and client secret. For more information, see Use client credentials grant flow to authenticate SMTP, IMAP, and POP connections.
Note
Before you set up the email notification, ensure that you enable SMTP AUTH in Microsoft Exchange Online.
To set up SMTP by using OAuth, follow these steps:
In the Azure portal, go to Microsoft Entra ID.
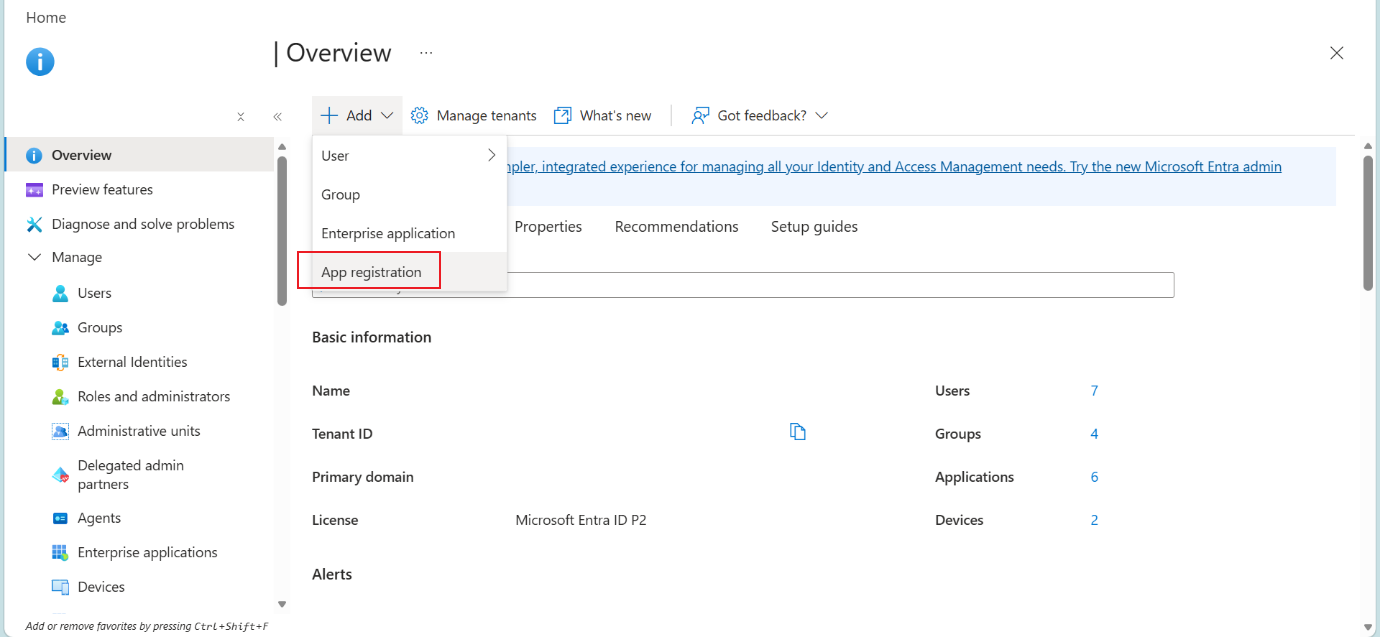
On the Microsoft Entra ID pane, select + Add > App registration.
On the Register an application pane, provide a name and select supported account types as required.
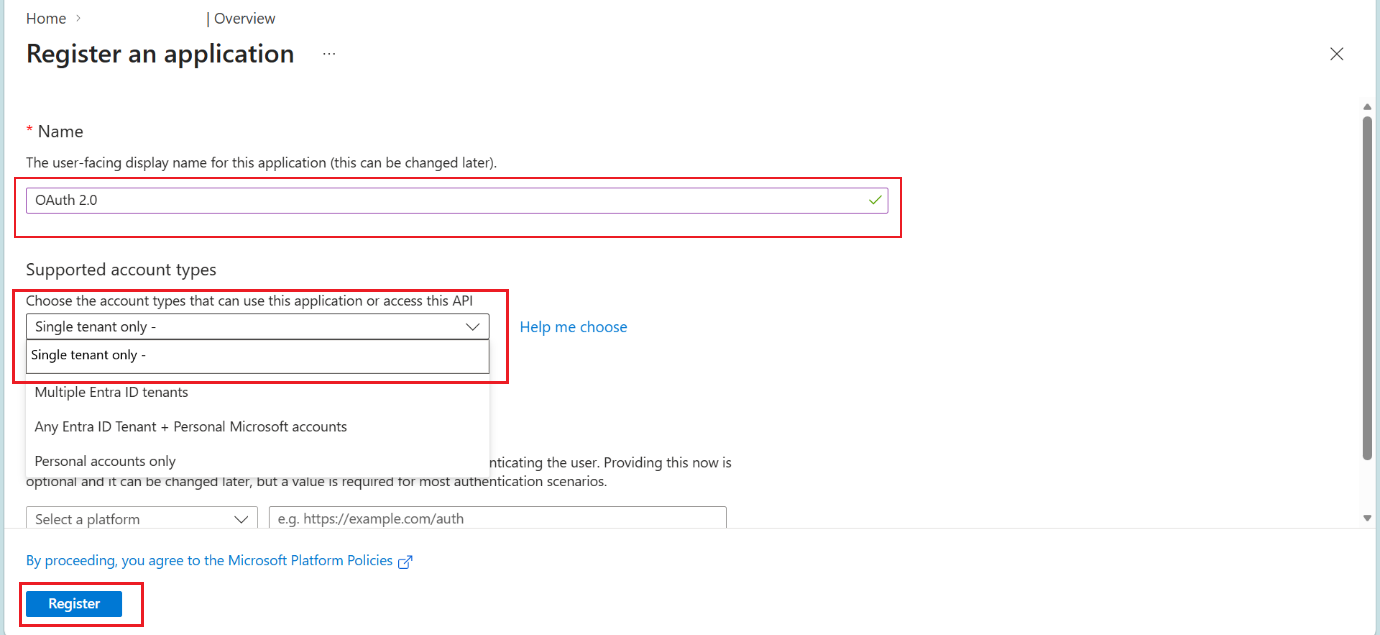
Select Register.
On the registered Microsoft Entra ID application pane, select Manage > API permissions.
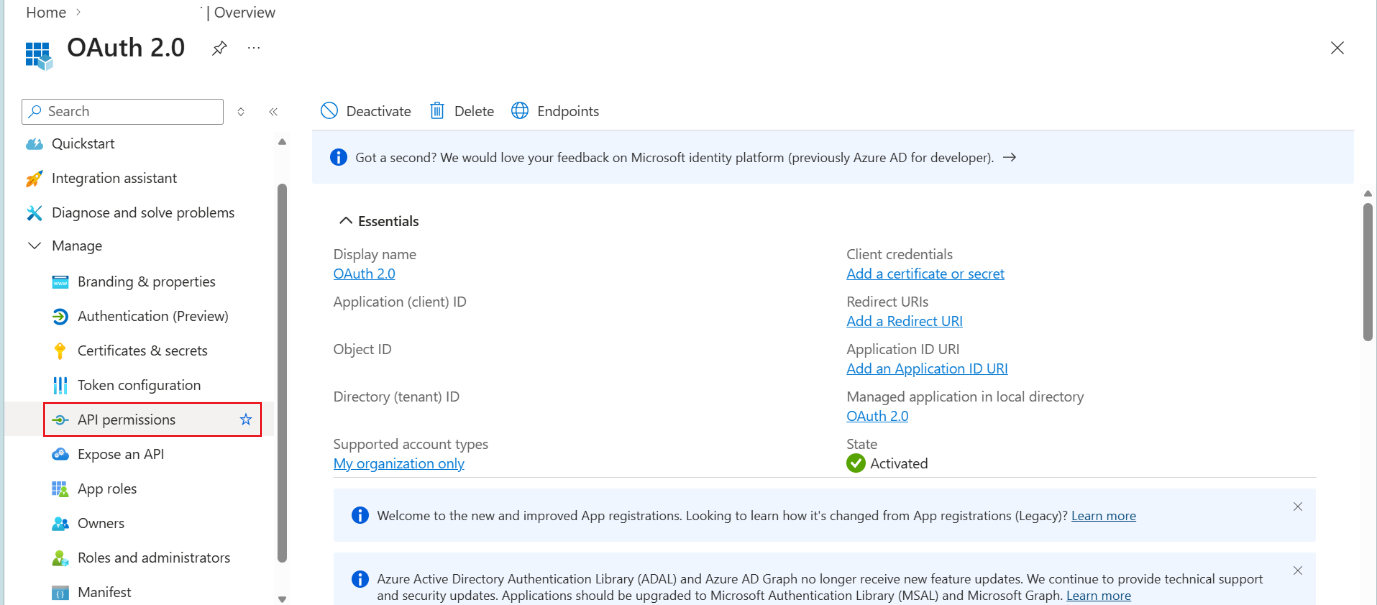
On the API permissions pane, select + Add a permission.
On the Request API permissions pane, select APIs my organization uses, and then search for Office 365 Exchange Online.
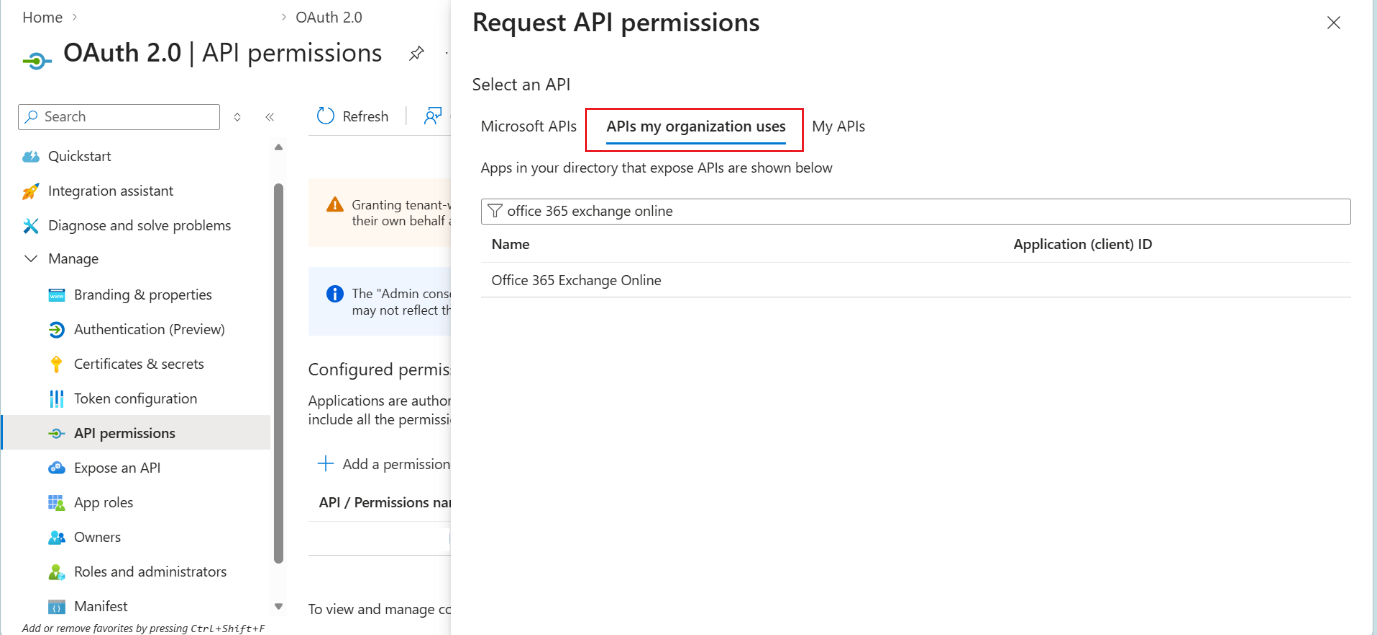
On the Request API permissions pane, select Application permissions.
For SMTP access, select the
SMTP.SendAsAppandMail.Sendpermissions.Ensure that you grant admin consent for these permissions.
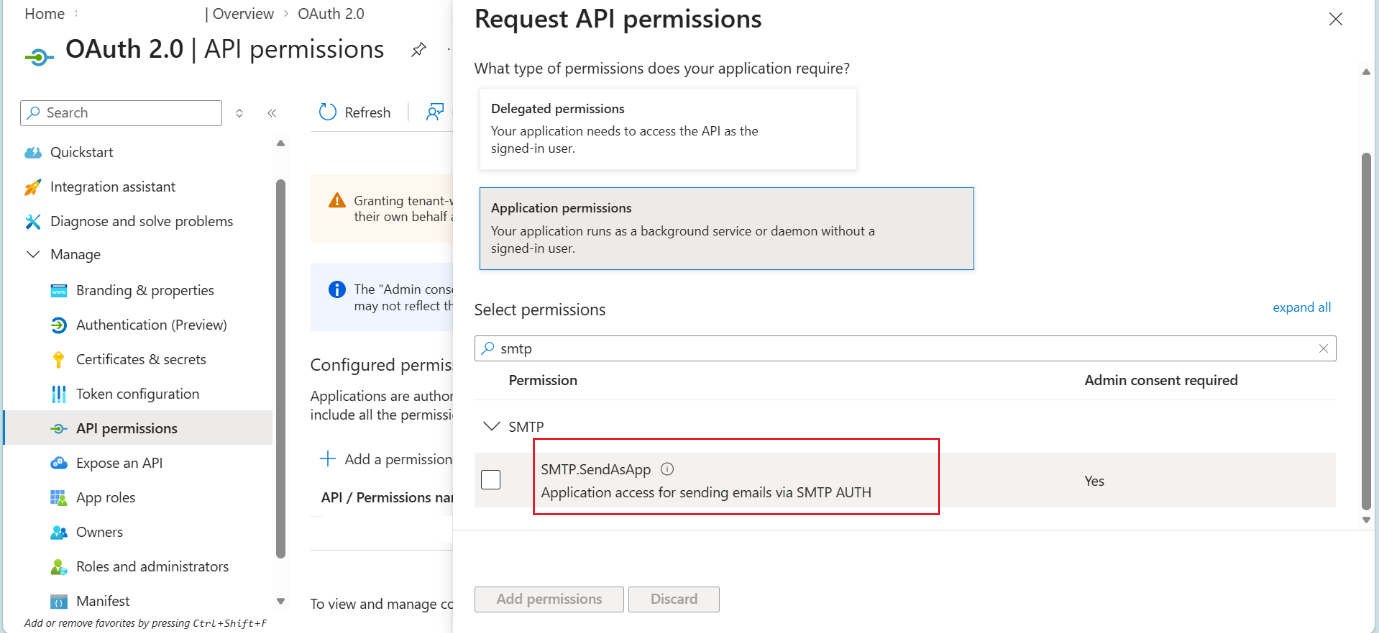
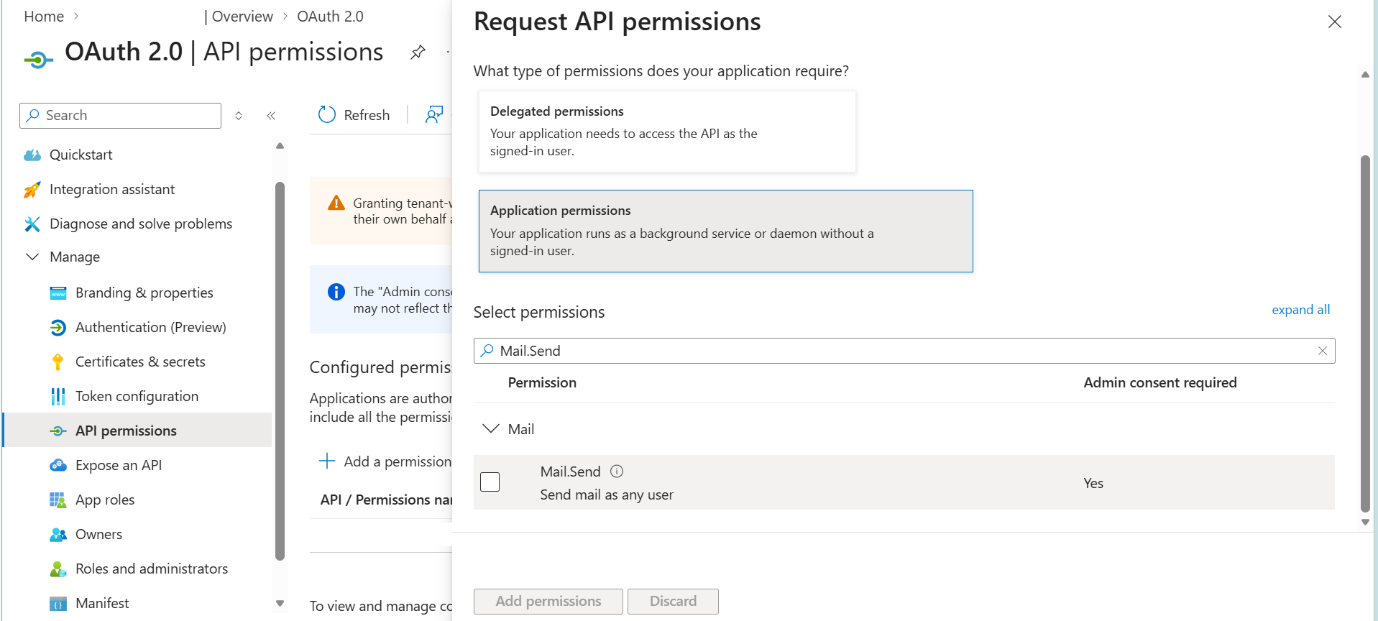
Select Add permissions.
Configure mailboxes for SMTP
To configure mailboxes for SMTP, register a service principal in Exchange and enable SMTP AUTH for specific mailboxes or the entire tenant.
Note
- Client secrets have a maximum lifetime of two years. To avoid mail delivery failures, administrators must generate a new secret in Microsoft Entra and update Microsoft Azure Backup Server SMTP settings before the current secret expires.
- Ensure that you enable SMTP AUTH for the tenant and the mailboxes.
Retrieve credentials and client secret
To retrieve essential details required to set up SMTP by using OAuth for Microsoft 365 accounts, follow these steps:
In the Azure portal, go to Microsoft Entra ID.
On the Microsoft Entra ID pane, select App registration.
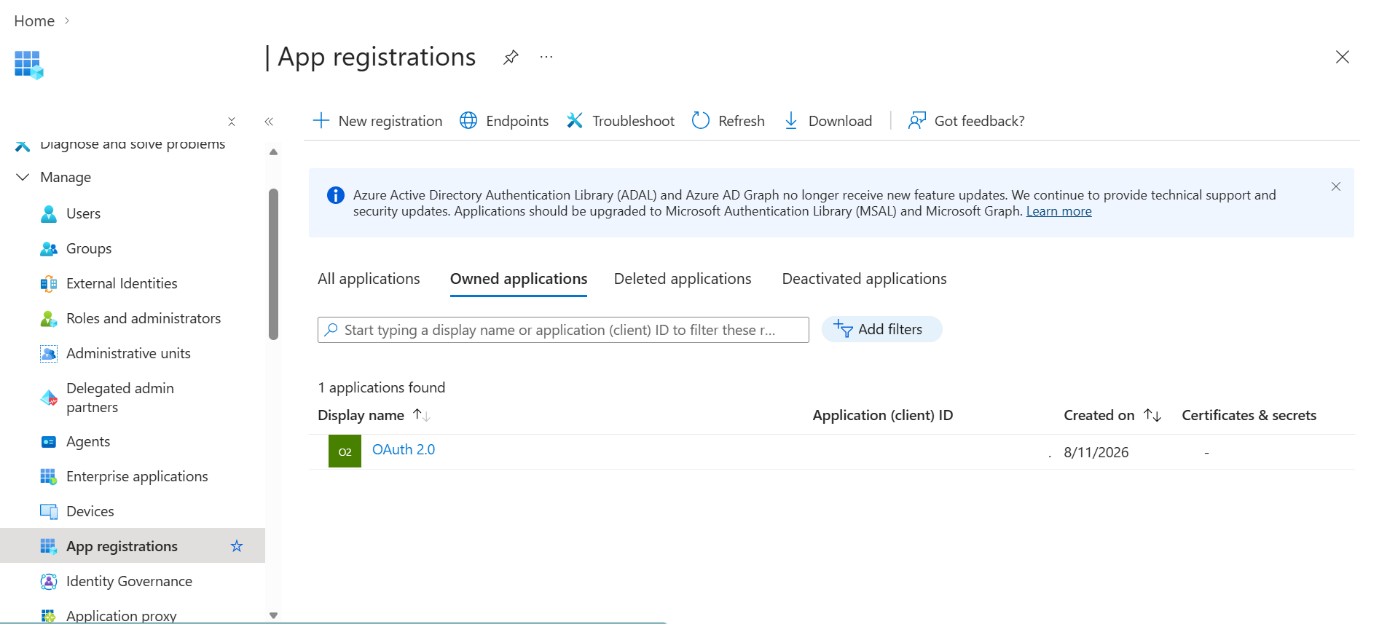
On the App registrations pane, select your application to open.
On the selected registered application pane, select Manage, select Certificates & secrets. Create a client secret by selecting New client secret.
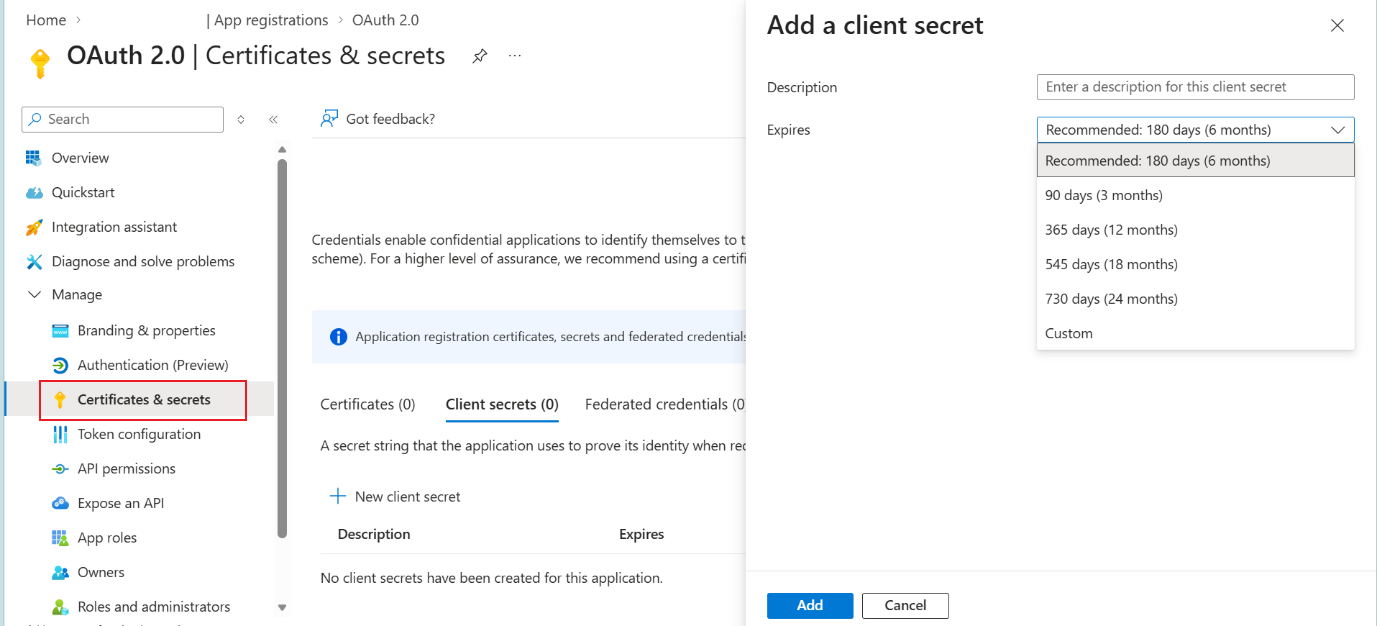
Important
After the client secret creation is complete, you can find the tenant ID and client ID on the Overview pane. Store the client secret value securely because you can't view it again after you leave the pane. Use the tenant ID, client ID, and client secret value to configure SMTP for Microsoft 365 accounts in MABS.
Use OAuth in MABS
To configure email for MABS by using the Microsoft 365 OAuth SMTP server, follow these steps:
On the MABS console, select Actions > Options > SMTP Server.
On SMTP Server, enter the following values:
- SMTP server name:
smtp.office365.com - SMTP server port:
587 - From address: Enter a valid email address.
- Authentication method: Select OAuth (M365).
- Tenant ID: Enter the tenant ID.
- Client ID: Enter the client ID.
- Client secret: Enter the newly created client secret.
- SMTP server name:
To verify if the setup works as expected, select Send Test E-mail.
Select OK and save the details.
Configure email for MABS
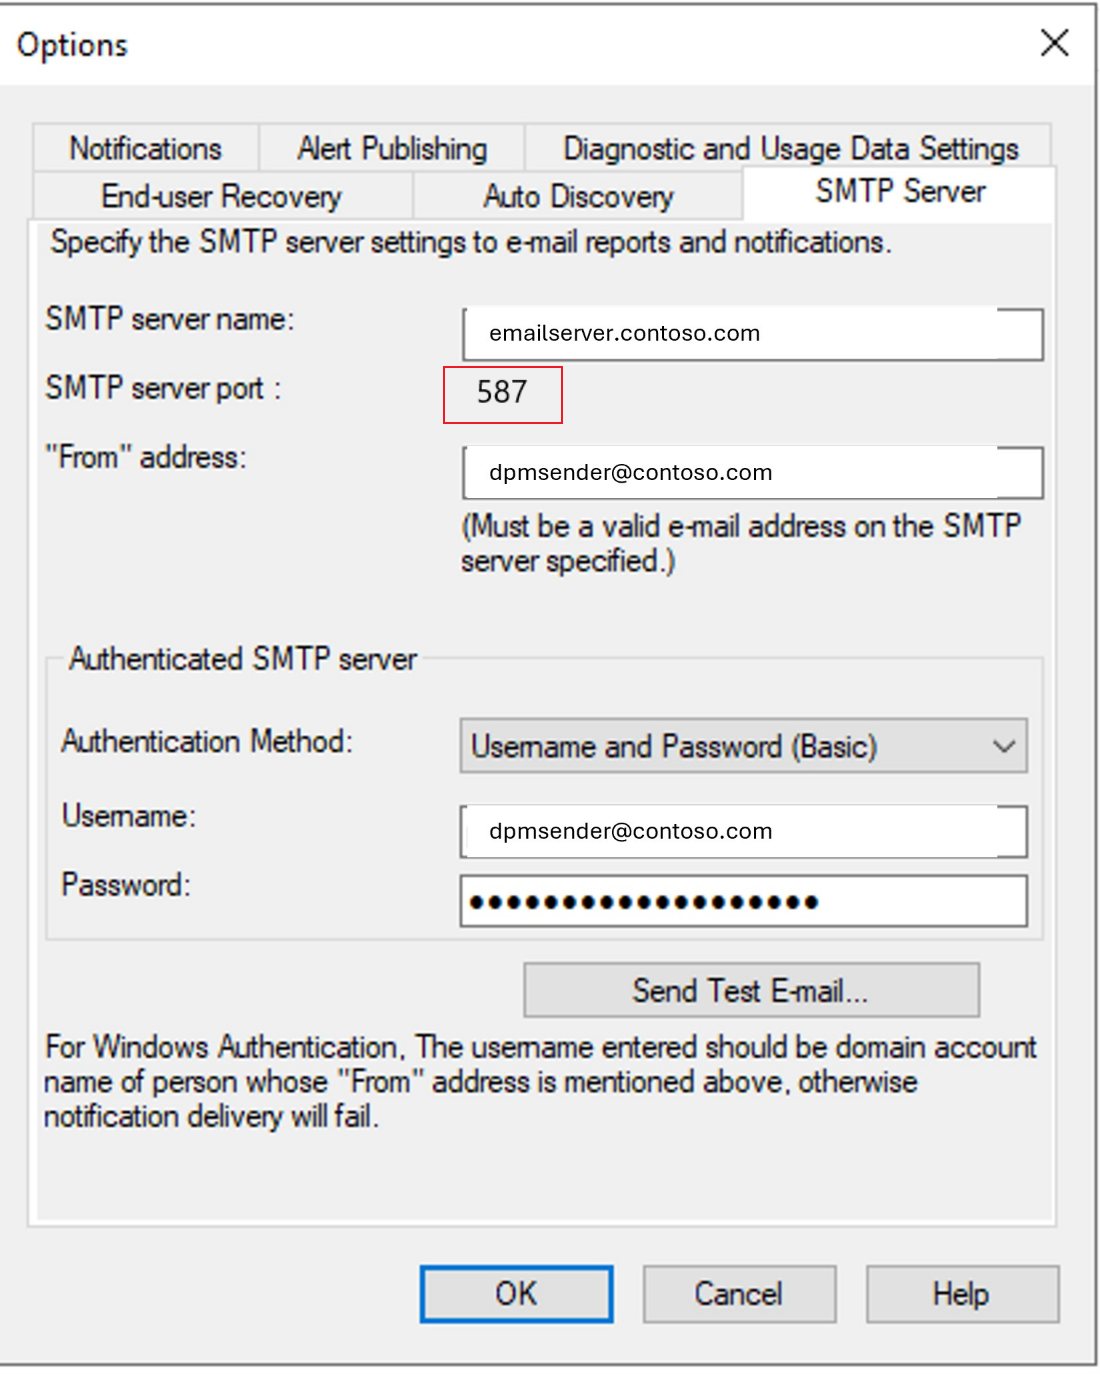
Use on-premises SMTP server to configure email for MABS.
Follow these steps to configure email for MABS by using an on-premises SMTP server:
- In the MABS console, select Actions > Options, and then select the SMTP Server.
- In SMTP Server, follow these steps:
- SMTP server name: Enter the complete domain name of the SMTP server.
- SMTP server port: Enter the complete domain name of the server port.
- From address: Enter a valid email address on the SMTP server.
- Authenticated SMTP server: Enter the domain user (such as domain\username) and password to authenticate the SMTP server. Select Windows Authentication and provide your domain user credentials to proceed.
- Select Send Test E-mail to verify the setup.
- Select OK to save the details.
Use an external SMTP mail provider to configure email for MABS.
MABS supports an external mail provider without a relay agent by using Basic authentication and port 587 to secure SMTP with your email (username@contoso.com) and password.
Note
Microsoft 365 SMTP no longer supports Basic authentication. For more information, see Deprecation of Basic authentication in Exchange Online.
Monitor MABS in the Central Console
Central Console is a System Center Operations Manager console that you can deploy to manage and monitor multiple MABS servers from a single location. In the Central Console, you can monitor and track the status of multiple MABS servers, jobs, protection groups, tapes, storage, and disk space.
In View Jobs, you can get a list of jobs running on all MABS servers monitored by the Central Console.
In Alert View, you can get a list of all MABS alerts that require action. You can use the Troubleshoot option to get more details of an alert.
You can consolidate alerts in the console. You can display a single alert for repeated alerts or display a single alert for multiple alerts that have the same root cause. If you're using a ticketing system, you can generate a single ticket only for repeated alerts.
In State View, you can get information about the state of objects.
Monitor MABS in the Azure console
Use the Dashboard to get a quick overview of the state of your Microsoft Azure Backup Server (MABS) backups in Microsoft Azure Backup. The Dashboard provides a centralized gateway to view servers protected by backup vaults as follows:
Usage Overview shows how you're using the backup vault. You can select a vault and see the storage being consumed by the vault versus the amount of storage provided by your subscription. You can also see the number of servers registered to this vault.
Quick Glance displays crucial configuration information about the backup vault. It tells you whether the vault is online, which certificate is assigned to it, when the certificate expires, the geographic location of the storage servers, and the subscription details for the service.
Note
From the MABS dashboard, you can download the Backup agent for installation on a server, modify settings for certificates uploaded to the vault, and delete a vault if necessary.
Back up items in Recovery Services vault
You can monitor the backed-up items using the Recovery Services vault. From the Recovery Services vault, navigate to Backup items to view the number of items backed-up for each workload type, associated with the vault. Select the workload item to view the detailed list of all items backed-up for the selected workload.
Here's a sample view:
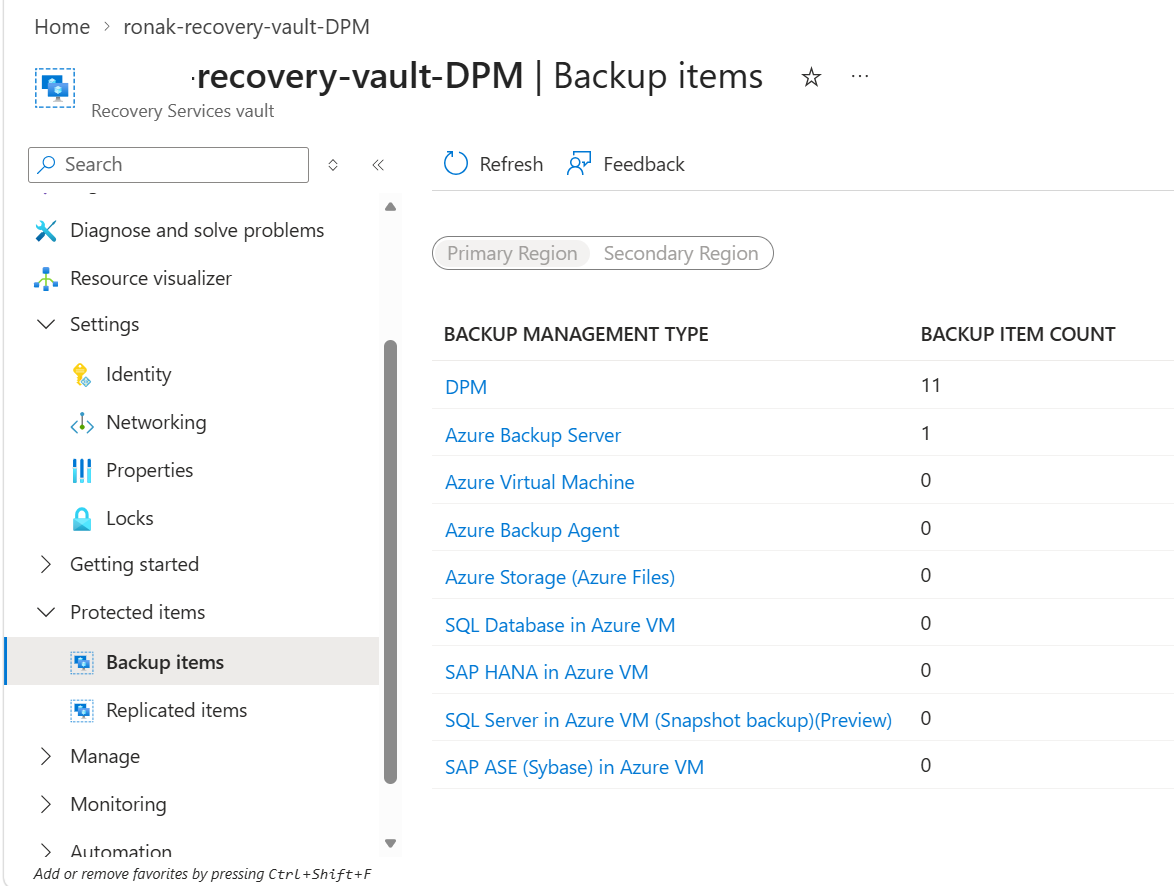
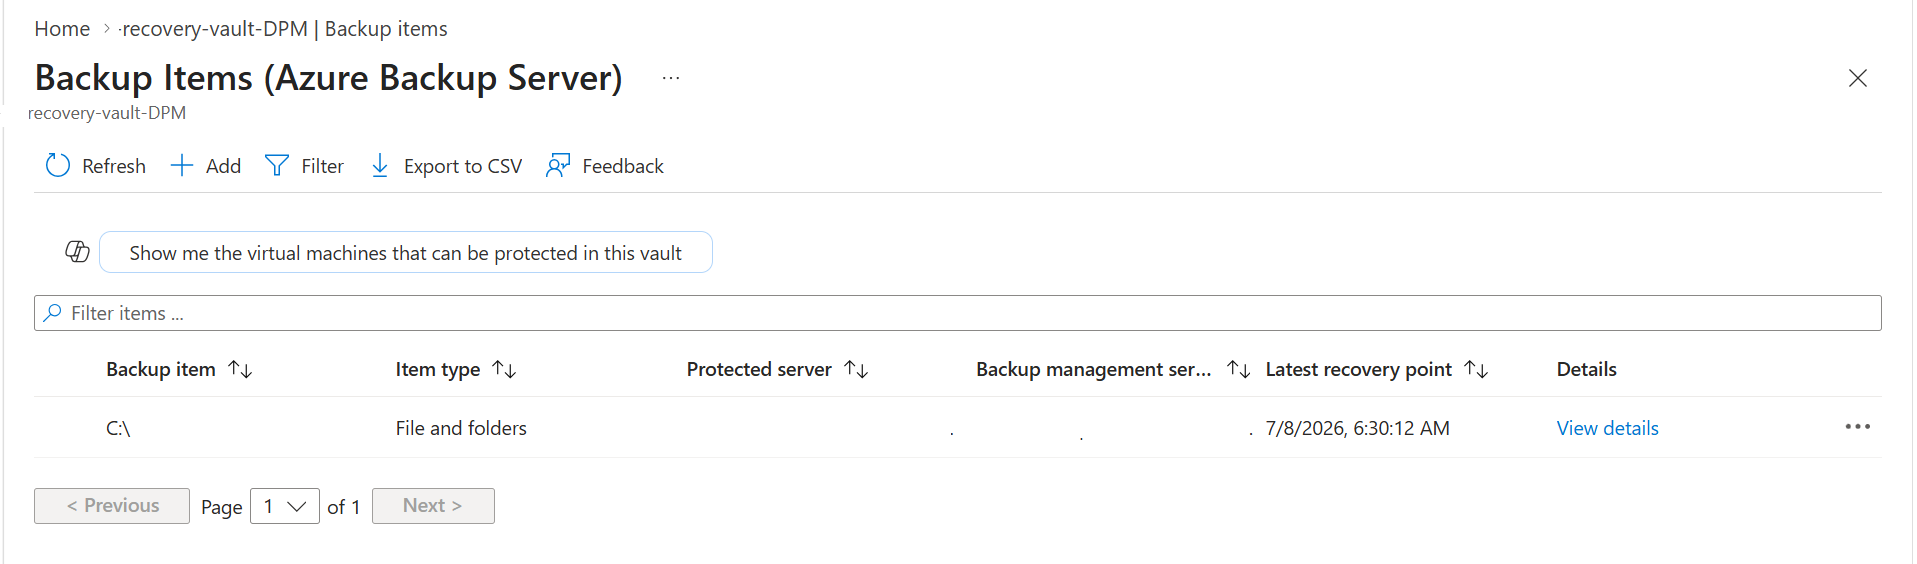
To view the list of backup items, select DPM or Azure Backup Server under Backup Management Type.
Note
- The Latest Recovery Point always displays the latest disk recovery point available for the backup item.
- If you view some data sources in the Backup items (MABS) from the Recovery Services vault in the Azure portal aren't refreshed/updated, check the workarounds to fix this known issue. For the items backed up to Azure by using MABS, the list shows all the data sources protected (both disk and online) by using the MABS server. If the protection is stopped for the data source with backup data retained, the data source is still listed in the portal.
- You can go to the details of the data source to see if the recovery points are present in the disk, online, or both. Also, for data sources where the online protection is stopped but data is retained, billing for the online recovery points continues until the data is completely deleted.
- Currently, data sources backed up directly to tape don't appear in the Recovery Services vault. To view them in the Recovery Services vault, back up the data to disk for a short term and then to Azure or tape as required.
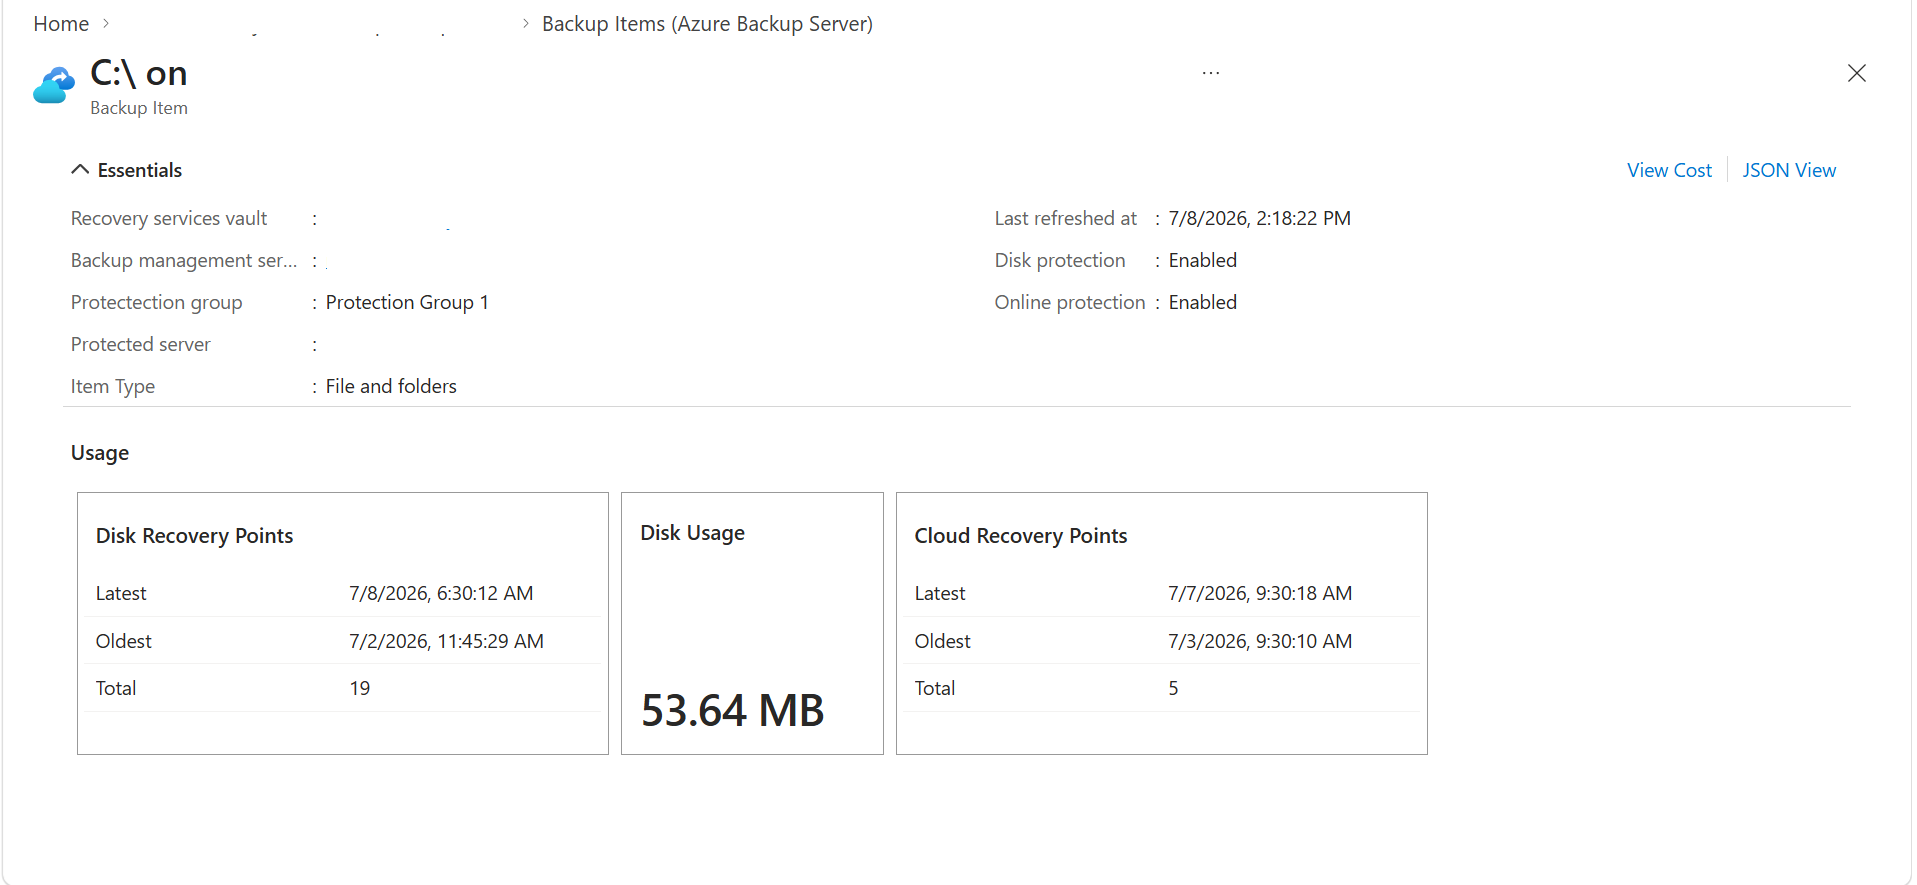
Select the backup item to view more details, such as latest, oldest and total number of recovery points for disk and cloud, if online protection is enabled.
Note
- The Backup items view continues to display a data source even after the protection is stopped. From the data source details, you can check the available recovery points for online/disk backups. This display continues until you manually remove the existing backup data for the data source for which the protection is stopped.
- For data sources where the online protection is stopped but data is retained, billing continues for the online recovery points until the data is completely deleted.
Monitor MABS in Operations Manager
To integrate MABS with System Center Operations Manager for centralized monitoring and reporting, you need to install and configure the appropriate MABS management packs. MABS provides the following management packs; use these packs as applicable for the MABS version you're using:
Reporting management pack (Microsoft.SystemCenter.DataProtectionManager.Reporting.mp) - Collects and displays reporting data from all MABS servers, and exposes a set of Operations Manager warehouse views for MABS. You can query these views to generate custom reports.
Discovery and monitoring management pack (Microsoft.SystemCenter.DataProtectionManager.Discovery.mp)
Library management pack - (Microsoft.SystemCenter.DataProtectionManager.Library)
Using these packs you can:
Centrally monitor the health and status of MABS servers, protected servers and computers, and backups.
View the state of all roles on MABS servers and protected data sources.
Monitor, identify, action, and troubleshoot alerts.
Use Operations Manager alerts to monitor MABS server memory, CPU, disk resources, and database.
Monitor resource usage and performance trends on MABS servers.
Prerequisites
To use the MABS management packs, you need a System Center Operations Manager server running. The Operations Manager Data Warehouse must be up and running.
If you're running a previous version of the Discover and Library management packs obtained from the MABS installation media, remove them from the MABS server and install the new versions from the download page.
You can only run one language version of the management pack at one time. If you want to use the pack in a different language, uninstall the pack in the existing language, and then install it with the new language.
If any previous versions of a MABS management pack are installed on the Operations Manager server, remove them before installing the new pack.
Set up the MABS management packs
Install the Operations Manager agent on each MABS server you want to monitor. Then obtain the management packs, import the Discovery and Library management Packs, install the MABS Central Console, and import the Reporting Management Pack.
Install the agent and obtain the Management Packs
For agent installation options, See Operations Manager Installation Methods. To obtain the latest version of the agent, see Microsoft Monitoring Agent in the Download Center.
Download the packs from the Download Center. The download action places the Discovery and Library Management Packs in the C:\Program Files\System Center Management Packs folder. The reporting management pack goes in a separate folder inside that folder.
Import the Management Packs
Import the Discovery and Library Management Packs.
Sign in to the Operations Manager server with an account that's a member of the Operations Manager Administrators role.
Ensure to remove any previous versions of the Library or Discover Management Packs running on the server.
In the Operations console, select Administration.
Right-click Management Packs > Import Management Packs. Select Microsoft.SystemCenter.DataProtectionManagerDiscovery.MP > Open and then Microsoft.SystemCenter.DataProtectionManagerLibrary.MP > Open.
Follow the instructions in the Import Management Packs wizard. For more information about running this wizard, see How to Import an Operations Manager Management Pack.
Set up MABS Central Console
Install the MABS Central Console on the Operations Manager server to manage multiple MABS servers in Operations Manager.
In the Setup screen of Operations Manager, do the following actions:
Select Install Central Console Server and Client side Components if you want to monitor MABS servers with the Management Pack, and you want to use the Central Console to manage settings and configuration on the MABS servers.
Select Install Central Console Server side Components if you want to monitor only MABS servers with the Management Pack, but don't want to use Central Console to manage settings and configuration on the MABS servers.
MABS adds firewall exceptions for port 6075 for the console. Open ports for SQL Server.exe and SQL browser.exe.
Import the Reporting Manager Pack
Sign in to the Operations Manager server with an account that is a member of the Operations Manager Administrators role.
In the Operations console, select Administration. Right-click Management Packs > Import Management Packs.
Select Microsoft.SystemCenter.DataProtectionManagerReporting.MP > Open. Follow the instructions in the Import Management Packs wizard.
Customize Management Pack settings
After you import the management packs, they discover and monitor data without requiring any additional configuration. You can optionally customize settings, such as monitors and rules, for your environment. For example, if you find that performance-measuring rules are degrading server performance with slow WAN links, you can disable them. For instructions, see How to enable or disable a rule or monitor.