Bilješka
Pristup ovoj stranici zahtijeva provjeru vjerodostojnosti. Možete pokušati da se prijavite ili promijenite direktorije.
Pristup ovoj stranici zahtijeva provjeru vjerodostojnosti. Možete pokušati promijeniti direktorije.
In this quickstart, you use the Azure CLI to publish events to an Event Grid namespace topic in the CloudEvents JSON format, and then push those events to an Azure Event Hubs handler. You create the Event Grid and Event Hubs resources, configure a managed identity for secure delivery, and send a sample event by using cURL.
By using Azure Event Grid namespace topics, you can publish events and deliver them to handlers such as Azure Event Hubs. Delivering events to Event Hubs is useful when you need to collect high-volume event streams or telemetry for downstream analytics, storage, or further processing.
If you don't have an Azure account, create a free account before you begin.
Prerequisites
Use the Bash environment in Azure Cloud Shell. For more information, see Quickstart for Bash in Azure Cloud Shell.

If you prefer to run CLI reference commands locally, install the Azure CLI. If you're running on Windows or macOS, consider running Azure CLI in a Docker container. For more information, see How to run the Azure CLI in a Docker container.
If you're using a local installation, sign in to the Azure CLI by using the
az logincommand. To finish the authentication process, follow the steps displayed in your terminal. For other sign-in options, see Sign in with the Azure CLI.When you're prompted, install the Azure CLI extension on first use. For more information about extensions, see Use extensions with the Azure CLI.
Run az version to find the version and dependent libraries that are installed. To upgrade to the latest version, run az upgrade.
This quickstart requires version 2.53.0 or later of the Azure CLI. The
az eventgrid namespacecommands come from theeventgridextension, version 2.51.0 or later, which installs automatically the first time you run one of these commands. If you use Azure Cloud Shell, the latest version is already installed.
Enable the Event Grid resource provider
If this is the first time you're using Event Grid in your Azure subscription, you might need to register the Event Grid resource provider. Run the following command to register the provider:
az provider register --namespace Microsoft.EventGridIt might take a moment for the registration to finish. To check the status, run the following command:
az provider show --namespace Microsoft.EventGrid --query "registrationState"When
registrationStateisRegistered, you're ready to continue.
Create a resource group
Create an Azure resource group with the az group create command. Use this resource group to hold all the resources you create in this quickstart.
Declare a variable to hold the name of an Azure resource group. Specify a name for the resource group by replacing
<your-resource-group-name>with a value you like.resource_group="<your-resource-group-name>"location="<your-resource-group-location>"Create a resource group. Change the location as you see fit.
az group create --name $resource_group --location $location
Create an Event Grid namespace
An Event Grid namespace provides a user-defined endpoint to which you post your events. The following example creates a namespace in your resource group by using Bash in Azure Cloud Shell. The namespace name must be unique because it's part of a Domain Name System (DNS) entry. A namespace name should meet the following rules:
- It should be between 3 and 50 characters.
- It should be regionally unique.
- Allowed characters are a-z, A-Z, 0-9, and -.
- It shouldn't start with reserved key word prefixes like
Microsoft,System, orEventGrid.
Declare a variable to hold the name for your Event Grid namespace. Specify a name for the namespace by replacing
<your-namespace-name>with a value you like.namespace="<your-namespace-name>"Create a namespace. You might want to change the location where it's deployed.
az eventgrid namespace create -g $resource_group -n $namespace -l $location
Create an Event Grid namespace topic
Create a topic to hold all events published to the namespace endpoint.
Declare a variable to hold the name for your namespace topic. Specify a name for the namespace topic by replacing
<your-topic-name>with a value you like.topic="<your-topic-name>"Create your namespace topic:
az eventgrid namespace topic create -g $resource_group -n $topic --namespace-name $namespace
Create a new Event Hubs resource
Create an Event Hubs resource that you use as the handler destination for the namespace topic push delivery subscription.
Declare a variable to hold the Event Hubs namespace name.
eventHubsNamespace="<your-event-hubs-namespace-name>"Create the Event Hubs namespace.
az eventhubs namespace create --resource-group $resource_group --name $eventHubsNamespace --location $locationDeclare a variable to hold the event hub name.
eventHubsEventHub="<your-event-hub-name>"Run the following command to create an event hub in the namespace.
az eventhubs eventhub create --resource-group $resource_group --namespace-name $eventHubsNamespace --name $eventHubsEventHub
Deliver events to Event Hubs by using managed identity
To deliver events to event hubs in your Event Hubs namespace by using managed identity, follow these steps:
- Enable system-assigned or user-assigned managed identity: namespaces. Continue reading to the next section to find how to enable managed identity by using Azure CLI.
- Add the identity to the Azure Event Hubs Data Sender role on the Event Hubs namespace. To learn how to add the role assignment, see the next section.
- Enable the Allow trusted Microsoft services to bypass this firewall setting on your Event Hubs namespace.
- Configure the event subscription that uses an event hub as an endpoint to use the system-assigned or user-assigned managed identity.
Enable managed identity in the Event Grid namespace
Enable system-assigned managed identity in the Event Grid namespace.
az eventgrid namespace update --resource-group $resource_group --name $namespace --identity "{type:SystemAssigned}"
Add role assignment in Event Hubs for the Event Grid managed identity
Get Event Grid namespace system managed identity principal ID.
principalId=$(az eventgrid namespace show --resource-group $resource_group --name $namespace --query identity.principalId -o tsv)Get Event Hubs event hub resource ID.
eventHubResourceId=$(az eventhubs eventhub show --resource-group $resource_group --namespace-name $eventHubsNamespace --name $eventHubsEventHub --query id -o tsv)Add role assignment in Event Hubs for the Event Grid system managed identity.
az role assignment create --role "Azure Event Hubs Data Sender" --assignee $principalId --scope $eventHubResourceId
Create an event subscription
Create a push delivery event subscription that uses the Event Grid namespace's managed identity to deliver events to your event hub.
event_subscription="<your-event-subscription-name>"
az eventgrid namespace topic event-subscription create --resource-group $resource_group --namespace-name $namespace --topic-name $topic --name $event_subscription --delivery-configuration "{deliveryMode:Push,push:{maxDeliveryCount:10,deliveryWithResourceIdentity:{identity:{type:SystemAssigned},destination:{endpointType:EventHub,properties:{resourceId:$eventHubResourceId}}}}}"
Send a test event to the namespace topic
Now, send a sample event to the namespace topic by following steps in this section.
List namespace access keys
Get the access keys associated with the namespace you created. Use one of them to authenticate when publishing events. To list your keys, you need the full namespace resource ID first. Get it by running the following command:
namespace_resource_id=$(az eventgrid namespace show -g $resource_group -n $namespace --query "id" --output tsv)Get the first key from the namespace:
key=$(az eventgrid namespace list-key -g $resource_group --namespace-name $namespace --query "key1" --output tsv)
Publish an event
Retrieve the namespace hostname. Use it to compose the namespace HTTP endpoint to which you send events.
publish_operation_uri="https://"$(az eventgrid namespace show -g $resource_group -n $namespace --query "topicsConfiguration.hostname" --output tsv)"/topics/"$topic:publish?api-version=2023-06-01-previewCreate a sample CloudEvents compliant event:
event=' { "specversion": "1.0", "id": "'"$RANDOM"'", "type": "com.yourcompany.order.ordercreatedV2", "source" : "/mycontext", "subject": "orders/O-234595", "time": "'`date +%Y-%m-%dT%H:%M:%SZ`'", "datacontenttype" : "application/json", "data":{ "orderId": "O-234595", "url": "https://yourcompany.com/orders/o-234595"}} 'The
dataelement is the payload of your event. Any well-formed JSON can go in this field. For more information about properties (also known as context attributes) that can go in an event, see the CloudEvents specifications.Use cURL to send the event to the topic. cURL is a utility that sends HTTP requests.
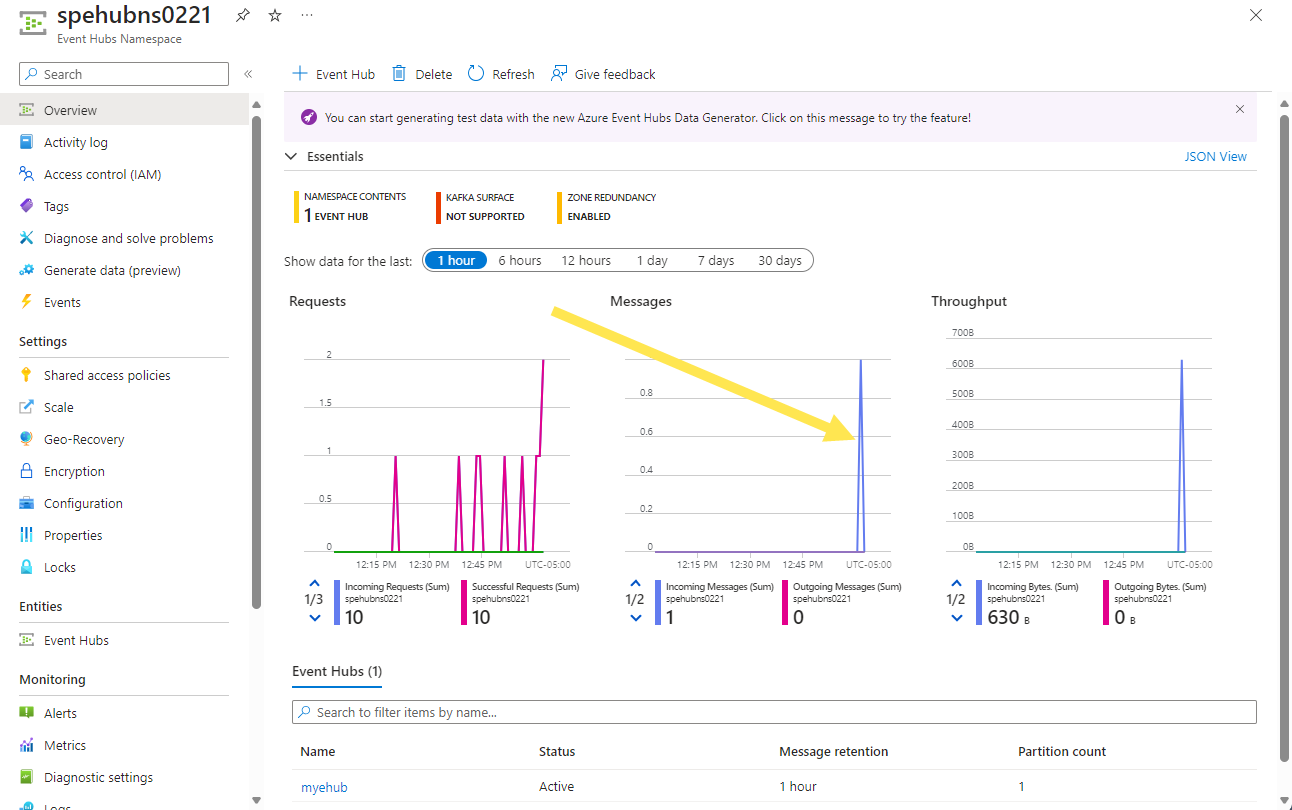
curl -X POST -H "Content-Type: application/cloudevents+json" -H "Authorization:SharedAccessKey $key" -d "$event" $publish_operation_uriIn the Azure portal, go to your Event Hubs namespace page, refresh the page, and verify that the incoming messages counter in the chart shows that an event was received.
Clean up resources
If you no longer need the resources that you created, delete them to avoid incurring extra charges. Delete the resource group and all the resources it contains:
az group delete --name $resource_group
Next steps
In this quickstart, you created and configured the Event Grid namespace and Event Hubs resources, and you pushed events to an event hub. To learn how to receive events from an event hub, see these tutorials: