Bilješka
Pristup ovoj stranici zahtijeva provjeru vjerodostojnosti. Možete pokušati da se prijavite ili promijenite direktorije.
Pristup ovoj stranici zahtijeva provjeru vjerodostojnosti. Možete pokušati promijeniti direktorije.
In this quickstart, you take an autopilot from nothing to a working instance in Microsoft Teams. You provision the infrastructure, create an autopilot blueprint from a hosted agent, publish it, have an administrator approve it, and hire your own instance.
An autopilot is an agent that acts as itself in Microsoft 365, under its own identity. You don't build an autopilot directly: you build a blueprint, and each autopilot is an instance created from it. For the model behind that, see What is an autopilot in Microsoft Foundry?
Important
Approving the blueprint requires a Microsoft 365 administrator. If that isn't you, identify your approver before you start.
Prerequisites
Licensing and enrollment
Creating an autopilot with an agent user account requires the following:
- Enroll your tenant in the Frontier preview program.
- Accept the Microsoft Agent 365 terms of service after you enroll. For details, see Preview Microsoft Agent 365 features through the Frontier program.
- Confirm that your tenant has at least one Microsoft 365 Copilot license or one Microsoft Agent 365 license, including Microsoft E7.
- Confirm that a Microsoft Agent 365 Frontier license is available. After enrollment, eligible tenants receive a 25-seat preview subscription. Each Foundry autopilot instance consumes one license, because each instance creates an agent user account.
Check the seat count before you begin. If your tenant has no free seats, the build completes and then fails when you create the instance.
Permissions
| Step | Who | Role |
|---|---|---|
| Provision infrastructure | You or an Azure administrator | Owner, or Contributor plus Role Based Access Control Administrator, at resource group scope |
| Build the agent blueprint | You | Foundry User at project scope, and AcrPush or Container Registry Repository Writer at registry scope |
| Publish the agent blueprint | You | Foundry User at project scope |
| Approve the blueprint | Your tenant administrator | Global Administrator or AI Administrator |
| Create an instance | You | Membership in the hiring scope your administrator selects |
Important
The Foundry RBAC roles were recently renamed. Foundry User, Foundry Owner, Foundry Account Owner, and Foundry Project Manager were previously named Azure AI User, Azure AI Owner, Azure AI Account Owner, and Azure AI Project Manager. You might still see the previous names in some places while the rename rolls out. The role IDs and core permissions are unchanged by the rename.
Provisioning creates role assignments as well as resources, which is why Contributor alone isn't enough. For the full matrix, see Hosted agent permissions reference.
You don't need a Microsoft Entra directory role. Foundry creates the agent identity blueprint when you create the agent.
Tools
- Azure CLI
- Azure Developer CLI
- Docker, running
Create all resources in a region that supports hosted agents. See Region availability.
Choose a code sample
Who does this: you.
This quickstart uses a code sample. Everything you deploy comes from the sample, so clone one before you start. Both samples do the same thing, so pick the language you prefer:
Clone the sample, and then open its folder in a terminal. Run every command in this quickstart from that folder.
The sample contains the agent code, the infrastructure templates, and the scripts that create and publish the agent.
Provision, build, and publish
Who does this: you or an Azure administrator. This stage needs every permission in the Permissions table except the two that belong to your administrator and to hiring.
From the sample folder, sign in with both CLIs, and then provision.
az login --tenant <tenant-id>
azd auth login --tenant-id <tenant-id>
azd provision
One command runs three stages: it provisions the infrastructure, builds the agent blueprint, and publishes it. The next three sections explain what each stage does and how to confirm it worked.
Expected result: azd provision completes with no failed resources, and a request is waiting in the Microsoft 365 admin center.
Depending on your tenant settings, you might need extra Azure CLI sign-in scopes before you provision, such as scopes for Foundry, Microsoft Graph, and Azure Resource Manager. If azd auth login returns an authorization error, use the sign-in commands in the sample README.
You can also run the stages separately, which is useful when different people hold the permissions or when you want to change the agent between stages. Use azd provision --preview to see what the template creates before you commit to it. To control each stage yourself, call the create and publish scripts in the sample's scripts folder directly instead of letting the post-provision hooks run them.
Provision the infrastructure
Permission needed: Owner, or Contributor plus Role Based Access Control Administrator, at resource group scope.
The sample creates a Foundry account and project, a model deployment, an Azure Container Registry, and Application Insights with a Log Analytics workspace. It also creates the role assignments those resources need, which is the part Contributor alone can't do.
Expected result: every resource in the sample template exists and reports success.
Build the agent blueprint
Permission needed: Foundry User at project scope, and AcrPush or Container Registry Repository Writer at registry scope.
The sample compiles your agent code into a container image, pushes it to the registry, and creates a hosted agent along with its first agent version. Traffic routes to that version.
The agent creates two Microsoft Entra objects: an agent identity blueprint and an agent identity for the agent itself. You don't create these objects, and you don't need a directory role to get them.
Save the deployment values. You need them if you troubleshoot:
azd env get-values
Expected result: the output includes your agent name, agent version, and blueprint ID.
To change what the agent does before you publish it, edit the agent instructions and tool manifest in the sample, and then run azd provision again. Each run creates a new agent version.
Publish the agent blueprint
Permission needed: Foundry User at project scope.
Publishing submits your agent as an autopilot blueprint and puts it in front of your administrator. The sample does this at the end of provisioning, using the publish script in its scripts folder.
Publishing sets three things that matter later:
- Autopilot publishing, which is what makes this a blueprint that hires instances rather than an agent published to the agent store.
- The hiring scope, which decides who can create instances after approval.
- The display details, including name, descriptions, and icon.
Expected result: the publish call succeeds and a request is waiting in the Microsoft 365 admin center.
Note
Each publish uses a version number. If you publish again without incrementing it, the call fails with a version already exists error. To roll out new agent behavior, create a new agent version instead of republishing.
The publish API
The sample calls the Microsoft 365 publish API for you. Read this section if you're automating the flow, or if you want to know what the sample sends.
POST {{endpoint}}/agents/<agent-name>/microsoft365/publish?api-version=2025-11-15-preview
Authorization: Bearer <access-token>
Content-Type: application/json
{{endpoint}} is your project endpoint, in the form https://<resource-name>.services.ai.azure.com/api/projects/<project-name>. Get a token for the https://ai.azure.com audience:
az account get-access-token --resource https://ai.azure.com --query accessToken -o tsv
Four fields distinguish an autopilot from an agent published to the Microsoft 365 Copilot and Teams agent stores. Set all four:
| Field | Value for an autopilot | Why |
|---|---|---|
publishAsAutopilot |
true |
Publishes a blueprint that hires instances, rather than an agent in the agent store. |
publishScope |
Tenant |
Always Tenant for an autopilot. The blueprint goes to your administrator for approval, and after approval the people in the hiring scope can create instances. |
useAgenticUserTemplate |
true |
Tells Foundry to provision an agent user account for each instance, which is what lets the autopilot act as itself in Microsoft 365. |
agenticUserTemplate |
An object, described below | Required whenever useAgenticUserTemplate is true. |
The agenticUserTemplate object carries the identity settings for the agent user account:
| Property | Description |
|---|---|
Id |
The template identifier. Use digitalWorkerTemplate. |
File |
The template manifest file name, agenticUserTemplateManifest.json. |
SchemaVersion |
The manifest schema version, for example 0.1.0-preview. |
AgentIdentityBlueprintId |
The blueprint client ID returned when the agent was created. The sample reads it from the agent creation response. |
CommunicationProtocol |
activityProtocol, the protocol the autopilot uses to exchange messages with Microsoft 365. |
The remaining fields are the display details users see, and they behave the same as for any published agent: agentDisplayName, appVersion, shortDescription, fullDescription, developerName, developerWebsiteUrl, privacyUrl, and termsOfUseUrl. Set canRespondWithoutMention to control whether the autopilot responds to all messages on its Teams surfaces or only when someone @mentions it.
A complete request body for an autopilot:
{
  "agentDisplayName": "Contoso Workstream Manager",
  "publishAsAutopilot": true,
  "publishScope": "Tenant",
  "appVersion": "1.0.0",
  "canRespondWithoutMention": true,
  "shortDescription": "Keeps release work on track.",
  "fullDescription": "Tracks release readiness, updates work items, and sends weekly status.",
  "developerName": "Contoso IT",
  "developerWebsiteUrl": "https://contoso.com",
  "privacyUrl": "https://contoso.com/privacy",
  "termsOfUseUrl": "https://contoso.com/terms",
  "useAgenticUserTemplate": true,
  "agenticUserTemplate": {
    "Id": "digitalWorkerTemplate",
    "File": "agenticUserTemplateManifest.json",
    "SchemaVersion": "0.1.0-preview",
    "AgentIdentityBlueprintId": "<blueprint-client-id>",
    "CommunicationProtocol": "activityProtocol"
  }
}
Warning
Don't include secrets, API keys, or other sensitive information in any metadata field. These fields are visible to users.
To publish an agent to the agent stores instead, set publishAsAutopilot to false and omit the agent user template. For that flow, see Publish agents to Microsoft 365 and Teams by using the REST API.
Approve the blueprint
Who does this: your tenant administrator, with Global Administrator or AI Administrator. Reader roles can see the request but can't approve it.
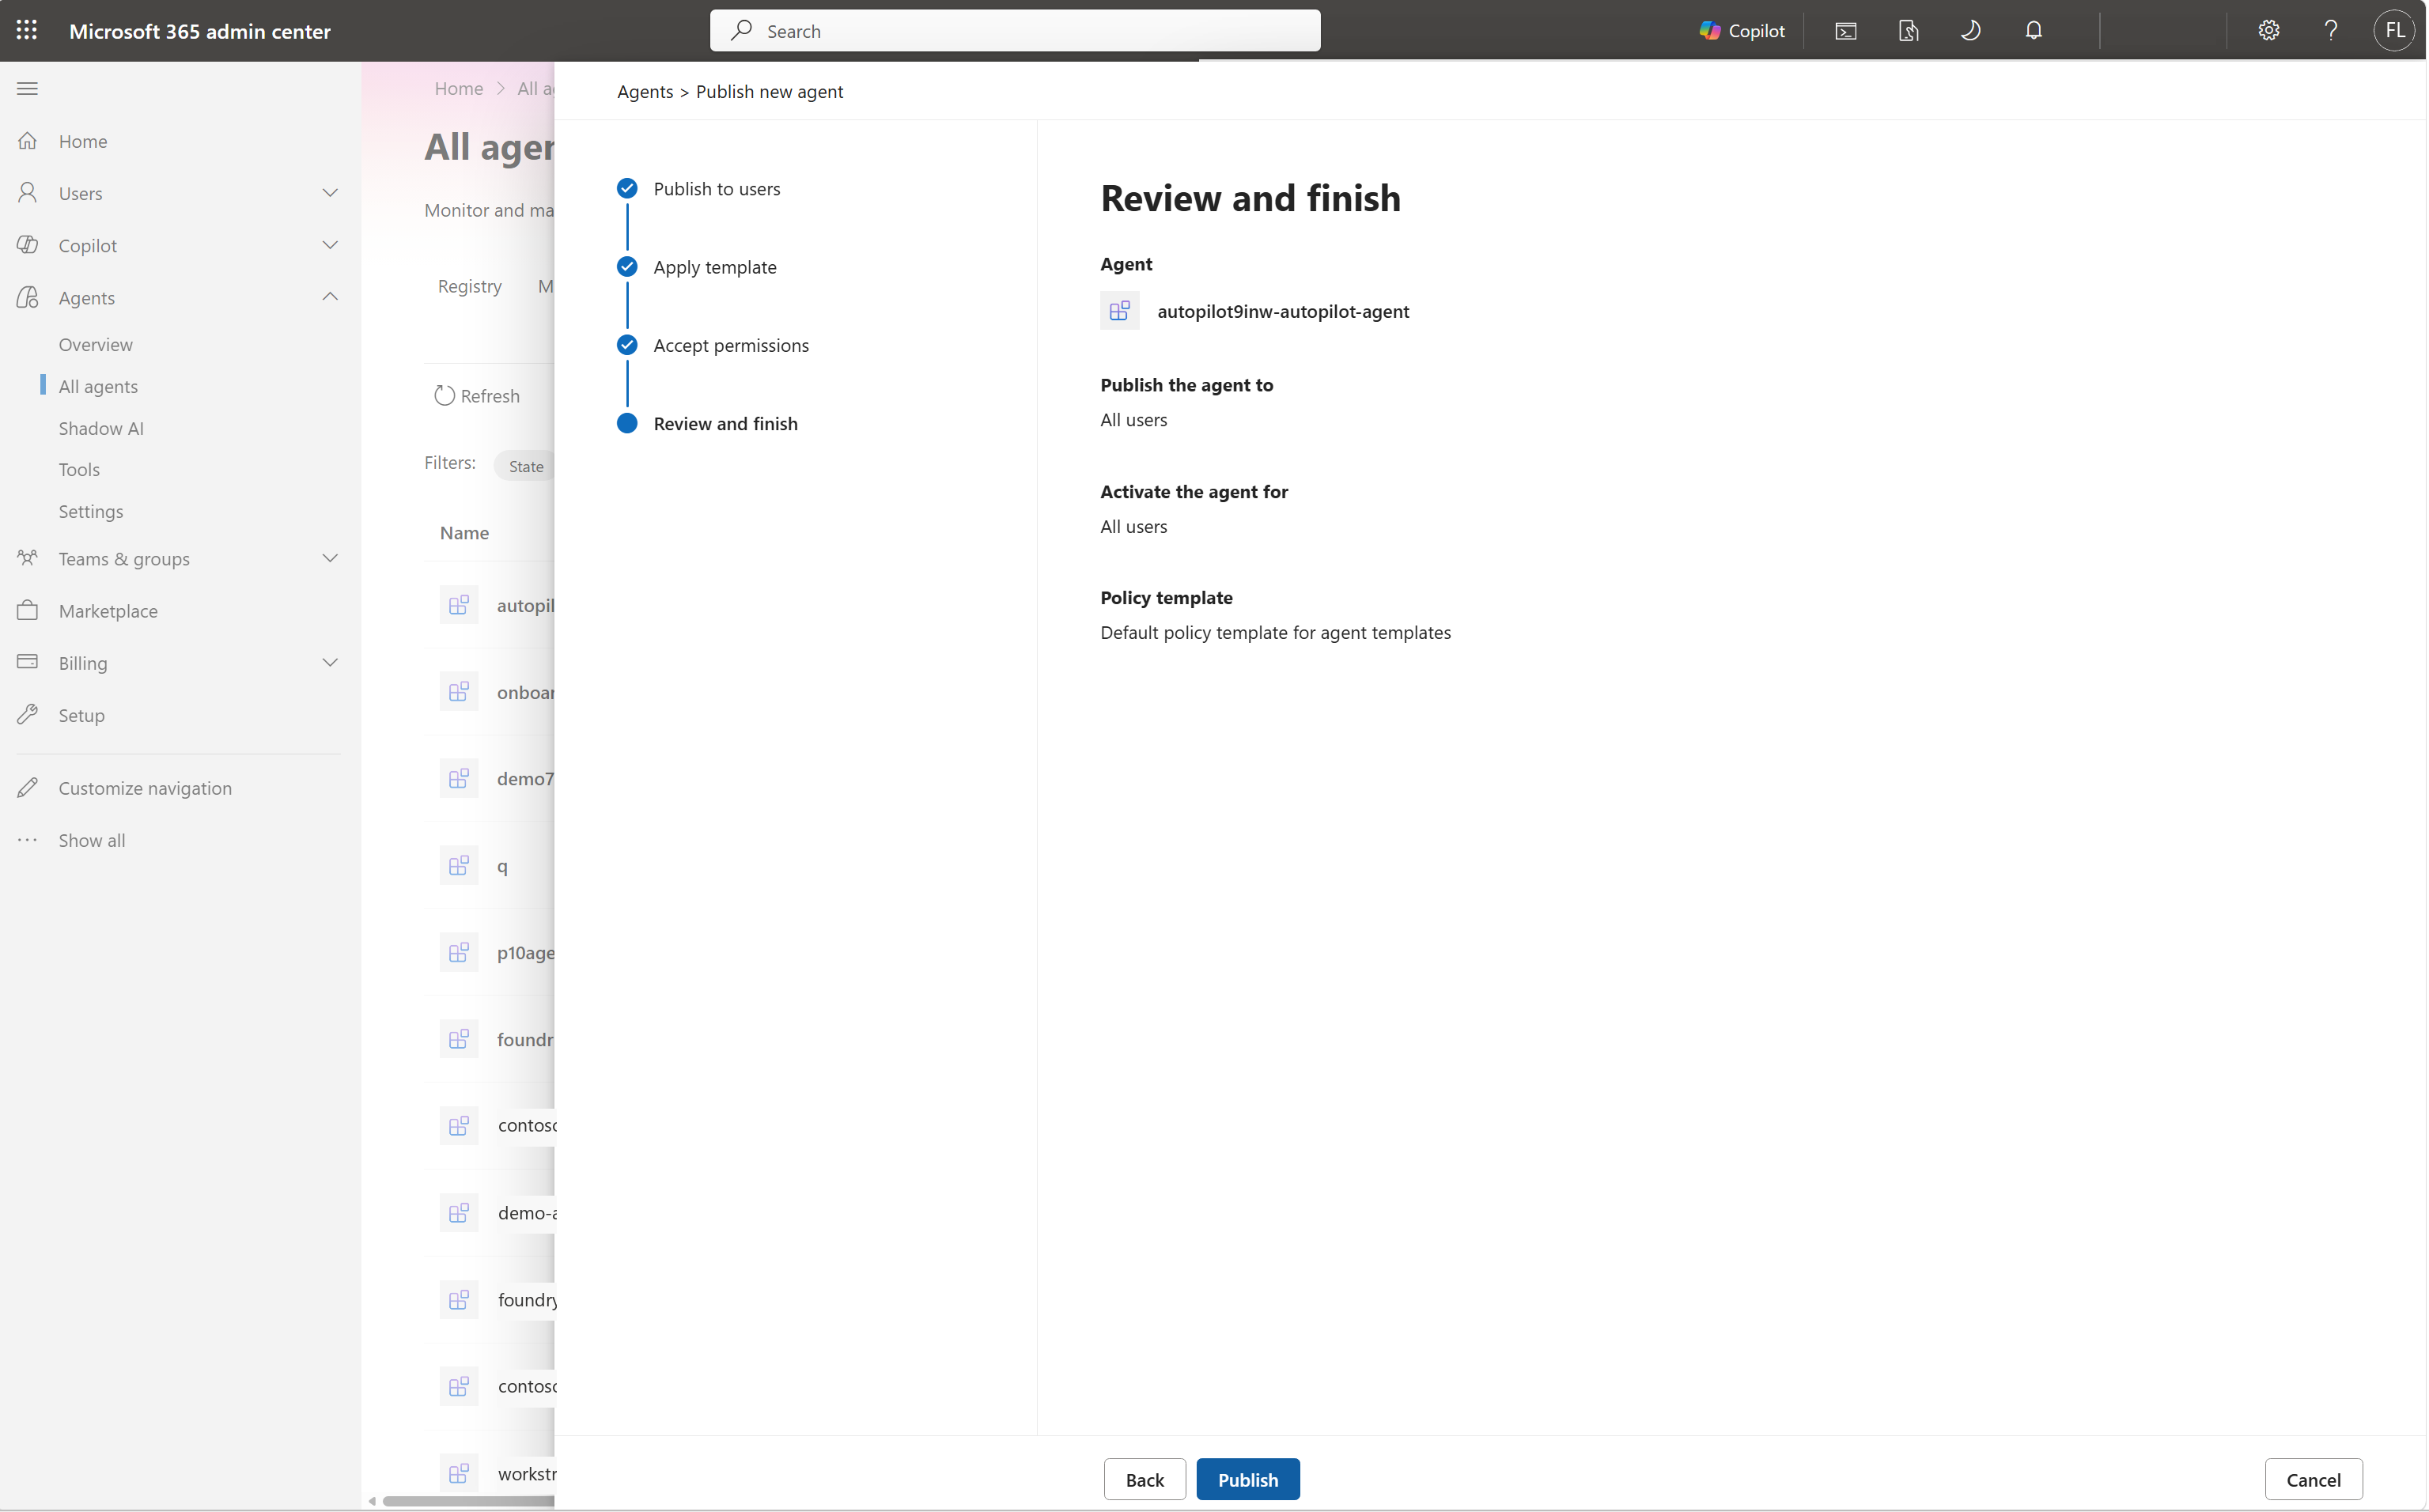
Approving runs a four-part wizard: choose who gets the agent, apply a policy template, grant consent, and publish.
Sign in to the Microsoft 365 admin center, and then select Agents > All agents.
On the Requests tab, find your autopilot. Its state is Pending activate.
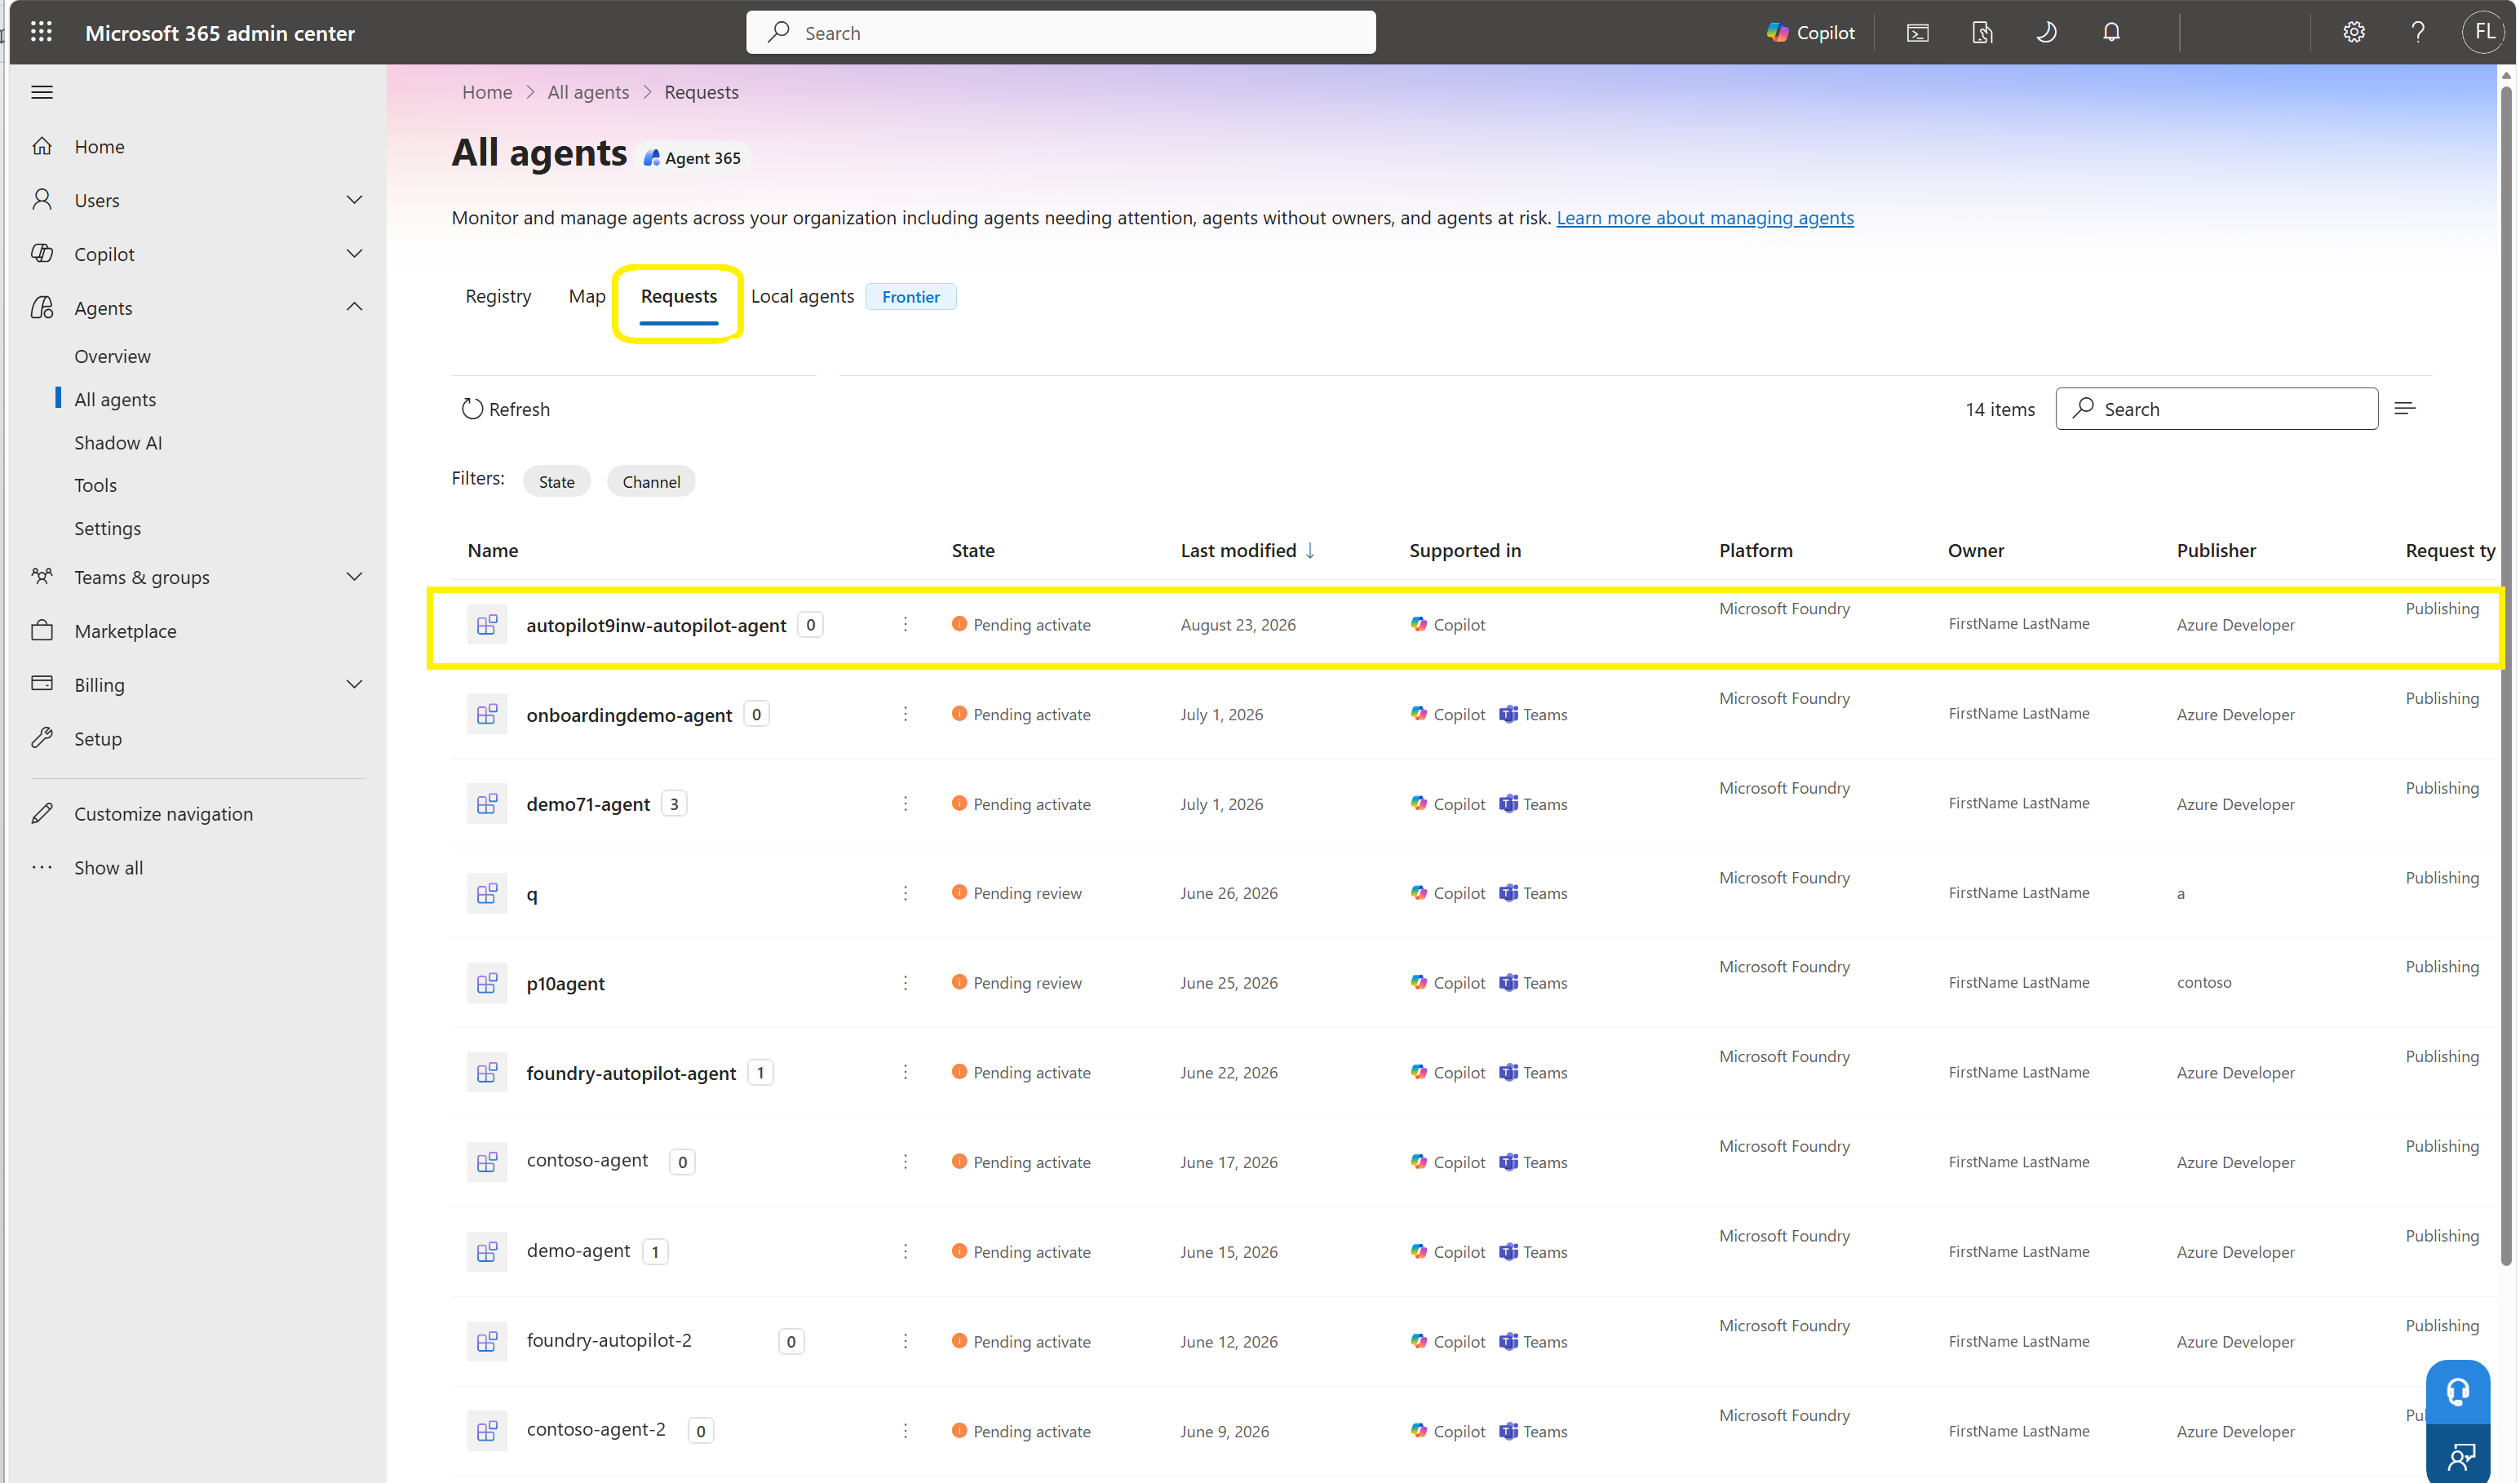
Select the autopilot to open the Publish new agent wizard.
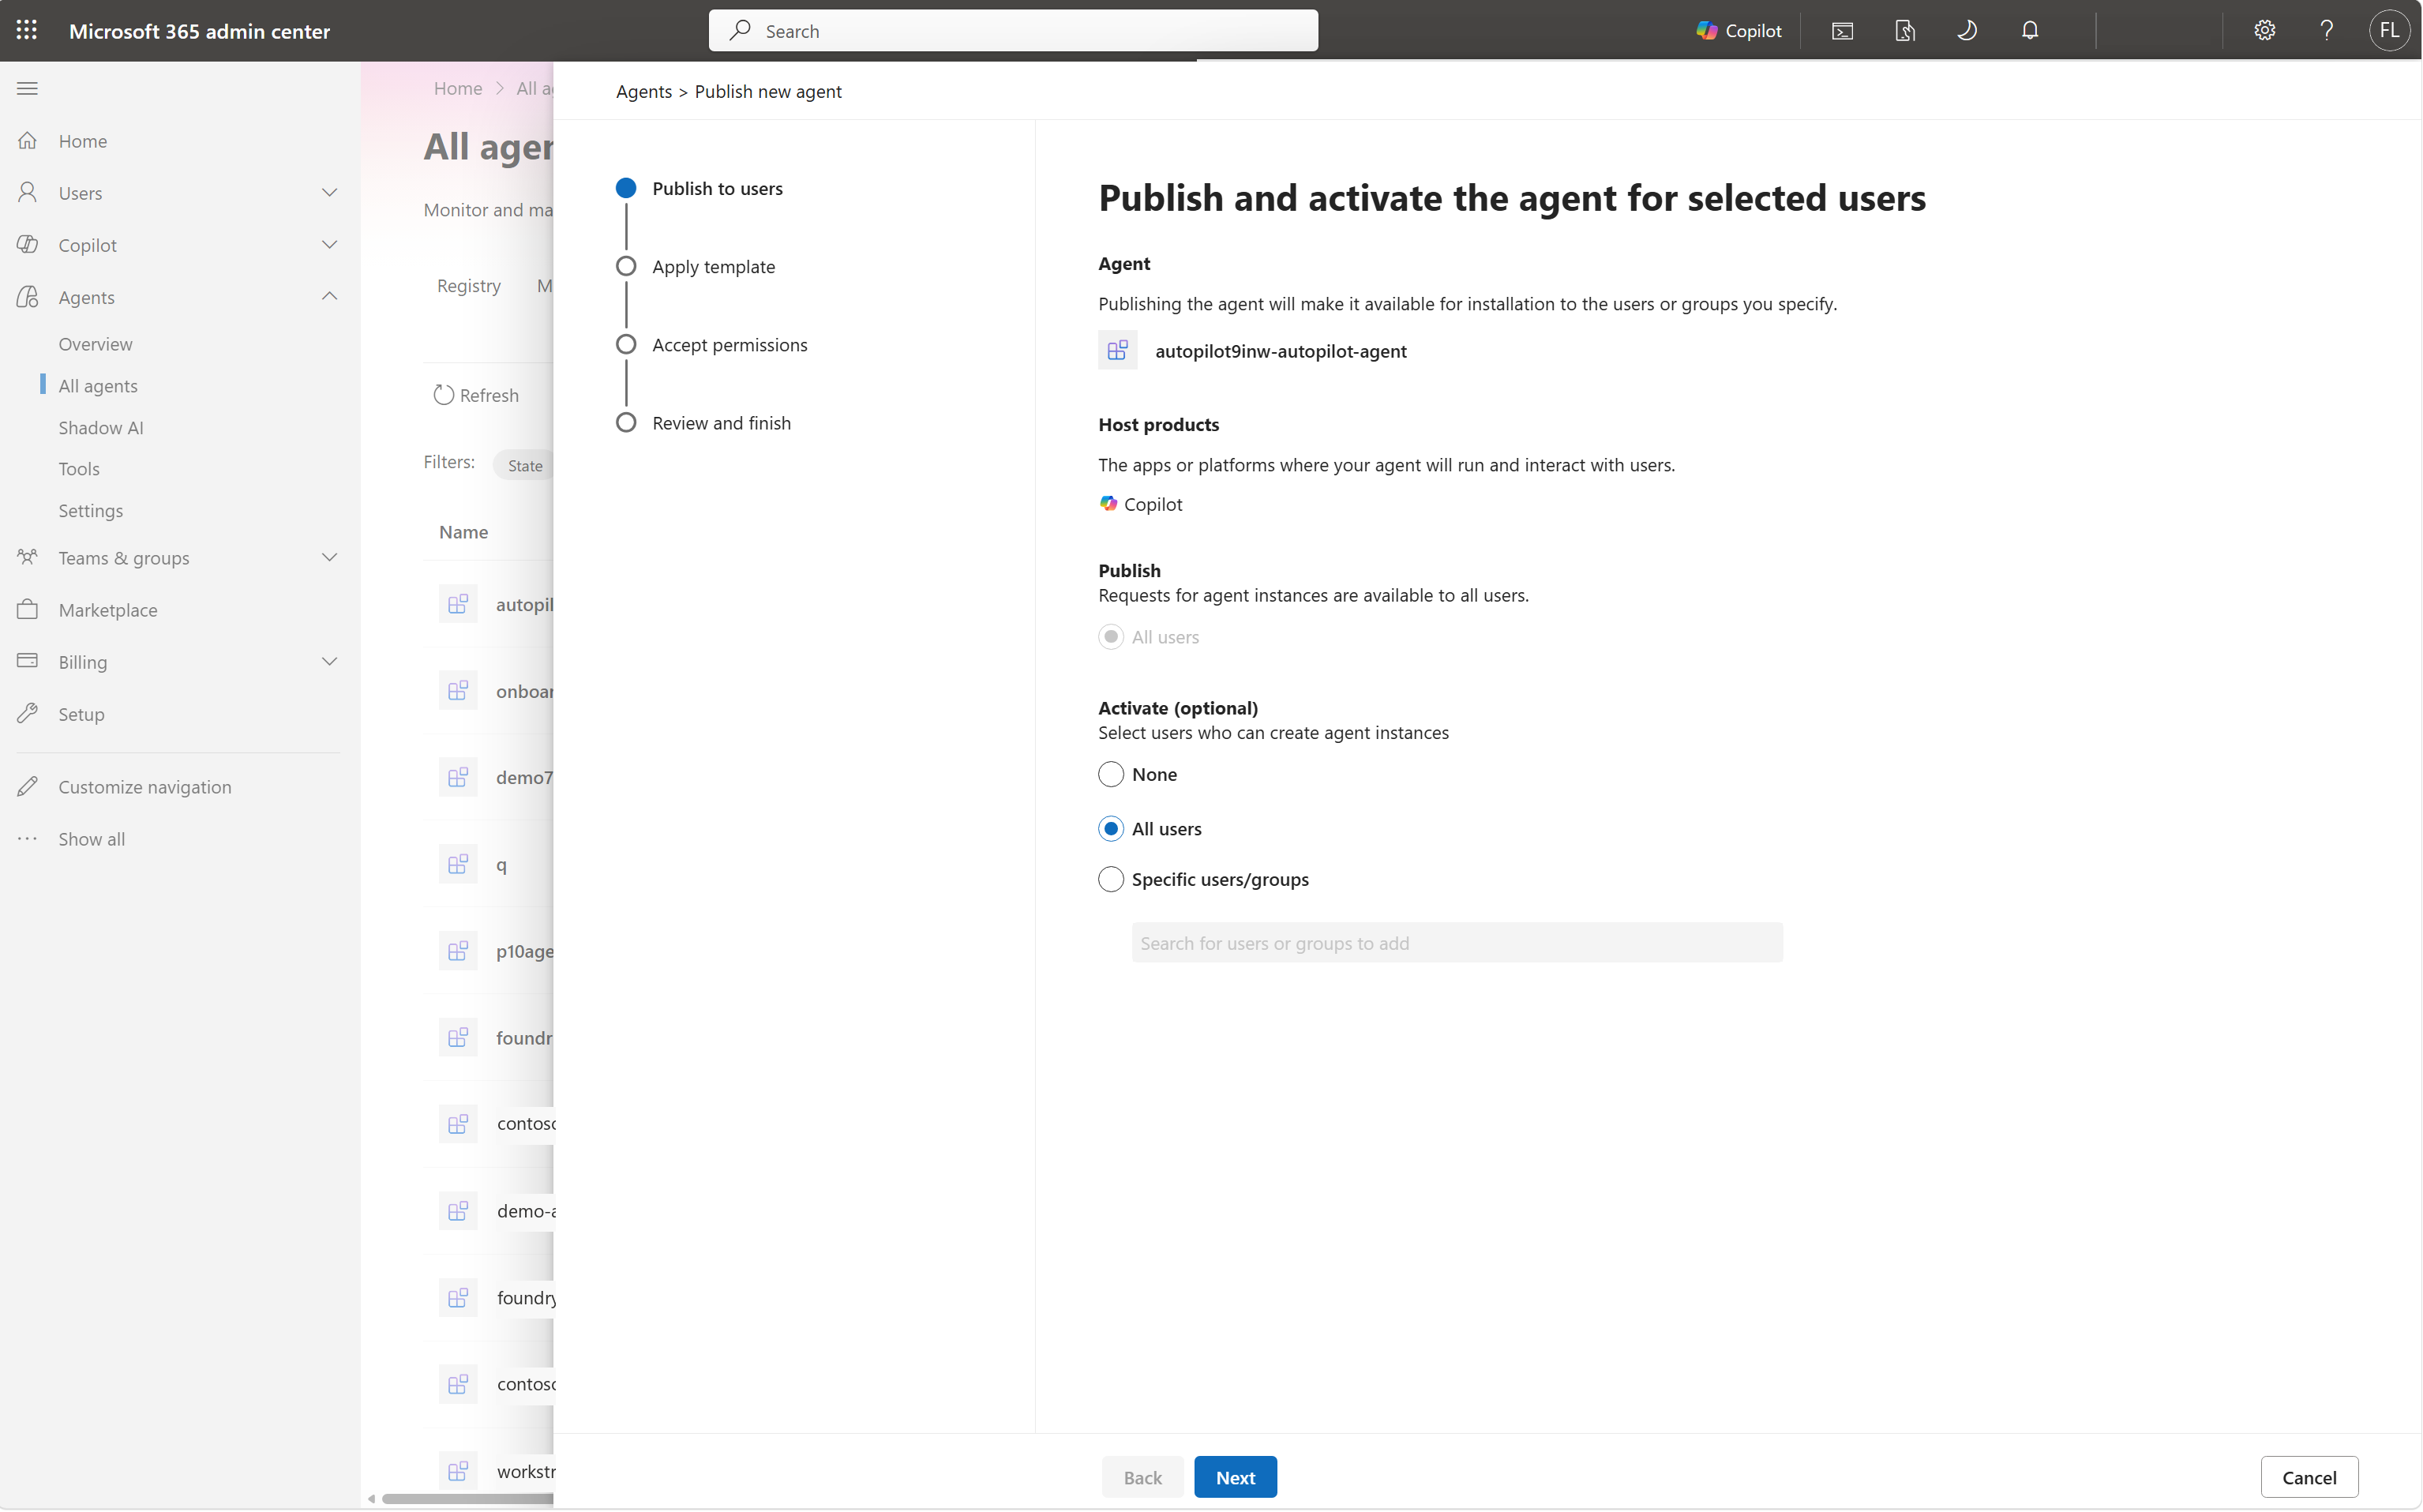
On Publish to users, confirm the host products and the publish audience. Under Activate, select who can create agent instances: None, All users, or Specific users or groups. This choice is the hiring scope.
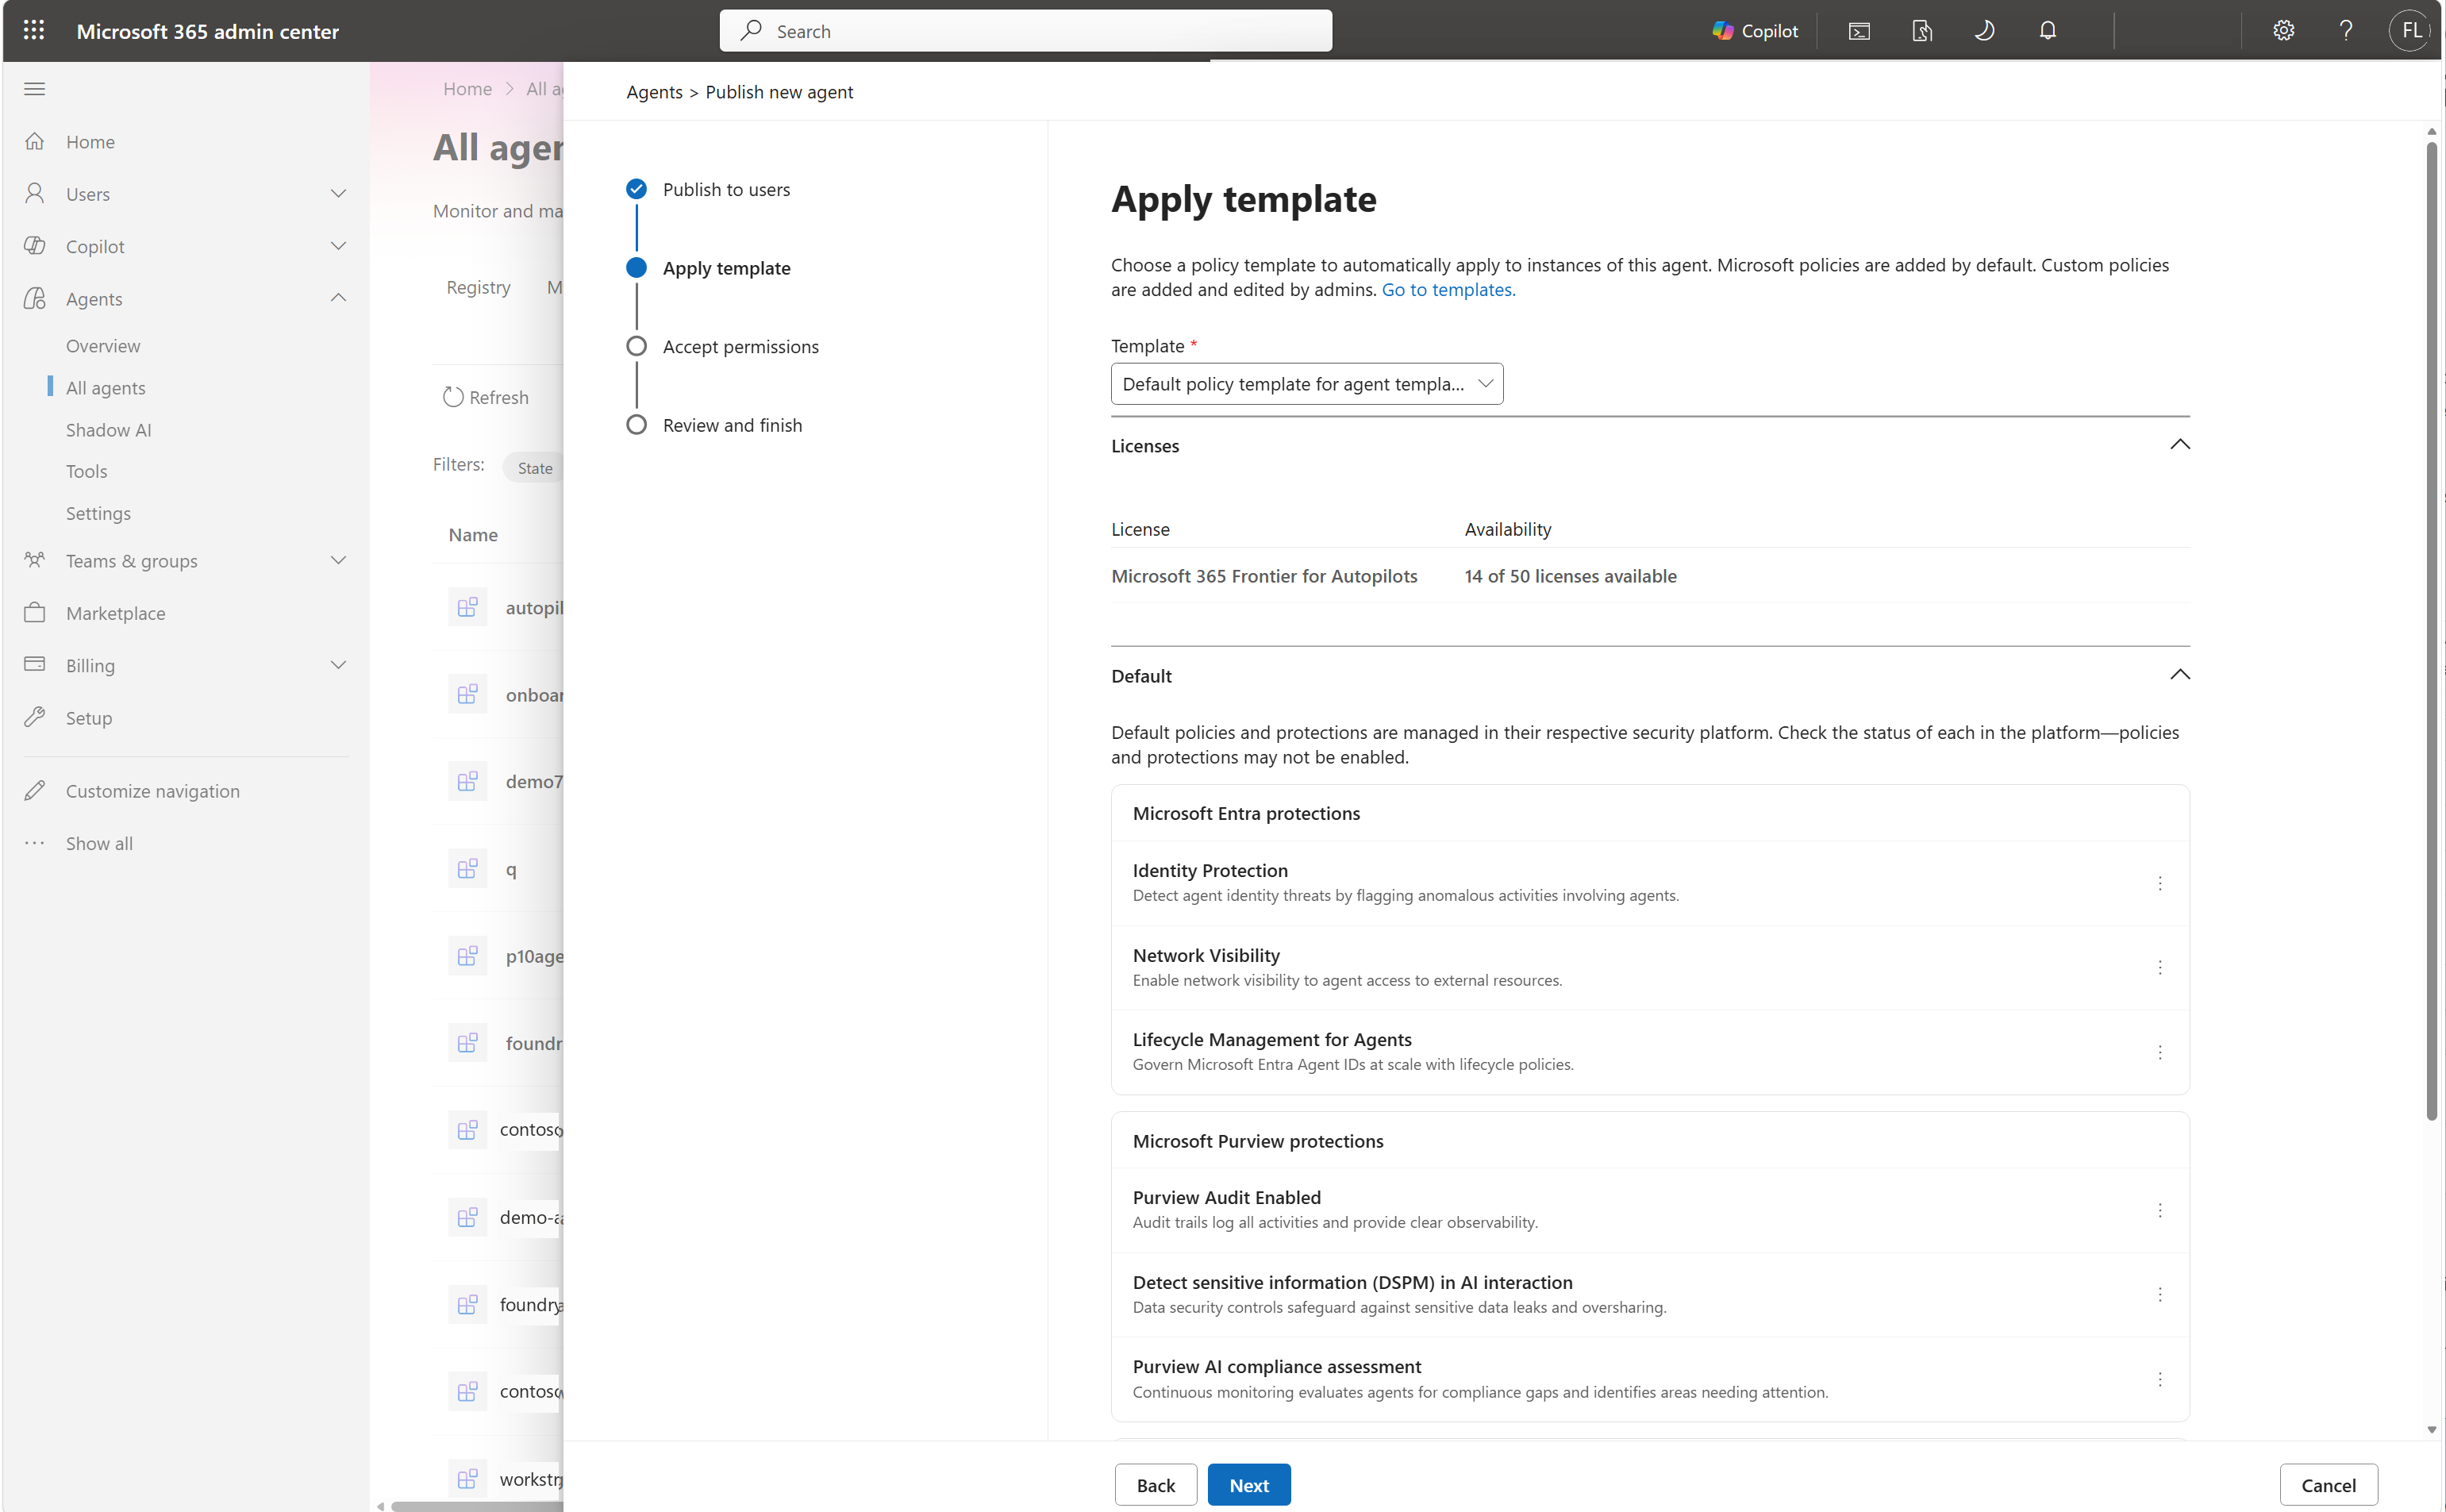
On Apply template, choose a policy template. Microsoft policies apply by default, and administrators add and edit custom policies. This step also shows how many autopilot licenses the tenant has available.
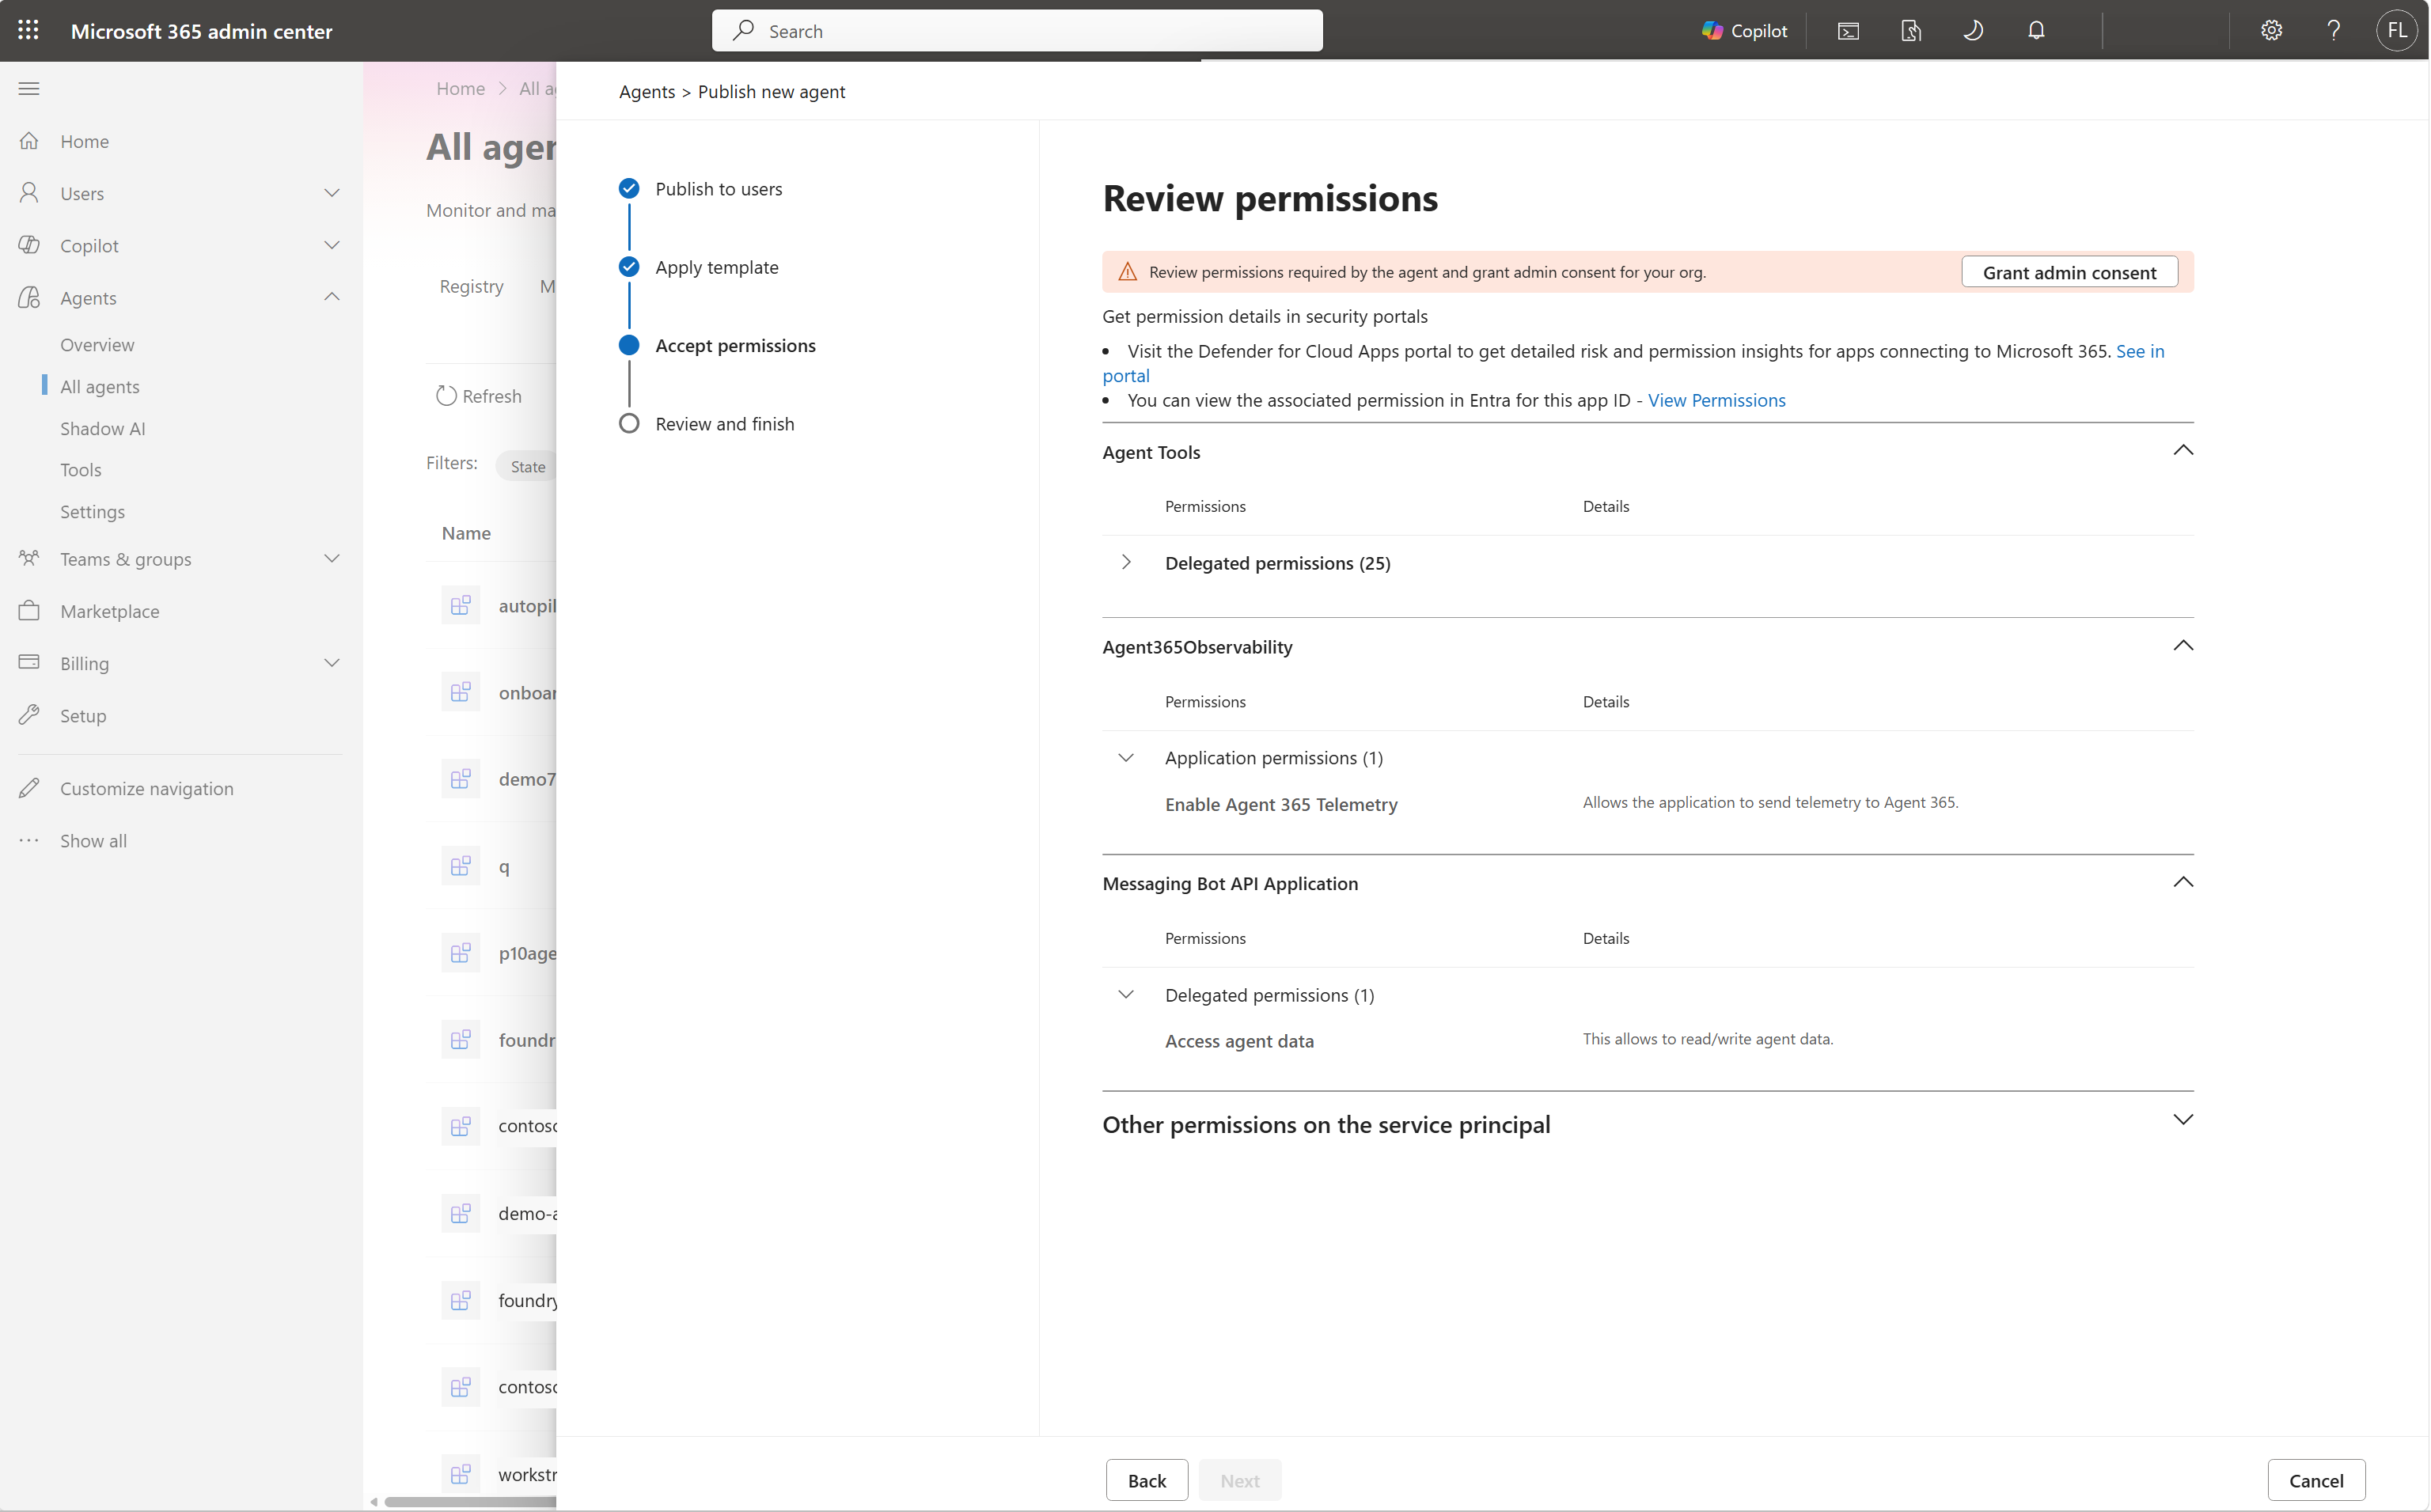
On Accept permissions, review the permissions the autopilot requests and select Grant admin consent. Consent here governs the token, meaning what kinds of calls the autopilot is ever allowed to make. It grants no team's data to anyone.
On Review and finish, check the audience, the activation scope, and the policy template, and then select Publish.
Verify the autopilot on the Registry tab. Its status is Available.
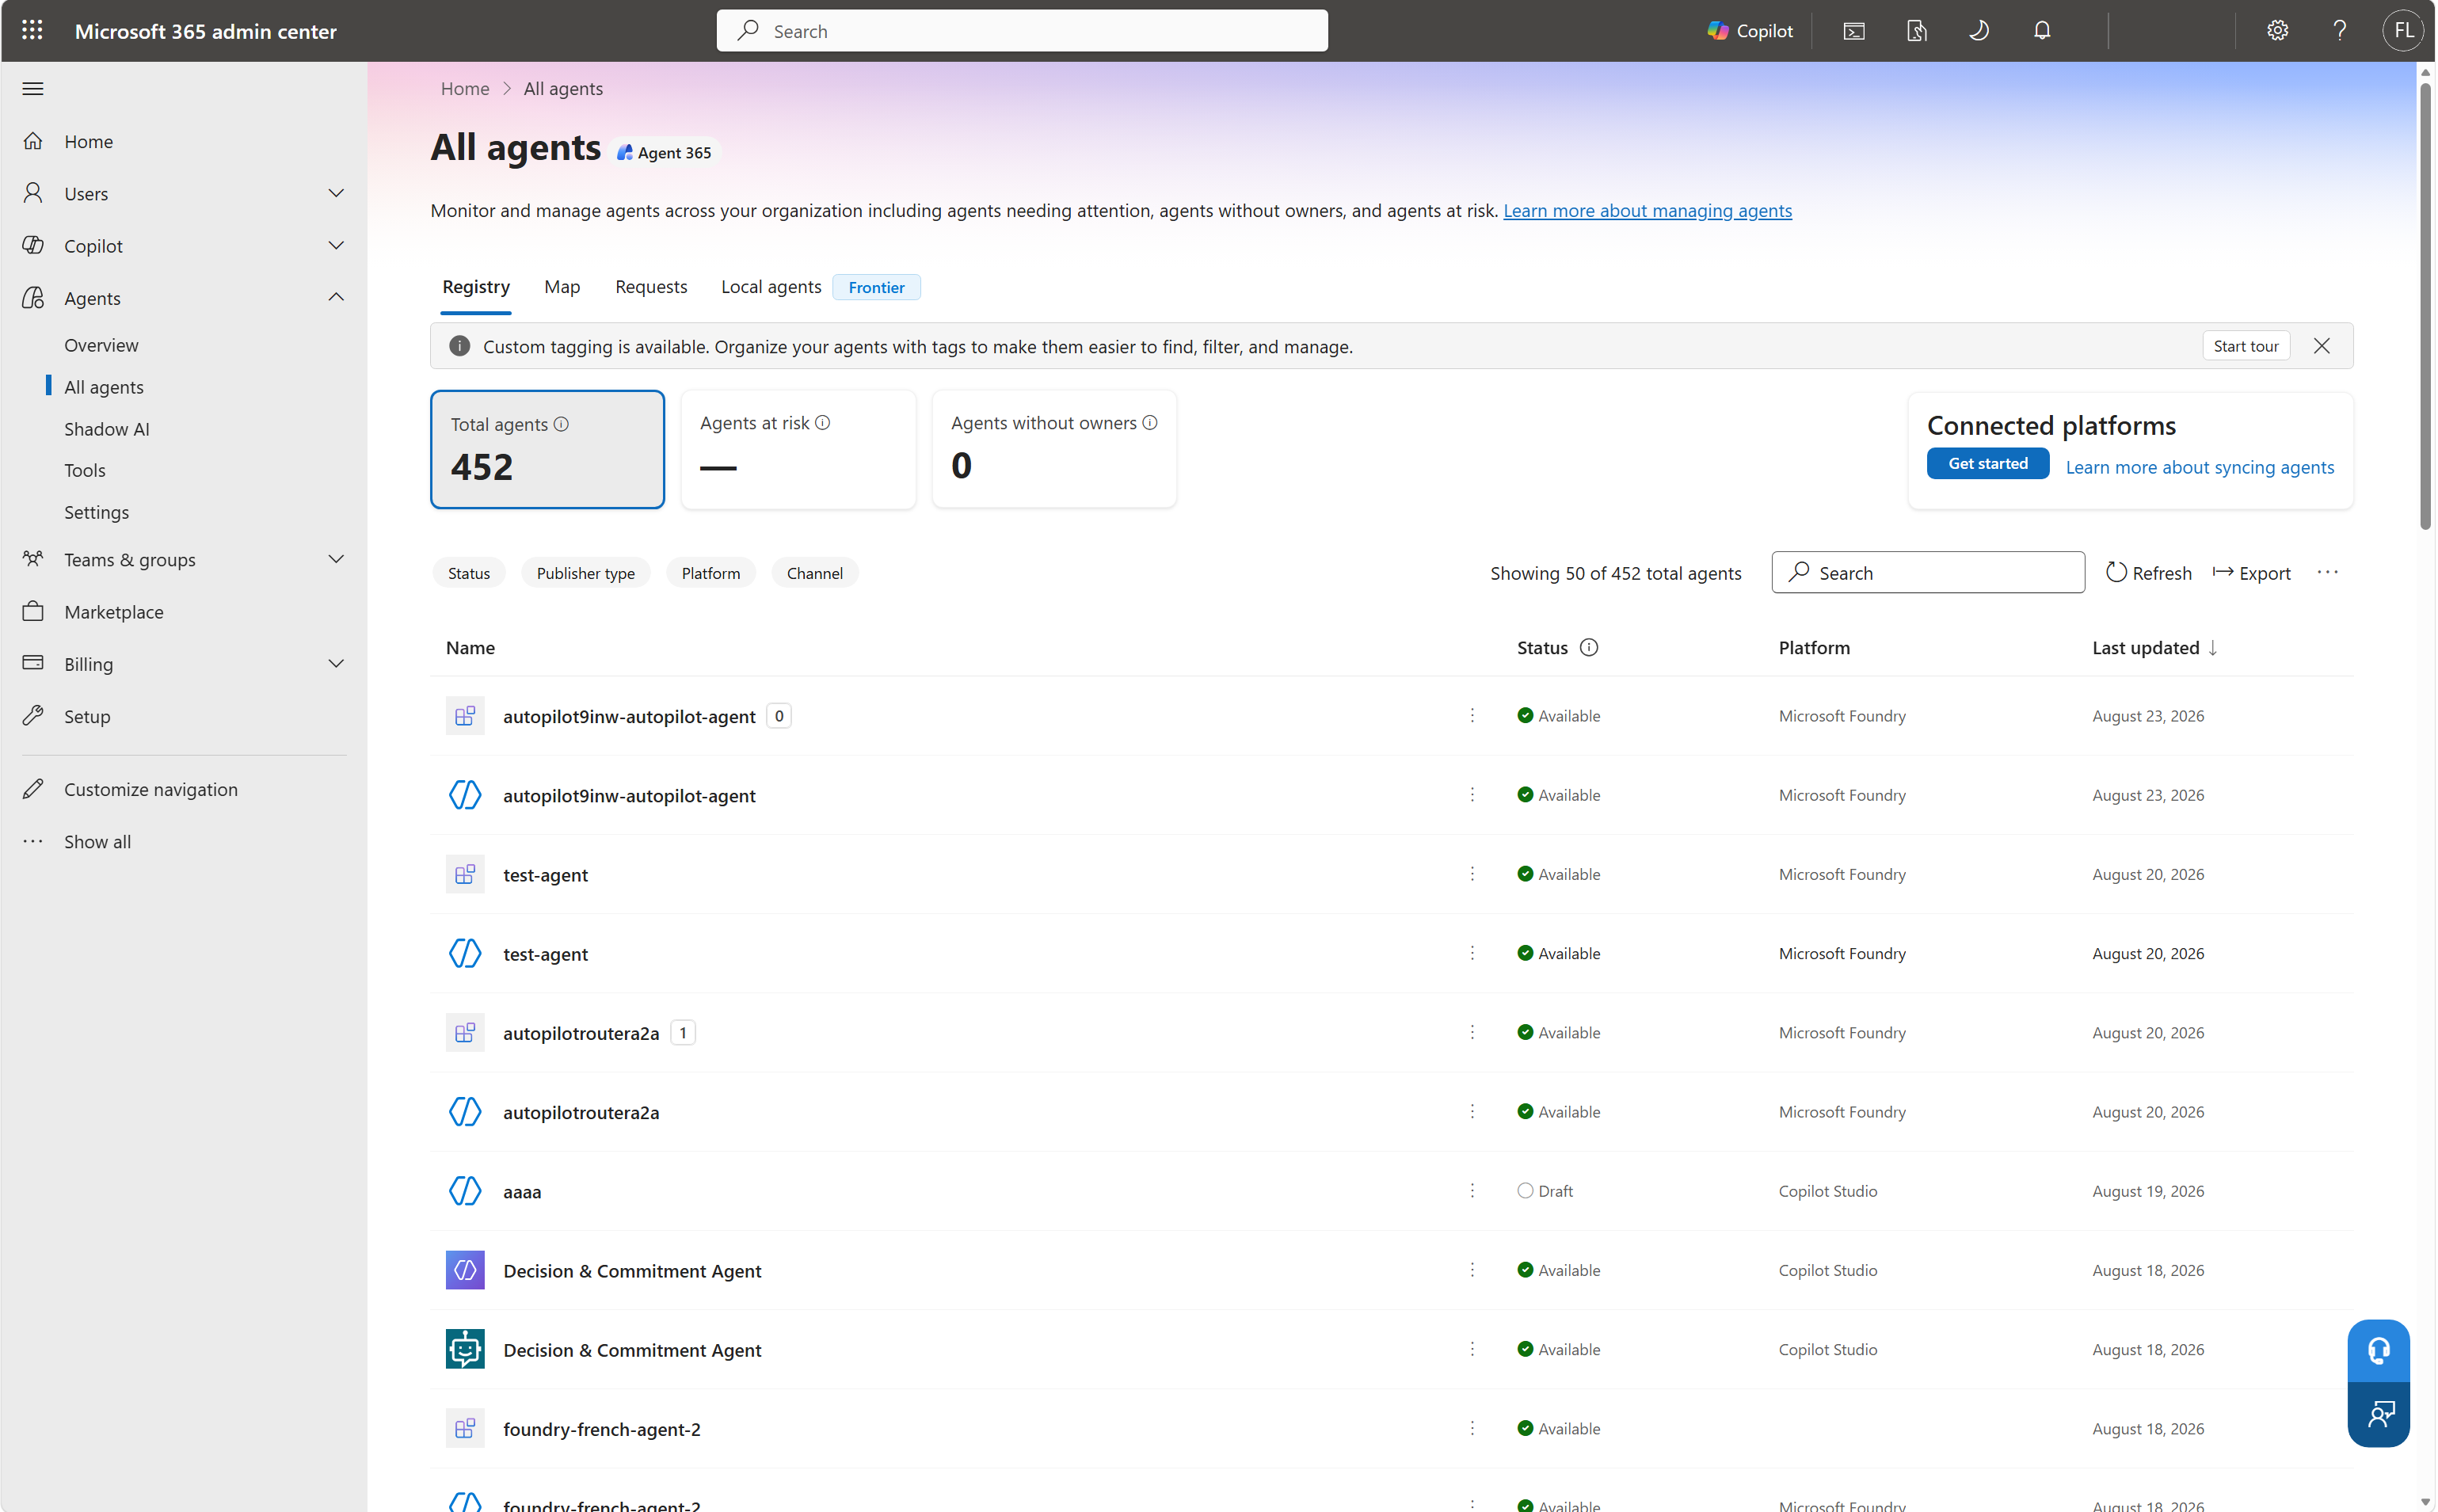
Expected result: the autopilot appears in the registry as Available, and the people in the hiring scope can create instances.
Create your instance
Who does this: you, if your administrator included you in the hiring scope.
After the autopilot is in the registry, you can hire it from either the Microsoft Teams app store or the Microsoft 365 Copilot agent store.
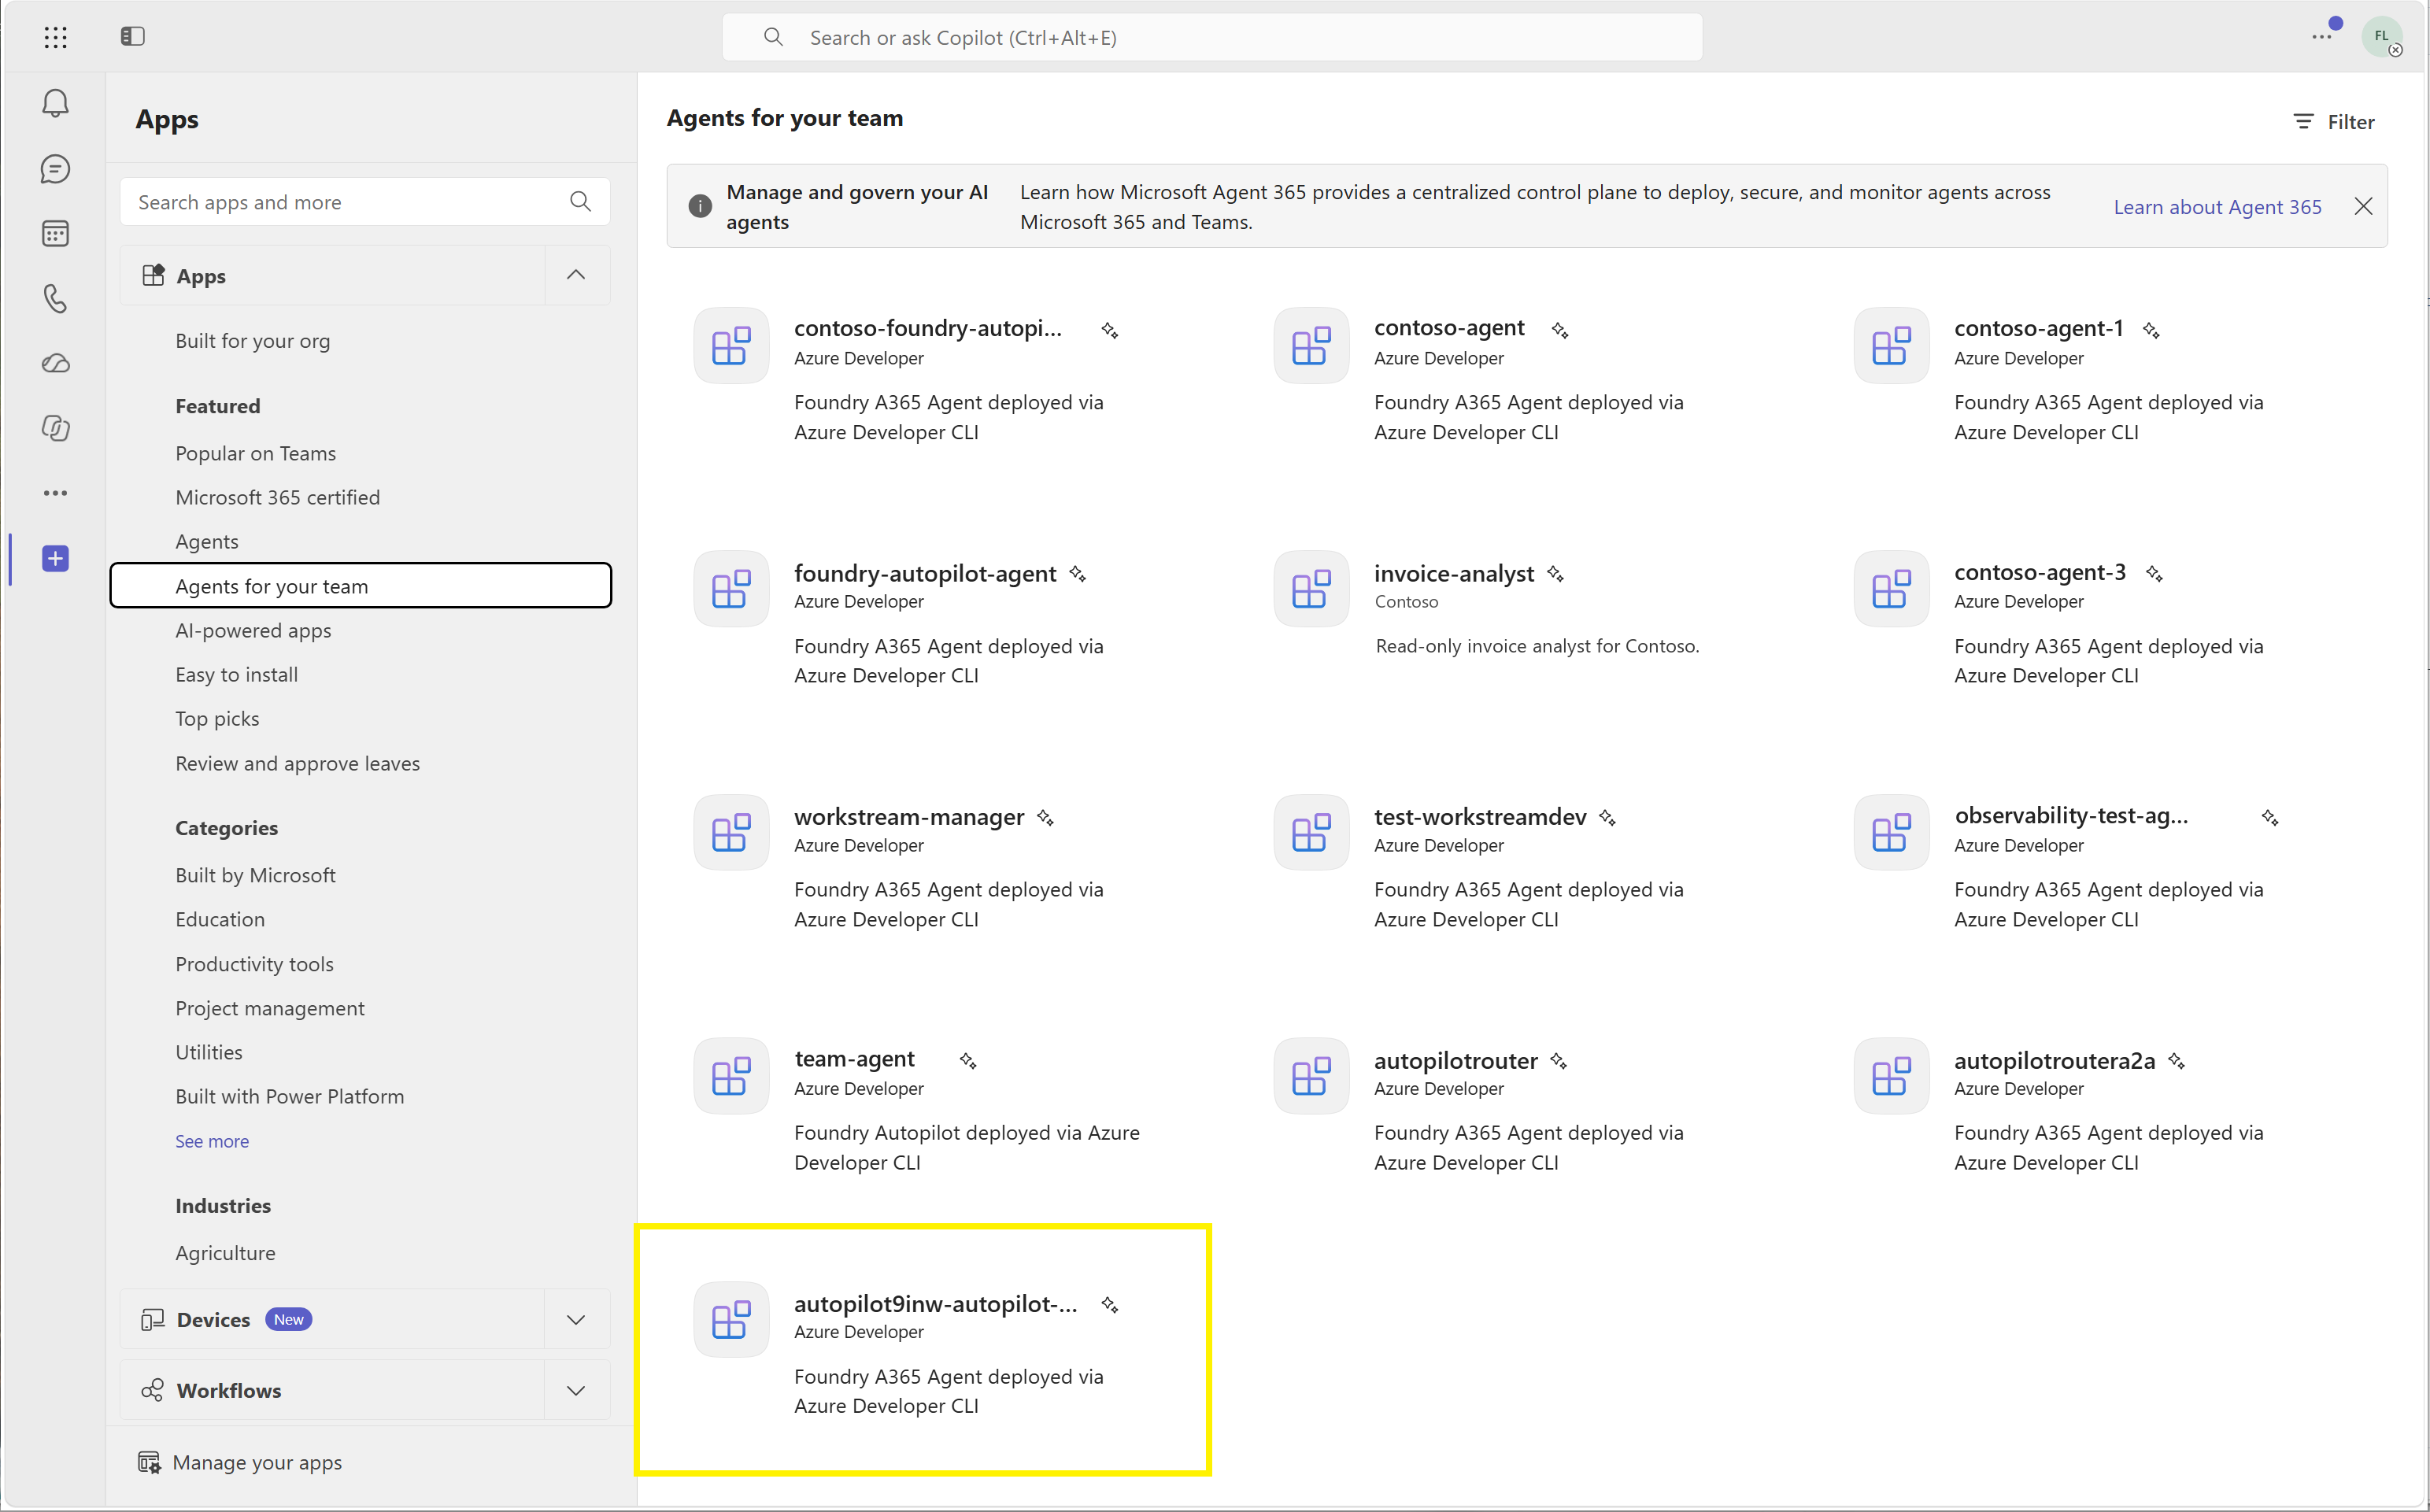
Find the autopilot under Agents for your team.
In Microsoft Teams, go to Apps > Agents for your team.
In Microsoft 365 Copilot, go to Agents > Agents for your team.
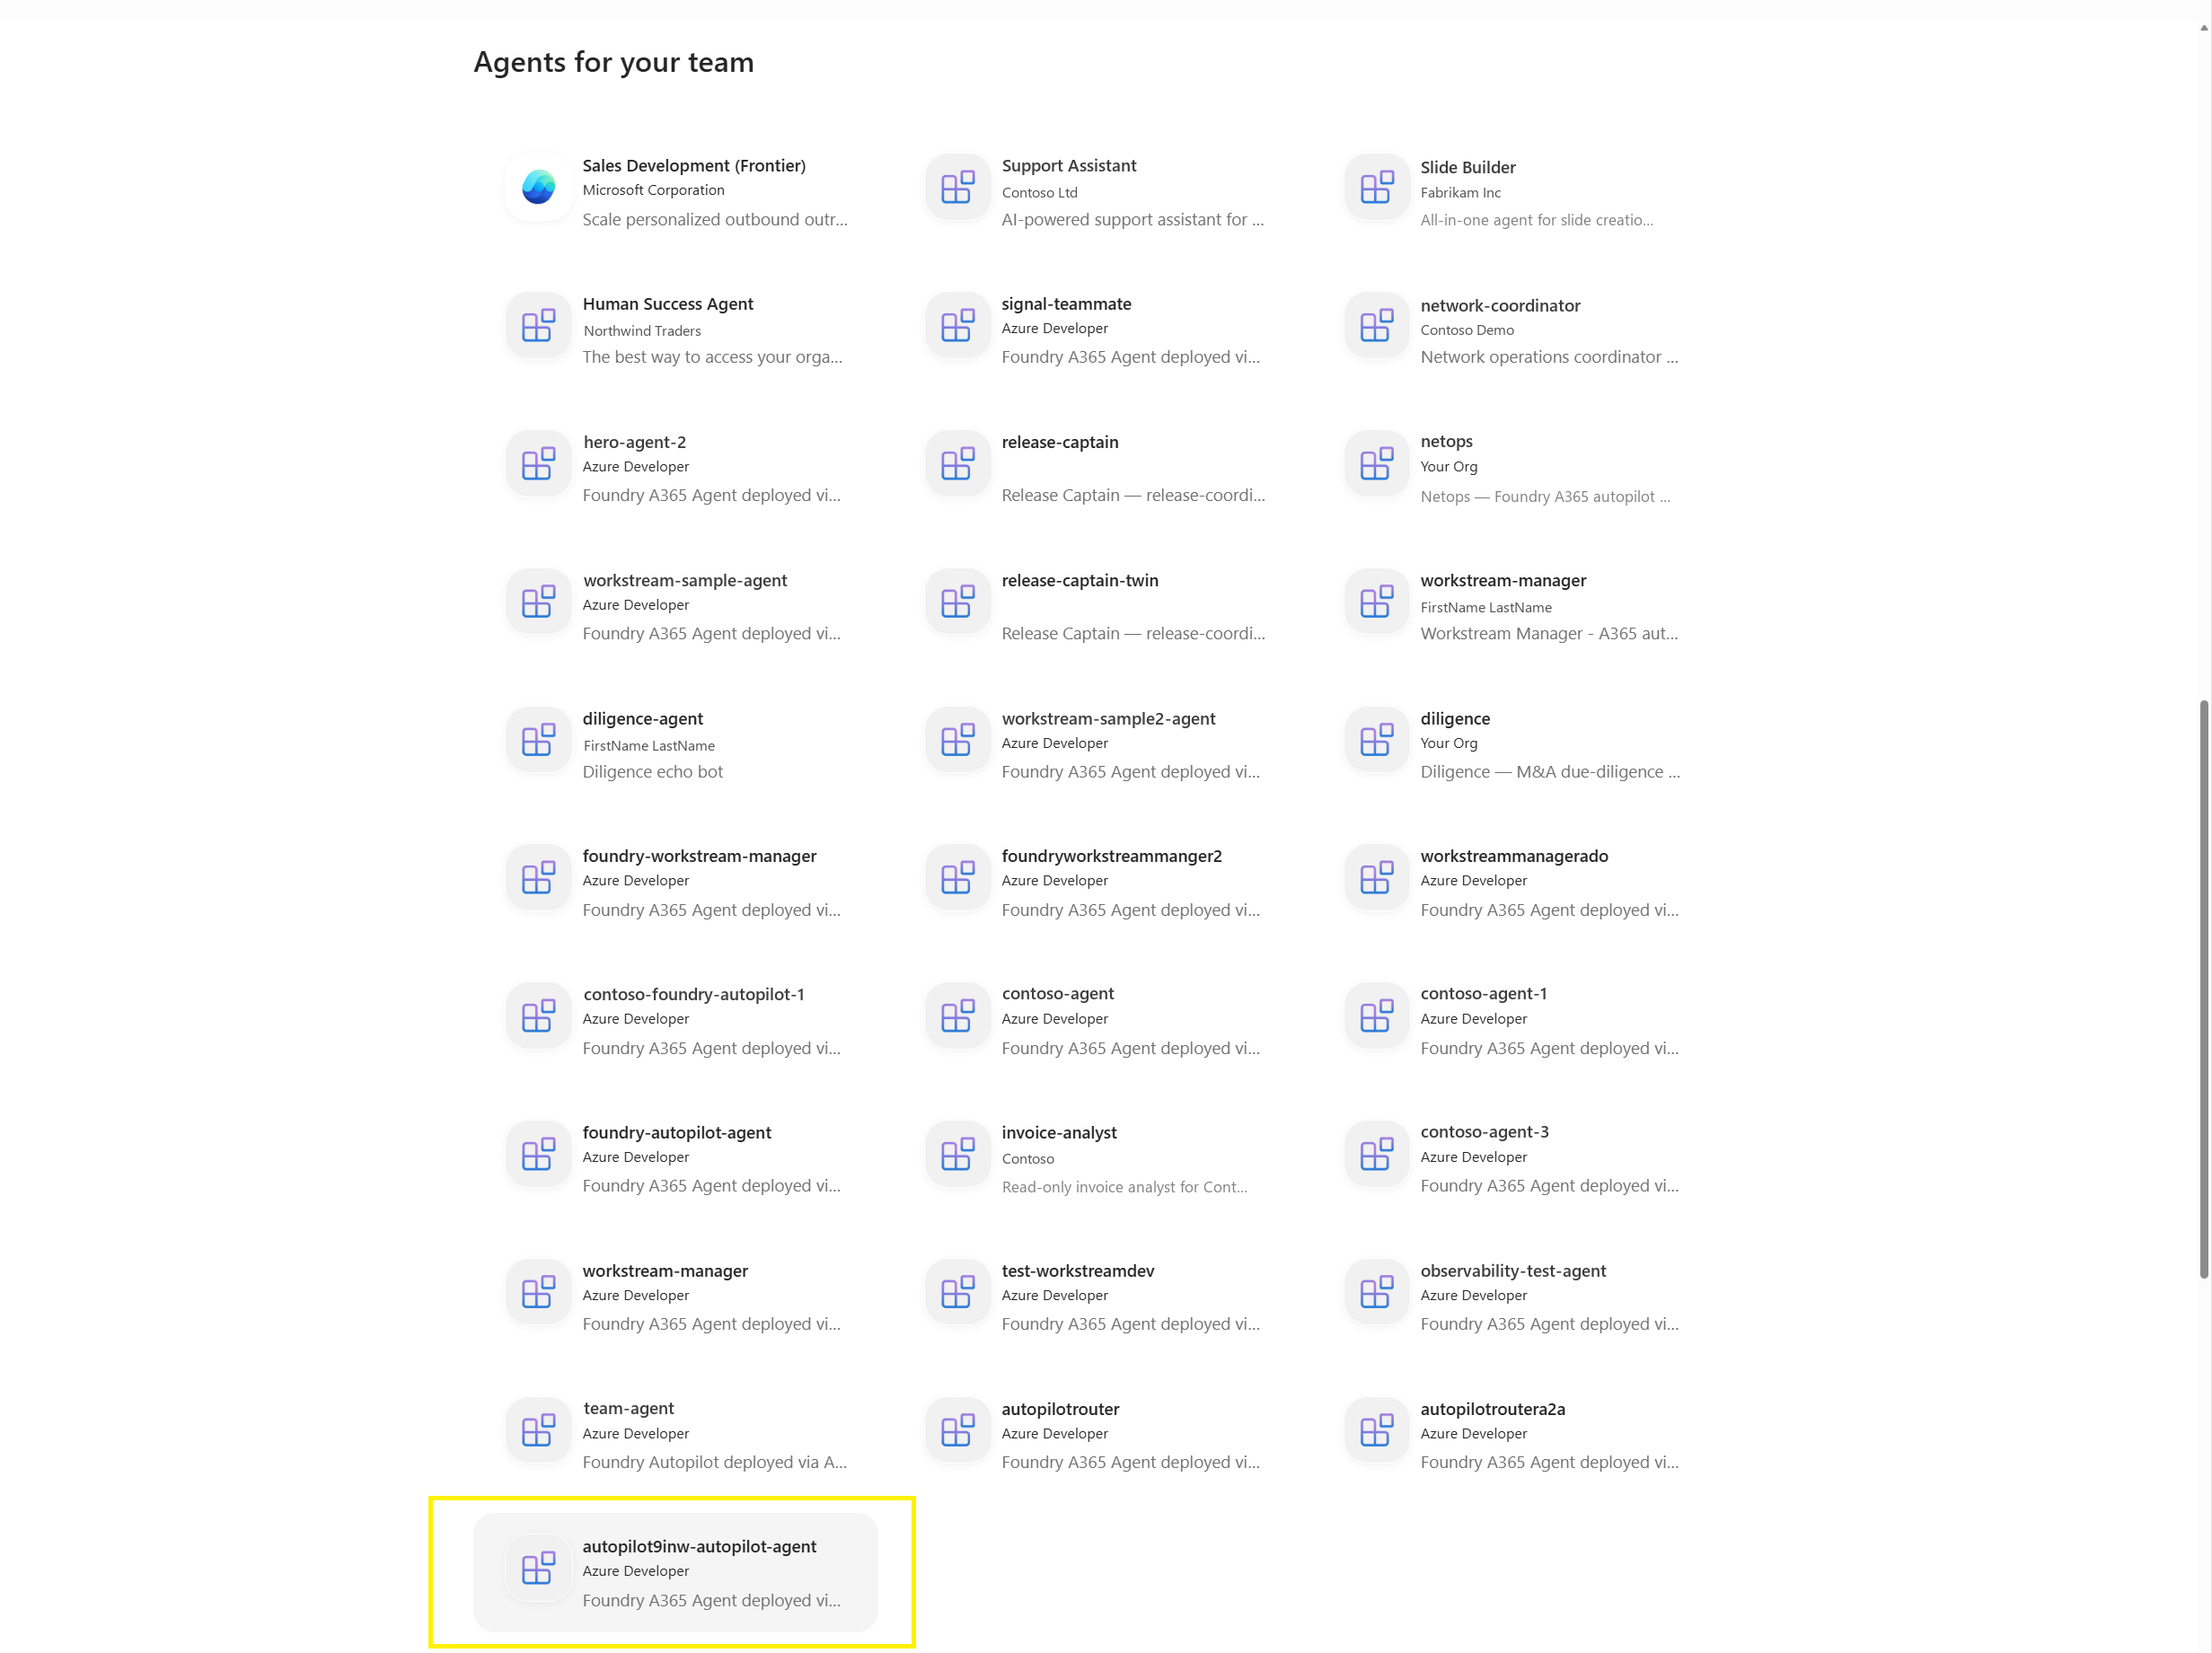
Select the autopilot, and then select Create instance.
Name the instance, set its alias and domain, and confirm who manages it. The name can be up to 32 characters.
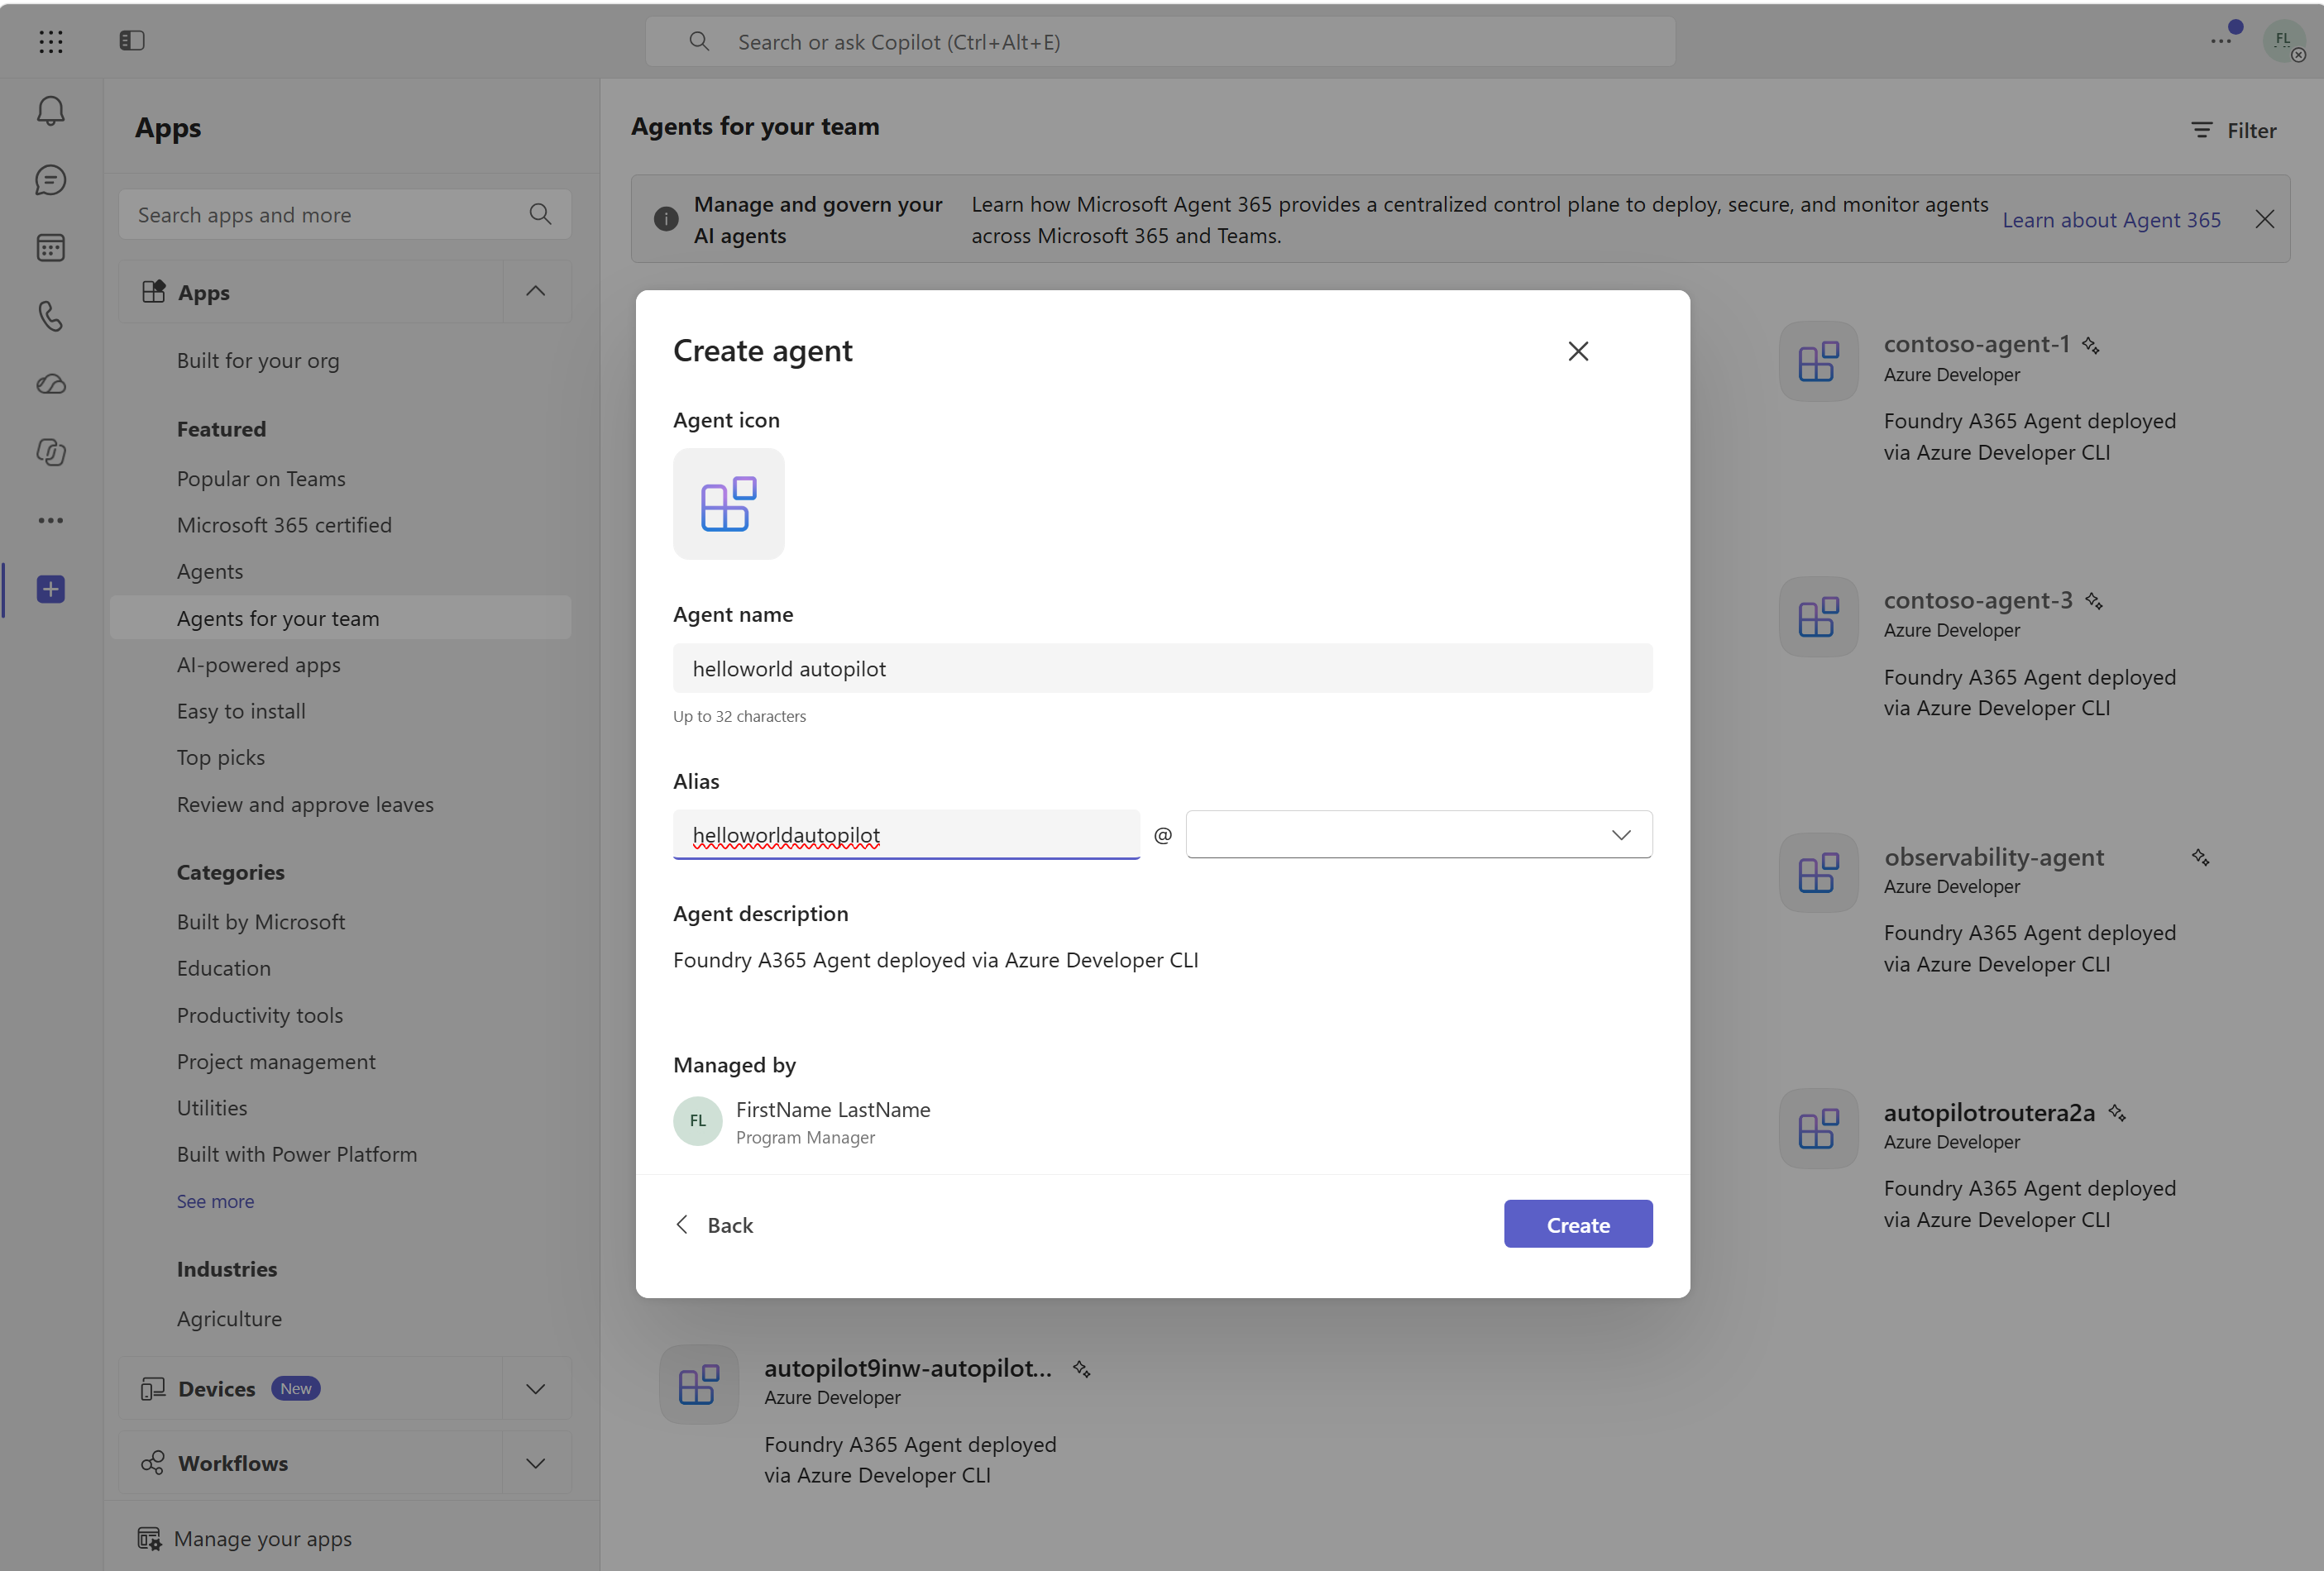
Select Create.
Creating the instance consumes one license and creates the instance's own agent identity and agent user account. You become its manager.
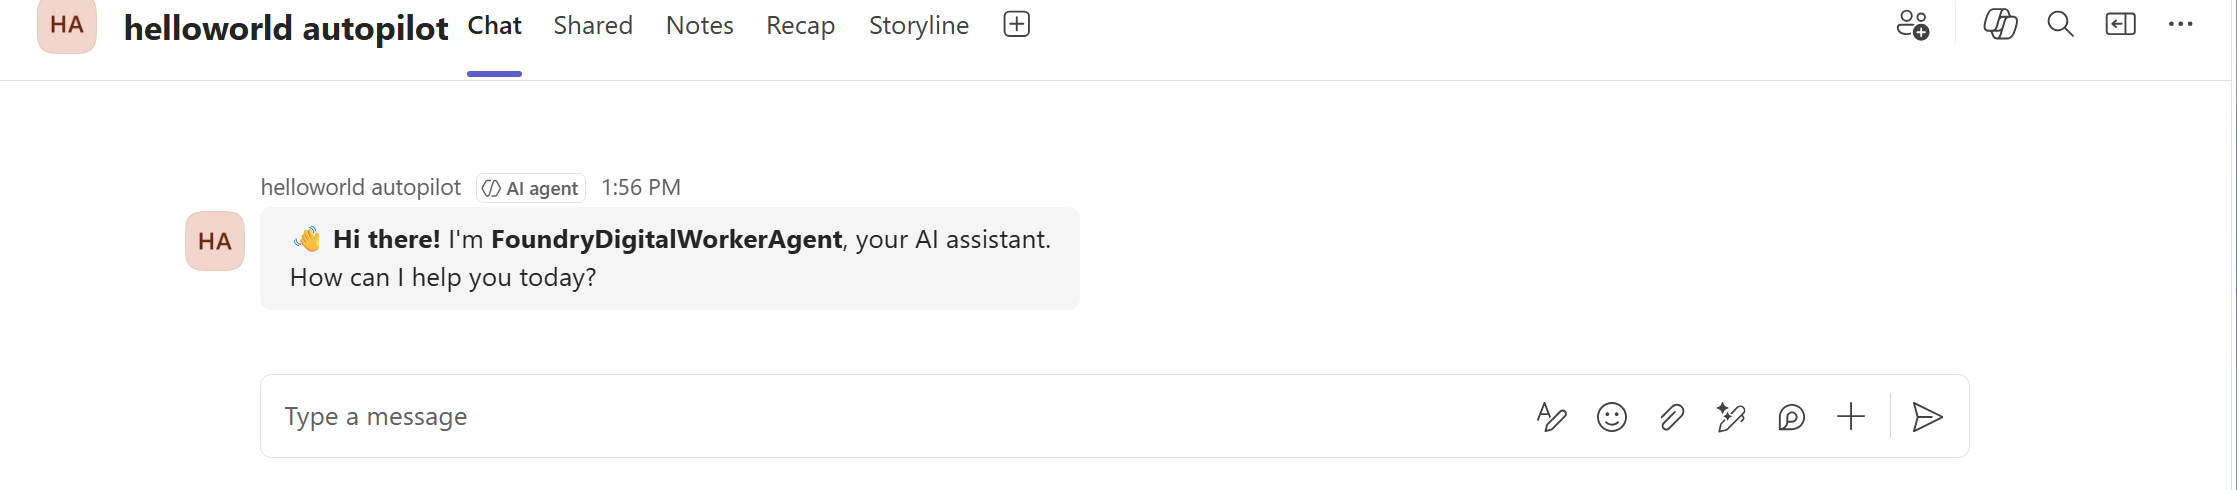
Expected result: the autopilot starts a Teams chat with you and appears in your organization chart.
Note
Instance creation is asynchronous. It can take a few minutes before the autopilot is searchable in Teams.
Clean up resources
To remove the Azure resources you created, run:
azd down
Deleting Azure resources doesn't remove the instances people hired from your blueprint. Work with your administrator to retire the blueprint.
Troubleshooting
| Issue | Cause | Resolution |
|---|---|---|
| Provisioning fails partway, after some resources exist | You have Contributor, not Owner | Provisioning creates role assignments, which Contributor can't do. Get Owner at the resource group, or Contributor plus Role Based Access Control Administrator, then run azd provision again. |
azd provision fails with a region or hosted-agent availability message |
Unsupported region | Create all resources in a region that supports hosted agents. |
| Container build or push fails | Docker isn't running, or you lack push rights | Start Docker. Confirm you have AcrPush or Container Registry Repository Writer on the registry. |
azd auth login prompts for more consent |
Extra scopes required | Run the sign-in commands from the sample README and grant the required Foundry, Microsoft Graph, and Azure Resource Manager scopes. |
Publishing fails with version already exists |
That version was already published | Increment the version number and publish again. |
| You can't find the request to approve | You lack the role, or publishing didn't finish | Confirm the approver has Global Administrator or AI Administrator. Reader roles can't approve. |
| Create instance is missing or disabled in the store | The tenant isn't enrolled in Frontier, the autopilot isn't activated, or you're not in the hiring scope | Confirm Frontier enrollment, that your administrator activated the autopilot, and that the activation scope includes you. |
| Hiring fails with a licensing error | No free Frontier seats | Each hire consumes one seat from the 25-seat preview subscription. Free a seat or request more. |
| The autopilot doesn't appear in Teams search | Creation is still propagating | Wait a few minutes and search again. |
Related content
- What is an autopilot in Microsoft Foundry? explains the identity model and why autopilots use blueprints.
- Autopilot lifecycle in Microsoft Foundry covers what happens after you publish, including updating and ending an autopilot.
- Microsoft Agent 365 integration with Foundry covers registry sync, data collection, and data residency.