Bilješka
Pristup ovoj stranici zahtijeva provjeru vjerodostojnosti. Možete pokušati da se prijavite ili promijenite direktorije.
Pristup ovoj stranici zahtijeva provjeru vjerodostojnosti. Možete pokušati promijeniti direktorije.
Healthcare organizations can use Microsoft Entra External ID with the FHIR® service in Azure Health Data Services to grant access to their applications and users.
Create a Microsoft Entra External ID tenant for the FHIR service
Creating a Microsoft Entra External ID tenant for the FHIR service sets up a secure infrastructure for managing user identities in your healthcare applications.
If you already created a Microsoft Entra External ID tenant, you can skip to Add a test user to the Microsoft Entra External ID tenant.
Use PowerShell or Azure CLI to deploy the ARM template to deploy a Microsoft Entra external ID tenant programmatically to an Azure subscription. For more information about syntax, properties, and usage of the template, see Deploy an instance of Microsoft Entra External ID.
Run the code in Azure Cloud Shell, or locally in PowerShell, Azure CLI, or Visual Studio Code to deploy the FHIR service to the Microsoft Entra External ID tenant.
Use the following PowerShell script to deploy a Microsoft Entra External ID tenant. Make sure to replace the variables in the script with your own values before running it. Don't include .onmicrosoft.com in the directoryName variable.
The following script signs in to Azure, creates a resource group, and deploys the ARM template that creates a Microsoft Entra External ID tenant. If you want to use an existing resource group, skip the "create resource group" step, or comment out the line starting with New-AzResourceGroup.
If you are using a locally stored ARM template, replace the -TemplateUri parameter with -TemplateFile and provide the local path to the ARM template JSON file.
Replace the <placeholder> values in the script with your actual Azure subscription details and desired configuration.
### variables
$tenantid="<your tenant id>"
$subscriptionid="<your subscription id>"
$resourceGroupName="<your resource group name>"
$location="<your desired location>"
$directoryName="<your entra external id tenant name>"

### login to azure
Connect-AzAccount -Tenant $tenantid -SubscriptionId $subscriptionid

# create the resource group
New-AzResourceGroup -Name $resourceGroupName -Location $location

# deploy the resource
New-AzResourceGroupDeployment -ResourceGroupName $resourceGroupName -TemplateUri https://raw.githubusercontent.com/Azure-Samples/azure-health-data-and-ai-samples/refs/heads/main/samples/fhir-aad-entra-external/entra-external-arm-template.json -directoryName $directoryName
Add a test user to the Microsoft Entra External ID tenant
Note
You're asked to set up multi-factor authentication (MFA) when signing in for the first time.
You need a test user in your Microsoft Entra External ID tenant to associate with a specific patient resource in the FHIR service and to verify that the authentication flow works as expected.
Sign in to the Microsoft Entra admin center.
If you have access to multiple tenants, use the Settings icon
 in the top menu to switch to your external tenant from the Directories + subscriptions menu. Here you're asked for MFA setup.
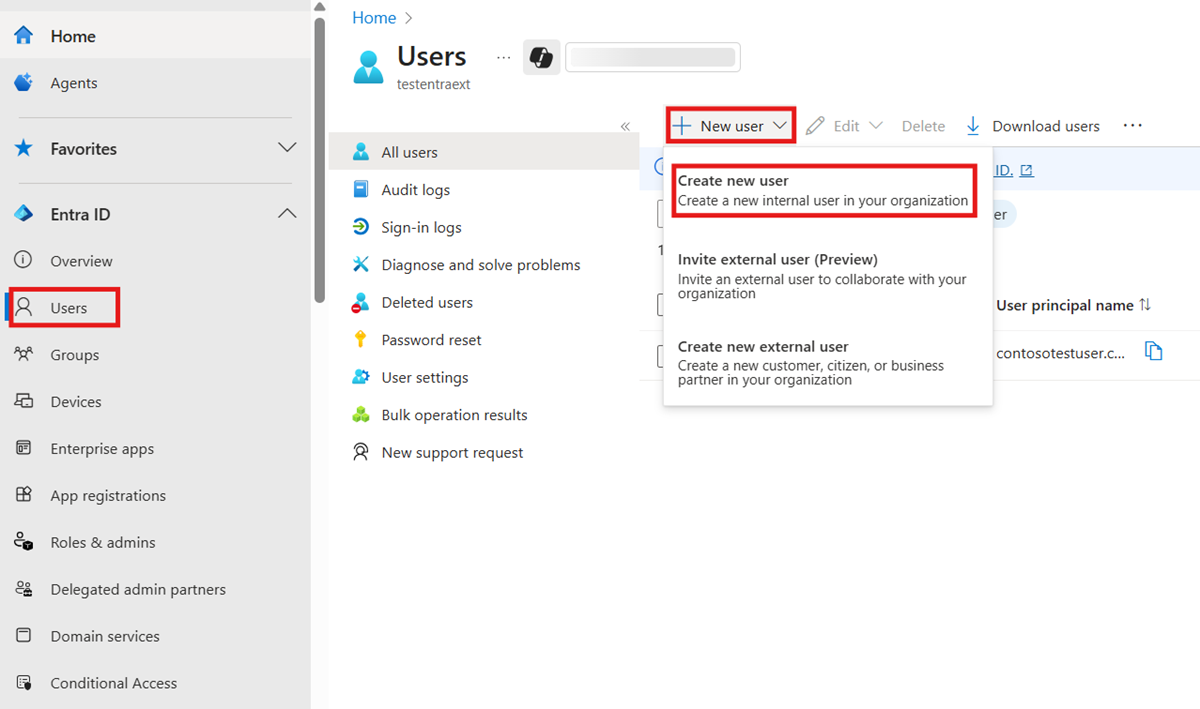
In the Users section of the Microsoft Entra admin center, select + New user, and then choose Create new user.
On the Basics tab, enter the User principal name and Display name, and then select Review + create.
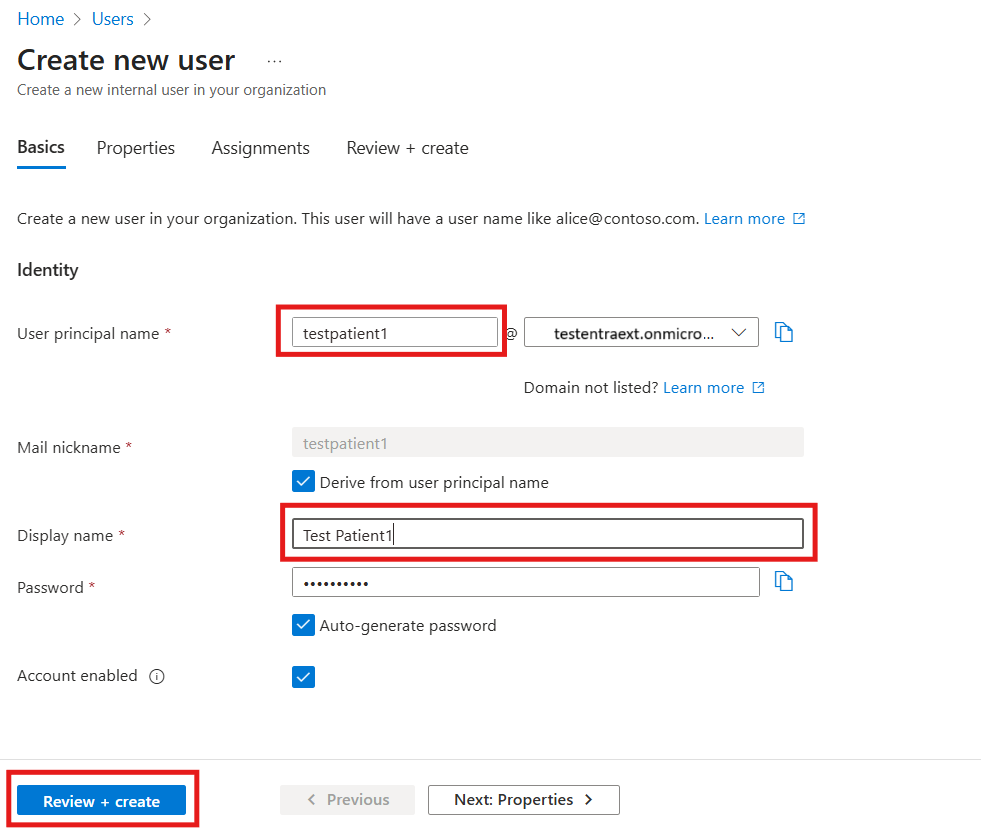
Review the information you entered to validate the input, and then select Create to create the user.
Link a Microsoft Entra External ID user with the fhirUser custom user attribute
Use the fhirUser custom user attribute to link a user in Microsoft Entra External ID with a corresponding patient resource in the FHIR service. In this example, you create a user named Test Patient1 in the Microsoft Entra External ID tenant. In a later step, you create a patient resource in the FHIR service. You associate the Test Patient1 user with the patient resource by setting the fhirUser attribute to the patient's FHIR resource identifier. For more information about custom attributes in Microsoft Entra External ID, see
User flow custom attributes in Microsoft Entra External ID.
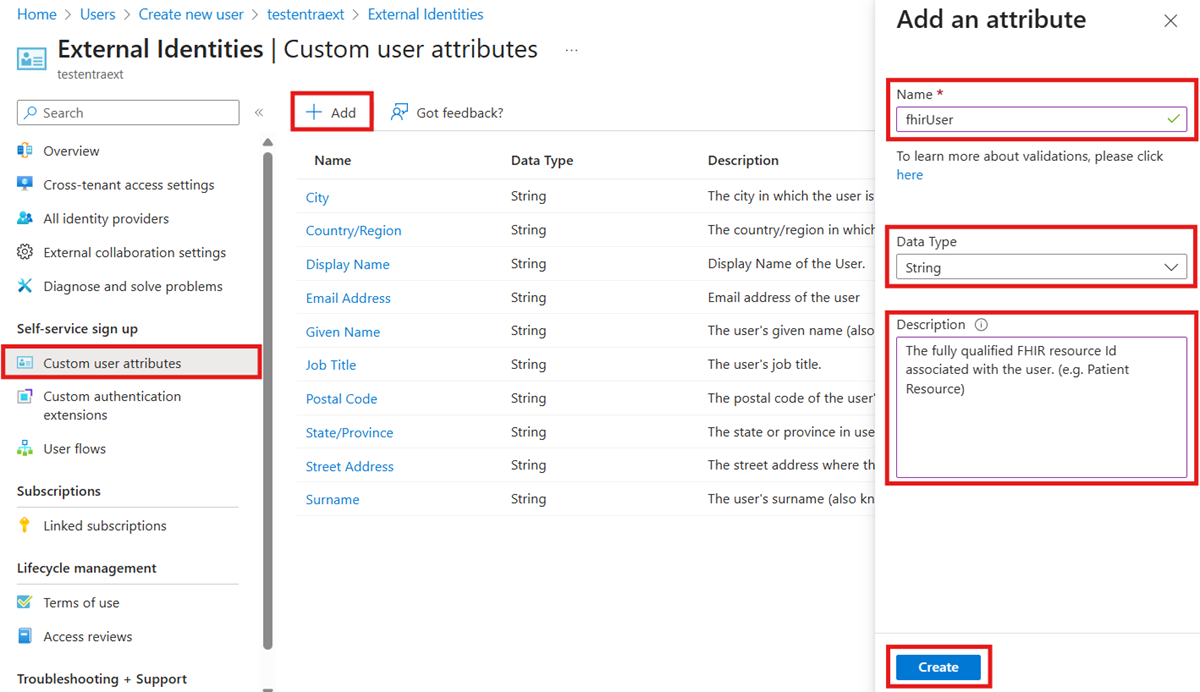
In the Microsoft Entra admin center, go to Entra ID > External Identities in the left pane.
Select Custom user attributes.
Select + Add.
In Add custom attribute:
In the Name field, enter fhirUser (case-sensitive).
From the Data Type dropdown list, select String.
In the Description field, enter a description for the custom attribute. For example, "The fully qualified FHIR resource ID associated with the user. (for example, Patient Resource)".
Select Create.
Create a new user flow in Microsoft Entra External ID
User flows define the sequence of steps users must follow to sign in. In this example, you define a user flow so that when a user signs in, the access token includes the fhirUser claim. For more information, see Create user flows and custom policies in Microsoft Entra External ID.
On Entra ID > External Identities, select User flows.
Select + New user flow.
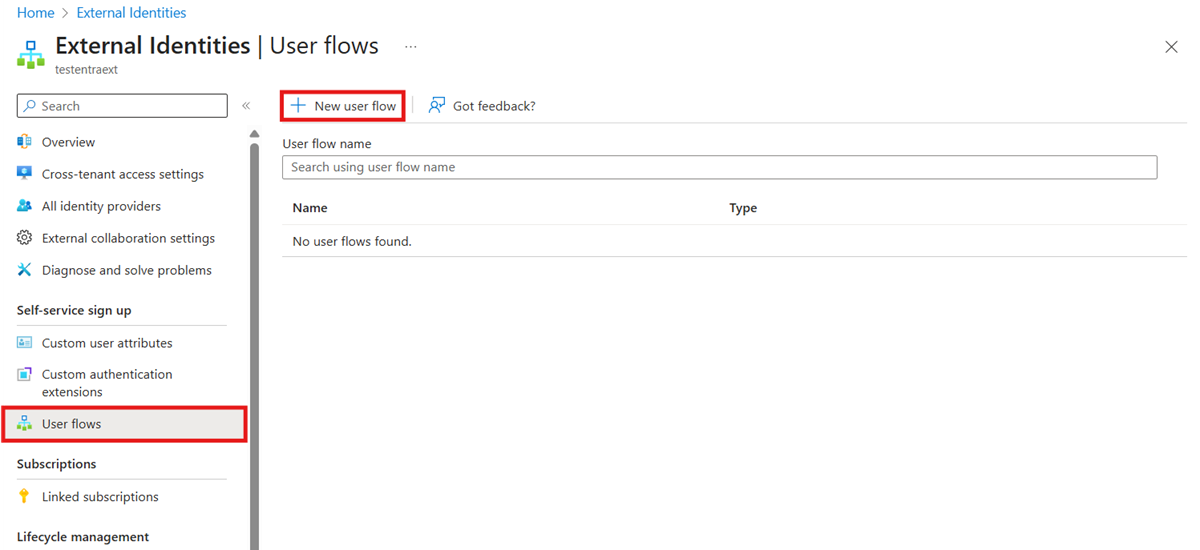
Enter a name for the user flow that's unique to the Microsoft Entra External ID tenant. The name doesn't need to be globally unique. In this example, the user flow name is USER_FLOW_1. Make note of the name.
Under Identity providers, keep Email with password selected (default).
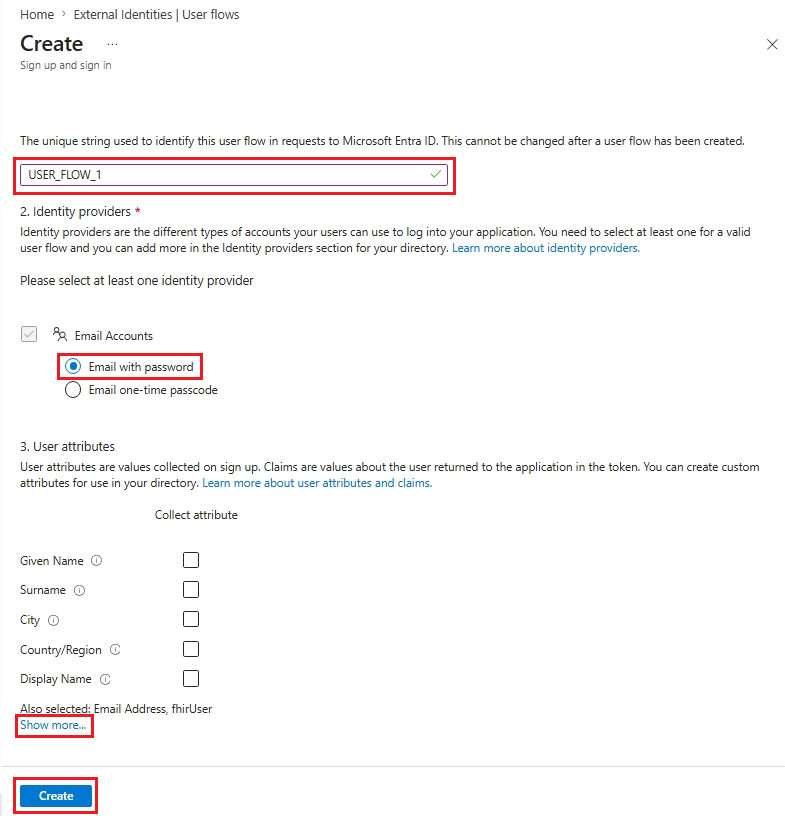
Under User attributes, select Show more to view more attributes.
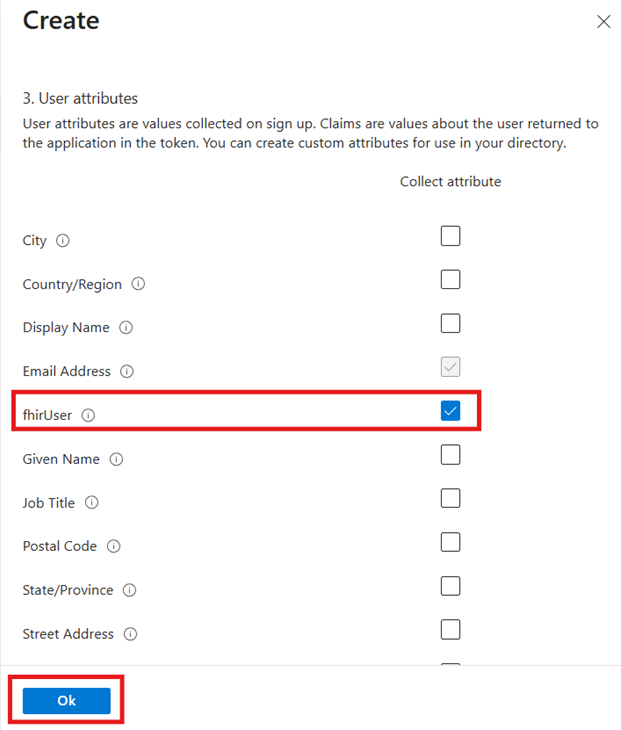
Select fhirUser.
Select Ok.
Select Create.
Create a Microsoft Entra External Resource Application
The Microsoft Entra External ID resource application handles authentication requests from your healthcare application to Microsoft Entra External ID.
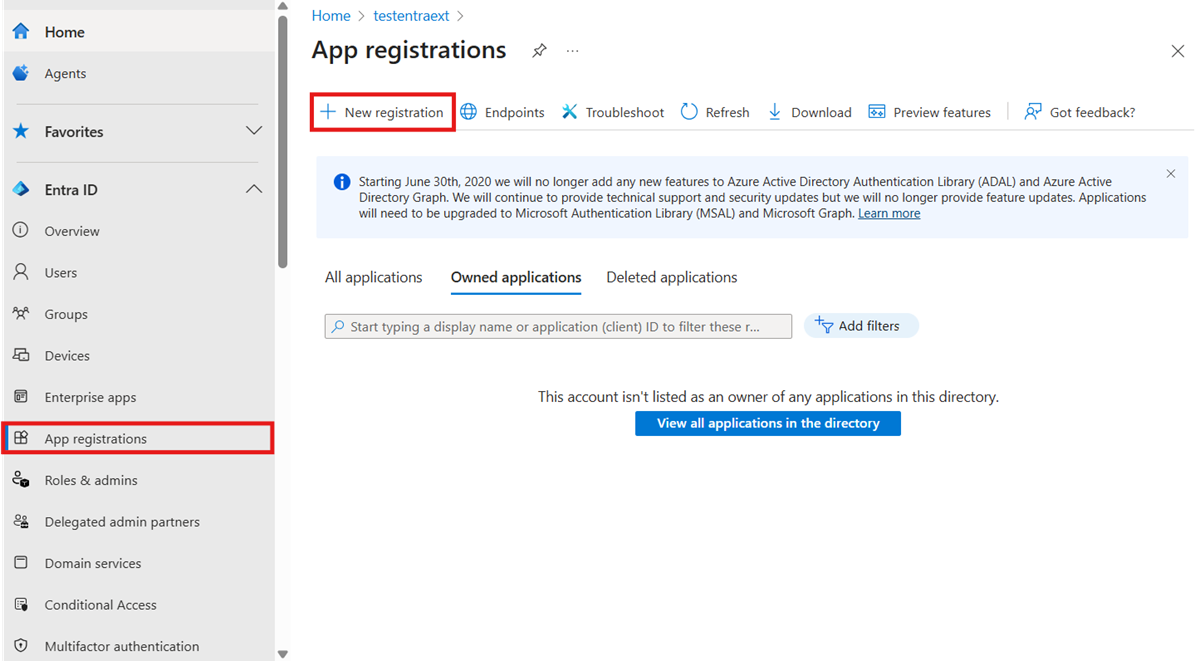
In the Microsoft Entra admin center, go to Entra ID > App registrations.
Select + New registration.
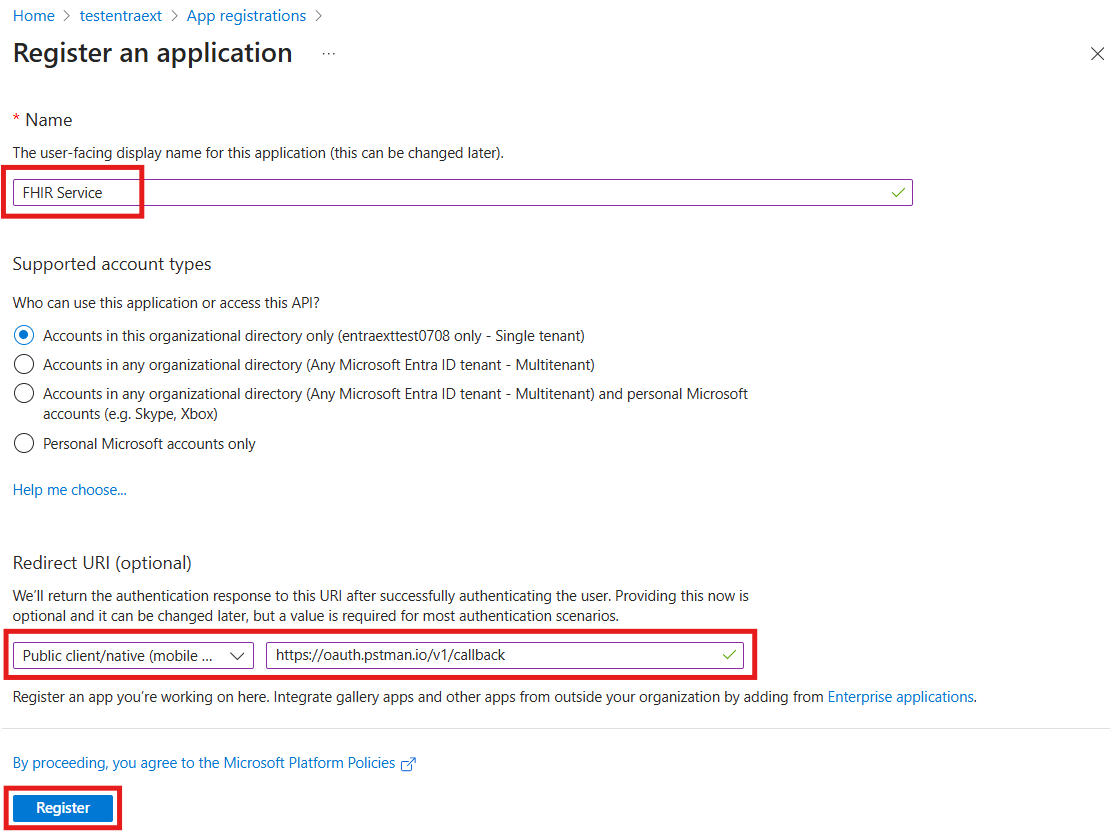
In Register an application:
Enter a display name. This example uses FHIR Service.
In the Redirect URI (recommended) drop-down list, select Public client/native (mobile & desktop). Enter the callback URI. This callback URI is for testing purposes.
Select Register. Wait for the application registration to complete. The browser automatically navigates to the application Overview page.
Configure API permissions for the app
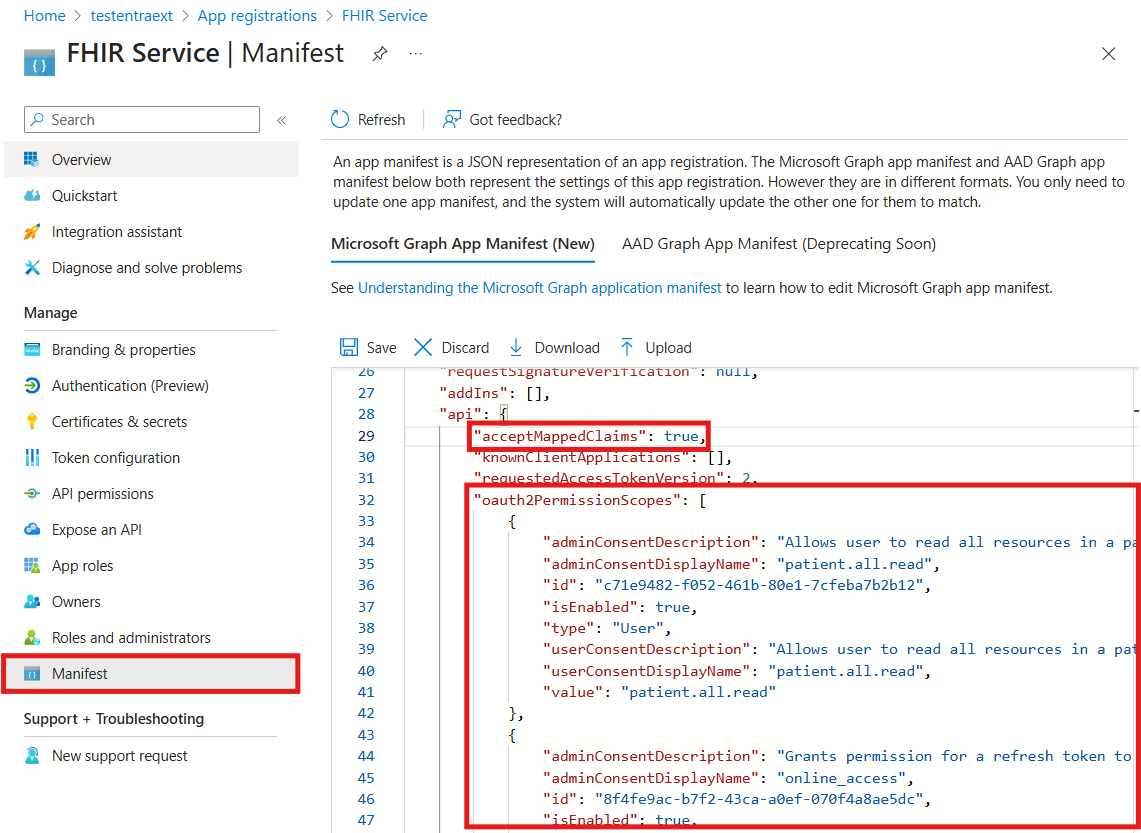
In the left pane, select App registrations, select the application you registered, and then select Manifest.
Scroll until you find the
oauth2PermissionScopesarray in the json code in Microsoft Graph App Manifest (New). Replace the array with one or more values from theoauth2Permissions.jsonfile. You can copy the entire array or individual permissions.
If you add a permission to the list, any user in the Microsoft Entra External ID tenant can get an access token with that API permission.
If a permission level isn't appropriate for all users, don't include it in the permission array. For example, the patient.all.read permission grants read access to all patient resources in the FHIR service. If you don't want all users to have this level of access, don't include patient.all.read in the oauth2PermissionScopes array.
In the same manifest, set the
acceptMappedClaimsproperty totrue. This setting enables the app to receive custom claims, likefhirUserin the token.Select Save.
Expose the web API and assign an application ID URI
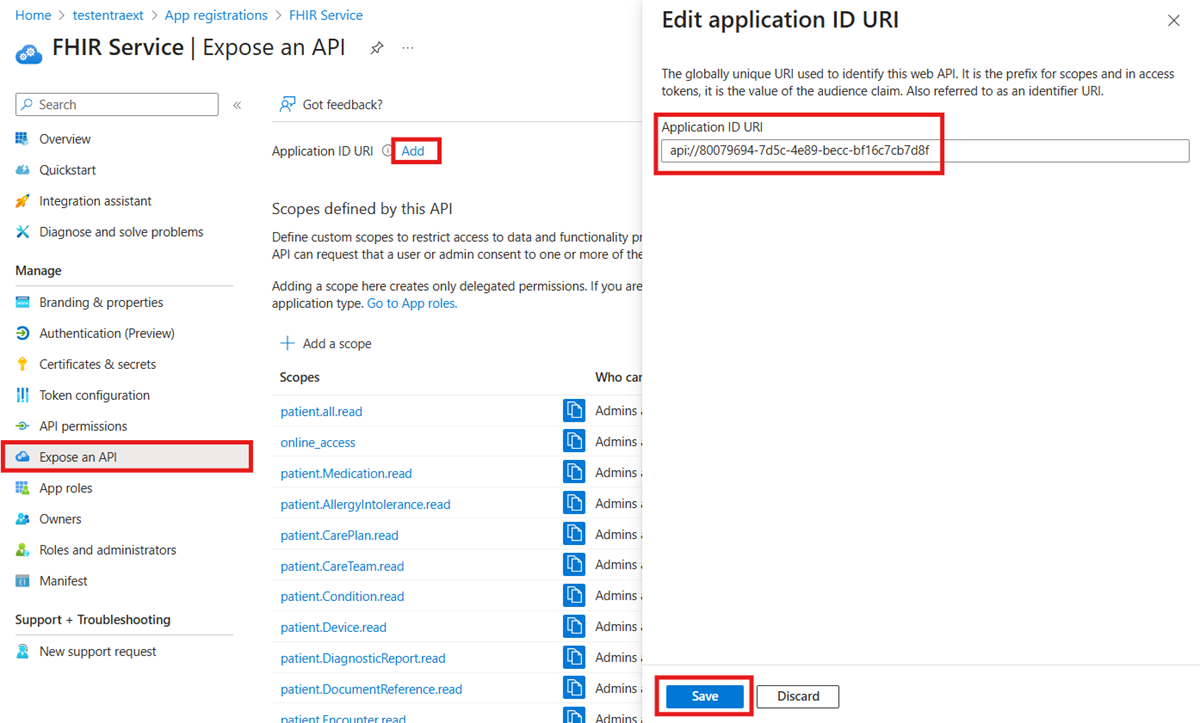
On App registrations select the application you registered, and then select Expose an API.
For the Application ID URI section, select Add.
By default, the Application ID URI field is populated with the application (client) ID. Change the value if desired.
Select Save.
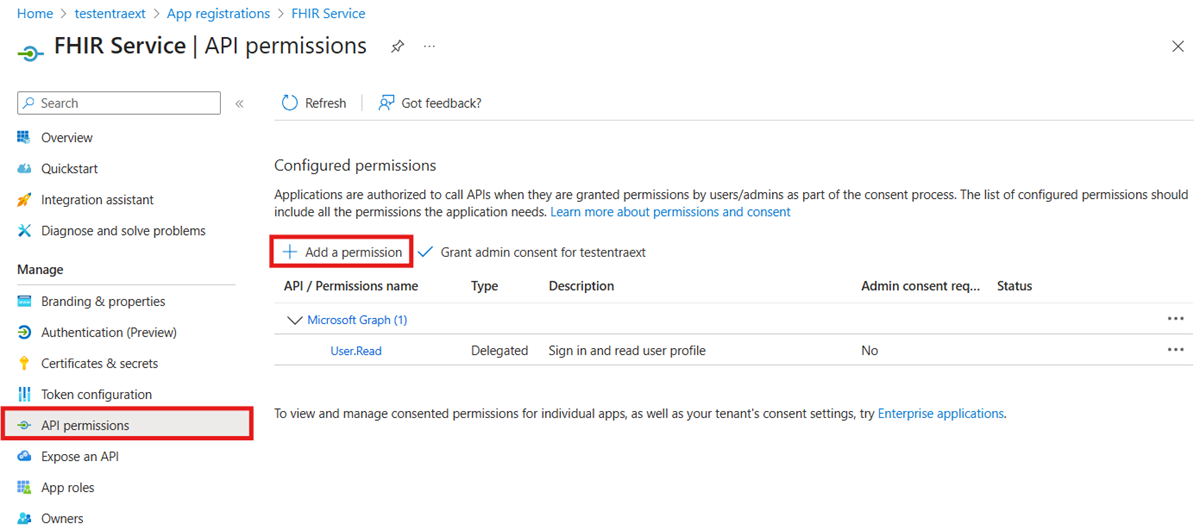
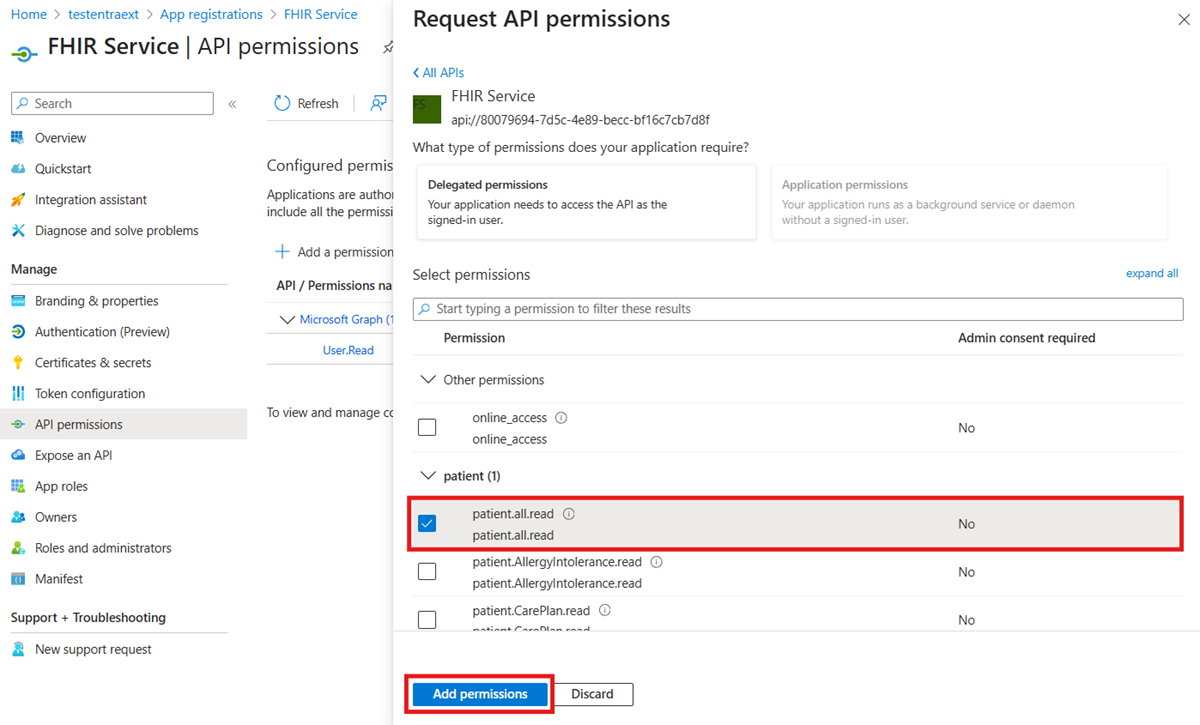
Select API permissions and then select + Add a permission.
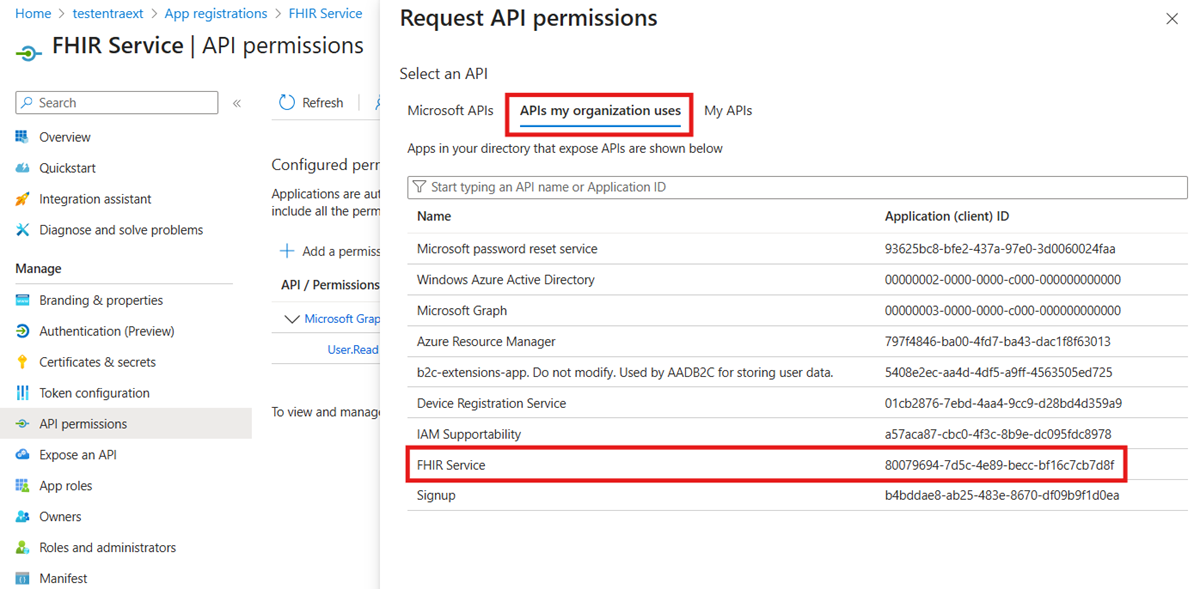
On Request API permissions, select APIs my organization uses.
Select the resource application from the list. For this example, select the application you registered in the previous section with the name FHIR Service.
Enter
Patientin the search box to filter the permissions list to show only permissions related to patient resources in the FHIR service.In the Patient section, select at least one permission. In this example, the permission
patient.all.readis selected, which means a user that requests an access token with the scopepatient.all.readhas Read privileges (patient.all.read) for all FHIR resources (patient.all.read) in the Patient compartment (patient.all.read) For more information, see Patient compartment.Select Add permissions.
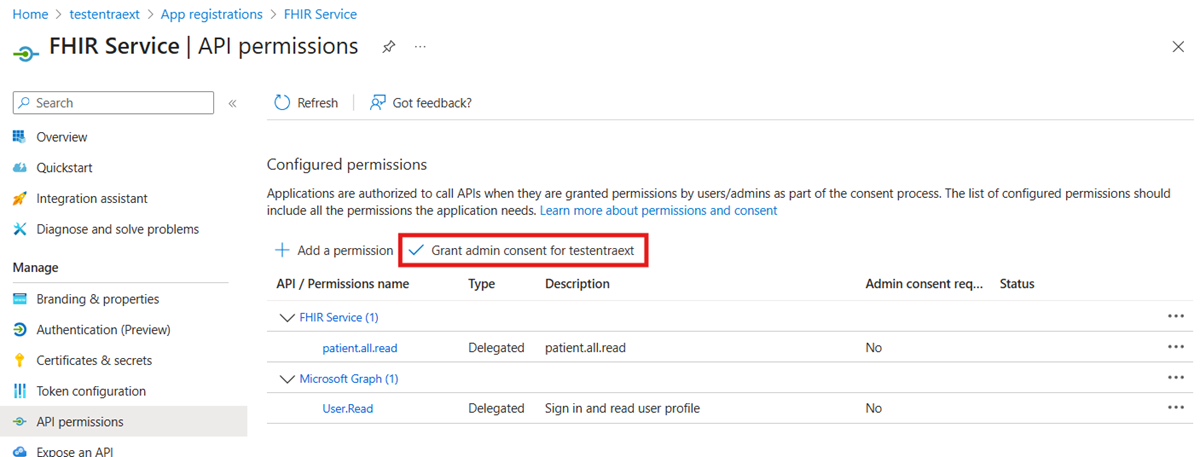
On API permissions in the Configured permissions section, select Grant admin consent.
Configure Single sign-on (Preview) for the app
Go to Entra External ID > Enterprise apps.
Select your registered application from the list.
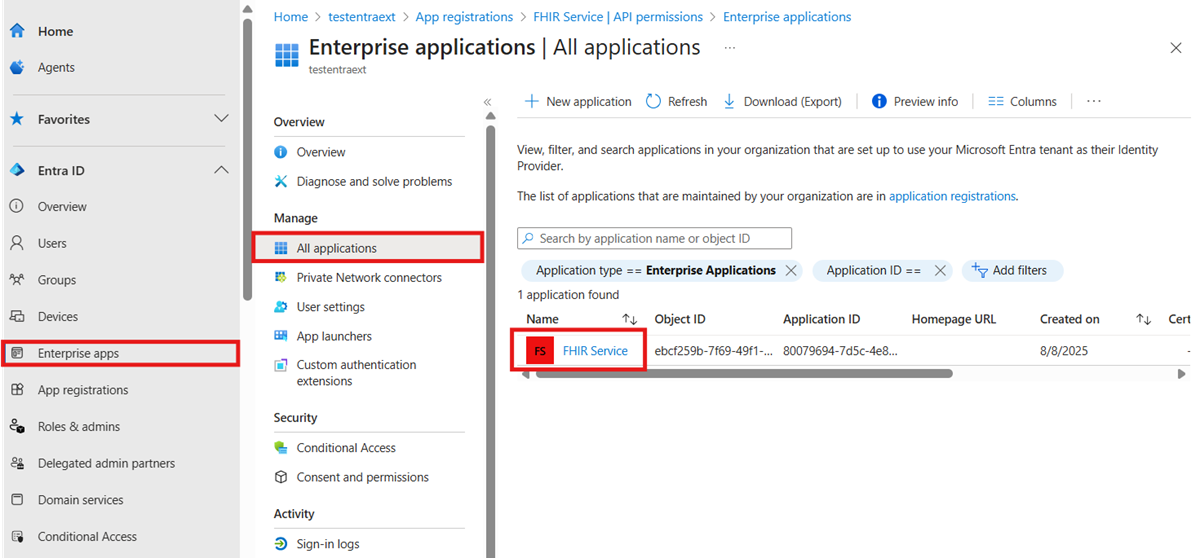
In your application’s pane, under Manage, select Single sign-on (Preview).
In the Attributes & Claims section, select Edit to configure the single sign-on settings.
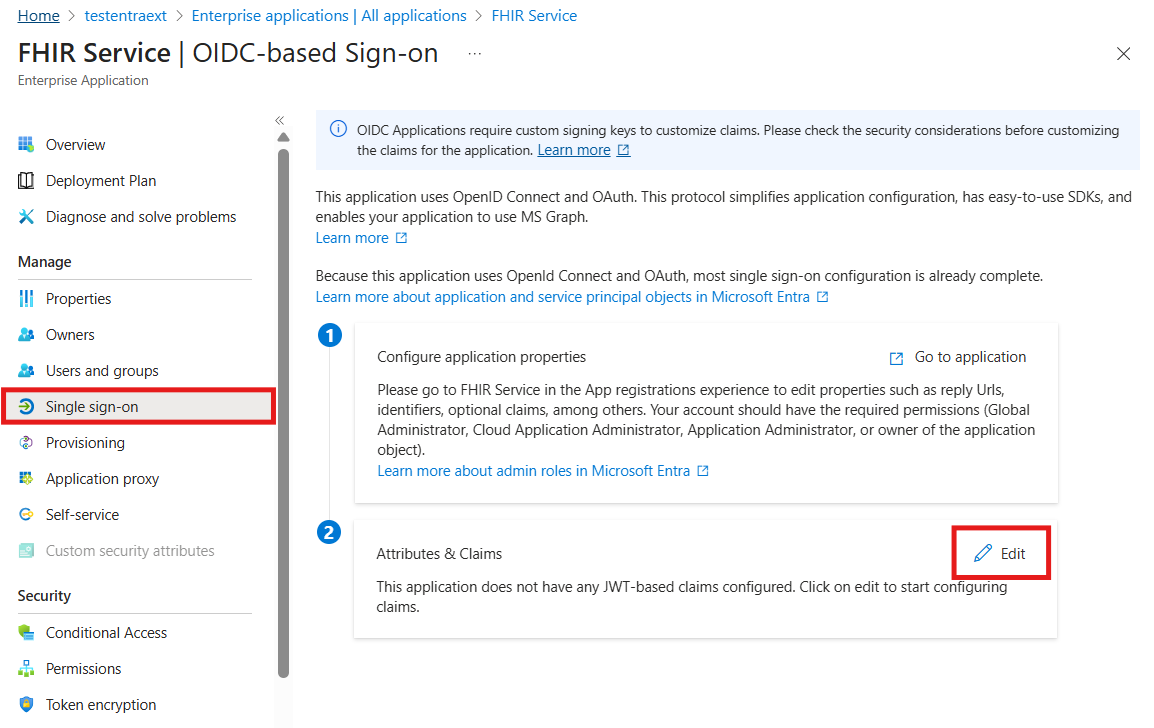
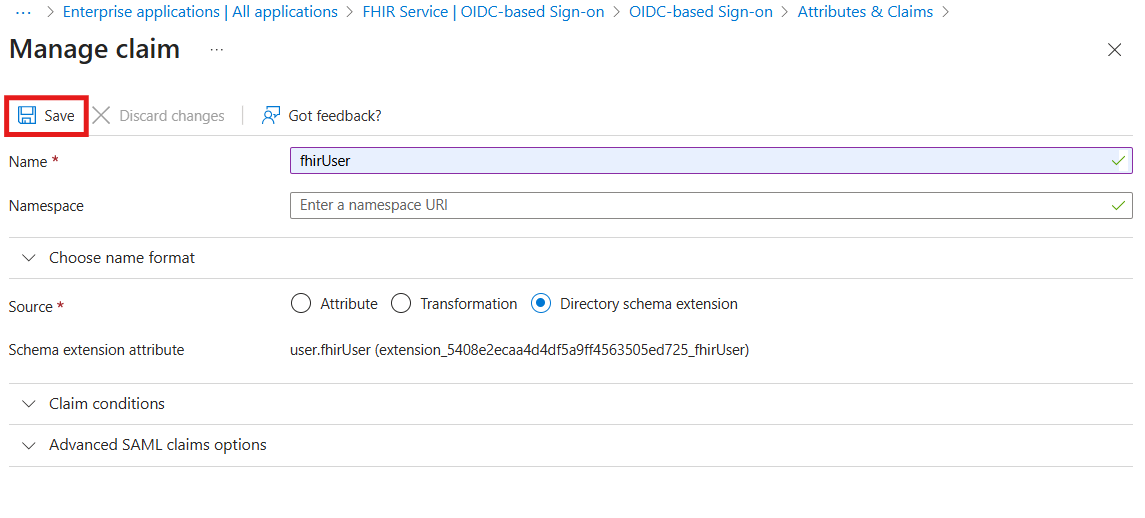
Under Attributes & Claims, select + Add new claim.
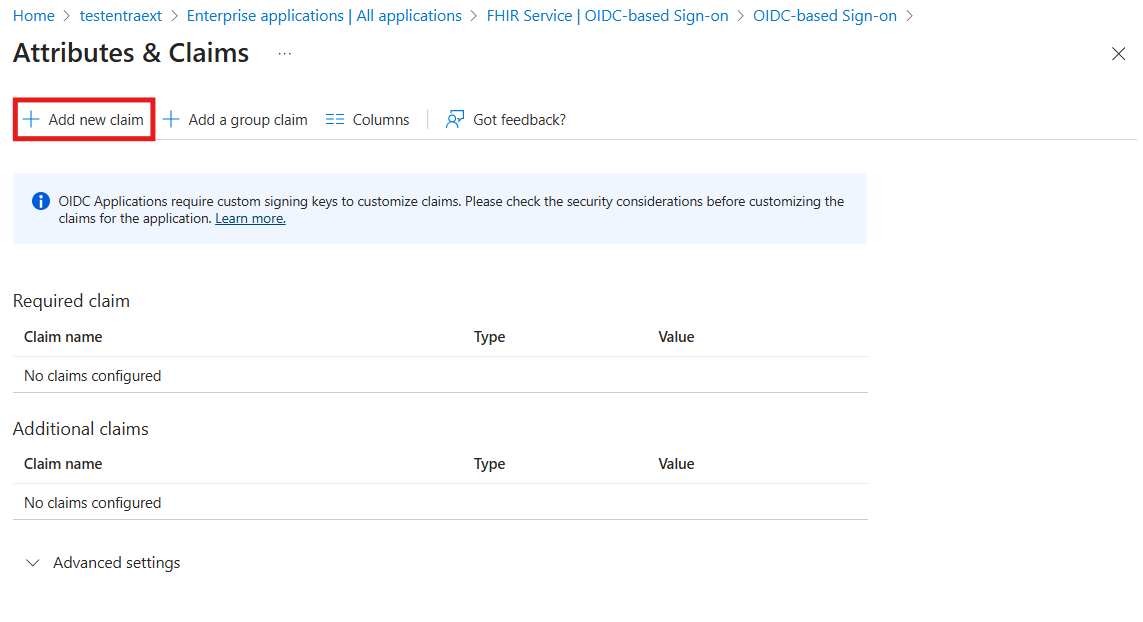
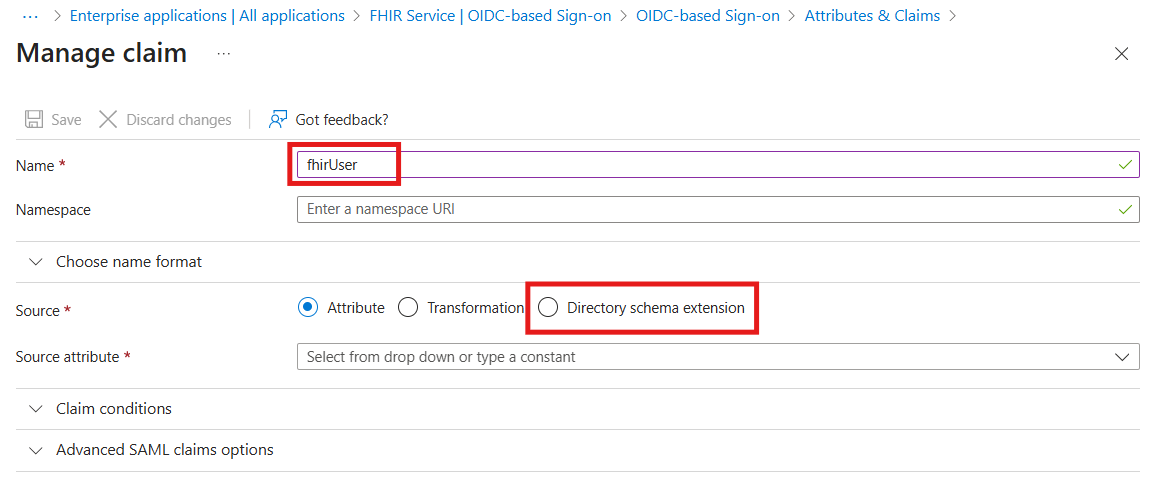
Configure the new claim:
Name:
fhirUserSource: Select Directory schema extension
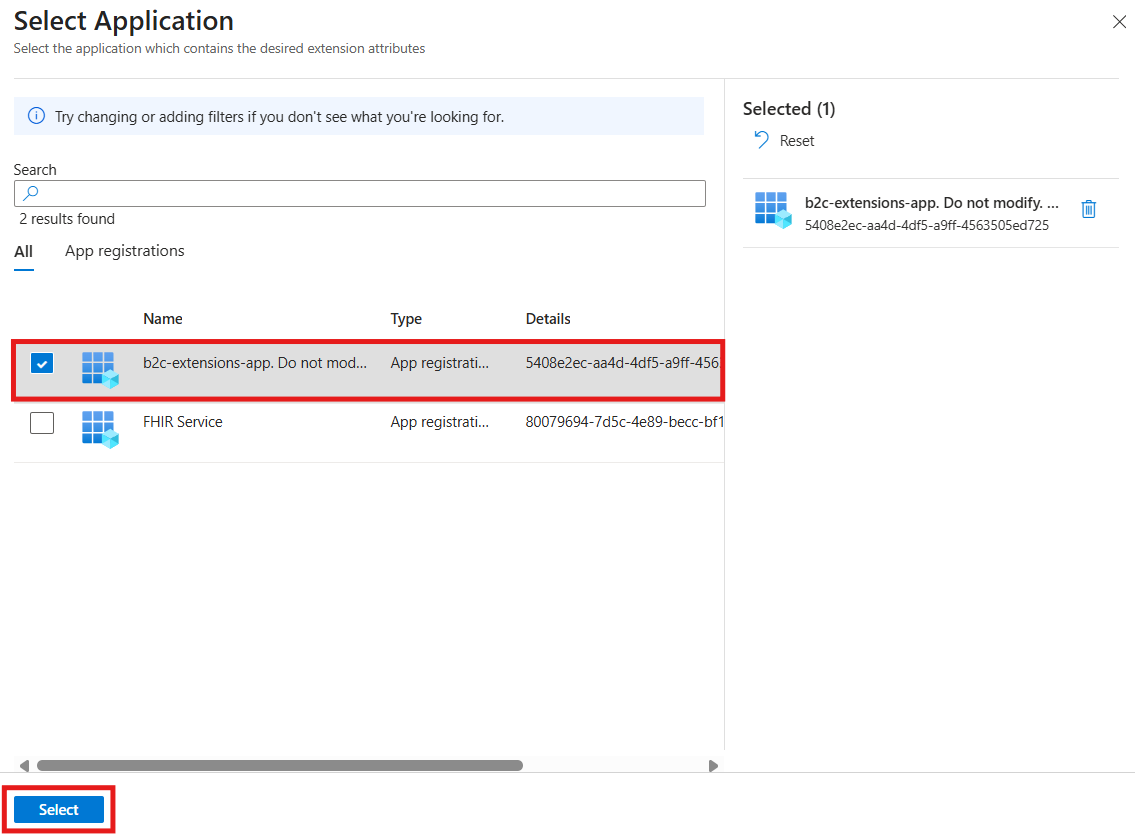
Source attribute: Select b2c-extensions-app
Select Select. This action opens the Add Extension Attributes window.
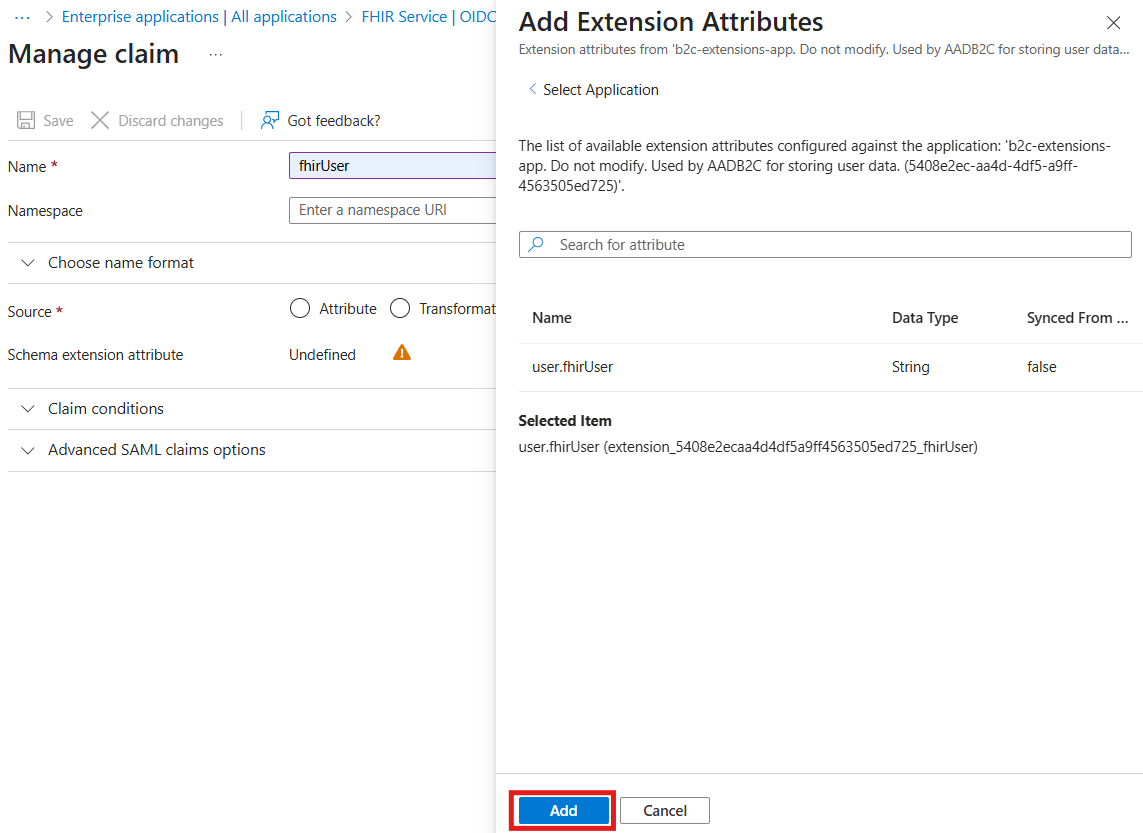
In the list, select the user.fhirUser attribute.
Select Add to include the attribute in the claim.
Select Save.
Deploy the FHIR service with Microsoft Entra External ID as the identity provider
When you deploy the FHIR service with Microsoft Entra External ID as the identity provider, the FHIR service authenticates users by using their Microsoft Entra External ID credentials. This authentication method ensures that only authorized users can access sensitive patient information.
Get the Microsoft Entra External ID authority and client ID
Use the authority and client ID (or application ID) parameters to configure the FHIR service to use a Microsoft Entra External ID tenant as an identity provider.
Create the authority string by using the name of the Microsoft Entra External ID tenant and the name of the user flow. Replace your tenant name and tenant ID in the following URL.
https://<your-external-id-tenant-name>.ciamlogin.com/<your-external-id-tenant-id>/v2.0Test the authority string by making a request to the
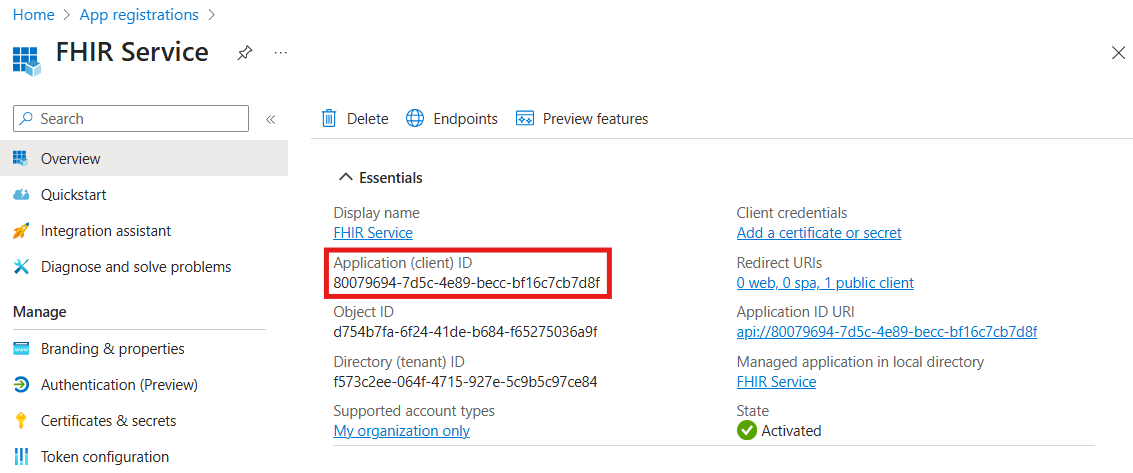
.well-known/openid-configurationendpoint. Enter the string into a browser to confirm it navigates to the OpenId Configuration JSON file. If the OpenId Configuration JSON fails to load, make sure the Microsoft Entra External ID tenant name and Microsoft Entra External ID tenant ID are correct. Replace your tenant name and tenant ID in the following URL.https://<your-external-id-tenant-name>.ciamlogin.com/<your-external-id-tenant-id>/v2.0/.well-known/openid-configurationRetrieve the client ID from the resource application overview page.
Deploy the FHIR service by using an ARM template
To simplify deploying the FHIR service, use an ARM template. Use PowerShell or Azure CLI to deploy the ARM template to your Azure subscription.
Use the following PowerShell script to deploy the FHIR service with Microsoft Entra External ID as the identity provider. Set the $smartAuthorityUrl variable to the authority string you created in the previous section, and set the $smartClientId variable to the client ID of the resource application you created in your external ID tenant.
The following script signs in to Azure, creates a resource group, and deploys the ARM template that creates the FHIR service with Microsoft Entra External ID as the identity provider. If you want to use an existing resource group, skip the "create resource group" step, or comment out the line starting with New-AzResourceGroup.
If you are using a locally stored ARM template, replace the -TemplateUri parameter with -TemplateFile and provide the local path to the ARM template JSON file.
Replace the <placeholder> values in the script with your actual Azure subscription details and desired configuration for the FHIR service deployment.
### variables
$tenantid="<your tenant id>"
$subscriptionid="<your subscription id>"
$resourcegroupname="<your resource group name>"
$region="<your desired region>"
$workspacename="<your workspace name>"
$fhirServiceName="<your fhir service name>"
$smartAuthorityUrl="<your authority>"
$smartClientId="<your client id>"

### Login to Azure
Connect-AzAccount

#Connect-AzAccount SubscriptionId $subscriptionid
Set-AzContext -Subscription $subscriptionid
Connect-AzAccount -Tenant $tenantid -SubscriptionId $subscriptionid

### create resource group
New-AzResourceGroup -Name $resourcegroupname -Location $region

### deploy the resource
New-AzResourceGroupDeployment -ResourceGroupName $resourcegroupname -TemplateUri https://raw.githubusercontent.com/Azure-Samples/azure-health-data-and-ai-samples/refs/heads/main/samples/fhir-aad-b2c/fhir-service-arm-template.json -tenantid $tenantid -region $region -workspaceName $workspacename -fhirServiceName $fhirservicename -smartAuthorityUrl $smartAuthorityUrl -smartClientId $smartClientId
Validate Microsoft Entra External ID users can access FHIR resources
The validation process involves creating a patient resource in the FHIR service, linking the patient resource to the Microsoft Entra External ID user, and configuring REST Client to get an access token for External ID users. After the validation process is complete, you can fetch the patient resource by using the External ID test user.
Use REST Client to get an access token
For steps to obtain the proper access to the FHIR service, see Access the FHIR service using REST Client.
When you follow the steps in the Get the FHIR patient data section, the request returns an empty response because the FHIR service is new and doesn't have any patient resources.
Create a patient resource in the FHIR service
Users in the Microsoft Entra External ID tenant can't read any resources until you link the user (such as a patient or practitioner) to a FHIR resource. A user with the FhirDataWriter or FhirDataContributor role in the Microsoft Entra ID where the FHIR service is tenanted must perform this step.
- Create a patient with a specific identifier by changing the method to
PUTand executing a request to{{fhirurl}}/Patient/1with this body:
{
    "resourceType": "Patient",
    "id": "1",
    "name": [
        {
            "family": "Patient1",
            "given": [
                "Test"
            ]
        }
    ]
}
- Verify the patient is created by changing the method back to
GETand verifying that a request to{{fhirurl}}/Patientreturns the newly created patient.
Link the patient resource to Microsoft Entra External ID User
Create an explicit link between the test user in the Microsoft Entra External ID tenant and the resource in the FHIR service. Use extension attributes in Microsoft Graph to define this link. For more information, see Create custom user attributes in Microsoft Entra External ID.
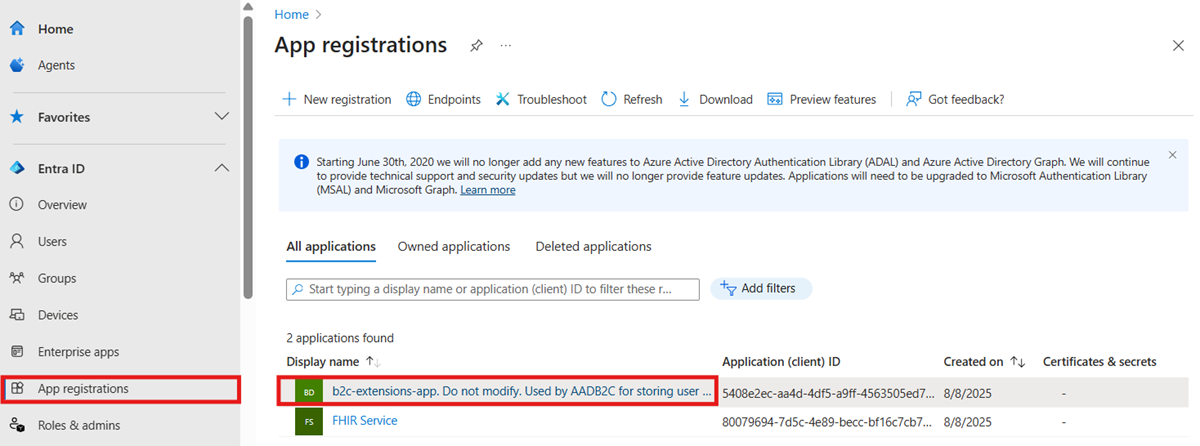
Go to the Microsoft Entra External ID tenant. On the left pane, choose App registrations.
Select All applications.
Select the application with the prefix b2c-extensions-app.
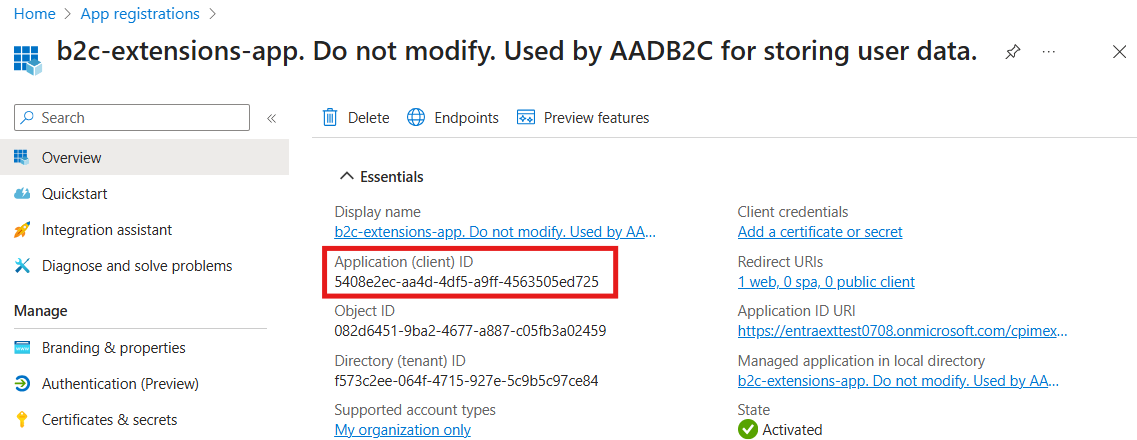
Note the Application (client) ID value.
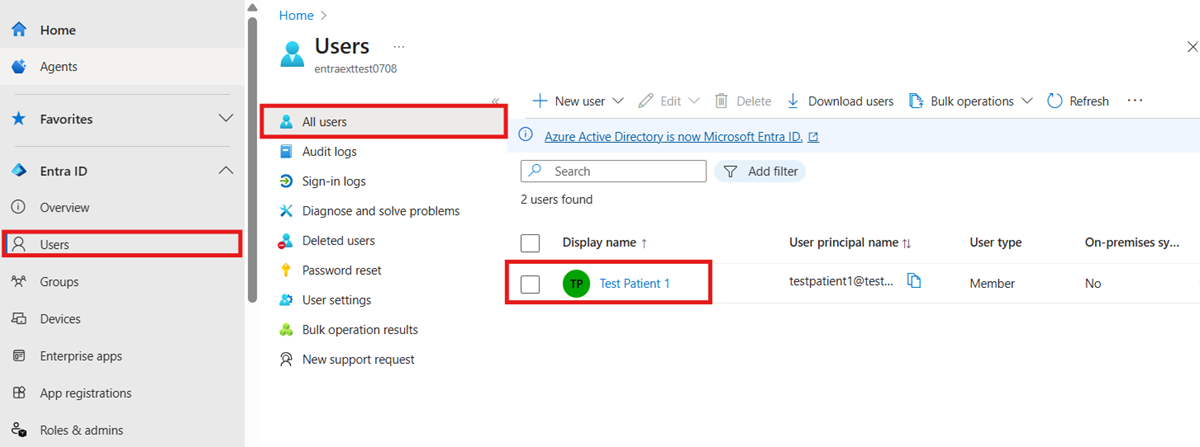
Navigate back to the Microsoft Entra External ID tenant home page, on the left pane select Users.
Under Users > All users, select Test Patient1.
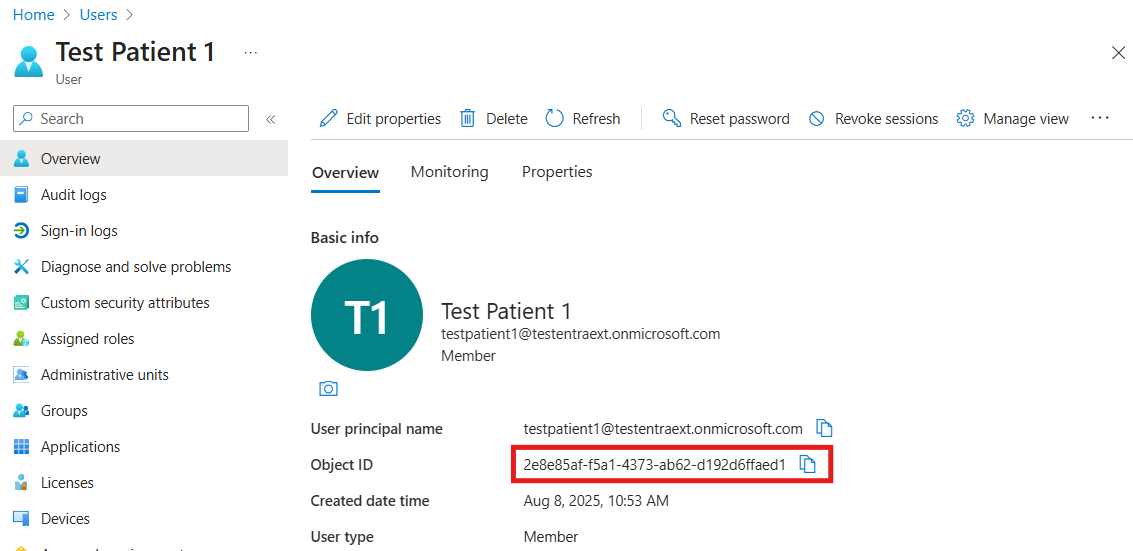
Note the Object ID.
Open Microsoft Graph Explorer Sign in with a user assigned to the Global Administrator role for the Microsoft Entra External ID tenant. (It's a good idea to create a new admin user in the Microsoft Entra tenant to manage users.)
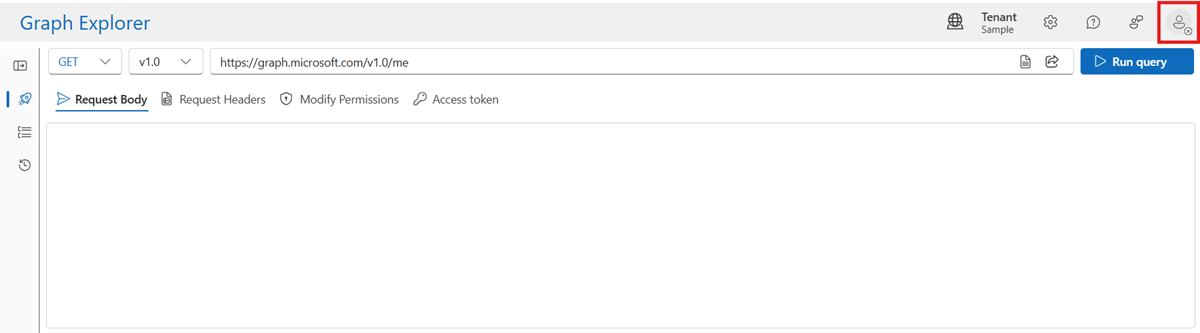
Select the avatar for the user, and then choose Consent to permissions.
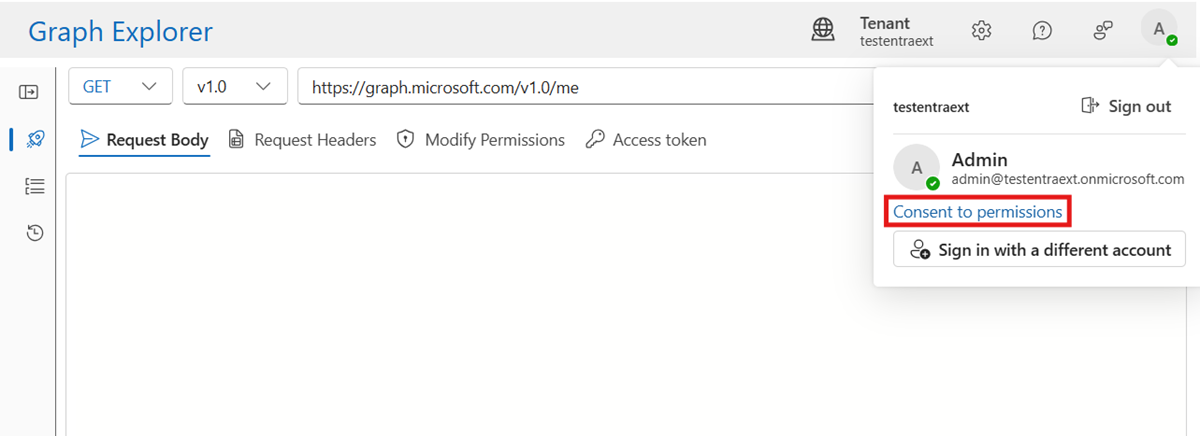
Scroll to User. Consent to
User.ReadWrite.All. This permission allows you to update the Test Patient1 user with thefhirUserclaim value.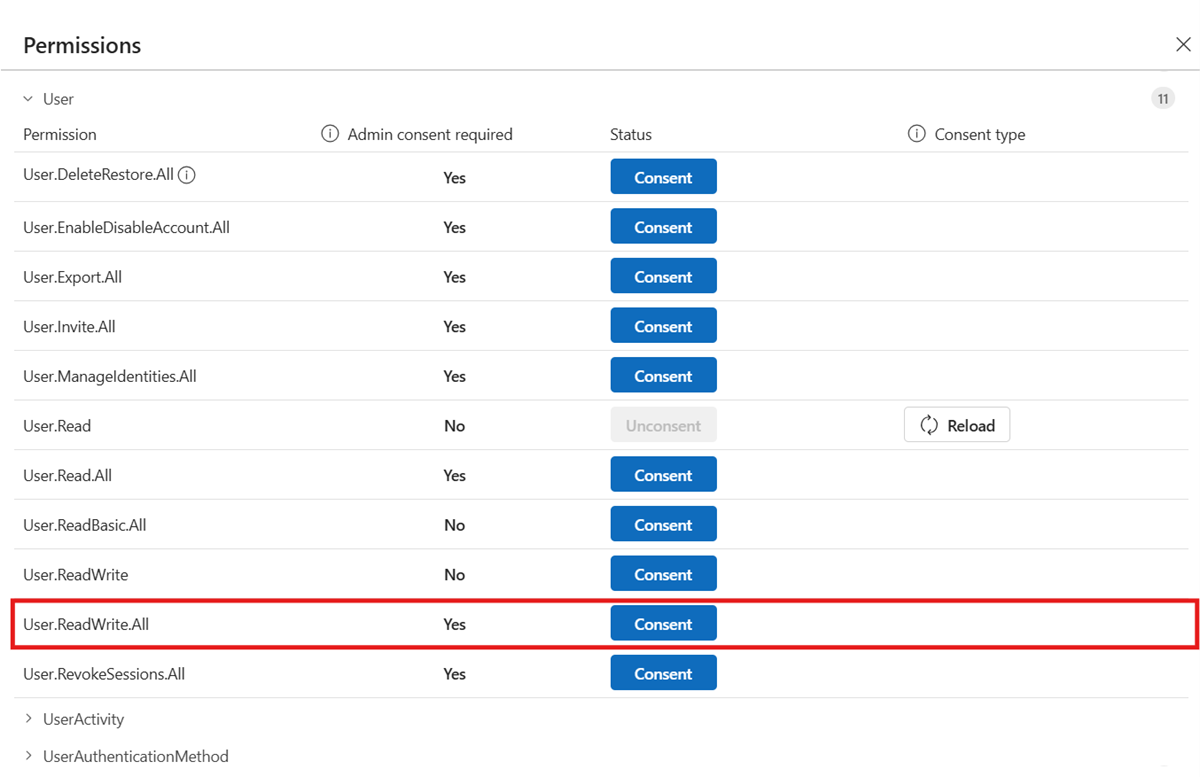
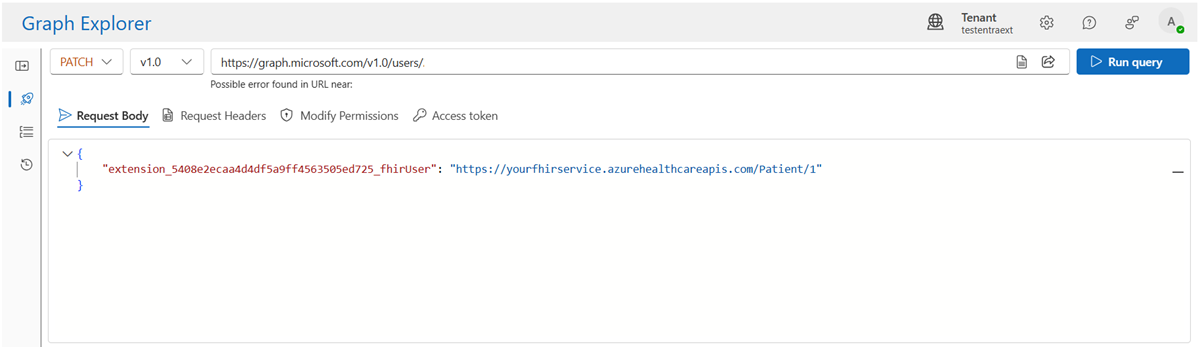
After the consent process completes, update the user. You need the b2c-extensions-app application (client) ID and the user Object ID.
Change the method to
PATCH.Change the URL to https://graph.microsoft.com/v1.0/users/{USER_OBJECT_ID}.
Create the
PATCHbody. APATCHbody is a single key-value-pair, where the key format isextension_<B2C-extensions-app-id>_fhirUserand the value is the fully qualified FHIR resource ID for the patienthttps://<your-fhir-service>.azurehealthcareapis.com/Patient/Patient1". Remove the hyphens from the b2c-extensions-app application (client) ID when you create the key.
For example:
{
  "extension_00001111aaaa2222bbbb3333cccc4444_fhirUser": "https://myworkspace-myfhirservice.fhir.azurehealthcareapis.com/Patient/Patient1"
}
For more information, see Manage extension attributes through Microsoft Graph.
After the request is formatted, choose Run query. Wait for a successful response that confirms the user in the Microsoft Entra External ID tenant is linked to the patient resource in the FHIR service.
Configuration to get an access token for Microsoft Entra External ID users
Get an access token to test the authentication flow.
Note
The grant_type of authorization_code is used to get an access token.
Online tools are available that offer intuitive interfaces for API testing and development.
Launch the API testing application.
Select the Authorization tab in the tool.
In the Type dropdown list, select OAuth 2.0.
Enter the following values.
Callback URL. You configure this value when you create the Microsoft Entra External ID resource application.
Auth URL. Create this value by using the name of the Microsoft Entra External ID tenant and the Microsoft Entra External ID tenant ID. Replace your tenant name and tenant ID in the following URL.
https://<your-external-id-tenant-name>.ciamlogin.com/<your-external-id-tenant-id>/oauth2/v2.0/authorizeAccess Token URL. Create this value by using the name of the Microsoft Entra External ID tenant and the Microsoft Entra External ID tenant ID. Replace your tenant name and tenant ID in the following URL.
https://<your-external-id-tenant-name>.ciamlogin.com/<your-external-id-tenant-id>/oauth2/v2.0/tokenClient ID: This value is the application (client) ID of the Microsoft Entra External resource application.
Scope. Define this value in the Microsoft Entra External ID resource application in the Expose an API section. The scope granted permission is
patient.all.read. The scope request must be a fully qualified URL, for example,https://testentraexternal.onmicrosoft.com/fhir/patient.all.read.Copy the fully qualified scope from the Expose an API section of the Microsoft Entra External resource application. Example: your-application-id-uri/patient.all.read
Fetch the patient resource by using the Microsoft Entra External ID user
Verify that Microsoft Entra External ID users can access FHIR resources.
When you set up the authorization configuration to launch the Microsoft Entra External ID user flow, select Get New Access Token to get an access token.
Use the Test Patient credentials to sign in.
Copy the access token and use it in fetching the Patient data.
To fetch the patient resource, follow the steps in the Get the FHIR patient data guide:
Select Send Request.
Verify that the response contains the single patient resource.
Next steps
Note
FHIR® is a registered trademark of HL7 and is used with the permission of HL7.