Bilješka
Pristup ovoj stranici zahtijeva provjeru vjerodostojnosti. Možete pokušati da se prijavite ili promijenite direktorije.
Pristup ovoj stranici zahtijeva provjeru vjerodostojnosti. Možete pokušati promijeniti direktorije.
This article shows you how to build and deploy custom Akri connectors for Azure IoT Operations. The example in this article shows how to build a REST connector that polls a REST endpoint for thermostat data such as current and desired temperature values.
The article uses the aiopollingtelemetryconnector .NET project template to scaffold the connector project in Visual Studio Code.
After you develop a custom Akri connector, you deploy it and make it visible in the operations experience by packaging it with a valid configuration file, pushing it to a container registry, and registering it as a connector type in the Azure portal.
For more information about developing Akri connectors by using the VS Code extension, see Build Akri connectors in VS Code.
Prerequisites
Development environment:
- Docker
- Visual Studio Code
- .NET 9 SDK
To deploy the connector to your Azure IoT Operations instance:
- Azure CLI
- ORAS CLI
- A container registry endpoint configured on your Azure IoT Operations instance. For more information, see Configure container registry endpoints. For simplicity, this article assumes you're using an Azure Container Registry configured for anonymous pull access.
The Azure CLI examples in this article use environment variables so that you can set each value once and then copy and paste the commands as-is. If you're using the Azure IoT Operations Codespaces environment from the quickstart, these variables are already set for you and you can skip this step. Otherwise, set the following environment variables in your shell before you run the commands.
The following scripts set the most commonly used environment variables:
| Environment variable | Description |
|---|---|
SUBSCRIPTION_ID |
The ID of the subscription that contains your Azure IoT Operations instance. |
RESOURCE_GROUP |
The name of the resource group that contains your Azure IoT Operations instance. |
AIO_INSTANCE_NAME |
The name of your Azure IoT Operations instance. To list your instances, run az iot ops list -o table. |
CLUSTER_NAME |
The name of the Azure Arc-enabled Kubernetes cluster that hosts your instance. |
LOCATION |
The Azure region to use for new resources, for example eastus. |
SUBSCRIPTION_ID=<subscription-id>
RESOURCE_GROUP=<resource-group-name>
AIO_INSTANCE_NAME=<instance-name>
CLUSTER_NAME=<cluster-name>
LOCATION=<region>
You only need to set the variables that this article uses. This article might use additional environment variables for resource names that you choose. The article explains how to set them where they're introduced.
This article also uses the ACR_NAME environment variable for the name of your Azure Container Registry. Set it before you run the related commands.
Scenario overview
Create a custom connector that connects to a RESTful service exposing thermostat data. The connector retrieves the current and desired temperature data points and publishes them as messages to the MQTT broker. You then use a data flow to read the messages from the MQTT broker and publish them to an Azure Event Hubs namespace.
To implement this scenario, complete the following tasks:
- Build a connector by using a project template from the Azure IoT Operations .NET SDK. The connector reads from a RESTful service that exposes thermostat data points and publishes the data to the MQTT broker.
- Publish the connector image to the container registry associated with your Azure IoT Operations instance.
- Create the connector metadata configuration file and publish it to the container registry.
- Create a connector template instance from your connector in your Azure IoT Operations instance by using the Azure portal.
- Deploy a sample REST server that exposes thermostat data for the connector to consume.
- Create a device and asset in the operations experience web UI. The device includes an endpoint definition that uses your connector template instance.
- Test the scenario by creating a data flow that reads messages from the MQTT broker and writes them to an event hub.
Create project
To install the .NET project templates for Azure IoT Operations, run the following command:
dotnet new install Azure.Iot.Operations.Templates
To create a project to build an Akri connected called MyConnector, run the following commands from a terminal:
dotnet new aiopollingtelemetryconnector -o MyConnector
cd MyConnector

# Verify the project builds
dotnet build
Implement the connector
The following steps assume you created a .NET project called MyConnector.
Important
The following example code is for illustrative purposes only and is not intended to be used in production. In a production connector, you should implement robust error handling and retry logic, and ensure that any credentials used to connect to the asset are stored and used securely. A production quality connector must implement the contract described in the Akri operator and connector contract document in the SDKs repository.
To represent the thermostat status, create a file called ThermostatStatus.cs in the MyConnector folder in the workspace with the following content. This file models the JSON response from the REST endpoint:
using System.Text.Json.Serialization;

namespace MyConnector
{
    internal class ThermostatStatus
    {
        [JsonPropertyName("desiredTemperature")]
        public double? DesiredTemperature { get; set; }

        [JsonPropertyName("currentTemperature")]
        public double? CurrentTemperature { get; set; }
    }
}
Implement the SampleDatasetAsync method in the provided DatasetSampler class. The method takes a Dataset as a parameter. A Dataset contains the data points for the connector to process.
Open the file
MyConnector/DatasetSampler.csin your VS Code workspace.To pass in the required data for processing the endpoint data, add a constructor to the
DatasetSamplerclass. The class uses theHttpClientandEndpointProfileCredentialsto connect to and authenticate with the asset endpoint. Add the JSON serializer options and theDisposeAsyncmethod to clean up theHttpClientwhen theDatasetSampleris disposed:private readonly HttpClient _httpClient; private readonly string _assetName; private readonly EndpointCredentials? _credentials; private readonly static JsonSerializerOptions _jsonSerializerOptions = new() { AllowTrailingCommas = true, }; public DatasetSampler(HttpClient httpClient, string assetName, EndpointCredentials? credentials) { _httpClient = httpClient; _assetName = assetName; _credentials = credentials; } public ValueTask DisposeAsync() { _httpClient.Dispose(); return ValueTask.CompletedTask; }Modify the
GetSamplingIntervalAsyncmethod to return a sampling interval of three seconds:public Task<TimeSpan> GetSamplingIntervalAsync(AssetDataset dataset, CancellationToken cancellationToken = default) { return Task.FromResult(TimeSpan.FromSeconds(3)); }Note
For simplicity, this example uses a fixed sampling interval. In a production connector, you can make the sampling interval configurable by using the connector metadata to define a sampling interval property that a user can set in the operations experience UI.
Replace the existing
SampleDatasetAsyncmethod with the following outline:public async Task<byte[]> SampleDatasetAsync(AssetDataset dataset, CancellationToken cancellationToken = default) { int retryCount = 0; while (true) { try { // TODO: Implement your dataset sampling logic here. } catch (Exception ex) { if (++retryCount >= 3) { throw new InvalidOperationException($"Failed to sample dataset with name {dataset.Name} in asset with name {_assetName}. Error: {ex.Message}", ex); } await Task.Delay(1000, cancellationToken); } } }In the
tryblock in theSampleDatasetAsyncmethod, add the following code to retrieve the temperature data from theDataSetand extract the data source paths. These paths are part of the URLs used to fetch the data from the REST endpoint. ThecurrentTemperatureanddesiredTemperaturedata points were modeled previously in theThermostatStatusclass:if (_credentials != null && _credentials.Username != null && _credentials.Password != null) { // Note that this sample uses username + password for authenticating the connection to the asset. In general, // x509 authentication should be used instead (if available) as it is more secure. string httpServerUsername = _credentials.Username; string httpServerPassword = _credentials.Password; var byteArray = Encoding.ASCII.GetBytes($"{httpServerUsername}:{httpServerPassword}"); _httpClient.DefaultRequestHeaders.Authorization = new AuthenticationHeaderValue("Basic", Convert.ToBase64String(byteArray)); } ThermostatStatus mergedStatus = new(); foreach (var dataPoint in dataset.DataPoints) { string path = dataPoint.DataSource!; var response = await _httpClient.GetAsync(path, cancellationToken); if (response.StatusCode == System.Net.HttpStatusCode.Unauthorized) { throw new Exception("Failed to authorize request to HTTP server. Check credentials configured in rest-server-device-definition.yaml."); } response.EnsureSuccessStatusCode(); var bytes = await response.Content.ReadAsByteArrayAsync(cancellationToken); ThermostatStatus partial = JsonSerializer.Deserialize<ThermostatStatus>(bytes, _jsonSerializerOptions)!; if (partial.CurrentTemperature.HasValue) { mergedStatus.CurrentTemperature = partial.CurrentTemperature; } if (partial.DesiredTemperature.HasValue) { mergedStatus.DesiredTemperature = partial.DesiredTemperature; } } return JsonSerializer.SerializeToUtf8Bytes(mergedStatus, _jsonSerializerOptions);Tip
Optionally, the connector can register a schema in the schema registry to enable other Azure IoT Operations to understand the format of the messages.
Finally, import the necessary types:
using Azure.Iot.Operations.Connector;
using Azure.Iot.Operations.Connector.Files;
using Azure.Iot.Operations.Services.AssetAndDeviceRegistry.Models;
using System.Net.Http.Headers;
using System.Text;
using System.Text.Json;
The final version of the code looks similar to DatasetSampler.
Implement the CreateDatasetSampler method in the DatasetSamplerProvider class. This class creates DataSetSampler objects to inject into the application as required.
Open the
MyConnector/DatasetSamplerProvider.csfile in your VS Code workspace.In the
CreateDatasetSamplermethod, return aDatasetSampleralong with theendpointCredentials, if the dataset name isthermostat_status:if (dataset.Name.Equals("thermostat_status")) { if (device.Endpoints != null && device.Endpoints.Inbound != null && device.Endpoints.Inbound.TryGetValue(inboundEndpointName, out var inboundEndpoint)) { var httpClient = new HttpClient() { BaseAddress = new Uri(inboundEndpoint.Address), }; return new DatasetSampler(httpClient, assetName, endpointCredentials); } } throw new InvalidOperationException($"Unrecognized dataset with name {dataset.Name} on asset with name {assetName}");Note
For simplicity, this example assumes that the dataset name is always
thermostat_status. In a production connector, you can implement additional logic to handle multiple datasets.
The final version of the code looks similar to DatasetSamplerProvider.
Implement the MessageSchemaProvider class to register a message schema for the dataset. This step is optional but allows other Azure IoT Operations to understand the format of the messages from the connector:
Open the
MyConnector/MessageSchemaProvider.csfile in your VS Code workspace.Add a string to the class that contains the JSON schema for the
thermostat_statusdataset:private static readonly string _datasetJsonSchema = """ { "$schema": "https://json-schema.org/draft-07/schema#", "type": "object", "properties": { "desiredTemperature": { "type": "number" }, "currentTemperature": { "type": "number" } } } """;In the
GetMessageSchemaAsyncmethod, return the JSON schema for thethermostat_statusdataset:public Task<ConnectorMessageSchema?> GetMessageSchemaAsync(Device device, Asset asset, string datasetName, AssetDataset dataset, CancellationToken cancellationToken = default) { if (datasetName.Equals("thermostat_status", StringComparison.OrdinalIgnoreCase)) { ConnectorMessageSchema? schema = new ConnectorMessageSchema(_datasetJsonSchema, Azure.Iot.Operations.Services.SchemaRegistry.SchemaRegistry.Format.JsonSchemaDraft07, Azure.Iot.Operations.Services.SchemaRegistry.SchemaRegistry.SchemaType.MessageSchema, "1", null); return Task.FromResult((ConnectorMessageSchema?)schema); } return Task.FromResult((ConnectorMessageSchema?)null); }
The final version of the code looks similar to MessageSchemaProvider.
Publish the connector image
After you finish the code, build and publish the connector to a container registry. If you don't complete these steps, the connector won't be available for use in your Azure IoT Operations instance. To build and publish the container image to your Azure Container Registry instance, run the following commands from the project folder:
Important
This container registry instance must be the one configured as the container registry endpoint in your Azure IoT Operations instance.
# Sign in to your Azure subscription and ACR instance
az login
az acr login --name $ACR_NAME

# Build and publish the connector image
dotnet publish /t:PublishContainer \
    -p:ContainerRegistry=$ACR_NAME.azurecr.io \
    -p:ContainerRepository=my-connector \
    -p:ContainerImageTag=latest
Author connector metadata configuration
The connector metadata configuration file describes the connector and its capabilities. The information in this file controls the properties exposed when a user creates a connector template instance and the UI exposed in the operations experience. Create a file called connector-metadata.json with the following content:
{
  "$schema": "https://json.schemastore.org/aio-connector-metadata-11.0-preview.json",
  "name": "MyRestConnector",
  "description": "Connector for polling a REST server for information - with property",
  "version": "1.0.0",
  "imageConfigurationSettings": {
    "imageName": "<YOUR ACR NAME>.azurecr.io/<YOUR CONNECTOR NAME>",
    "tag": "latest"
  },
  "supportedArchitectures": [
    "linux/amd64"
  ],
  "inboundEndpoints": [
    {
      "endpointType": "Contoso.Http",
      "version": "2.0",
      "fields": {
        "address": {
          "input": "required",
          "exampleValue": "https://www.contoso.com/someAddress",
          "regex": [
            "/^(https?:\/\/)?([\\da-z\\.-]+)\\.([a-z\\.]{2,6})([\/\\w \\.-]*)*\/?$/"
          ],
          "description": "The HTTP address to connect to"
        }
      },
      "datasets": {
        "limits": {
          "minimum": 0
        },
        "fields": {
          "dataSource": {
            "input": "required",
            "exampleValue": "some/http/path"
          },
          "typeRef": {
            "input": "unsupported"
          }
        },
        "destinations": {
          "supportedDestinations": ["Mqtt"],
          "defaultDestination": {
            "destination": "Mqtt",
            "topic": "mqtt/{deviceName}/{inboundEndpointName}/{assetName}/{datasetName}",
            "qos": 1,
            "ttl": 3600,
            "retain": "never"
          }
        },
        "datasetConfigurationSchema": {
          "$schema": "http://json-schema.org/draft-07/schema#",
          "$id": "https://contoso.com/datasetConfig.schema.json",
          "title": "Dataset Config Schema",
          "description": "The JSON schema for both the default dataset configuration field and all individual dataset-specific configuration fields",
          "type": "object",
          "properties": {
            "SamplingInterval": {
              "description": "How frequently to sample each dataset by default (in milliseconds)",
              "type": "integer"
            }
          }
        },
        "dataPoints": {
          "limits": {
            "minimum": 0
          },
          "fields": {
            "dataSource": {
              "input": "optional",
              "exampleValue": "some/http/path"
            },
            "typeRef": {
              "input": "optional"
            }
          },
          "dataPointConfigurationSchema": {
            "$schema": "http://json-schema.org/draft-07/schema#",
            "$id": "https://contoso.com/datapointConfig.schema.json",
            "title": "Dataset Config Schema",
            "description": "The JSON schema for both the default dataset configuration field and all individual dataset-specific configuration fields",
            "type": "object",
            "properties": {
              "HttpRequestMethod": {
                "description": "Http method to use for the request",
                "type": "string",
                "enum": [
                  "GET",
                  "POST"
                ]
              }
            }
          }
        }
      }
    }
  ]
}
In the previous file, some of the key settings are:
nameanddescription: The name and description of the connector displayed in the Azure portal.imageConfigurationSettings: The name and tag of the connector code container image you published to the container registry.endpointType: The type of inbound endpoint supported by the connector. In this example, the connector supports theContoso.Httpendpoint type.datasetConfigurationSchemaanddataPointConfigurationSchema: The JSON schema definitions for the dataset and data point configuration options exposed in the operations experience UI. Currently, the example connector code doesn't read these configuration options -SamplingIntervalandHttpRequestMethod- to control its behavior. Instead, the connector code uses hard-coded values for these settings. However, you can modify the connector code to read these configuration options and use them to control its behavior. If a user sets these values in the UI, currently they're ignored.
Tip
Review the schema for connector metadata files at Connector metadata schema to learn more about the available settings.
To publish this file to your container registry, run the following command from the folder where the file is located:
oras push --config /dev/null:application/vnd.microsoft.akri-connector.v1+json $ACR_NAME.azurecr.io/connector-metadata:latest connector-metadata.json:application/json
In the previous command, the --config parameter specifies the application/vnd.microsoft.akri-connector.v1+json media type. The media type indicates that this file is an Akri connector metadata file. Without this parameter, the Azure IoT Operations instance can't recognize the file as connector metadata.
Author additional configuration
If your connector supports extra configuration options, define a JSON schema for these options. The schema specifies the fields and their types that appear on the Advanced tab of the Inbound endpoint definition in the operations experience. The connector code reads these extra configuration options to control its behavior.
The following JSON snippet shows an example additional configuration:
{
  "$schema": "http://json-schema.org/draft-07/schema#",
  "title": "MQTT Device Endpoint Config Schema",
  "description": "The JSON schema for the MQTT device endpoint additional configuration field",
  "type": "object",
  "properties": {
    "useBuiltInMqttBroker": {
      "type": "boolean",
      "default": false,
      "description": "Whether to use the built-in AIO broker as the inbound endpoint"
    },
    "assetDiscoveryConfiguration": {
      "type": "object",
      "description": "Configuration options for discovering assets via MQTT topics.",
      "properties": {
        "topicFilter": {
          "type": "string",
          "description": "The MQTT topic filter to subscribe to. This supports single level wildcard (+)"
        },
        "assetLevel": {
          "type": "integer",
          "minimum": 1,
          "default": 1,
          "description": "The level in topic tree where MQTT Connector looks for asset name. If single level wildcard (+) is used, please map this to it's position in topic filter."
        },
        "topicMappingPrefix": {
          "type": "string",
          "description": "A prefix used to map incoming topic to UNS topic. This will be used as prefix for the destination topic on the discovered dataset."
        }
      }
    },
    "externalBrokerConfiguration": {
      "$schema": "http://json-schema.org/draft-07/schema#",
      "title": "External Broker Configuration Schema",
      "type": "object",
      "description": "Configuration options for external MQTT broker connections.",
      "properties": {
        "keepAlive": {
          "type": "integer",
          "default": 60,
          "description": "The keep alive interval in seconds for the MQTT connection."
        },
        "receiveMax": {
          "type": "integer",
          "default": 65535,
          "maximum": 65535,
          "description": "The maximum number of in-flight QoS 1 and QoS 2 publishes that the client is willing to process concurrently."
        },
        "receivePacketSizeMax": {
          "title": "Maximum received packet size",
          "type": "integer",
          "description": "The maximum packet size in bytes that the client is willing to accept."
        },
        "sessionExpiry": {
          "type": "integer",
          "default": 3600,
          "description": "The expiry of the session in seconds."
        },
        "connectionTimeout": {
          "type": "integer",
          "default": 30,
          "description": "The connection timeout in seconds for the MQTT connection."
        }
      },
      "required": ["receiveMax", "receivePacketSizeMax"]
    }
  }
}
You can save the previous JSON snippet to a standalone file or embed it in the connector-metadata.json file for the MQTT connector. If you embed it in the connector-metadata.json file, use the additionalConfigurationSchema property inside an inboundEndpoints array entry.
To learn more, see Akri operator and connector contract > ADDITIONAL_CONNECTOR_CONFIGURATION.
Create a connector template instance
A connector template instance defines a reusable configuration of a connector type. An operator uses a connector template instance when they create an inbound endpoint on a device in the operations experience. To create a connector template instance from your connector, use either the Azure portal or the Azure CLI.
Sign in to the Azure portal and go to your Azure IoT Operations instance.
In your Azure IoT Operations instance, go to Components > Connector templates and select + Create a connector template. Your new connector type appears in the list of available connectors. Check that the status of your connector shows as Valid before you continue.
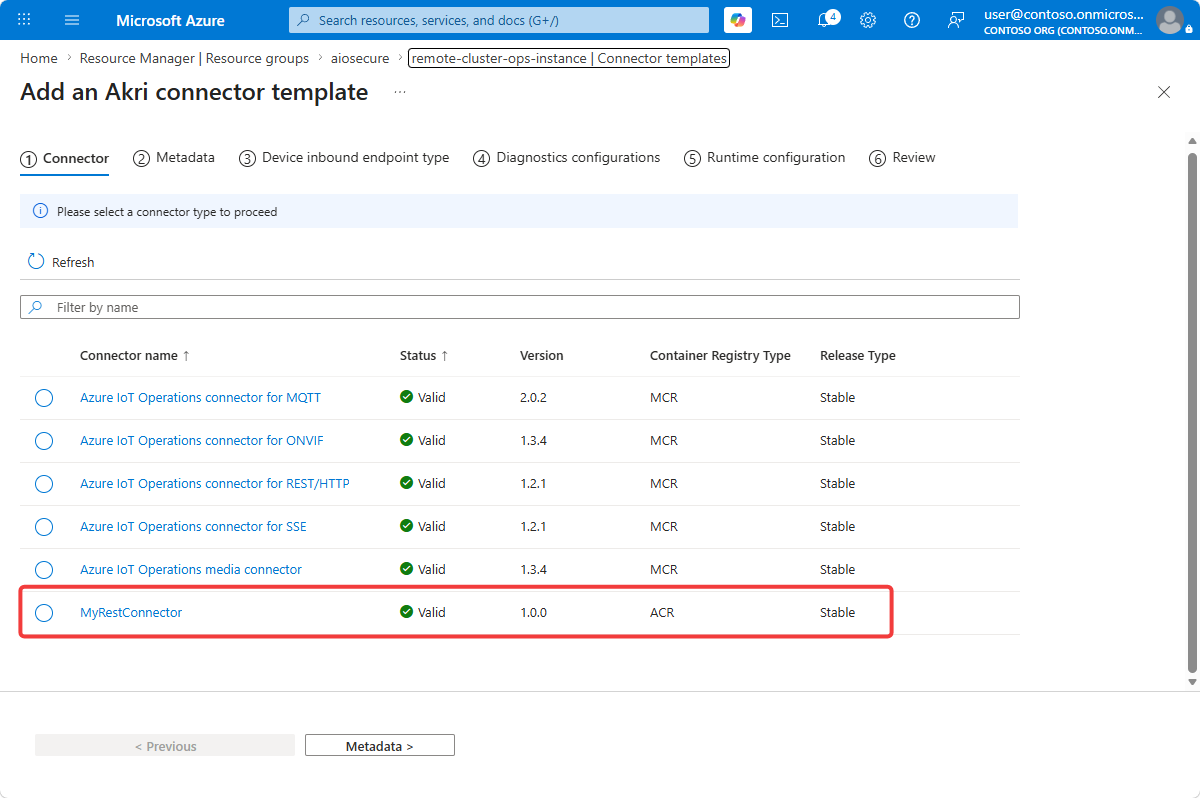
Select your connector type -
MyRestConnectorin this example - and then select Metadata > to move to the next page.On the Metadata page, enter a name for your connector template instance such as
my-rest-connectorand select Device inbound endpoint type > to move to the next page.Tip
Later, if you want to see the pod in Kubernetes cluster that contains a connector instance, this name is the prefix of the pod name. For example,
my-rest-connector-80625de9-ss-.On the Device inbound endpoint type page, notice the endpoint type -
Contoso.Httpin this example - from the connector-metadata.json file. Select Diagnostics configurations > to move to the next page.Select Runtime configuration > to move to the next page. Then select Review > to move to the final page.
On the Review page, review the settings and select Create to create the connector template instance. The new connector template instance appears in the list of connector templates.
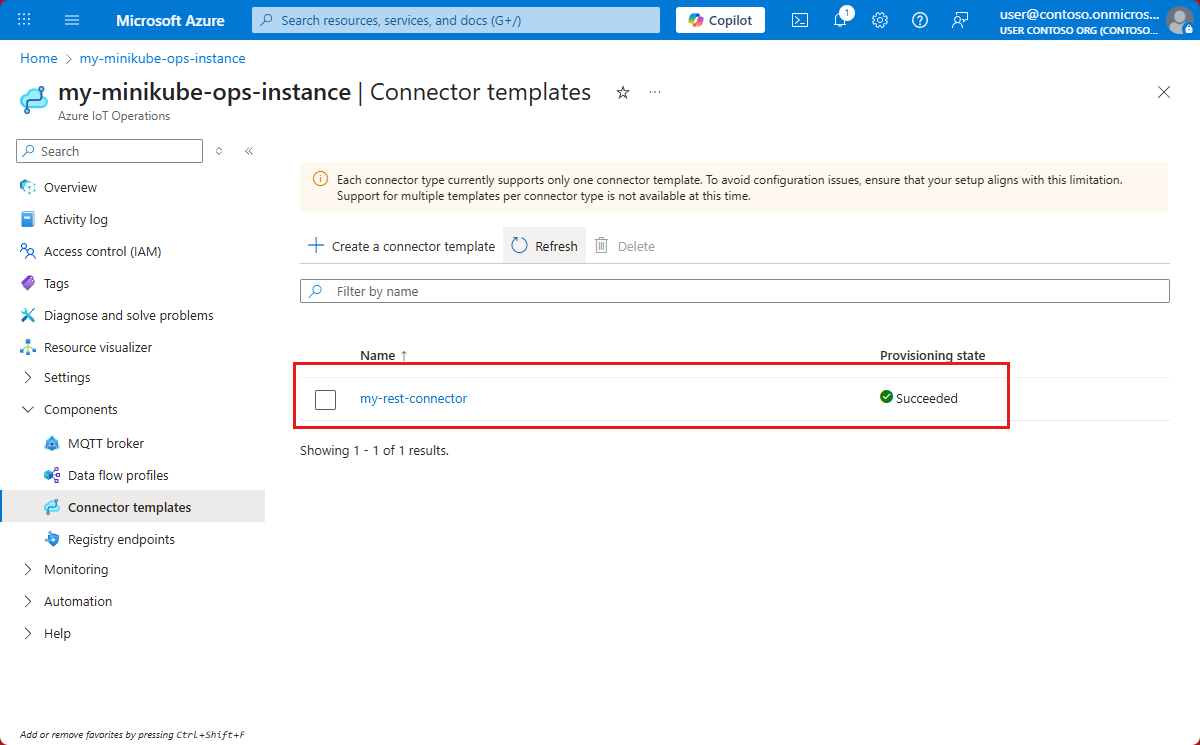
The connector template instance is now available for operators to use when they create devices in the operations experience UI.
Test the connector
This section describes how to test the connector by completing the following tasks:
- Deploy a sample REST server that exposes thermostat data.
- Create a device and asset in the operations experience that connects to REST server to fetch thermostat data.
- Create a data flow that reads messages from the MQTT broker and writes them to an Event Hubs namespace.
Deploy the sample REST server
The sample rest server in the Explore IoT Operations GitHub repository simulates a RESTful service. The server is packaged as a Docker image that exposes thermostat data on port 3000 for the connector to use. Deploy the sample REST server to a Docker container in a location that's accessible to your Azure IoT Operations instance. The following steps assume you deploy the REST server to a machine on the same network as your Kubernetes cluster.
Tip
You can also deploy the sample REST server to an Azure Container instance if your Azure IoT Operations instance has internet access.
Create device and asset in operations experience
To create a device and asset in the operations experience web UI that use your custom connector to retrieve thermostat data from the sample REST server, follow these steps:
Sign in to the operations experience and go to your Azure IoT Operations instance.
Go to the Devices page and select + Create new > Device. On the Basics page, enter a name for the device such as
contoso-thermostat-deviceand select + New on the tile that represents your custom connector. The information on the tile comes from the connector metadata file you created earlier: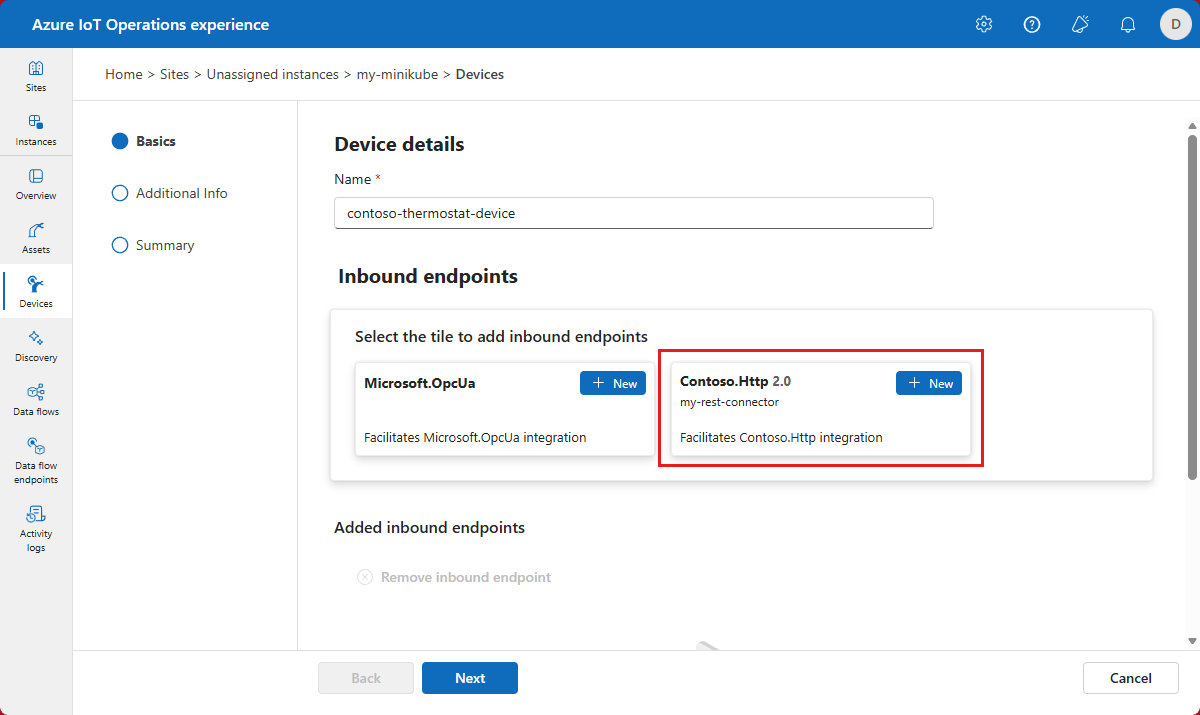
On the Inbound endpoint page, enter the following information. You need the IP address of the sample REST server:
- For Endpoint name, enter a name such as
contoso-thermostat-endpoint. - For Server URL, enter the address of the sample REST server such as
http://<REST SERVER IP ADDRESS>:3000. - For Authentication, select Anonymous.
Select Save. Your endpoint configuration shows in the list of added endpoints for the device. Select Next to move to the next page.
- For Endpoint name, enter a name such as
On the Additional Info page, add any custom properties you want to associate with the device. Select Next to move to the next page.
On the Summary page, review the device configuration and select Create to create the device. Your new device configuration appears in the list of devices for your Azure IoT Operations instance.
In the operations experience, go to the Assets page and select + Create new > Asset.
On the Asset details page, enter the following information:
- For Inbound endpoint, select the endpoint you created earlier -
contoso-thermostat-endpointin this example. - For Asset name, enter a name such as
contoso-thermostat-asset. - For Description, enter a description such as
Asset that represents a thermostat device at Contoso. - Add any custom properties you want to associate with the asset.
Select Next to move to the next page.
- For Inbound endpoint, select the endpoint you created earlier -
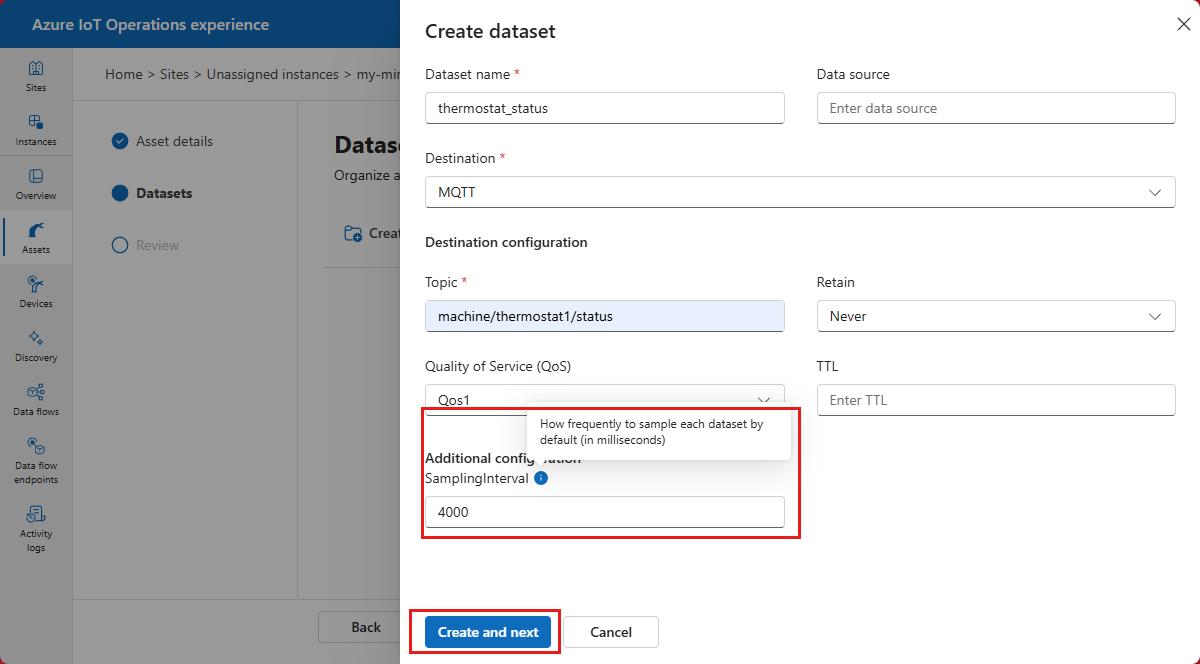
On the Datasets page, select Create dataset. On the Add dataset page, enter the following information:
- For Dataset name, the custom connector code expects a dataset named
thermostat_statusin this example. - Leave Data source blank.
- For Destination topic, enter
machine/thermostat1/status. The data flow you deploy later subscribes to this MQTT topic. - For Retain, select
Never. - For Quality of Service, select
Qos1. - Leave TTL blank.
- For SamplingInterval, enter
4000. You defined this setting the connector metadata file. Currently, the sample connector code doesn't read this setting and uses a hard-coded value instead.
Select Create and next to create the dataset and move to the next page:
- For Dataset name, the custom connector code expects a dataset named
On the List of data points page, select + Add data point twice to add two data points. For each data point, enter the following information:
For the first data point:
- For Data source, enter
/api/thermostat/current. - For Data point name, enter
currentTemperature. - For HttpRequestMethod, select
GET. Currently, the sample connector code doesn't read this setting and defaults to aGETrequest.
For the second data point:
- For Data source, enter
/api/thermostat/desired. - For Data point name, enter
desiredTemperature. - For HttpRequestMethod, select
GET. You defined this setting the connector metadata file. Currently, the sample connector code doesn't read this setting and defaults to aGETrequest.
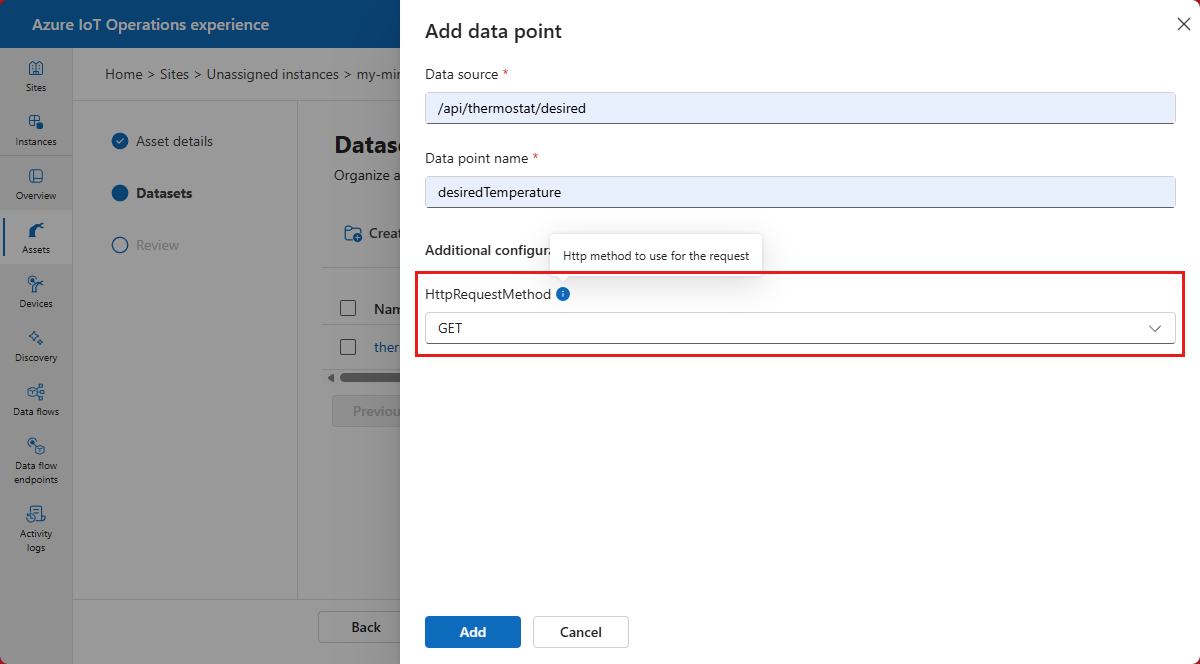
Select Save to save the data points and then select Next to move to the next page.
- For Data source, enter
On the Review page, review the asset configuration and select Create to create the asset. Your new asset configuration appears in the list of assets for your Azure IoT Operations instance.
After the asset configuration deploys to your Azure IoT Operations instance, the Akri services in your Kubernetes cluster discover the asset and use the connector template instance to create an instance of your connector in the cluster. The connector starts polling the sample REST server for thermostat data and publishes the data as messages to the MQTT broker.
Create an Event Hubs namespace and data flow
To verify that the connector works correctly, create a data flow that reads messages from the MQTT broker and writes them to an Event Hubs namespace. Then, use the Event Hubs data explorer to view the messages. To create the data flow and deploy an Event Hubs namespace, follow these steps:
To download the bicep file that deploys an Event Hubs namespace with an event hub and that adds a data flow to your Azure IoT Operations instance, run the following command from a terminal:
wget https://raw.githubusercontent.com/Azure-Samples/explore-iot-operations/main/samples/custom-connector-bicep/connector-verify.bicep -O connector-verify.bicepTo use the bicep file to deploy your Event Hubs namespace and data flow, run the following commands:
RESOURCE_GROUP='<your Azure resource group name>'
CLUSTER_NAME='<your Kubernetes cluster name>'
SUBSCRIPTION='<your Azure subscription ID>'
ADR_ASSET_NAME=contoso-thermostat-asset

AIO_EXTENSION_NAME=$(az k8s-extension list -g $RESOURCE_GROUP --cluster-name $CLUSTER_NAME --cluster-type connectedClusters --query "[?extensionType == 'microsoft.iotoperations'].id" -o tsv | awk -F'/' '{print $NF}')
AIO_INSTANCE_NAME=$(az iot ops list -g $RESOURCE_GROUP --query "[0].name" -o tsv)
CUSTOM_LOCATION_NAME=$(az iot ops list -g $RESOURCE_GROUP --query "[0].extendedLocation.name" -o tsv | awk -F'/' '{print $NF}')

az deployment group create --subscription $SUBSCRIPTION_ID --resource-group $RESOURCE_GROUP --template-file connector-verify.bicep --parameters clusterName=$CLUSTER_NAME customLocationName=$CUSTOM_LOCATION_NAME aioExtensionName=$AIO_EXTENSION_NAME aioInstanceName=$AIO_INSTANCE_NAME aioAssetName=$ADR_ASSET_NAME --query "properties.outputs"
To review the data flow configuration, go to your Azure IoT Operations instance in the operations experience.
Go to Data flows and select thermostat-data-flow. This data flow connects to your contoso-thermostat-asset by subscribing to the
machine/thermostat1/statustopic in the MQTT broker. The data flow passes the messages through to the thermostat-eh-endpoint data flow output endpoint. This output endpoint connects to your event hub.
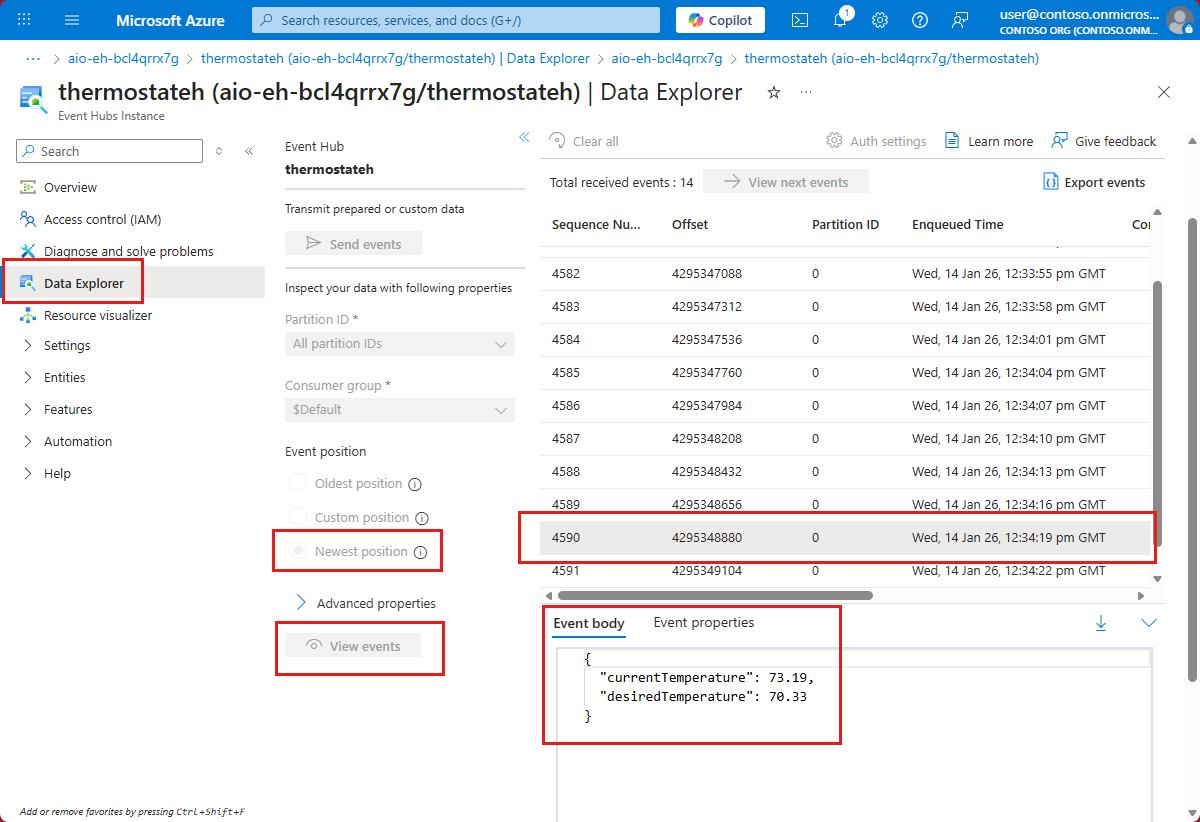
To view the messages flowing to your event hub, follow these steps:
In the Azure portal, go to the Event Hubs namespace that the Bicep file deployed. Then go to the
thermostatehevent hub in the namespace.Select Access control and select Add > Add role assignment. Add yourself to the Azure Event Hubs Data Receiver role.
Go to Data Explorer, select Newest position, and then View events. Select one of the events to view the data in the message:
Next steps
In this article, you used the aiopollingtelemetryconnector .NET project template to create a connector that polls a REST service to retrieve thermostat data. The aioeventdriventelemetryconnector project template lets you build event-driven connectors. For more information, see the Event Driven TCP Thermostat Connector in the Azure IoT Operations .NET SDK.