Bilješka
Pristup ovoj stranici zahtijeva provjeru vjerodostojnosti. Možete pokušati da se prijavite ili promijenite direktorije.
Pristup ovoj stranici zahtijeva provjeru vjerodostojnosti. Možete pokušati promijeniti direktorije.
Microsoft’s commercial marketplace is an online marketplace for applications and services that lets businesses of all sizes offer solutions to customers around the world. As an independent software vendor (ISV) member of the Partner Program, you can create, publish, and manage your Microsoft Sentinel security information and event management (SIEM) solutions in Partner Center. Your solutions are listed together with other Microsoft solutions, connecting you to businesses, organizations, and government agencies around the world. Microsoft Sentinel solutions published in the marketplace are available to customers in Azure Marketplace and Microsoft Sentinel content hub.
Prerequisites
Solution code approved in GitHub: Ensure that the Microsoft Sentinel team approved your solution and that the code is merged to the main branch of the GitHub repository. After approval, your solution is available in the GitHub repository for Microsoft Sentinel at
https://github.com/Azure/Azure-Sentinel/tree/\<Your branch\>/Solutions/\<Your Solution Folder\>.Solution package created: Your solution package must be created and uploaded to the GitHub repository and should be available at "https://github.com/Azure/Azure-Sentinel/tree/master/Solutions/<Your Solution Folder>/Package" folder with the correct version. The solution package contains the createUiDefinition.json and mainTemplate.json files that are required for correctly listing solutions in Azure Marketplace and Microsoft Sentinel content hub.
Commercial Marketplace account created: If your company already has an account, you don't need to create a new account. The same account can be used for publishing any solutions, including Microsoft Sentinel. If your company is a first-time publisher to Microsoft commercial marketplace, you need to complete a one-time registration process. For more information, see Create a commercial marketplace account in Partner Center.
Note
To avoid delays, we recommend that you sign up for a commercial marketplace account as soon as you engage with us. You don't have to wait until your Microsoft Sentinel solution is ready for publishing.
After you sign up for the commercial marketplace account, Partner Center generates a unique Publisher ID and grants you access to the authoring and publishing experience. Using Partner Center, you can create, certify, and publish your solutions for Microsoft customers.
Offer configuration
This section provides a step-by-step guide through the tabs in Partner Center to create and configure your offer. For each tab, this guide references only the fields that you need to fill out for Microsoft Sentinel solutions. For fields that aren't mentioned in this guide, you can leave the default values as they are. For more information on the offer configuration process and details on all the fields, see Plan an Azure Application offer.
Create an offer in Partner Center
To create the offer and configure its top-level attributes in Partner Center, follow these steps. After creation, the offer ID and offer type can't be changed. To make corrections to the Offer ID, type, or publisher, delete the offer and recreate it. To delete an offer, go to the Offer overview tab and select Delete offer. This action isn't reversible.
Sign in to Microsoft Partner Center with your account.
Select Marketplace offers.
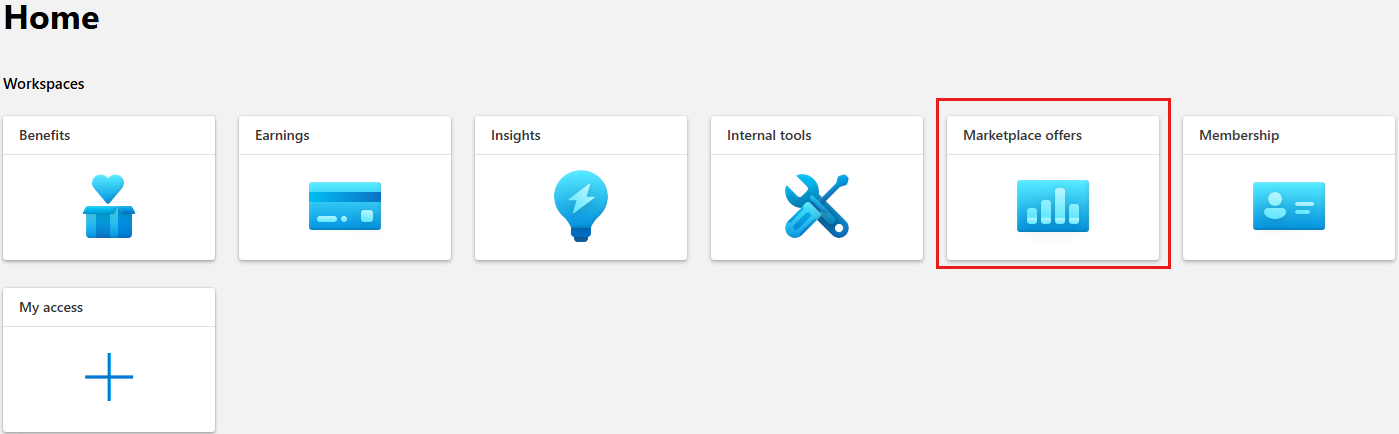
Select New offer and then select Azure application.
Important
Make sure to set the offer to Azure Application. Setting the offer to anything else will require you to submit a new pull request with a new offerID before you can publish your offer.”
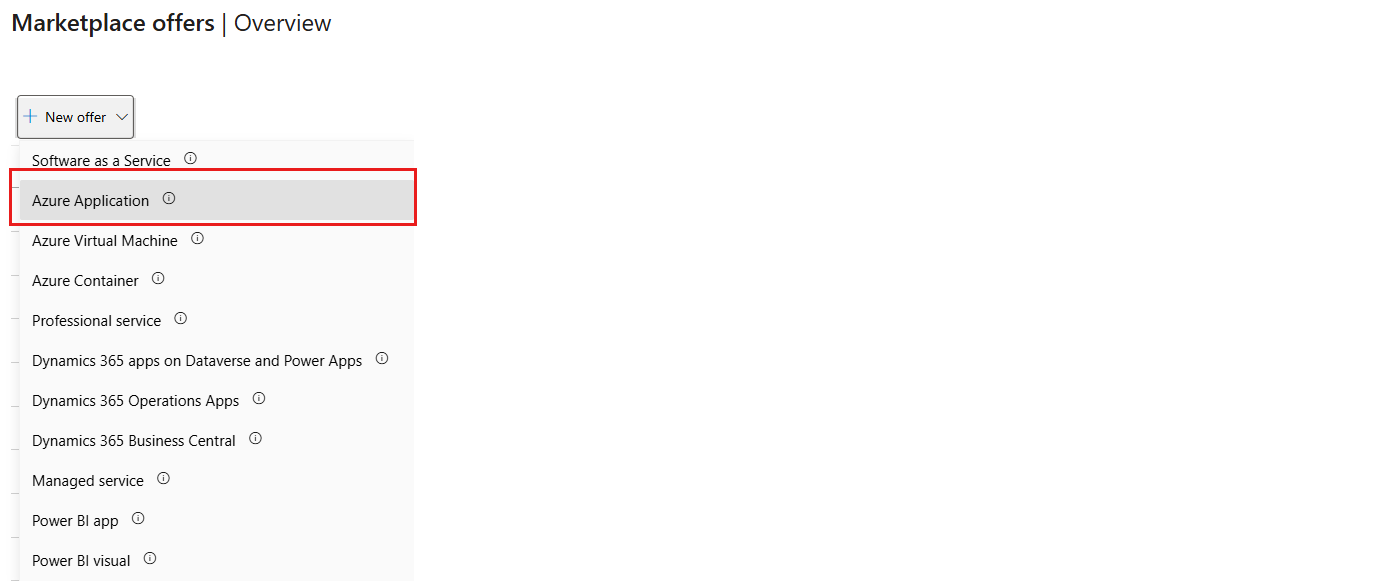
Enter the following information.
Field Description Offer ID The offer ID should be the same as offer ID mentioned in the SolutionMetadata.json file in your solution folder in GitHub at /Azure/Azure-Sentinel/blob/<Your Branch>/Solutions/<Your Solution>/SolutionMetadata.json. We recommend using the naming convention for offer ID as azure-sentinel-solution-<your-solution-name>. For example, azure-sentinel-solution-ciscoumbrella. Use only lowercase, alphanumeric characters, dashes, or underscores. ID can't end with "-preview" and can't be modified after selecting Create.
Offer ID: Max length is 50 characters.Offer alias This name isn't used in the marketplace listing and is solely for reference within Partner Center. Publisher Select the publisher ID that you want to use to publish your Microsoft Sentinel solution. The publisher selected can't be modified after creation of the offer. Note
To make any changes to the Offer ID, Offer type, or publisher ID, you must delete the offer and recreate it. To delete an offer, go to the Offer overview tab and select Delete offer. This action isn't reversible.
Offer setup
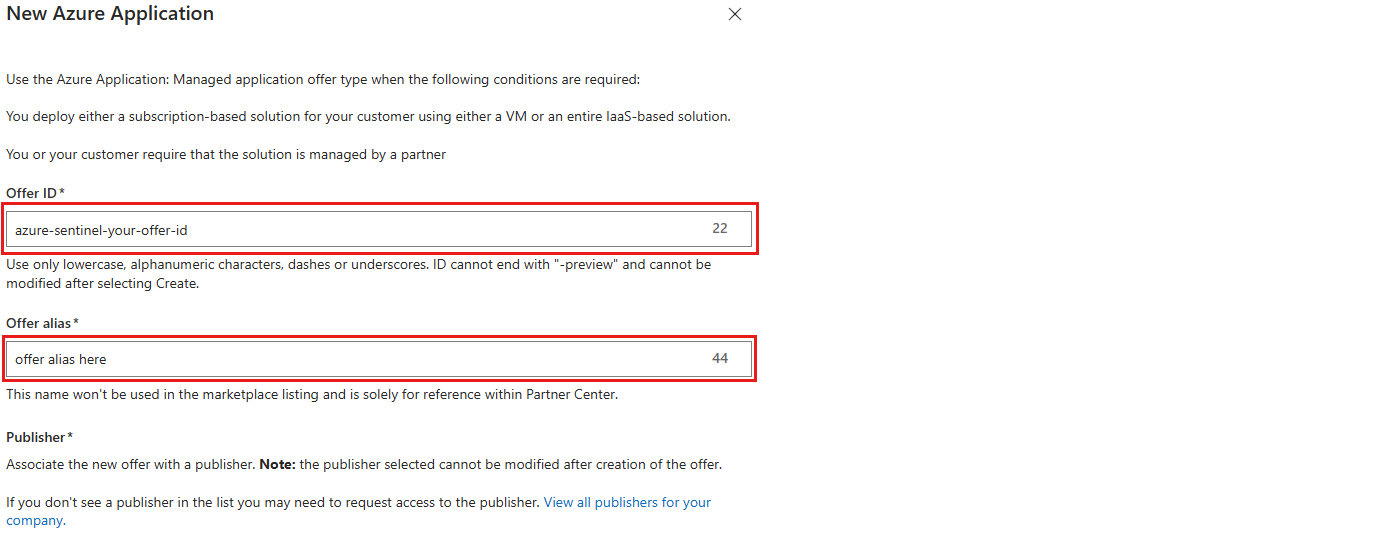
Configure the following properties in the Offer setup tab in Partner Center. This screen shows the selections made during initial offer creation. You can change the offer alias from this page if needed.
| Field | Description |
|---|---|
| Offer ID | The Offer ID is unique to your specific solution. Offer ID on this page is read-only. |
| Alias | Enter a descriptive name. Alias is used to refer to the offer solely within Microsoft Partner Center. The offer alias isn't shown in Azure Marketplace and is different than the offer name shown to customers. We strongly recommend listing the solution title using the convention [Company Name] [Product Name] for Microsoft Sentinel. For example: Cisco Umbrella for Microsoft Sentinel as this helps find your solution by the Microsoft Sentinel team internally. |
| Test Drive | Leave "Enable a test drive." unchecked. This feature isn't supported for Microsoft Sentinel solutions. |
| Customer Leads | You can provide connection details to the CRM system where you would receive customer leads. Learn more about configuring customer leads. This step is optional and can be done after your solution is public. |
Offer properties
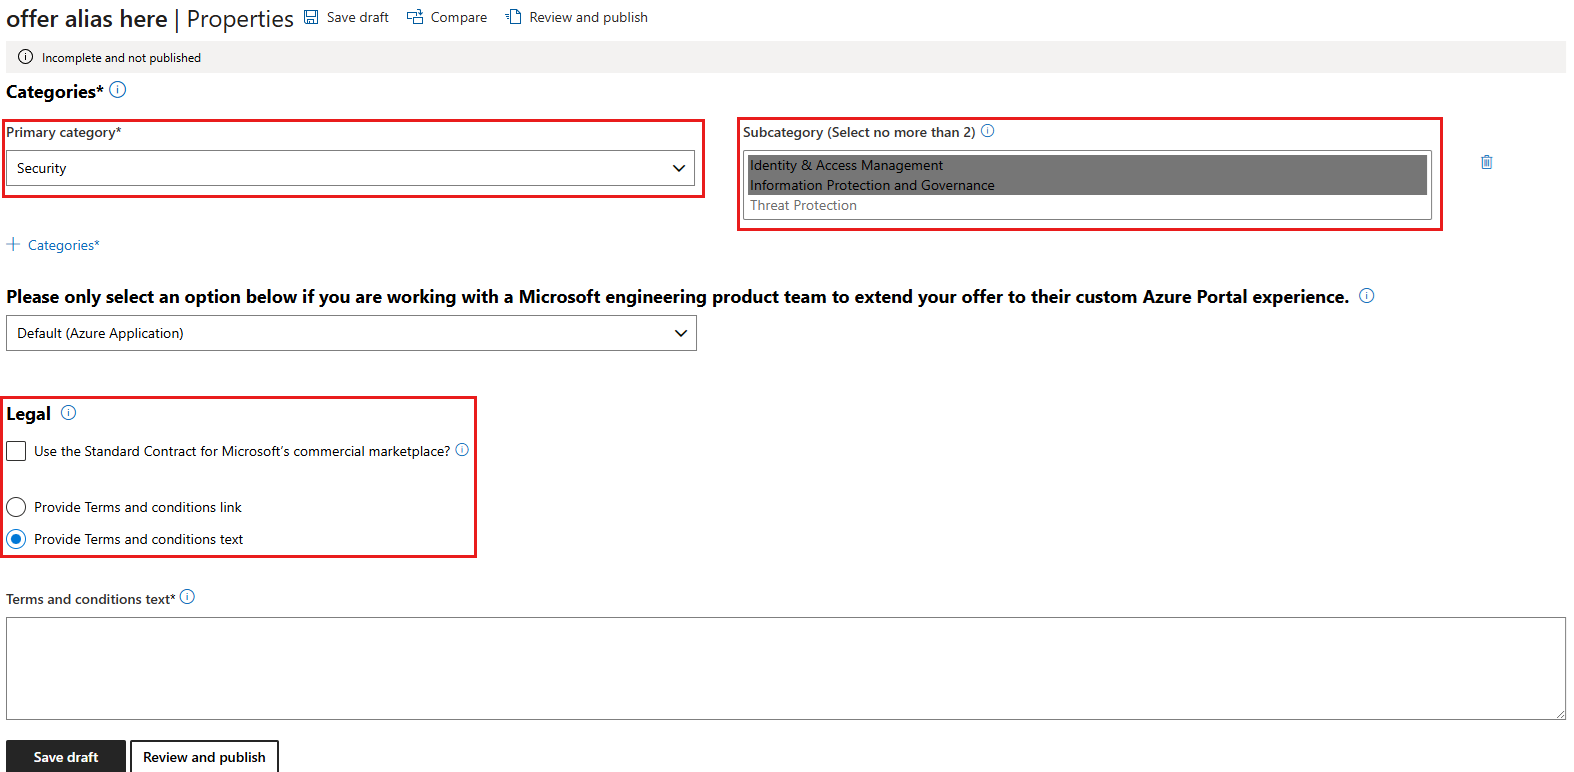
Configure the following properties in the Properties tab in Microsoft Partner Center.
| Field | Description |
|---|---|
| Primary Category | Primary category is required to provide better categorization of solution in the Azure Marketplace. For adding a category, select the "+ Categories" link. You can select up to two subcategories for more granular classification of your solution. Note: For Microsoft Sentinel solutions, primary category must be Security. |
| Application type | Leave application type as Default (Azure Application). Make no changes. |
| Legal | Here you have three options to choose from - Use the standard contract Provide terms and conditions link Provide terms and conditions text. Choose the option that works best for you. If you select the standard contract, the options to share Terms & Conditions are hidden. |
Offer listing
Configure the following properties in the Offer listing tab in Microsoft Partner Center. The parameters that you set in this tab define how customers can find your solution and what information they see for your solution.
| Field | Description |
|---|---|
| Name | Enter a descriptive name for the offer. This name is used to list the offer in the marketplace. |
| Search results summary | A single sentence summarizing the purpose or function of the offer, written in plain text with no line breaks. The summary appears on your offer’s search results page. |
| Short description | Provide a two to three line overview of your solution. This text appears on the solution detail page in marketplace. |
| Description | Detailed description of your solution that appears in both marketplace and in Microsoft Sentinel's content hub. Use markup appropriately to convey the right information to customers. In addition to detailed solution description, we recommend including these details – Link to Release notes (in GitHub) which has more details about the current solution. File path - /Azure/Azure-Sentinel/blob/<Your branch>/<Your solution>/ReleaseNotes.md. Type of content included in your solution. For example, Data Connectors: 1, Parsers: One, Workbooks: 1, Analytic Rules: 10, Hunting Queries: 10. Any prerequisites for the solution. For example, if the solution requires a specific license, mention it here. |
| Search keywords | You can list up to three search keywords that customers can use to find your solution in the Marketplace. Required details - You must add the GUID f1de974b-f438-4719-b423-8bf704ba2aef as one of your search keywords. If this keyword is not added, your solution doesn't appear in Microsoft Sentinel. We strongly recommend that you include the word Microsoft Sentinel (can be Microsoft Sentinel, <Your product name> for Microsoft Sentinel) as one of the search keywords. Here you can use your company name, product name, or any other text that you think is relevant for your solution. |
| Privacy policy link | Working link to the privacy policy page of your company that applies to the solution that you're publishing. |
| Product information links | Select Add a link to add one or more links that are relevant for your solution. You can add a link to your company page, product details page, or similar pages. We strongly recommend that you include a link for customers to learn more about Microsoft Sentinel (text - Microsoft Sentinel, URL - https://aka.ms/azuresentinel). |
| Contact information | Support contact: Contact info for Microsoft partners to use when customers open support tickets. Name, Email, Phone, and Support website for Azure Global customers are required. This information isn't listed in the marketplace. **Engineering contact **: Contact info for Microsoft to use when there are issues with your offer including certification issues. This information isn't listed in the marketplace. Name, Email, and Phone are required. Cloud solution provider program contact – In addition to publishing your offers through commercial marketplace online stores, you can also sell through the Cloud Solution Provider (CSP) program to reach millions of qualified Microsoft customers that the program serves. If you would like to share your solution through the CSP program, you need to provide the contact details that CSP partners can use for support and business issues. This info is only shown to CSP partners. You can learn more about the CSP program here. |
| Marketplace media | Logos: Upload a logo for your company/product. Screenshots: Add relevant screenshots of the solution (for example, workbooks) to highlight the usefulness of the solution. Appropriate screenshots enable customers to understand the solution value better. Videos: Add relevant videos of the solution. For instance, you can provide a quick overview of the solution and its benefits or show customers how to install the solution and get started. |
Technical configuration
This section in the offer configuration is optional. Skip this section and move on to Plan overview.
Plan overview
A plan defines an offer's scope and limits, and the associated pricing when applicable. For example, depending on the offer type, you can select regional markets and choose whether a plan is visible to the public or only to a private audience. For Microsoft Sentinel solutions, only one plan is required. Select Create new plan and enter a plan ID and name. The plan ID should be unique in this offer and is visible to customers in the product URL in Azure Marketplace after publishing. Enter the following details:
| Field | Description |
|---|---|
| Plan setup: | Plan type: Should be "Solution template." Azure regions – Select Azure Global to ensure that customers can deploy your solution in all Azure public regions that have marketplace integration. |
| Plan listing | Plan name: Use the name you entered for "Name" in the Offer listing tab. Plan name is visible to customers in Azure Marketplace. Plan summary: Use the details you entered for "Short description" in the Offer listing tab. Plan description: Use the details you entered for "Description" in the Offer listing tab. |
| Availability: | Plan visibility: Set plan visibility to Public if you want the plan to be available for everyone in the Azure portal and Azure Marketplace Hide plan: Leave the check box unchecked. If you check this box, your solution doesn't show up in Microsoft Sentinel content hub. |
| Technical configuration | Version: Enter the version number of the package you're uploading. The version number should be the same as the latest approved package version in GitHub. Package path in GitHub - /Azure/Azure-Sentinel/tree/<Your branch>/<Your solution>/Package Package File (zip): Upload the matching package zip file with the same version number you entered for version. Note: Make sure that you always upload the latest approved version. |
Co-sell with Microsoft
No changes required in the Co-sell with Microsoft section. Move to the next step.
Resell through CSPs
You can opt whether you want to expand the reach of your solution by offering it through Microsoft’s Cloud Solution Providers (CSP) program. Here you can use from three options that define which of the CSP partners can resell your solution. You can choose any partner, specific list of partners, or you can choose to opt out.
Partner Center preview
Define a preview audience who can review your offer listing before it goes live. A preview audience is allowed access to your offer before it's published live in Marketplace. They can see and validate all plans, including those which will be available only to a private audience after your offer is fully published to Marketplace.
Preview audience
Previews let you test and validate your solution in a real environment before it's publicly available to all customers. During this phase, your solution is only accessible to the Azure subscription IDs you listed here. Use this time to confirm:
- Your solution appears correctly in the Microsoft Sentinel ecosystem.
- The data connector installs and reaches a connected state.
- All included content, such as workbooks, analytic rules, and hunting queries deploy and function as expected.
Use at least one subscription where Microsoft Sentinel is active so you can run a complete installation test. When you're satisfied with your validation, select Go live in Partner Center to publish the offer to Azure Marketplace and the Microsoft Sentinel content hub. To make changes after reviewing your preview, edit and resubmit before selecting Go live.
Add at least one Azure Subscription ID. You can enter your own subscription ID or your customer subscription IDs for whom you would like to enable preview access to your solution. After you select Go Live for this offer, this list is ignored, and your solution is visible to all customers. For more information, see Add a preview audience for an Azure Application offer.
Note
If the preview audience hasn't been configured with the correct subscription IDs, you may get the following error “Could not create the marketplace item / Gallery item is required, no gallery item is provided." This error is because the marketplace item is only visible to the subscription ids provided in the preview audience section. To resolve this issue, add the correct subscription IDs to the preview audience and try again.
Review and publish
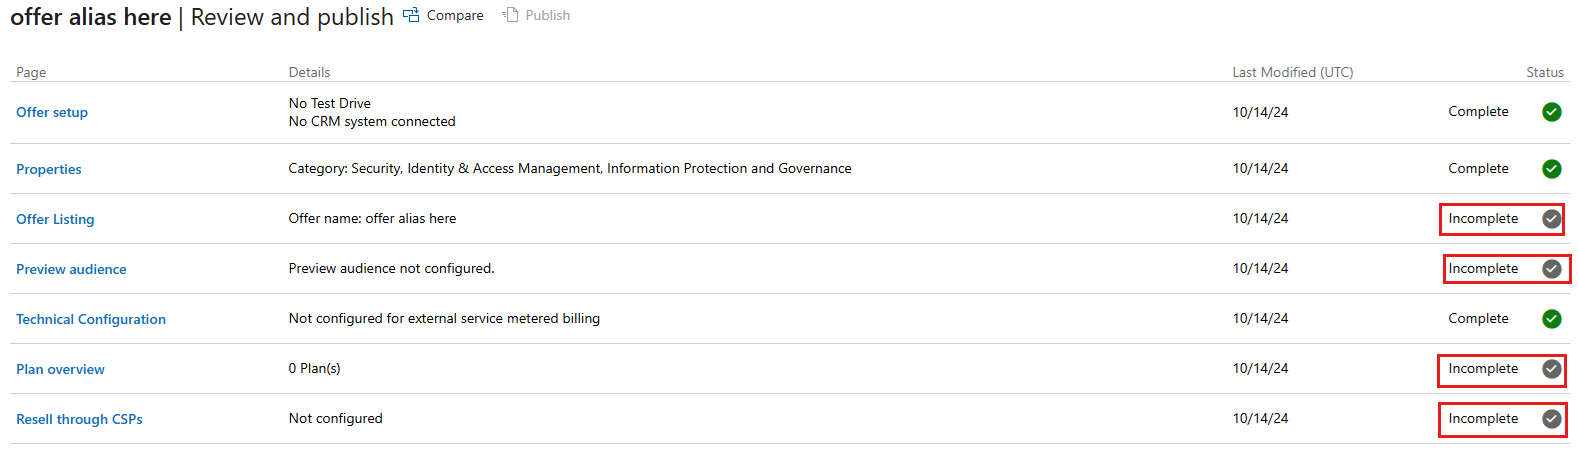
After you enter all the details, select each tab to review your offer for errors or omissions. When you're ready, select Review and publish from any of the tabs. The review page shows the status of your submission for each tab (Complete, Incomplete). The Publish button is enabled only if all the required details are filled out, that is, status shows as Complete for all tabs. For pages with Incomplete status, select the page link to fill out the missing details and select Review and publish again.
In this screenshot, only the Offer setup, Properties, and Technical Configuration tabs are fully filled out and the rest have missing details.
After you fill out all the details and publish the solution, your solution goes through a series of checks before it goes live in Azure Marketplace and Microsoft Sentinel content hub.