Bilješka
Pristup ovoj stranici zahtijeva provjeru vjerodostojnosti. Možete pokušati da se prijavite ili promijenite direktorije.
Pristup ovoj stranici zahtijeva provjeru vjerodostojnosti. Možete pokušati promijeniti direktorije.
To connect to a virtual network over point-to-site (P2S), you need to configure the client device that you'll connect from. This article helps you configure a VPN client for point-to-site connections that use certificate authentication. Select the operating system for the client that you want to configure.
Before you begin
Before beginning client configuration steps, verify that you're on the correct VPN client configuration article. The following table shows the configuration articles available for VPN Gateway point-to-site VPN clients. Steps differ, depending on the authentication type, tunnel type, and the client OS.
| Authentication method | Tunnel type | Client OS | VPN client |
|---|---|---|---|
| Certificate | |||
| IKEv2, SSTP, OpenVPN | Windows, macOS, Linux, iOS | VPN client configuration - certificate authentication | |
| Microsoft Entra ID | |||
| OpenVPN | Windows | Azure VPN client | |
| OpenVPN | macOS | Azure VPN Client | |
| OpenVPN | Linux | Azure VPN Client |
Prerequisites
This article assumes that you already performed the following prerequisites:
- You created and configured your VPN gateway for point-to-site certificate authentication and the tunnel type required by the client you want to configure. See Configure server settings for P2S VPN Gateway connections - certificate authentication for steps.
- You generated and downloaded the VPN client configuration files. See Generate VPN client profile configuration files for steps.
- You can either generate client certificates or acquire the appropriate client certificates necessary for authentication. For information about working with certificates, see Point-to-site: Generate certificates.
Windows
Windows clients can connect by using the native VPN client (IKEv2/SSTP tunnel type) or the OpenVPN tunnel type by using the Azure VPN Client, OpenVPN Client 2.x, or OpenVPN Connect 3.x.
Native VPN client
If your point-to-site (P2S) VPN gateway is configured to use IKEv2/SSTP and certificate authentication, you can connect to your virtual network using the native VPN client that's part of your Windows operating system.
Workflow
- Generate and install client certificates if you haven't already done so.
- View the VPN client profile configuration files contained in the VPN client profile configuration package that you generated.
- Configure the native VPN client that's already installed on your Windows computer.
- Connect to Azure.
Generate and install client certificates
For certificate authentication, you must install a client certificate on each client computer. You must export the client certificate you want to use with the private key and include all certificates in the certification path. For some configurations, you also need to install root certificate information.
In many cases, you can install the client certificate directly on the client computer by double-clicking it. However, for certain OpenVPN client configurations, you might need to extract information from the client certificate to complete the configuration.
- For information about working with certificates, see Point-to-site: Generate certificates.
- To view an installed client certificate, open Manage User Certificates. The client certificate is installed in Current User\Personal\Certificates.
Install the client certificate
Each computer needs a client certificate to authenticate. If the client certificate isn't already installed on the local computer, you can install it by using the following steps:
- Locate the client certificate. For more information about client certificates, see Install client certificates.
- Install the client certificate. Typically, you can do this by double-clicking the certificate file and providing a password (if required).
View configuration files
The VPN client profile configuration package contains specific folders. The files within the folders contain the settings needed to configure the VPN client profile on the client computer. The files and the settings they contain are specific to the VPN gateway and the type of authentication and tunnel your VPN gateway is configured to use.
Locate and unzip the VPN client profile configuration package you generated. For certificate authentication and IKEv2/SSTP, you see the following files:
- WindowsAmd64 and WindowsX86 contain the Windows 64-bit and 32-bit installer packages, respectively. The WindowsAmd64 installer package is for all supported 64-bit Windows clients, not just AMD.
- Generic contains general information used to create your own VPN client configuration. The Generic folder is provided if IKEv2 or SSTP+IKEv2 was configured on the gateway. If only SSTP is configured, then the Generic folder isn’t present.
Configure the VPN client profile
To connect, you first need to configure the VPN client with the required settings. Configure the VPN client profile by using the settings in the VPN client configuration package. The settings in the package are specific to the VPN gateway to which you connect.
You can use the same VPN client configuration package on each Windows client computer, as long as the version matches the architecture for the client. For a list of supported client operating systems, see the point-to-site section of the VPN Gateway FAQ.
Note
You must have Administrator rights on the Windows client computer from which you want to connect.
Install the VPN client configuration package
- Select the VPN client configuration files that correspond to the architecture of the Windows computer. For a 64-bit processor architecture, choose the
VpnClientSetupAmd64installer package. For a 32-bit processor architecture, choose theVpnClientSetupX86installer package. - Double-click the package to install it. If you see a SmartScreen pop-up, select More info, and then Run anyway.
Connect
Connect to your virtual network through a point-to-site VPN.
- Go to the VPN settings and locate the VPN connection that you created. It has the same name as your virtual network. Select Connect. A pop-up message might appear. Select Continue to use elevated privileges.
- On the Connection status page, select Connect to start the connection. If you see a Select Certificate screen, verify that the client certificate showing is the one that you want to use to connect. If it isn't, use the drop-down arrow to select the correct certificate, and then select OK.
Azure VPN Client
If your point-to-site (P2S) VPN gateway is configured to use OpenVPN and certificate authentication, you can connect to your virtual network using the Azure VPN Client.
While it's possible that the Azure VPN Client for Windows might work on other operating system versions, the Azure VPN Client for Windows is only supported on the following releases:
- Supported Windows releases: Windows 11 on x64, x86, and ARM64 architectures.
Connection requirements
To connect to Azure, each connecting client computer requires the following items:
- The Azure VPN Client software installed on each client computer.
- The Azure VPN Client profile configured by using the settings in the downloaded azurevpnconfig.xml or azurevpnconfig_cert.xml configuration file.
- A client certificate installed locally on the client computer.
Generate and install client certificates
For certificate authentication, install a client certificate on each client computer. Export the client certificate you want to use with the private key, and include all certificates in the certification path. For some configurations, you also need to install root certificate information.
- For information about working with certificates, see Point-to site: Generate certificates.
- To view an installed client certificate, open Manage User Certificates. The client certificate is installed in Current User\Personal\Certificates.
Install the client certificate
Each computer needs a client certificate to authenticate. If the client certificate isn't already installed on the local computer, you can install it by using the following steps:
- Locate the client certificate. For more information about client certificates, see Install client certificates.
- Install the client certificate. Typically, you can do this by double-clicking the certificate file and providing a password (if required).
View configuration files
The VPN client profile configuration package contains specific folders. The files within the folders contain the settings needed to configure the VPN client profile on the client computer. The files and the settings they contain are specific to the VPN gateway and the type of authentication and tunnel your VPN gateway is configured to use.
Locate and unzip the VPN client profile configuration package you generated. For certificate authentication and OpenVPN, you see the AzureVPN folder. In this folder, you see either the azurevpnconfig_cert.xml file or the azurevpnconfig.xml file, depending on whether your P2S configuration includes multiple authentication types. The .xml file contains the settings you use to configure the VPN client profile.
If you don't see either file, or you don't have an AzureVPN folder, verify that your VPN gateway is configured to use the OpenVPN tunnel type and that certificate authentication is selected.
Download the Azure VPN Client
The features and settings that are available for the Azure VPN Client depend on the version of the client that you're using. For information about Azure VPN Client versions, see the Azure VPN Client versions article.
Download the latest version of the Azure VPN Client install files using one of the following links:
- Install using Client Install files: https://aka.ms/azvpnclientdownload.
- Install directly, when signed in on a client computer: Microsoft Store.
- Install using the Windows Package Manager (WinGet). You can run the following command to install and learn more about the WinGet method in this document.
winget install Microsoft.AzureVPNClient --source winget
Install the Azure VPN Client to each computer.
Verify that the Azure VPN Client has permission to run in the background. For steps, see Windows background apps.
To verify the installed client version, open the Azure VPN Client. Go to the bottom of the client and select ... -> ? Help. In the right pane, you can see the client version number.
Configure the Azure VPN Client and connect
Open the Azure VPN Client.
Select + on the bottom left of the page, then select Import.
In the window, navigate to the azurevpnconfig.xml or azurevpnconfig_cert.xml file, depending on your configuration. Select the file, then select Open.
On the client profile page, notice that many of the settings are already specified. The preconfigured settings are contained in the VPN client profile package that you imported. Even though most of the settings are already specified, you need to configure settings specific to the client computer.
From the Certificate Information dropdown, select the name of the child certificate (the client certificate). For example, P2SChildCert. For this exercise, for secondary profile, select None.
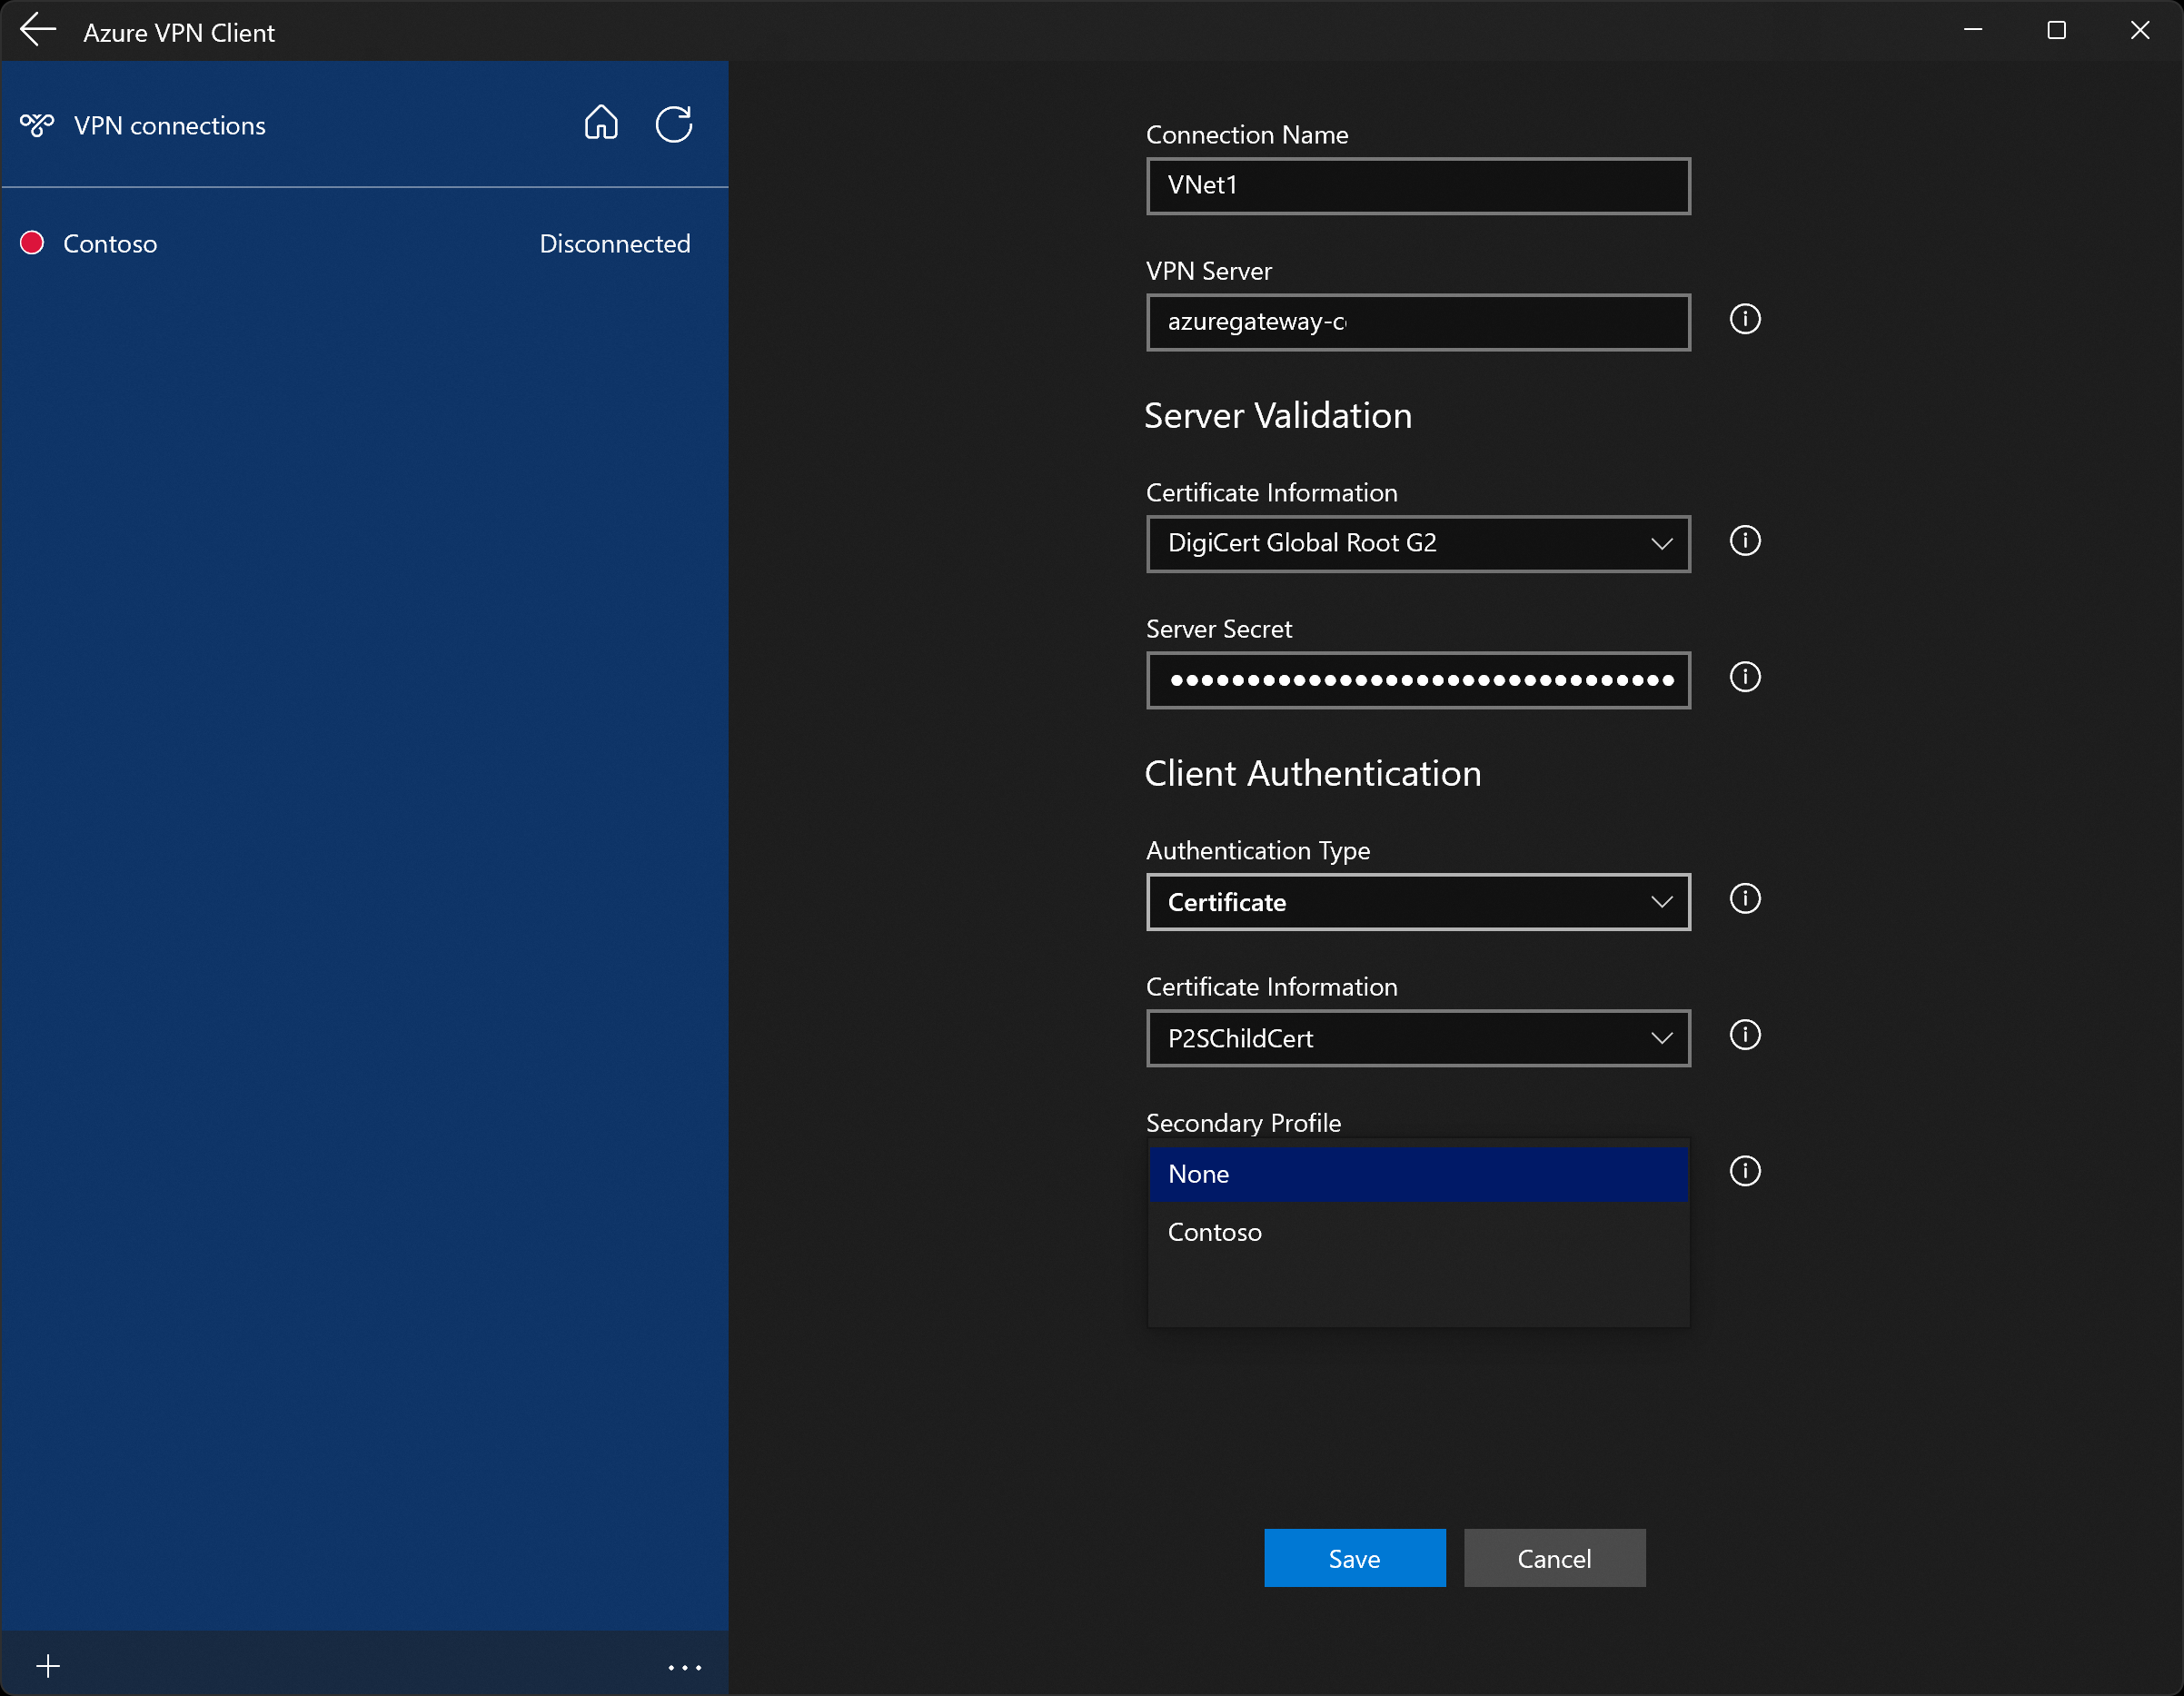
If you don't see a client certificate in the Certificate Information dropdown, you'll need to cancel the profile configuration import and fix the issue before proceeding. It's possible that one of the following things is true:
- The client certificate isn't installed locally on the client computer.
- There are multiple certificates with exactly the same name installed on your local computer (common in test environments).
- The child certificate is corrupt.
After the import validates (imports with no errors), select Save.
In the left pane, locate the VPN connection, then select Connect.
-
The Azure VPN Client system tray, available in version 4.0.0.0 and later, lets you close the Azure VPN Client application while keeping the connection active. When you close the application, you can see the application in the Windows system tray. You can reopen the Azure VPN Client app in compact mode by clicking the tray icon.
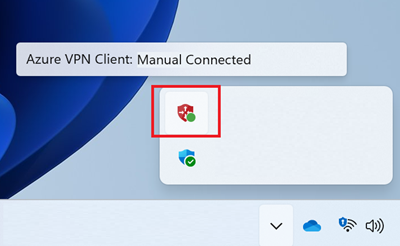
If you experience connection issues and you're running version 4.0.0.0 or later of the Azure VPN Client, select the ... at the bottom of the Azure VPN Client page, and then select Prerequisites. On the Test Application Prerequisites page, select Run Prerequisites Test. Fix any issues and try connecting again. For more information, see Azure VPN Client prerequisites check.
Export and distribute a client profile
Once you have a working profile and need to distribute it to other users, you can export it using the following steps:
Highlight the VPN client profile that you want to export, select the ..., then select Export.
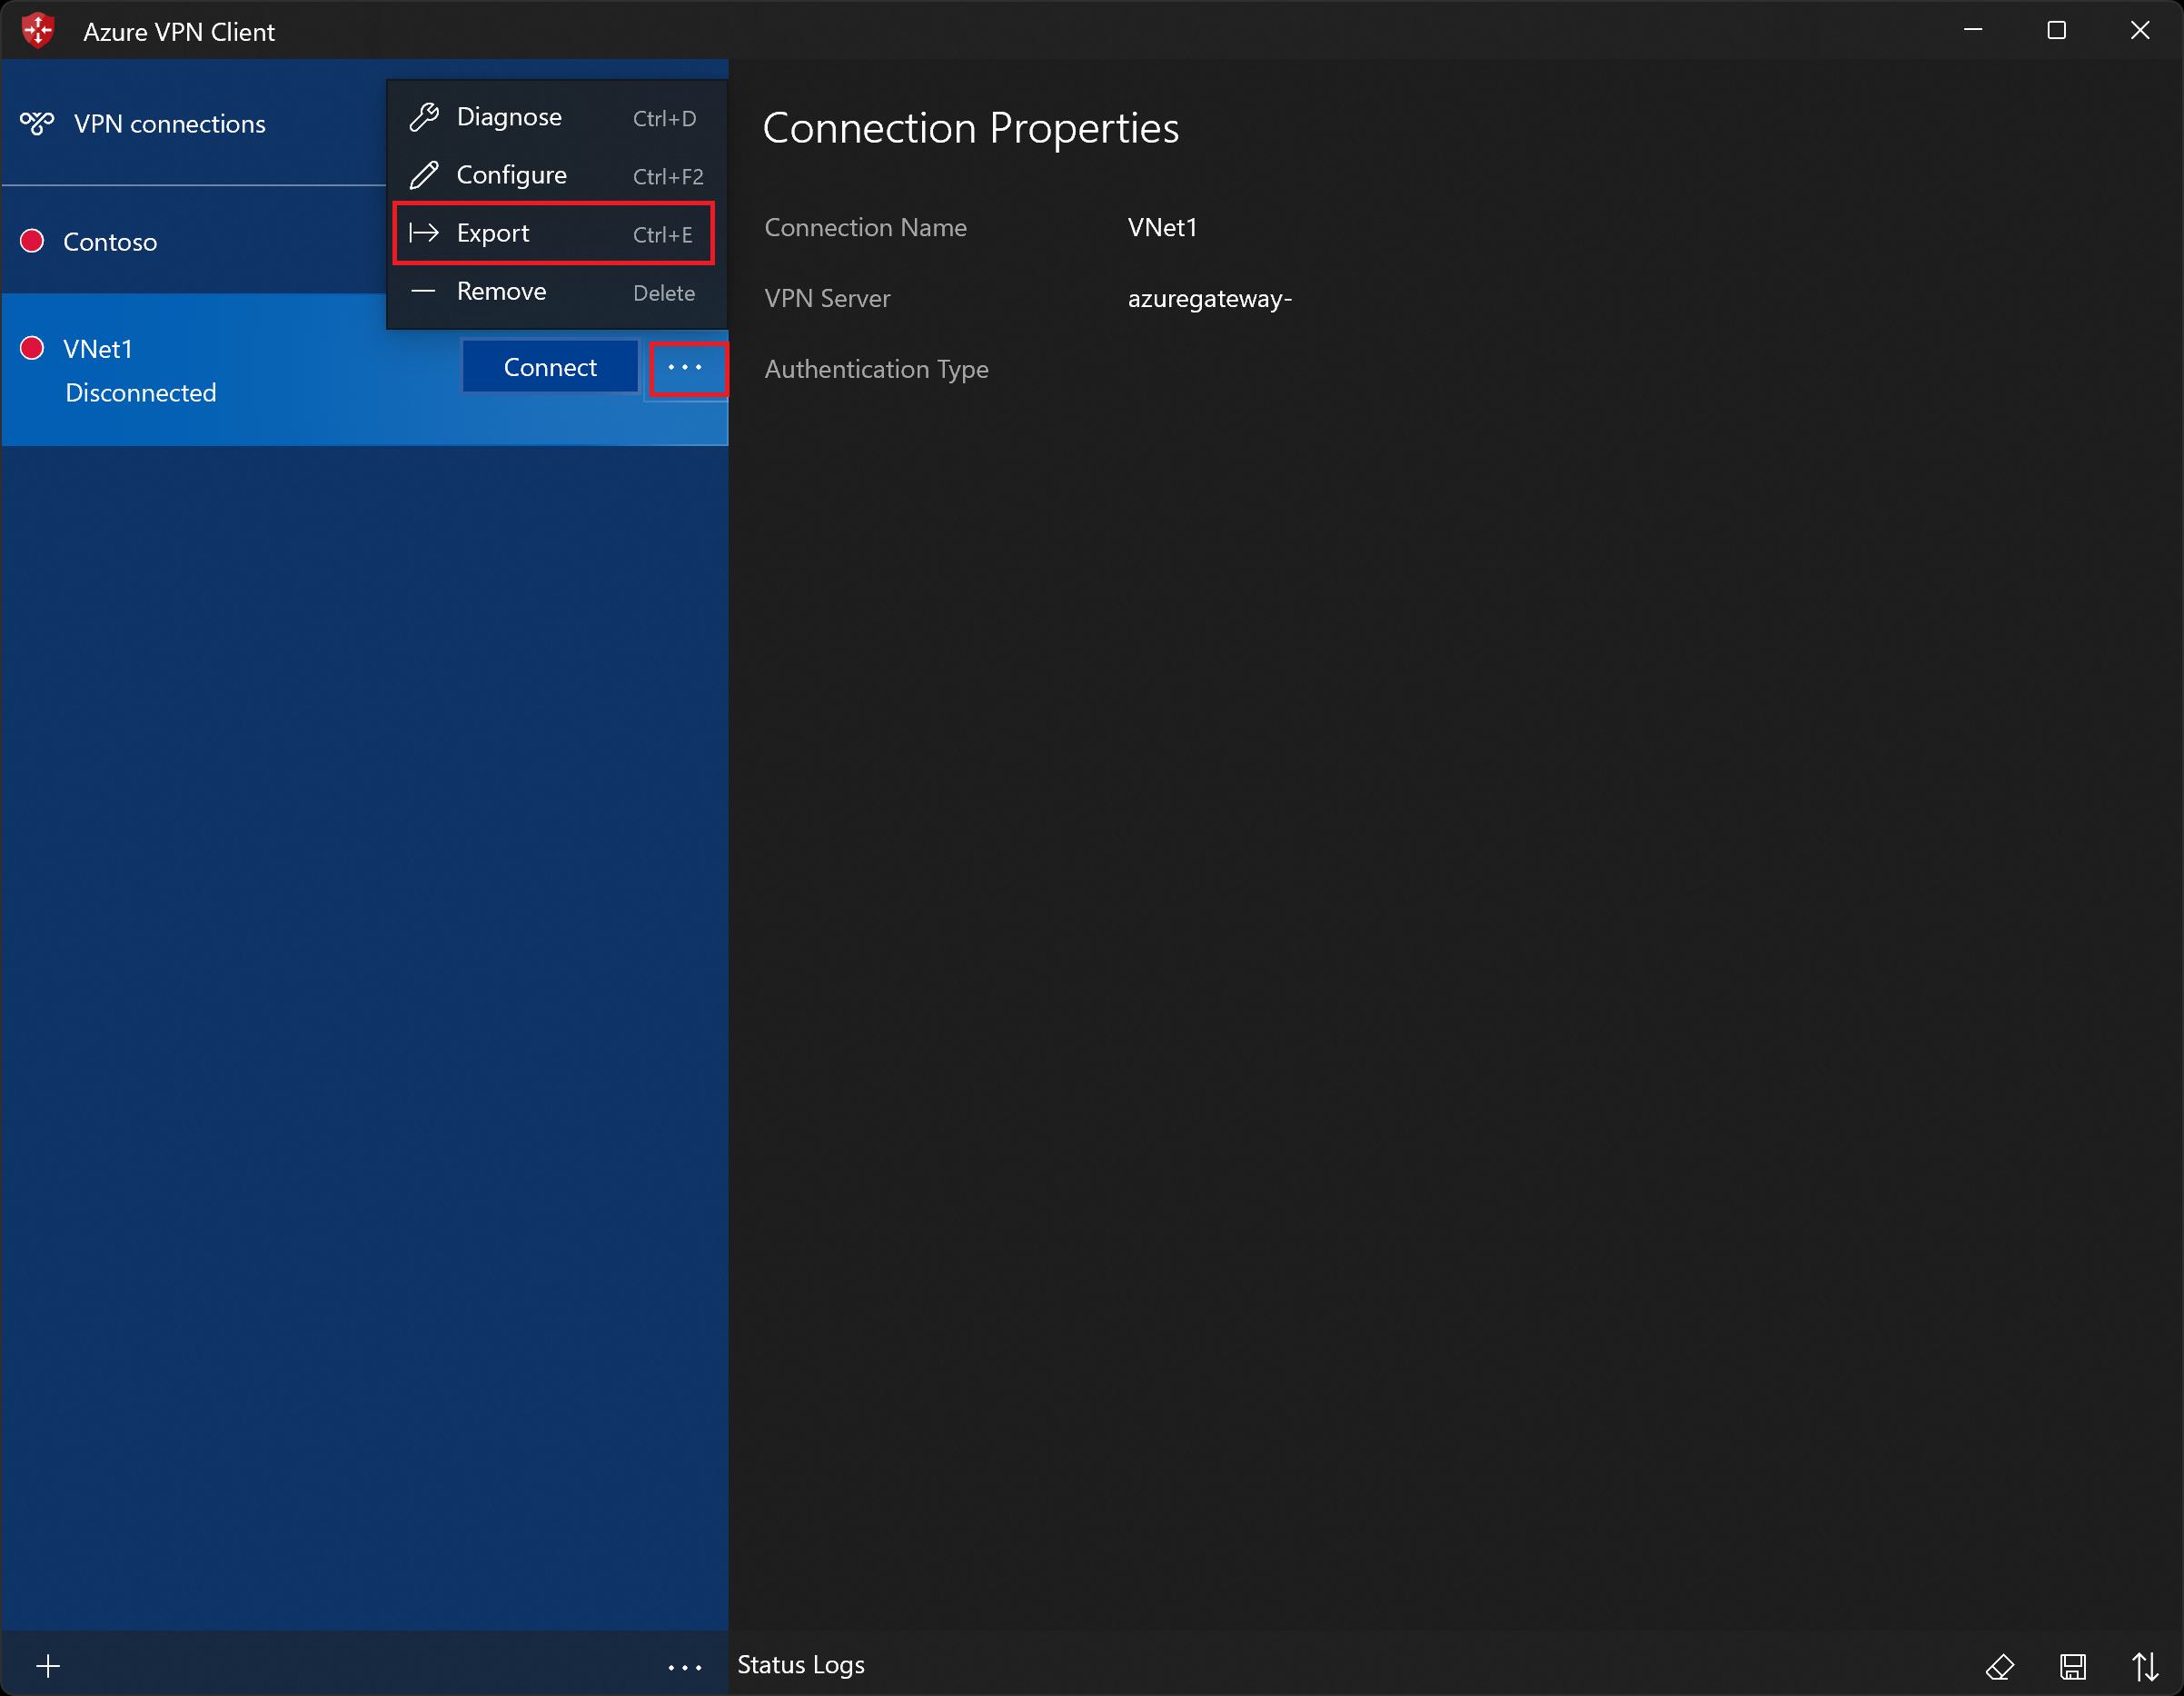
Select the location that you want to save this profile to, leave the file name as is, then select Save to save the xml file.
Delete a client profile
Highlight the VPN client profile that you want to export, select the ..., then select Remove.
On the confirmation popup, select Remove to delete.
Configure a secondary profile
The Azure VPN Client provides high availability for client profiles. Adding a secondary client profile gives the client a more resilient way to access the VPN. If there's a region outage or failure to connect to the primary VPN client profile, the Azure VPN Client autoconnects to the secondary client profile without causing any disruptions. This feature requires the Azure VPN Client version 2.2124.51.0 or later.
For this example, we'll add a secondary profile to an already existing profile. If the client can't connect to VNet1, it will automatically connect to Contoso without causing disruptions.
Add another VPN client profile to the Azure VPN Client. For this example, we imported a VPN client profile file and added a connection to Contoso.
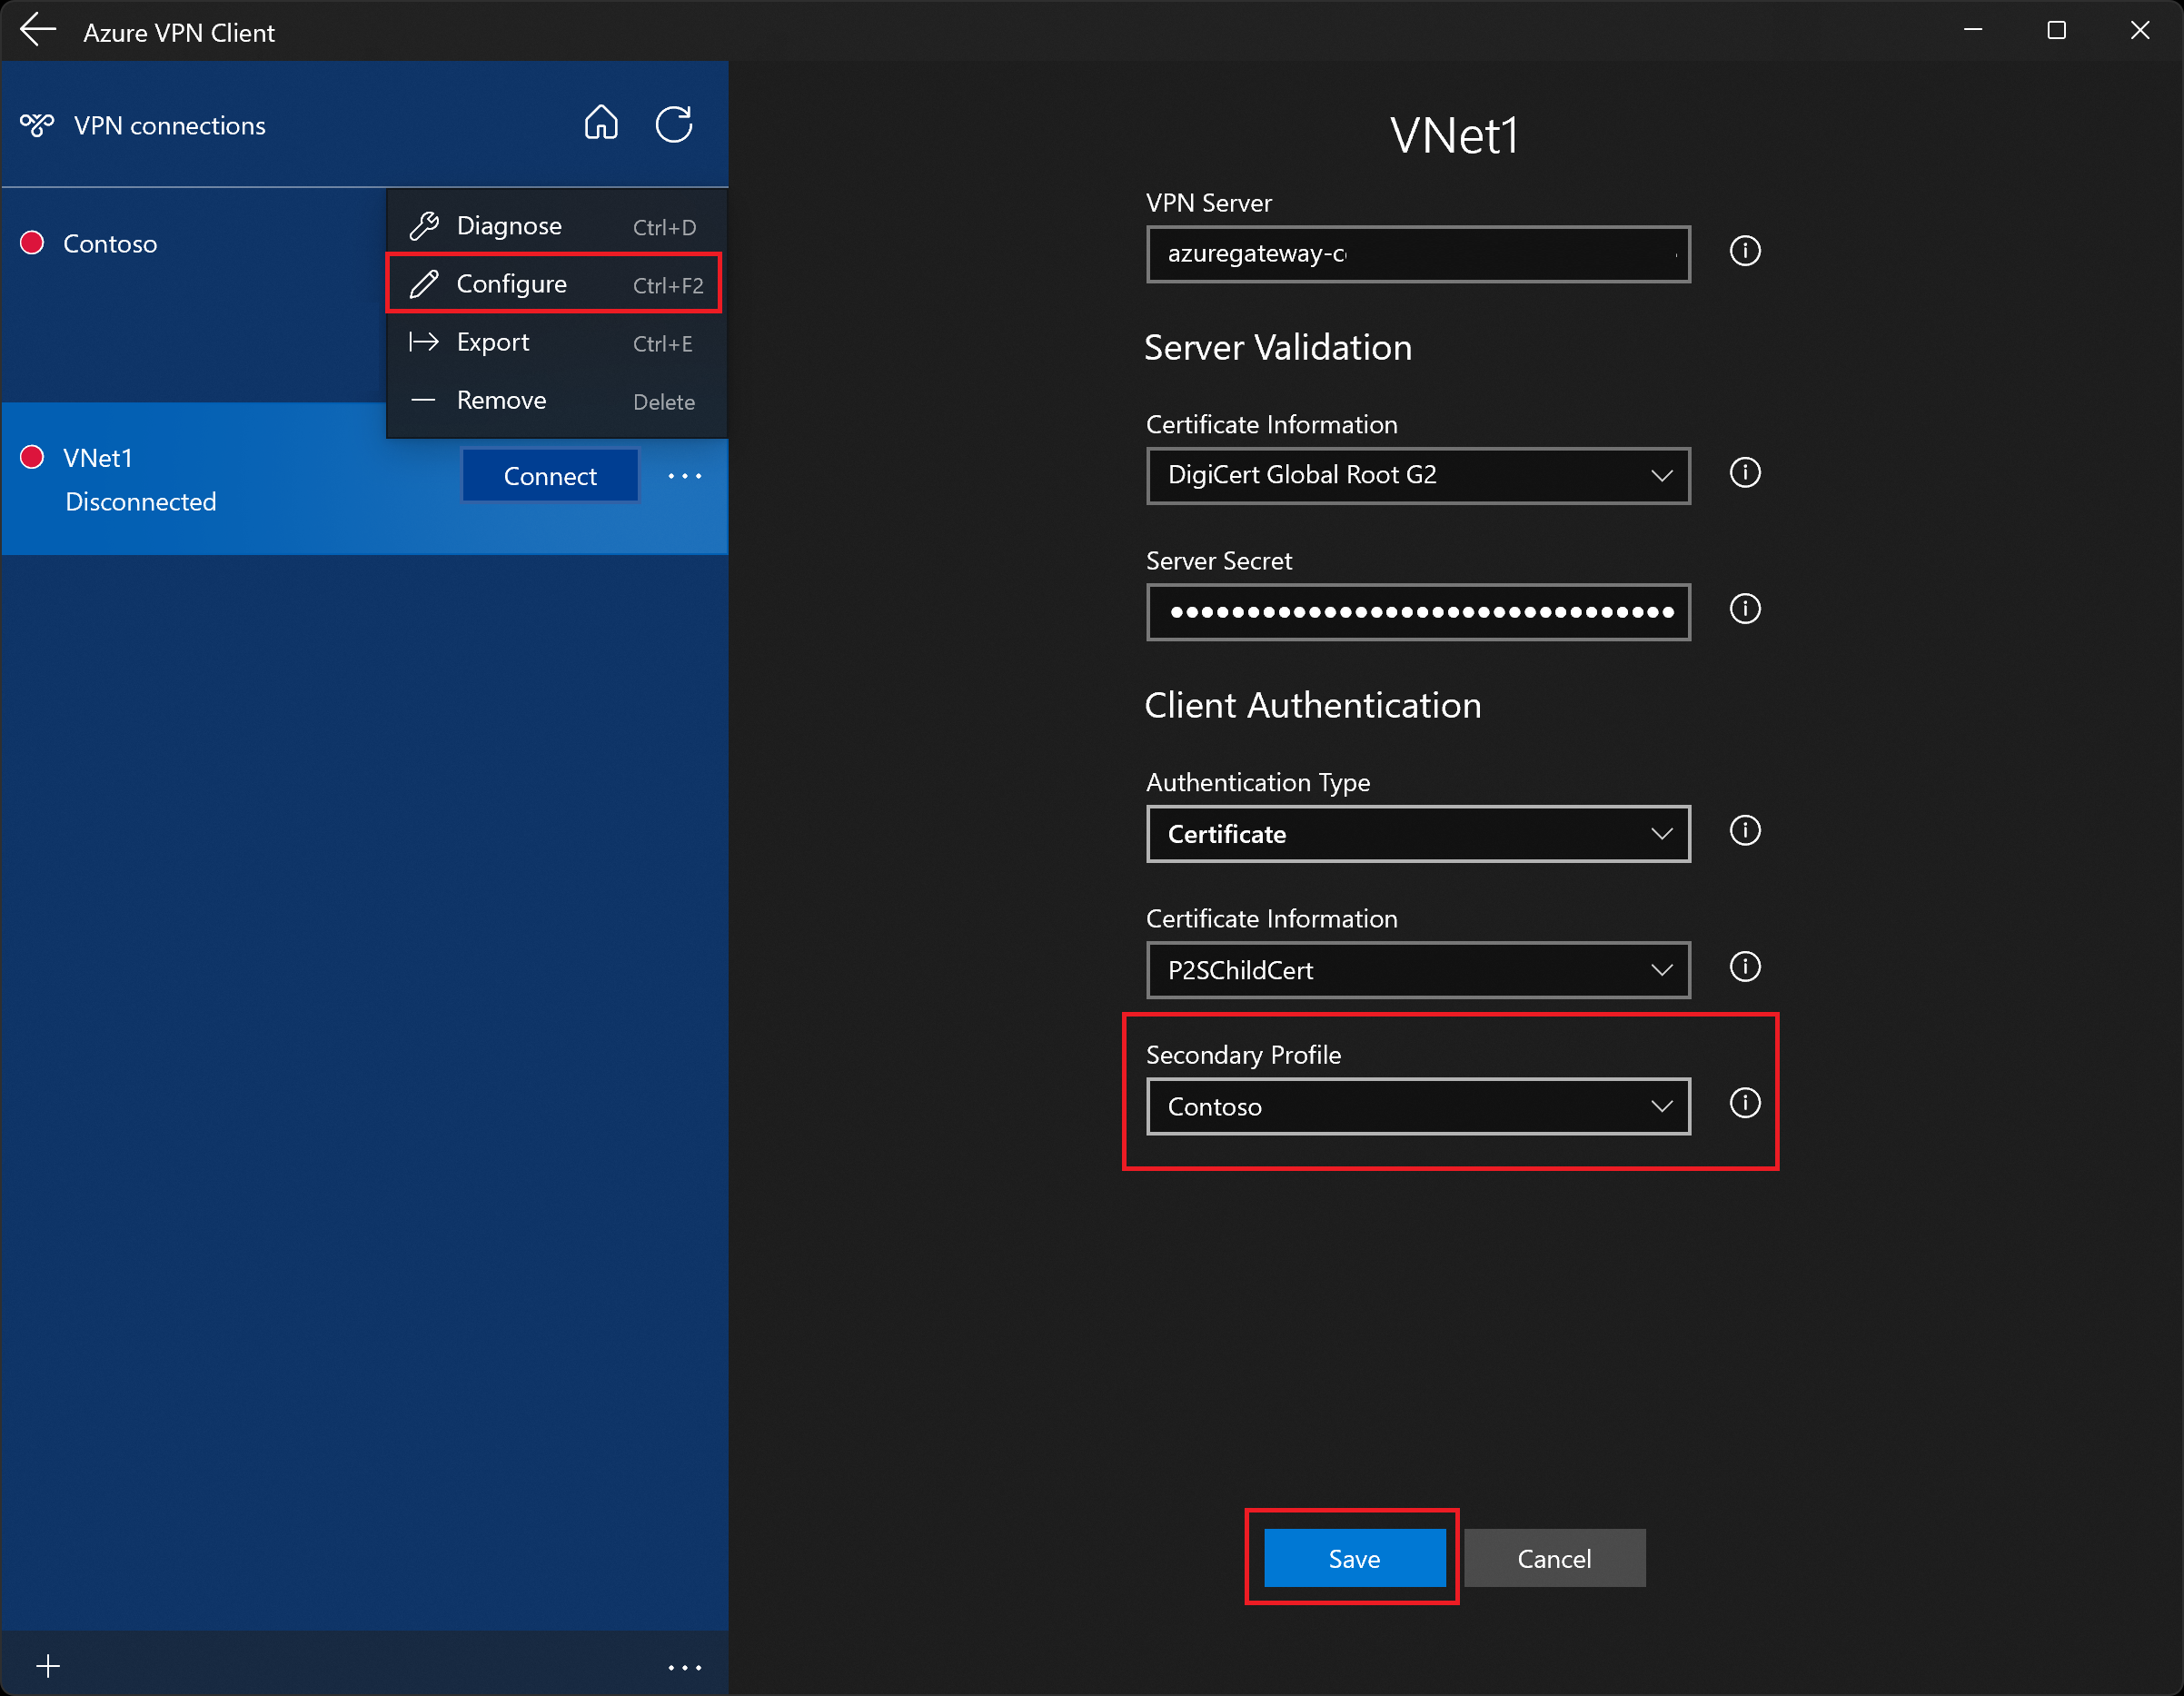
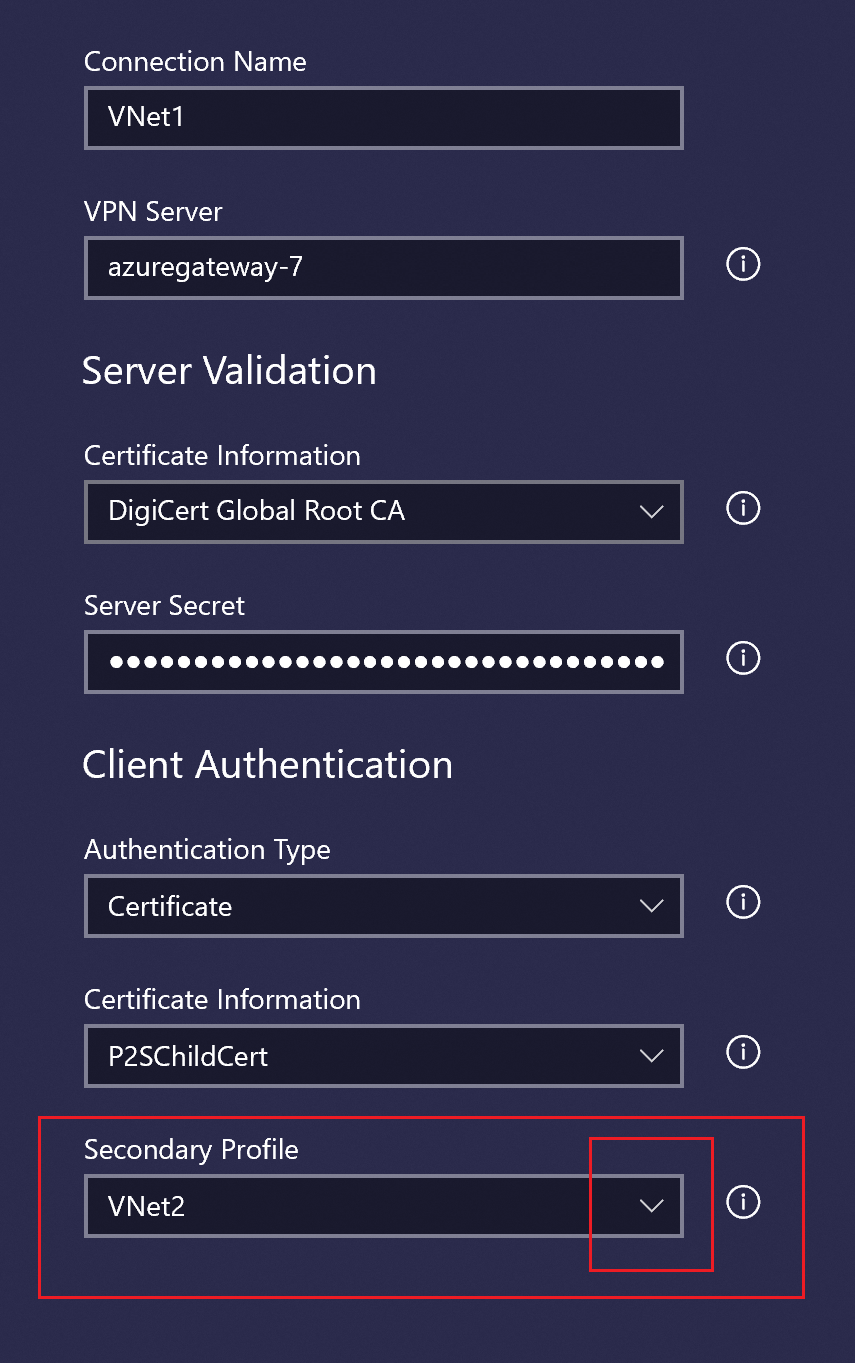
Next, go to the VNet1 profile and click "...", then Configure.
From the Secondary Profile dropdown, select the profile for Contoso. Then, Save your settings.
Working with connections
To connect automatically
These steps help you configure your connection to connect automatically with Always-on.
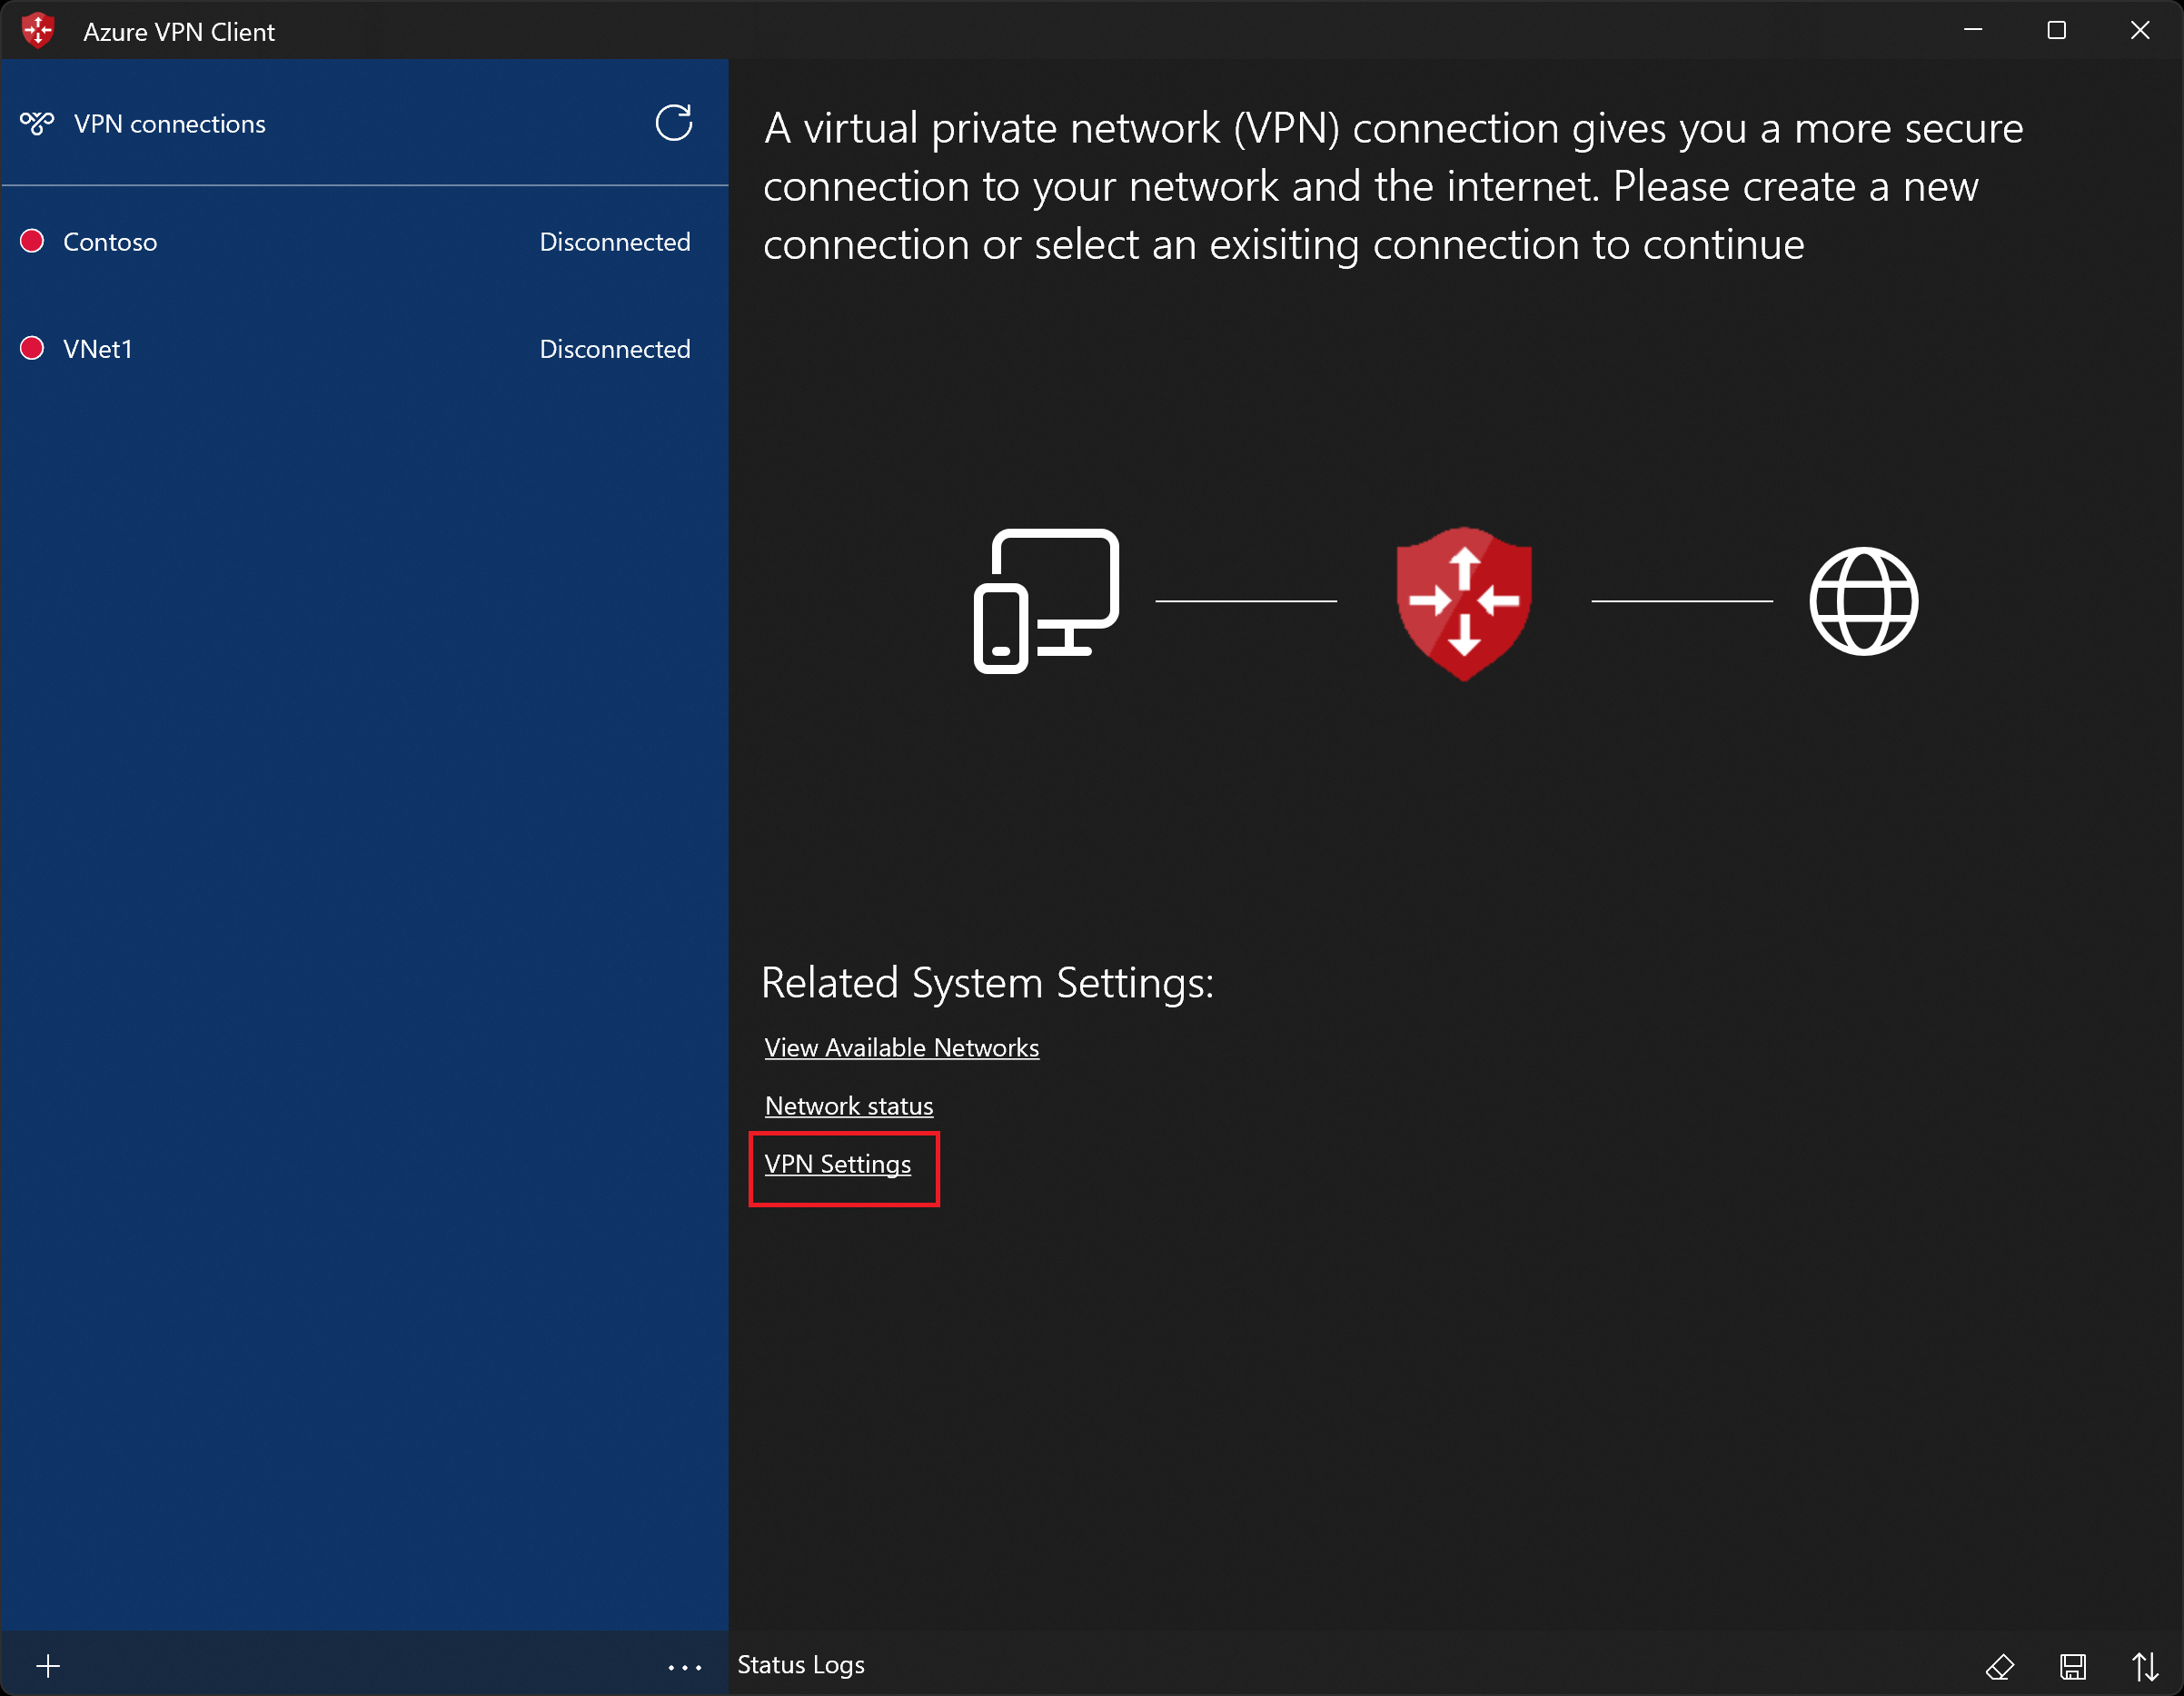
On the home page for your VPN client, select VPN Settings. If you see the switch apps dialog box, select Yes.
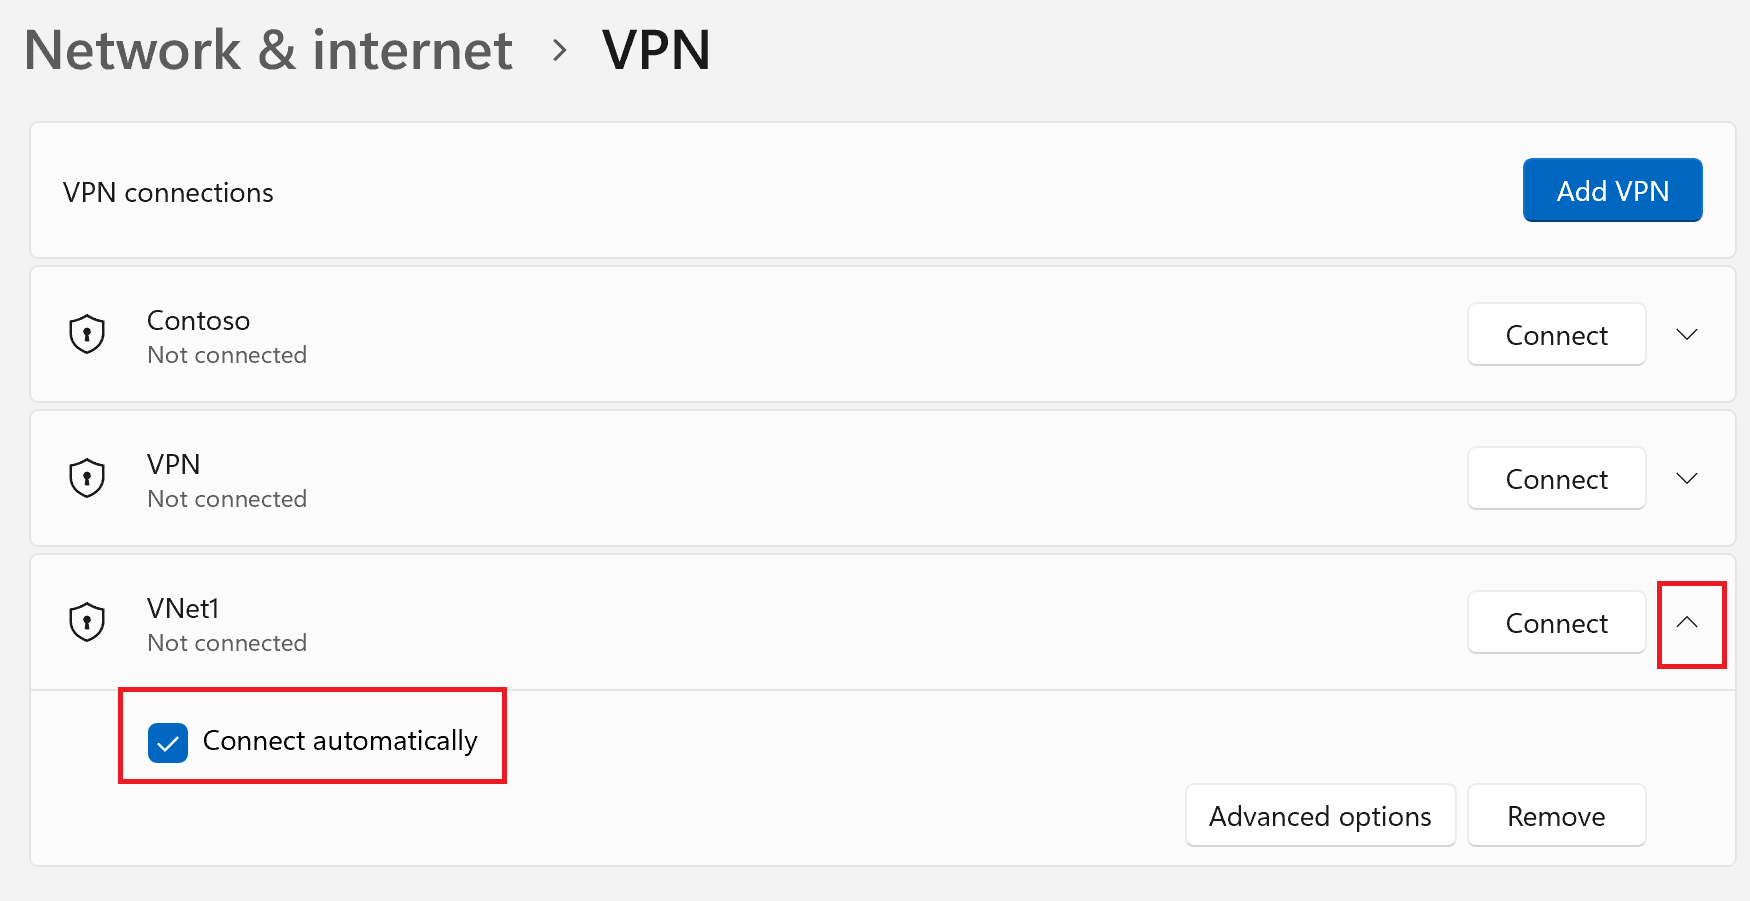
If the profile that you want to configure is connected, disconnect the connection, then highlight the profile and select the Connect automatically check box.
Select Connect to initiate the VPN connection.
Diagnose connection issues
Prerequisites check
If your Azure VPN Client is version 4.0.0.0 or later, you can run a prerequisites check to verify that your computer has the necessary items configured and installed to successfully connect. To view the version number of an installed Azure VPN Client, launch the client and select Help.
- Select the ... at the bottom of the Azure VPN Client page and select Prerequisites.
- On the Test Application Prerequisites page, select Run Prerequisites Test.
- Fix any issues and try connecting again. For more information, see Azure VPN Client prerequisites check.
Diagnostics tool
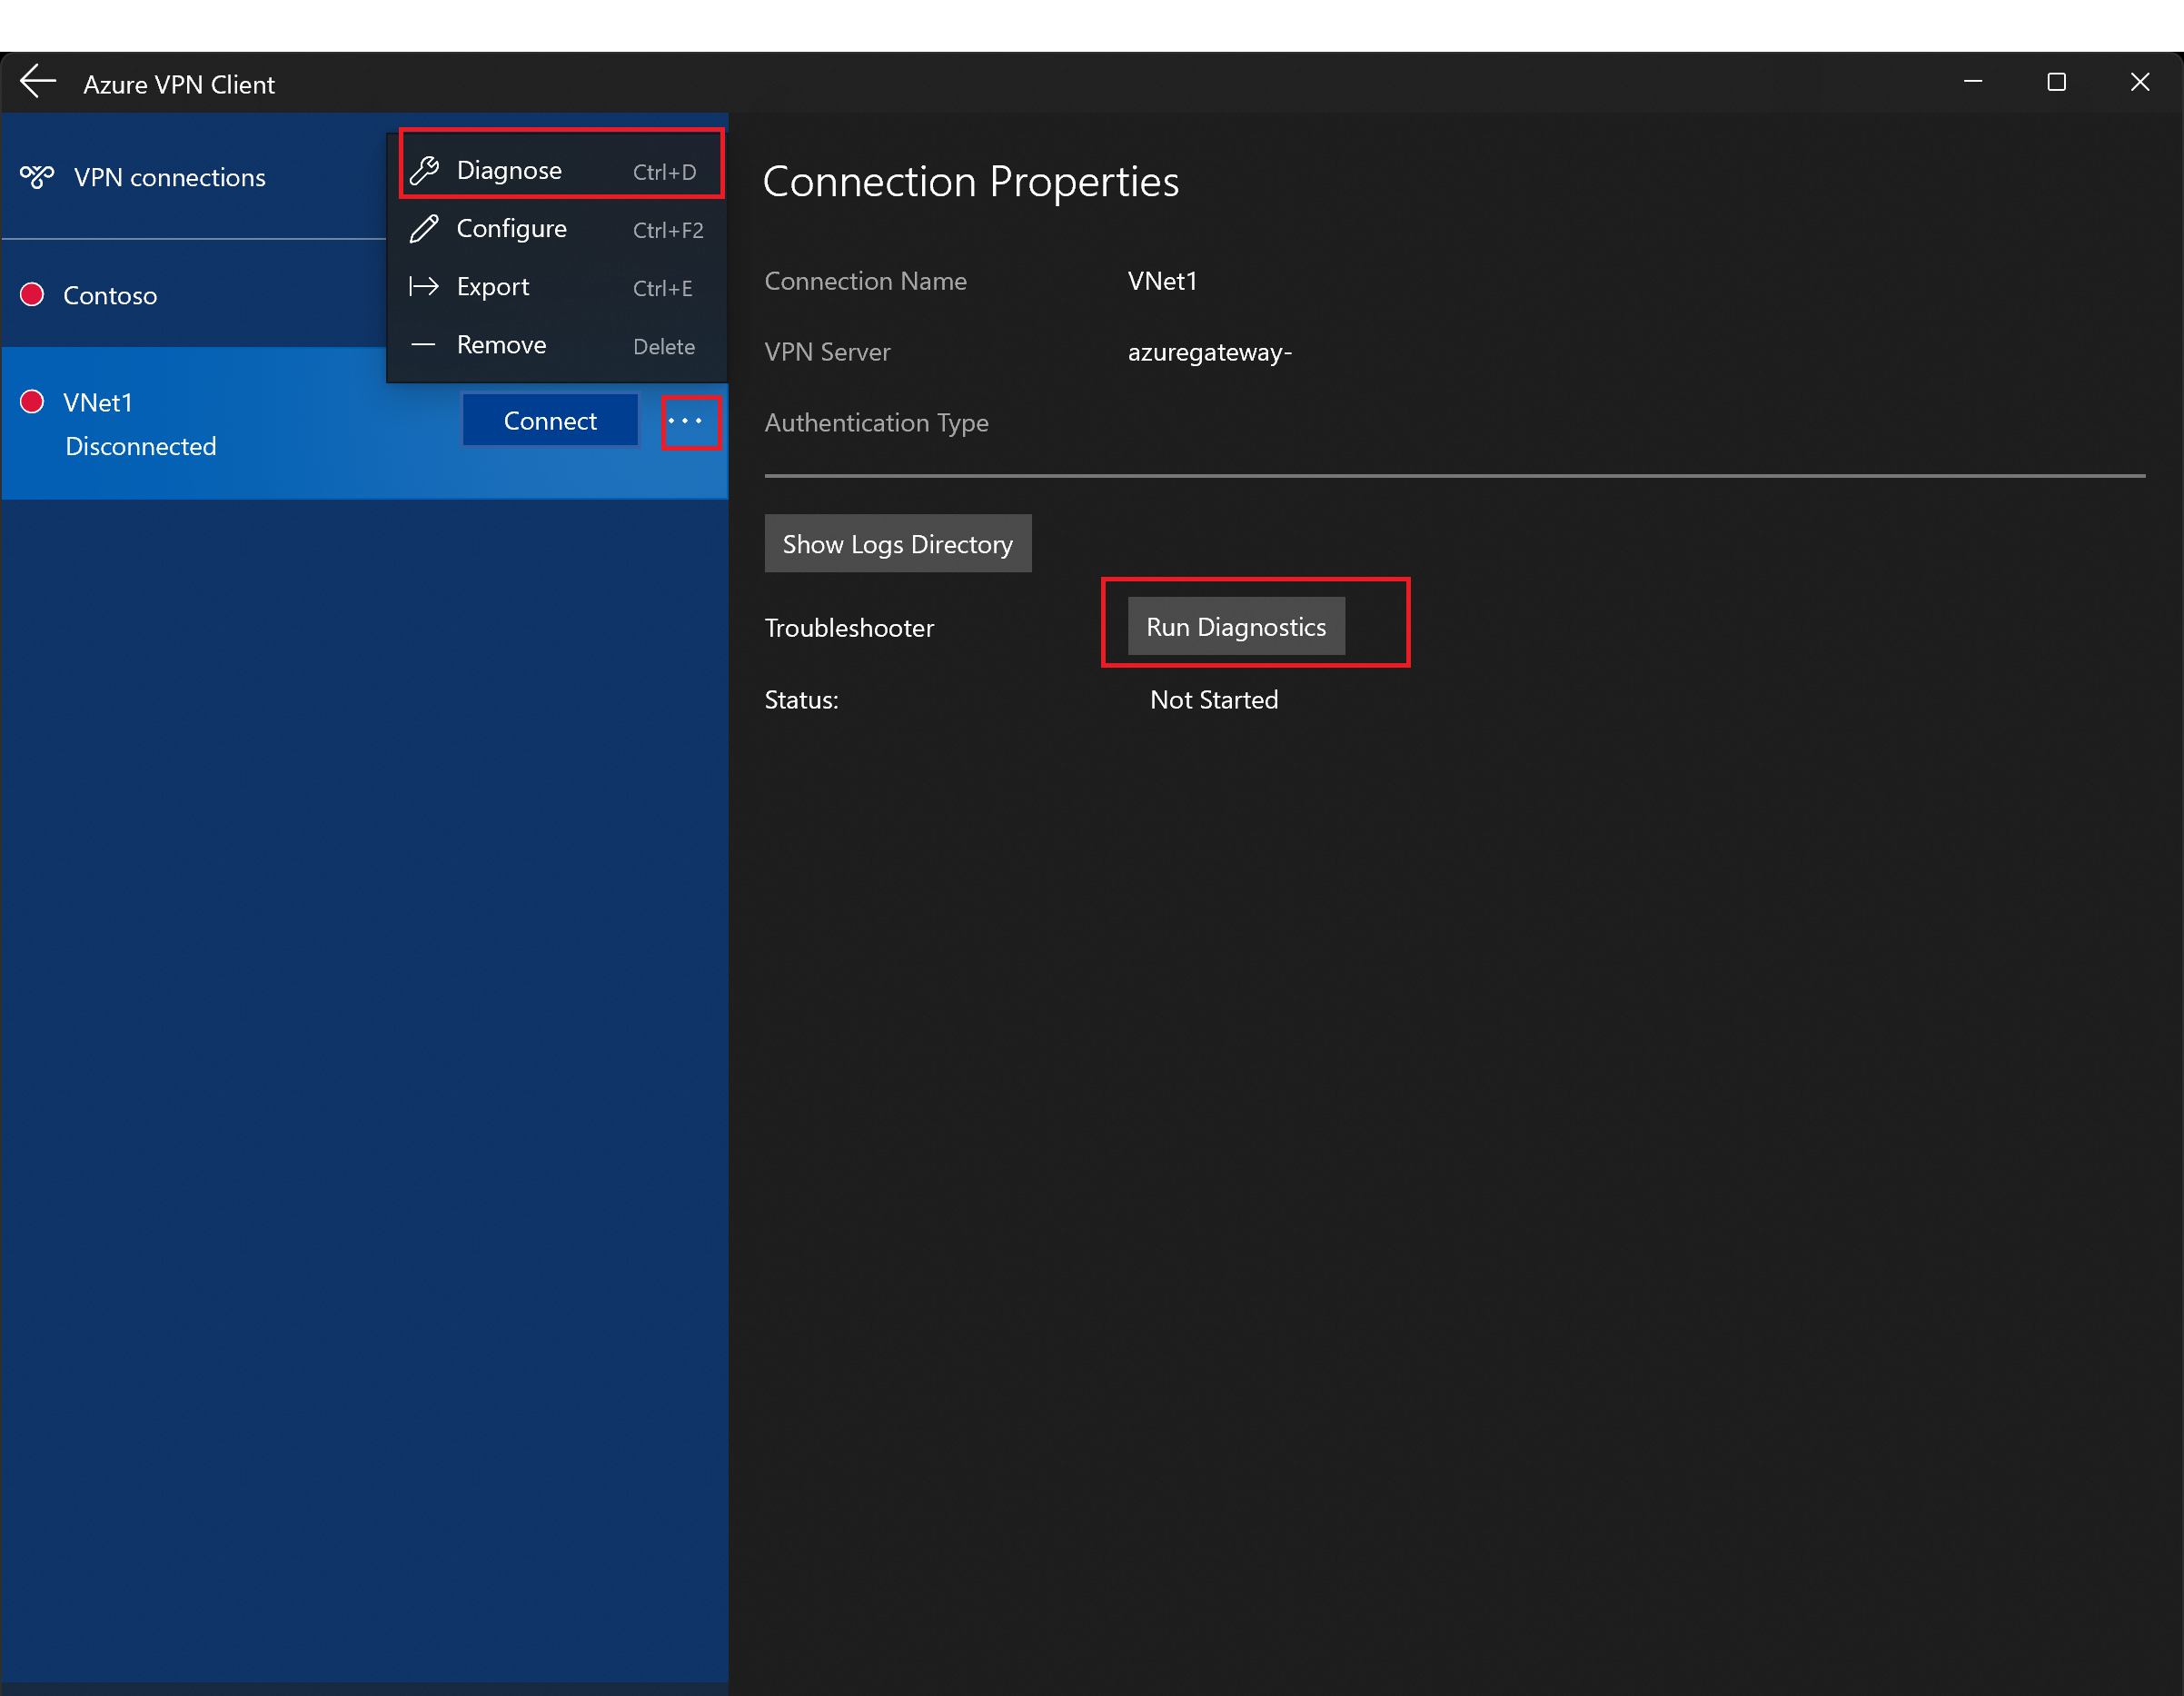
Select the ... next to the VPN connection that you want to diagnose to reveal the menu. Then select Diagnose.
On the Connection Properties page, select Run Diagnostics. If asked, sign in with your credentials, then view the results.
Custom settings: DNS and routing
You can configure the Azure VPN Client with optional configuration settings such as more DNS servers, custom DNS, forced tunneling, custom routes, and other settings. For a description of the available settings and configuration steps, see Azure VPN Client optional settings.
OpenVPN Client 2.x
If your point-to-site (P2S) VPN gateway is configured to use OpenVPN and certificate authentication, you can connect to your virtual network using the OpenVPN Client 2.4 and higher. For OpenVPN Connect 3.x clients, see the OpenVPN Client 3.x section instead.
Note
The OpenVPN client is independently managed and isn't under Microsoft's control. This means Microsoft doesn't oversee its code, builds, roadmap, or legal aspects. If you encounter any bugs or issues with the OpenVPN client, contact OpenVPN Inc. support directly. The guidelines in this article are provided "as is" and haven't been validated by OpenVPN Inc. They help customers who are already familiar with the client and want to use it to connect to the Azure VPN Gateway in a Point-to-Site VPN setup.
Connection requirements
To connect to Azure by using the OpenVPN client and certificate authentication, each connecting client computer requires the following items:
- The OpenVPN Client software installed and configured on each client computer.
- A client certificate installed locally on the client computer.
Workflow
The workflow for this section is:
- Generate and install client certificates if you haven't already.
- View the VPN client profile configuration files contained in the VPN client profile configuration package that you generated.
- Configure the OpenVPN client.
- Connect to Azure.
Generate and install client certificates
For certificate authentication, install a client certificate on each client computer. Export the client certificate you want to use with the private key, and include all certificates in the certification path. For some configurations, you also need to install root certificate information.
In many cases, you can install the client certificate directly on the client computer by double-clicking it. However, for certain OpenVPN client configurations, you might need to extract information from the client certificate to complete the configuration.
- For information about working with certificates, see Point-to site: Generate certificates.
- To view an installed client certificate, open Manage User Certificates. The client certificate is installed in Current User\Personal\Certificates.
Install the client certificate
Each computer needs a client certificate to authenticate. If you didn't already install the client certificate on the local computer, use the following steps to install it:
- Locate the client certificate. For more information about client certificates, see Install client certificates.
- Install the client certificate. Typically, you can install a certificate by double-clicking the certificate file and providing a password (if required).
- Use the client certificate later in this exercise to configure the OpenVPN Connect client profile settings.
View client profile configuration files
The VPN client profile configuration package contains specific folders. The files within the folders contain the settings needed to configure the VPN client profile on the client computer. The files and the settings they contain are specific to the VPN gateway and the type of authentication and tunnel your VPN gateway is configured to use.
Locate and unzip the VPN client profile configuration package you generated. For certificate authentication and OpenVPN, you should see the OpenVPN folder. If you don't see the folder, verify the following items:
- Verify that your VPN gateway is configured to use the OpenVPN tunnel type.
- If you're using Microsoft Entra authentication, you might not have an OpenVPN folder. See the Microsoft Entra ID configuration article instead.
Configure the client
Download and install the OpenVPN client (version 2.4 or higher) from the official OpenVPN website.
Locate the VPN client profile configuration package that you generated and downloaded to your computer. Extract the package. Go to the OpenVPN folder and open the vpnconfig.ovpn configuration file using Notepad.
Next, locate the child certificate you created. If you don't have the certificate, use one of the following links for steps to export the certificate. You'll use the certificate information in the next step.
- VPN Gateway instructions
- Virtual WAN instructions
From the child certificate, extract the private key and the base64 thumbprint from the .pfx. There are multiple ways to do this. Using OpenSSL on your computer is one way. The profileinfo.txt file contains the private key and the thumbprint for the CA and the Client certificate. Be sure to use the thumbprint of the client certificate.
openssl pkcs12 -in "filename.pfx" -nodes -out "profileinfo.txt"Switch to the vpnconfig.ovpn file you opened in Notepad. Fill in the section between
<cert>and</cert>, getting the values for$CLIENT_CERTIFICATE,$INTERMEDIATE_CERTIFICATE, and$ROOT_CERTIFICATEas shown in the following example.# P2S client certificate # please fill this field with a PEM formatted cert <cert> $CLIENT_CERTIFICATE $INTERMEDIATE_CERTIFICATE (optional) $ROOT_CERTIFICATE </cert>- Open profileinfo.txt from the previous step in Notepad. You can identify each certificate by looking at the
subject=line. For example, if your child certificate is called P2SChildCert, your client certificate will be after thesubject=CN = P2SChildCertattribute. - For each certificate in the chain, copy the text (including and between) "-----BEGIN CERTIFICATE-----" and "-----END CERTIFICATE-----".
- Only include an
$INTERMEDIATE_CERTIFICATEvalue if you have an intermediate certificate in your profileinfo.txt file.
- Open profileinfo.txt from the previous step in Notepad. You can identify each certificate by looking at the
Open the profileinfo.txt in Notepad. To get the private key, select the text (including and between) "-----BEGIN PRIVATE KEY-----" and "-----END PRIVATE KEY-----" and copy it.
Go back to the vpnconfig.ovpn file in Notepad and find this section. Paste the private key replacing everything between and
<key>and</key>.# P2S client root certificate private key # please fill this field with a PEM formatted key <key> $PRIVATEKEY </key>If you're using the 2.6 version of the OpenVPN client, add the "disable-dco" option to the profile. This option doesn't seem to be backward compatible with previous versions, so it should only be added to OpenVPN client version 2.6.
Don't change any other fields. Use the filled in configuration in client input to connect to the VPN.
Copy the vpnconfig.ovpn file to C:\Program Files\OpenVPN\config folder.
Right-click the OpenVPN icon in the system tray and click Connect.
OpenVPN Client 3.x
If your point-to-site (P2S) VPN gateway is configured to use OpenVPN and certificate authentication, you can connect to your virtual network using the OpenVPN Connect client 3.x. There are some configuration differences between the OpenVPN 2.x client and the OpenVPN Connect 3.x client. This section focuses on the OpenVPN Connect 3.x client.
Note
The OpenVPN client is independently managed and not under Microsoft's control. This means Microsoft doesn't oversee its code, builds, roadmap, or legal aspects. Should customers encounter any bugs or issues with the OpenVPN client, they should directly contact OpenVPN Inc. support. The guidelines in this article are provided 'as is' and haven't been validated by OpenVPN Inc. They're intended to assist customers who are already familiar with the client and wish to use it to connect to the Azure VPN Gateway in a Point-to-Site VPN setup.
Connection requirements
To connect to Azure using the OpenVPN Connect 3.x client using certificate authentication, each connecting client computer requires the following items:
- The OpenVPN Connect client software must be installed and configured on each client computer.
- The client computer must have a client certificate that's installed locally.
- If your certificate chain includes an intermediate certificate, see the Intermediate certificates section first to verify that your P2S VPN gateway configuration is set up to support this certificate chain. The certificate authentication behavior for 3.x clients is different than previous versions, where you could specify the intermediate certificate in the client profile.
Workflow
The workflow for this section is:
- Generate and install client certificates, if you haven't already done so.
- View the VPN client profile configuration files contained in the VPN client profile configuration package that you generated.
- Configure the OpenVPN Connect client.
- Connect to Azure.
Generate and install client certificates
For certificate authentication, a client certificate must be installed on each client computer. The client certificate you want to use must be exported with the private key, and must contain all certificates in the certification path. Additionally, for some configurations, you'll also need to install root certificate information.
In many cases, you can install the client certificate directly on the client computer by double-clicking. However, for some OpenVPN client configurations, you might need to extract information from the client certificate to complete the configuration.
- For information about working with certificates, see Point-to site: Generate certificates.
- To view an installed client certificate, open Manage User Certificates. The client certificate is installed in Current User\Personal\Certificates.
Install the client certificate
Each computer needs a client certificate to authenticate. If the client certificate isn't already installed on the local computer, you can install it using the following steps:
- Locate the client certificate. For more information about client certificates, see Install client certificates.
- Install the client certificate. Typically, you can install a certificate by double-clicking the certificate file and providing a password (if required).
- You'll also use the client certificate later in this exercise to configure the OpenVPN Connect client profile settings.
View configuration files
The VPN client profile configuration package contains specific folders. The files within the folders contain the settings needed to configure the VPN client profile on the client computer. The files and the settings they contain are specific to the VPN gateway and the type of authentication and tunnel your VPN gateway is configured to use.
Locate and unzip the VPN client profile configuration package you generated. For Certificate authentication and OpenVPN, you should see the OpenVPN folder. If you don't see the folder, verify the following items:
- Verify that your VPN gateway is configured to use the OpenVPN tunnel type.
- If you're using Microsoft Entra ID authentication, you might not have an OpenVPN folder. See the Microsoft Entra ID configuration article instead.
Configure the client
Download and install the OpenVPN client version 3.x from the official OpenVPN website.
Locate the VPN client profile configuration package that you generated and downloaded to your computer. Extract the package. Go to the OpenVPN folder and open the vpnconfig.ovpn configuration file using Notepad.
Next, locate the child certificate you created. If you don't have the certificate, use one of the following links for steps to export the certificate. You'll use the certificate information in the next step.
- VPN Gateway instructions
- Virtual WAN instructions
From the child certificate, extract the private key and the base64 thumbprint from the .pfx. There are multiple ways to do this. Using OpenSSL on your computer is one way. The profileinfo.txt file contains the private key and the thumbprint for the CA and the Client certificate. Be sure to use the thumbprint of the client certificate.
openssl pkcs12 -in "filename.pfx" -nodes -out "profileinfo.txt"Switch to the vpnconfig.ovpn file you opened in Notepad. Fill in the section between
<cert>and</cert>, getting the values for$CLIENT_CERTIFICATE, and$ROOT_CERTIFICATEas shown in the following example.# P2S client certificate # please fill this field with a PEM formatted cert <cert> $CLIENT_CERTIFICATE $ROOT_CERTIFICATE </cert>- Open profileinfo.txt from the previous step in Notepad. You can identify each certificate by looking at the
subject=line. For example, if your child certificate is called P2SChildCert, your client certificate will be after thesubject=CN = P2SChildCertattribute. - For each certificate in the chain, copy the text (including and between) "-----BEGIN CERTIFICATE-----" and "-----END CERTIFICATE-----".
- Open profileinfo.txt from the previous step in Notepad. You can identify each certificate by looking at the
Open the profileinfo.txt in Notepad. To get the private key, select the text (including and between) "-----BEGIN PRIVATE KEY-----" and "-----END PRIVATE KEY-----" and copy it.
Go back to the vpnconfig.ovpn file in Notepad and find this section. Paste the private key replacing everything between and
<key>and</key>.# P2S client root certificate private key # please fill this field with a PEM formatted key <key> $PRIVATEKEY </key>Comment out the "log openvpn.log" line. If it's not commented out, the OpenVPN client reports that the log is no longer a supported option. See the User profile example for an example of how to comment out the log line. After commenting out the log line, you can still access logs via the OpenVPN client interface. To access, click the log icon at the top right corner of the client UI. Microsoft recommends that customers check the OpenVPN connect documentation for log file location because logging is controlled by the OpenVPN client.
Don't change any other fields. Use the filled in configuration in client input to connect to the VPN.
Import the vpnconfig.ovpn file in OpenVPN client.
Right-click the OpenVPN icon in the system tray and click Connect.
User profile example
The following example shows a user profile configuration file for 3.x OpenVPN Connect clients. This example shows the log file commented out and the "ping-restart 0" option added to prevent periodic reconnects due to no traffic being sent to the client.
client
remote <vpnGatewayname>.ln.vpn.azure.com 443
verify-x509-name <IdGateway>.ln.vpn.azure.com name
remote-cert-tls server
dev tun
proto tcp
resolv-retry infinite
nobind
auth SHA256
cipher AES-256-GCM
persist-key
persist-tun
tls-timeout 30
tls-version-min 1.2
key-direction 1
#log openvpn.log
#inactive 0
ping-restart 0
verb 3
# P2S CA root certificate
<ca>
-----BEGIN CERTIFICATE-----
……
……..
……..
……..
-----END CERTIFICATE-----
</ca>
# Pre Shared Key
<tls-auth>
-----BEGIN OpenVPN Static key V1-----
……..
……..
……..
-----END OpenVPN Static key V1-----
</tls-auth>
# P2S client certificate
# Please fill this field with a PEM formatted client certificate
# Alternatively, configure 'cert PATH_TO_CLIENT_CERT' to use input from a PEM certificate file.
<cert>
-----BEGIN CERTIFICATE-----
……..
……..
……..
-----END CERTIFICATE-----
</cert>
# P2S client certificate private key
# Please fill this field with a PEM formatted private key of the client certificate.
# Alternatively, configure 'key PATH_TO_CLIENT_KEY' to use input from a PEM key file.
<key>
-----BEGIN PRIVATE KEY-----
……..
……..
……..
-----END PRIVATE KEY-----
</key>
Intermediate certificates
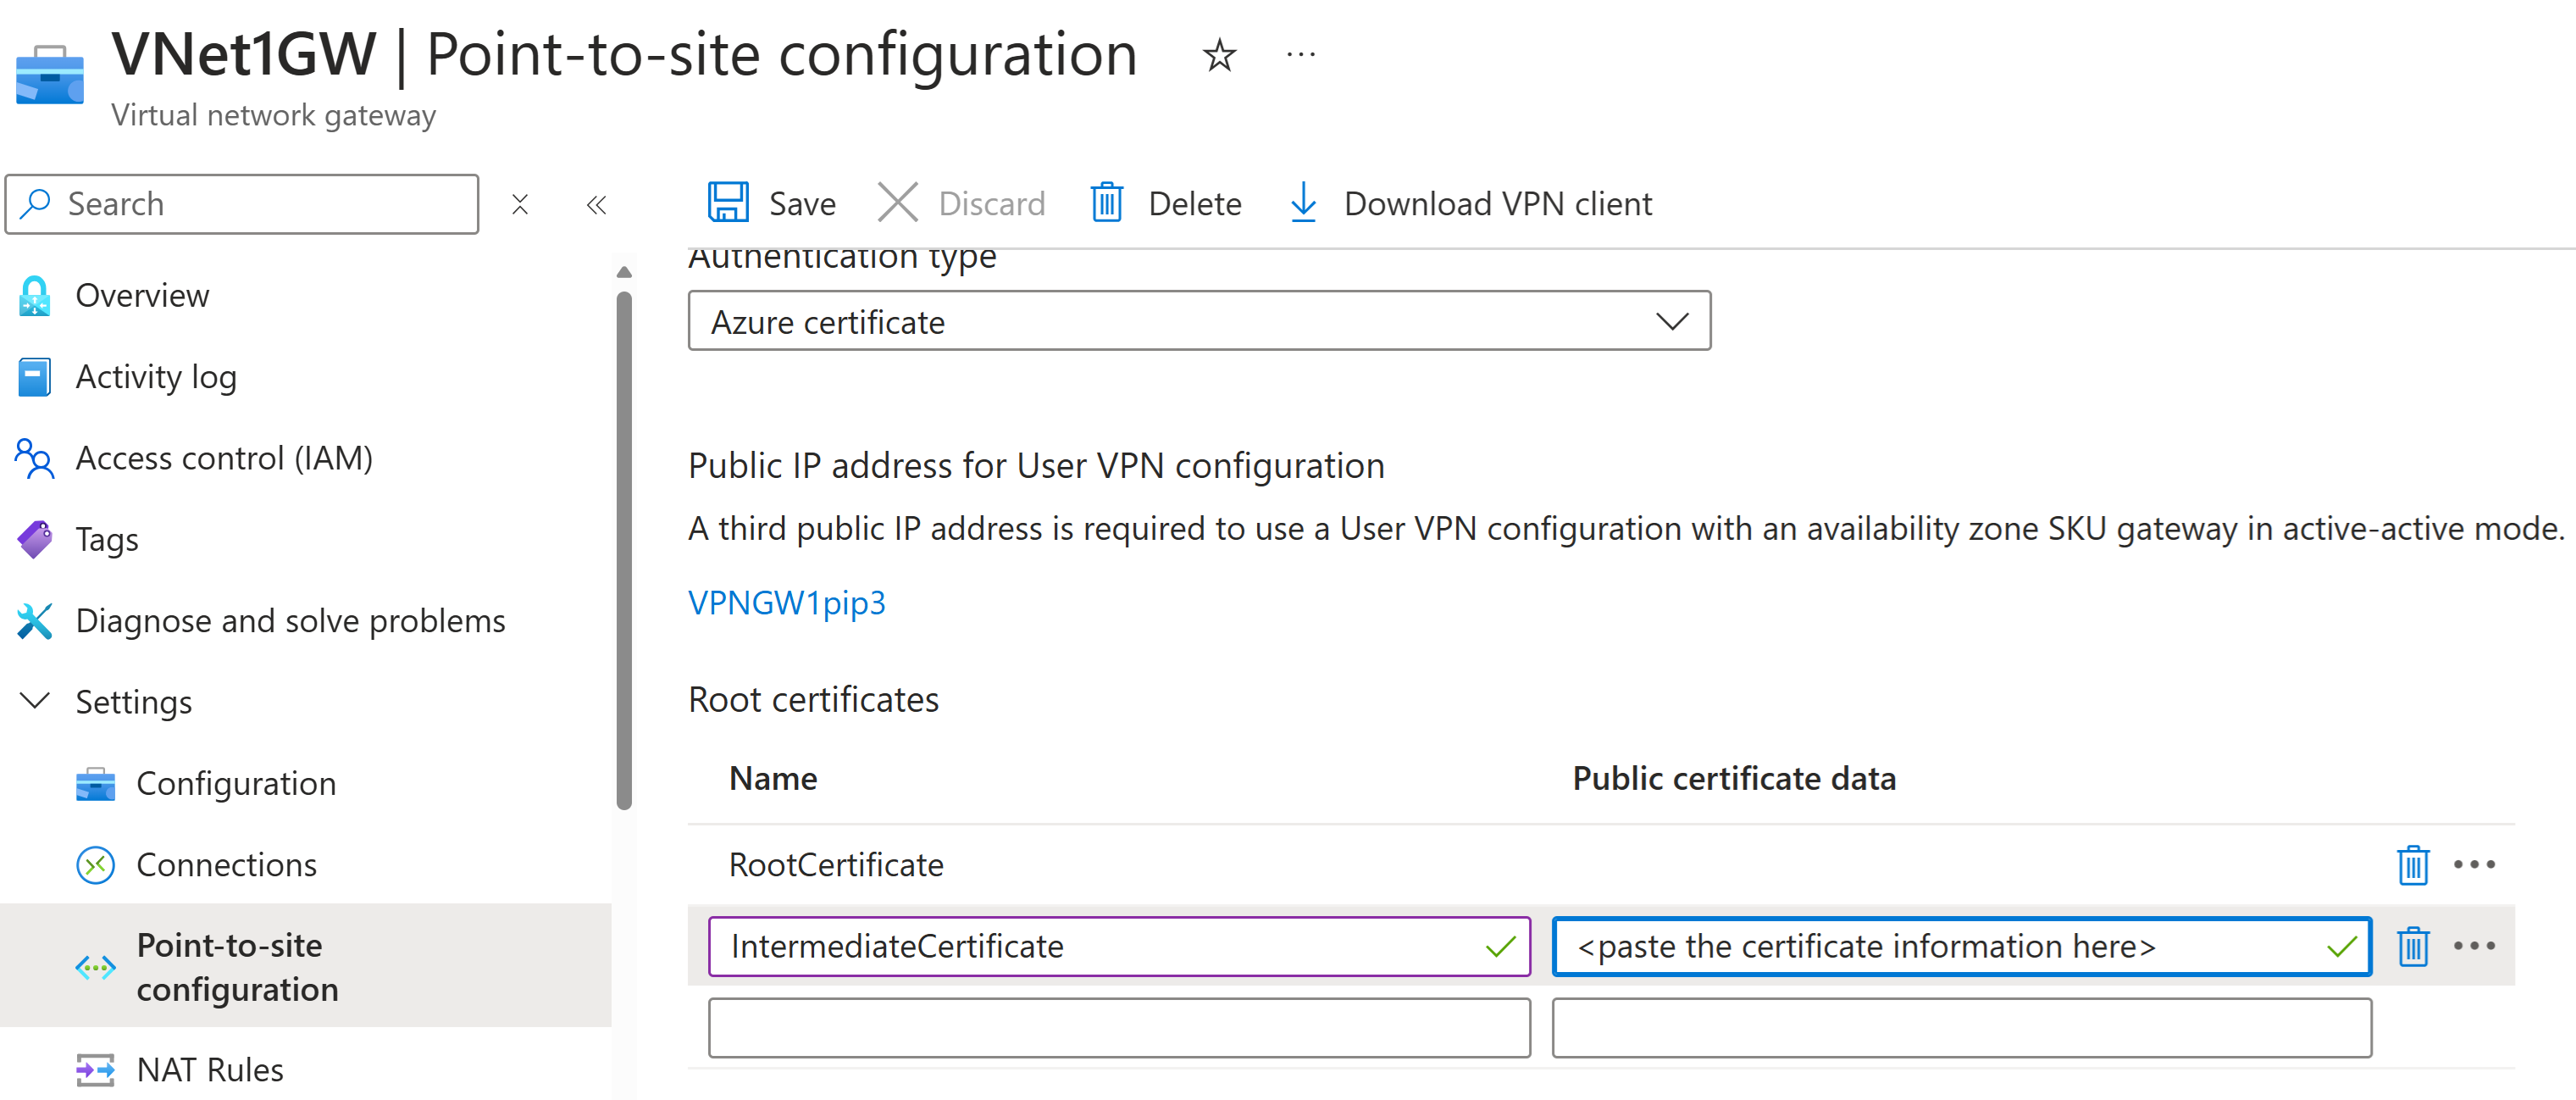
If your certificate chain includes intermediate certificates, you must upload the intermediate certificates to the Azure VPN gateway. This is the preferred method to use, regardless of the VPN client you choose to connect from. In previous versions, you could specify intermediate certificates in the user profile. This is no longer supported in OpenVPN Connect client version 3.x.
When you're working with intermediate certificates, the intermediate certificate must be uploaded after the root certificate.
Reconnects
If you experience periodic reconnects due to no traffic being sent to client, you can add the "ping-restart 0" option to the profile to prevent disconnections from causing reconnects. This is described in the OpenVPN Connect documentation as follows: --ping-restart n Similar to --ping-exit, but trigger a SIGUSR1 restart after n seconds pass without reception of a ping or other packet from remote.
See the User profile example for an example of how to add this option.
macOS
macOS clients can connect using the native VPN client (IKEv2 tunnel type) or an OpenVPN client (OpenVPN tunnel type).
Native VPN client
If your point-to-site (P2S) VPN gateway is configured to use IKEv2 and certificate authentication, you can connect to your virtual network using the native VPN client that's part of your macOS operating system.
Note
Your VPN gateway must be using a SKU other than the Basic SKU.
Workflow
- Generate client certificates if you haven't already done so.
- View the VPN client profile configuration files contained in the VPN client profile configuration package that you generated.
- Install certificates.
- Configure the native VPN client that's already installed on your OS.
- Connect to Azure.
Generate certificates
For certificate authentication, a client certificate must be installed on each client computer. The client certificate you want to use must be exported with the private key, and must contain all certificates in the certification path. Additionally, for some configurations, you'll also need to install root certificate information.
For information about working with certificates, see Generate and export certificates.
View the VPN client profile configuration files
All of the necessary configuration settings for the VPN clients are contained in a VPN client profile configuration zip file. You can generate client profile configuration files using PowerShell, or by using the Azure portal. Either method returns the same zip file.
The VPN client profile configuration files are specific to the P2S VPN gateway configuration for the virtual network. If there are any changes to the P2S VPN configuration after you generate the files, such as changes to the VPN protocol type or authentication type, you need to generate new VPN client profile configuration files and apply the new configuration to all of the VPN clients that you want to connect.
Unzip the file to view the folders. When you configure macOS native clients, you use the files in the Generic folder. The Generic folder is present if IKEv2 was configured on the gateway. If you don't see the Generic folder, check the following items, then generate the zip file again.
- Check the tunnel type for your configuration. It's likely that IKEv2 wasn’t selected as a tunnel type.
The Generic folder contains the following files.
- VpnSettings.xml, which contains important settings like server address and tunnel type.
- VpnServerRoot.cer, which contains the root certificate required to validate the Azure VPN gateway during P2S connection setup.
Install certificates
You'll need both the root certificate and the child certificate installed on your Mac. The child certificate must be exported with the private key and must contain all certificates in the certification path.
Root certificate
- Copy the root certificate file (the .cer file) - to your Mac. Double-click the certificate. Depending on your operating system, the certificate will either automatically install, or you'll see the Add Certificates page.
- If you see the Add Certificates page, for Keychain: click the arrows and select login from the dropdown.
- Click Add to import the file.
Client certificate
The client certificate (.pfx file) is used for authentication and is required. Typically, you can just click the client certificate to install.
Verify certificates are installed
Verify that both the client and the root certificate are installed.
- Open Keychain Access.
- Go to the Certificates tab.
- Verify that both the client and the root certificate are installed.
Configure VPN client profile
Use the steps in the Mac User Guide that are appropriate for your operating system version to add a VPN client profile configuration with the following settings.
Select IKEv2 as the VPN type.
For Display Name, select a friendly name for the profile.
For both Server Address and Remote ID, use the value from the VpnServer tag in the VpnSettings.xml file.

For Authentication settings, select Certificate.
For the Certificate, choose the child certificate you want to use for authentication. If you have multiple certificates, you can select Show Certificate to see more information about each certificate.
For Local ID, type the name of the child certificate that you selected.
Once you finished configuring the VPN client profile, save the profile.
Connect
The steps to connect are specific to the macOS operating system version. Refer to the Mac User Guide. Select the operating system version that you're using and follow the steps to connect.
Once the connection has been established, the status shows as Connected. The IP address is allocated from the VPN client address pool.
OpenVPN client
This section helps you connect to your Azure virtual network (VNet) using VPN Gateway point-to-site (P2S) and Certificate authentication on macOS using an OpenVPN client.
Connection requirements
To connect to Azure using the OpenVPN client using certificate authentication, each connecting client requires the following items:
- The Open VPN Client software must be installed and configured on each client.
- The client must have a client certificate that's installed locally.
Workflow
- Install the OpenVPN client.
- View the VPN client profile configuration files contained in the VPN client profile configuration package that you generated.
- Configure the OpenVPN client.
- Connect to Azure.
Generate client certificates
For certificate authentication, a client certificate must be installed on each client computer. The client certificate you want to use must be exported with the private key, and must contain all certificates in the certification path.
For information about working with certificates, see Point-to site: Generate certificates - Linux.
Configure the OpenVPN client
The following example uses TunnelBlick.
Important
Only macOS 10.13 and above is supported with OpenVPN protocol.
Note
OpenVPN Client version 2.6 is not yet supported.
Download and install an OpenVPN client, such as TunnelBlick.
Download the VPN client profile package from the Azure portal.
Unzip the profile. Open the vpnconfig.ovpn configuration file from the OpenVPN folder in a text editor.
Fill in the P2S client certificate section with the P2S client certificate public key in base64. In a PEM formatted certificate, you can open the .cer file and copy over the base64 key between the certificate headers.
Fill in the private key section with the P2S client certificate private key in base64. See Export your private key on the OpenVPN site for information about how to extract a private key.
Don't change any other fields. Use the filled in configuration in client input to connect to the VPN.
Double-click the profile file to create the profile in Tunnelblick.
Launch Tunnelblick from the applications folder.
Click on the Tunnelblick icon in the system tray and pick connect.
Linux
Linux clients can connect using strongSwan (IKEv2 tunnel type) or using OpenVPN (OpenVPN tunnel type) with either the Azure VPN Client or an OpenVPN client.
strongSwan
This section helps you connect to your Azure virtual network (VNet) using VPN Gateway point-to-site (P2S) VPN and Certificate authentication from an Ubuntu Linux client using strongSwan.
Connection requirements
To connect to Azure using the strongSwan client and certificate authentication via IKEv2 tunnel type, each connecting client requires the following items:
- Each client must be configured to use strongSwan.
- The client must have the correct certificates installed locally.
Workflow
The workflow for this article is:
- Install strongSwan.
- View the VPN client profile configuration files contained in the VPN client profile configuration package that you generated.
- Locate any necessary client certificates.
- Configure strongSwan.
- Connect to Azure.
About certificates
For certificate authentication, a client certificate must be installed on each client computer. The client certificate you want to use must be exported with the private key, and must contain all certificates in the certification path. Additionally, for some configurations, you'll also need to install root certificate information.
For more information about certificates for Linux, see the following articles:
Install strongSwan
The following configuration was used when specifying commands:
- Computer: Ubuntu Server 18.04
- Dependencies: strongSwan
Use the following commands to install the required strongSwan configuration:
sudo apt-get update
sudo apt-get upgrade
sudo apt install strongswan
sudo apt install strongswan-pki
sudo apt install libstrongswan-extra-plugins
sudo apt install libtss2-tcti-tabrmd0
View strongSwan VPN client profile configuration files
When you generate a VPN client profile configuration package, all the necessary configuration settings for VPN clients are contained in a VPN client profile configuration zip file. The VPN client profile configuration files are specific to the P2S VPN gateway configuration for the virtual network. If there are any changes to the P2S VPN configuration after you generate the files, such as changes to the VPN protocol type or authentication type, you need to generate new VPN client profile configuration files and apply the new configuration to all of the VPN clients that you want to connect.
Locate and unzip the VPN client profile configuration package you generated and downloaded. You can find all of the information that you need for configuration in the Generic folder. Azure doesn’t provide a mobileconfig file for this configuration.
If you don't see the Generic folder, check the following items, then generate the zip file again.
- Check the tunnel type for your configuration. It's likely that IKEv2 wasn’t selected as a tunnel type.
- On the VPN gateway, verify that the SKU isn’t Basic. The VPN Gateway Basic SKU doesn’t support IKEv2. Then, select IKEv2 and generate the zip file again to retrieve the Generic folder.
The Generic folder contains the following files:
- VpnSettings.xml, which contains important settings like server address and tunnel type.
- VpnServerRoot.cer, which contains the root certificate required to validate the Azure VPN gateway during P2S connection setup.
Configure the VPN client
After viewing the VPN client profile files, continue with the steps that you want to use:
GUI steps
This section walks you through the configuration using the strongSwan GUI. The following instructions were created on Ubuntu 18.0.4. Ubuntu 16.0.10 doesn’t support strongSwan GUI. If you want to use Ubuntu 16.0.10, you’ll have to use the command line. The following examples might not match screens that you see, depending on your version of Linux and strongSwan.
Open the Terminal to install strongSwan and its Network Manager by running the command in the example.
sudo apt install network-manager-strongswanSelect Settings, then select Network. Select the + button to create a new connection.
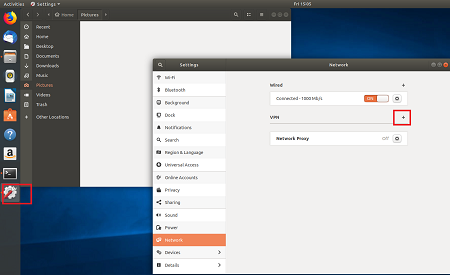
On the Add VPN page, select IPsec/IKEv2 (strongSwan) from the menu, and double-click.
On the Add VPN page, add a name for your VPN connection.
Open the VpnSettings.xml file from the Generic folder contained in the downloaded VPN client profile configuration package files. Find the tag called VpnServer and copy the name, beginning with 'azuregateway' and ending with '.cloudapp.net'.
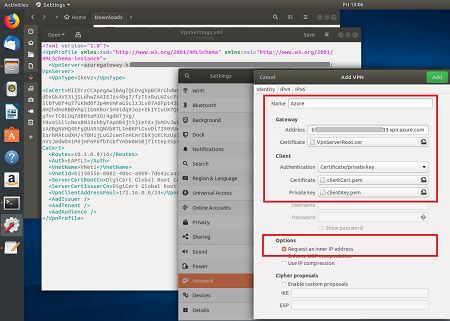
Paste the name in the Address field of your new VPN connection in the Gateway section. Next, select the folder icon at the end of the Certificate field, browse to the Generic folder, and select the VpnServerRoot file.
In the Client section of the connection, for Authentication, select Certificate/private key. For Certificate and Private key, choose the certificate and the private key that were created earlier. In Options, select Request an inner IP address. Then, select Add.
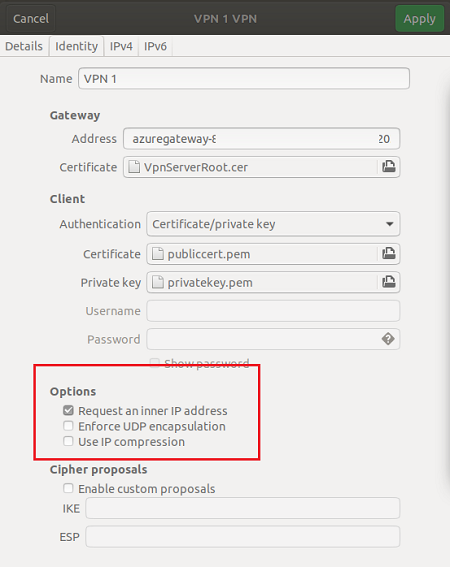
Turn the connection On.
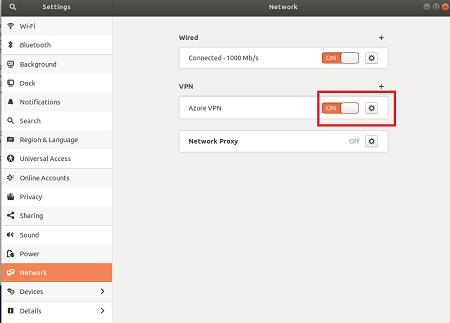
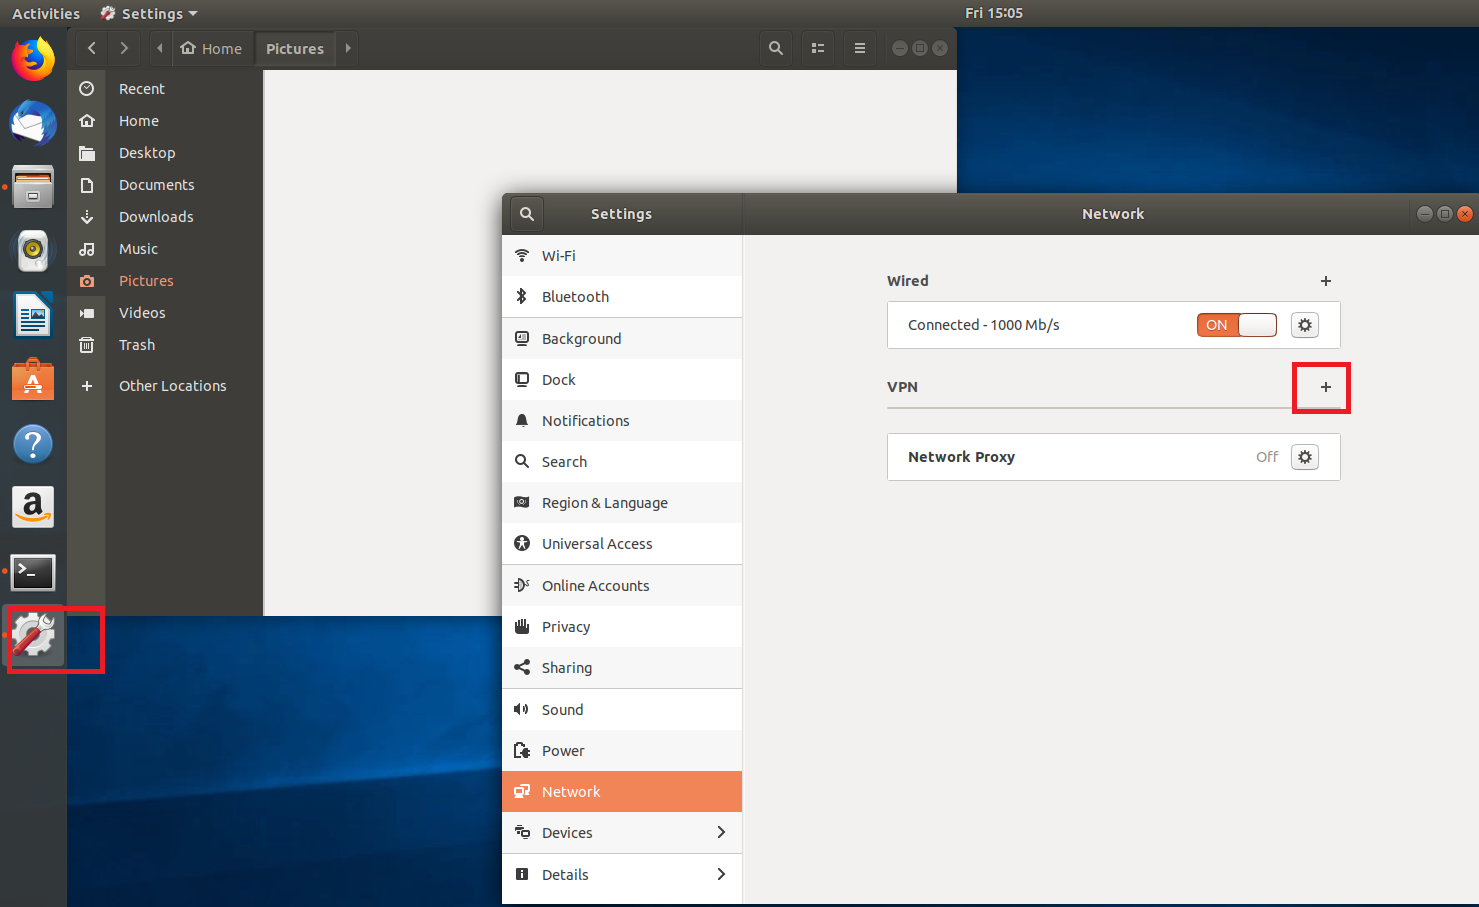
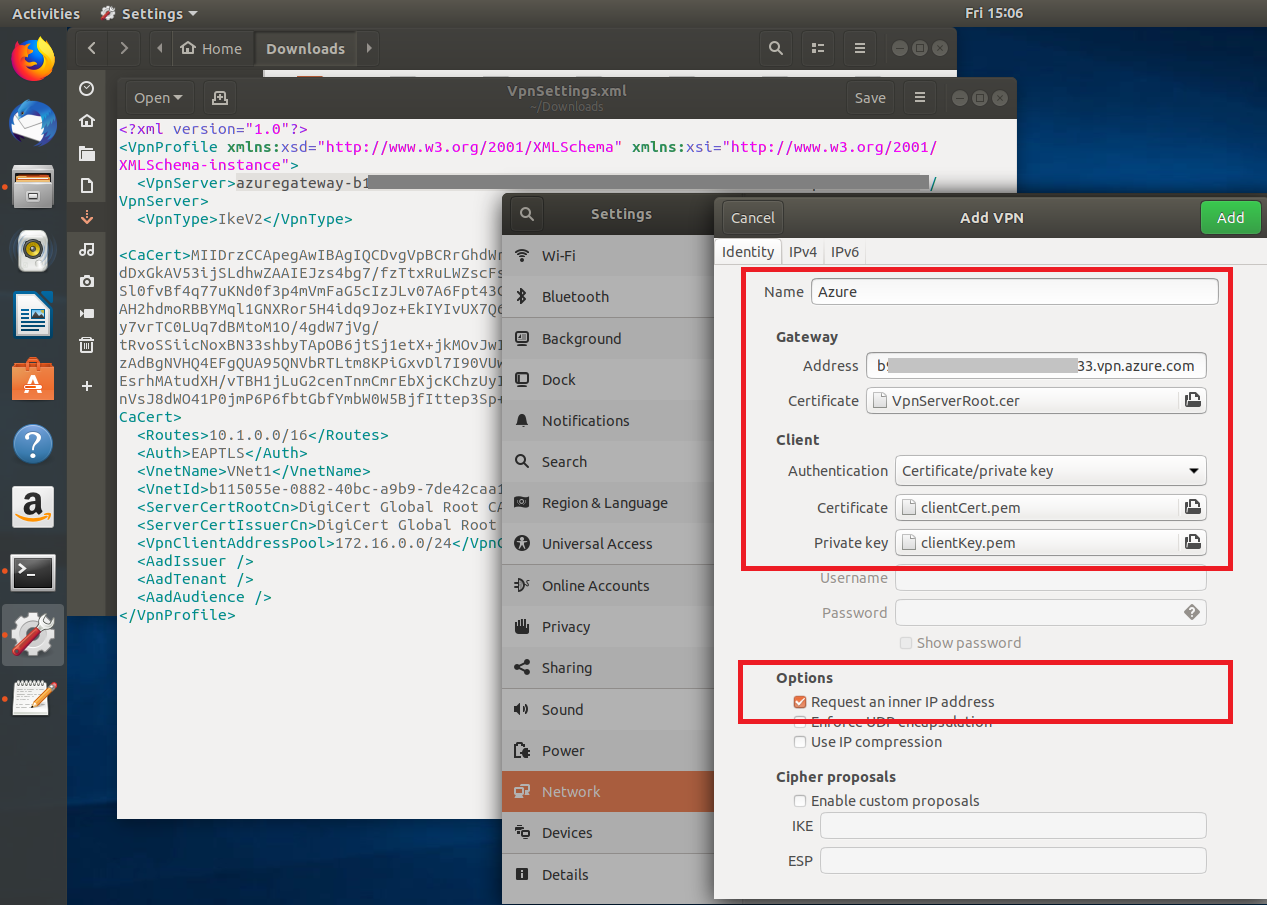
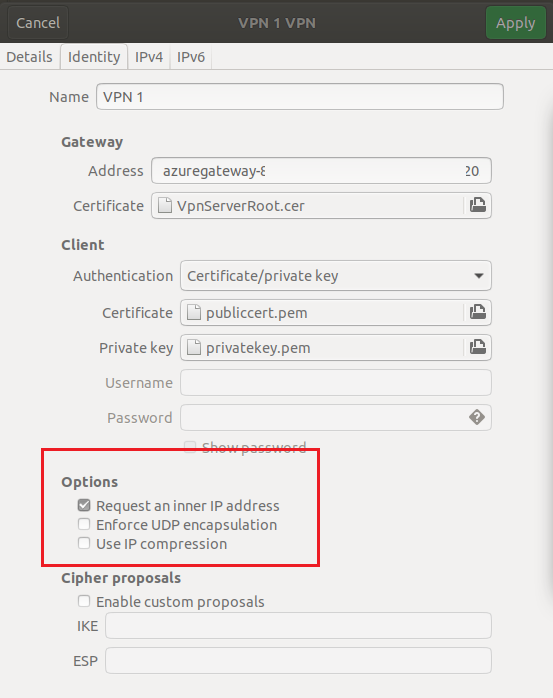
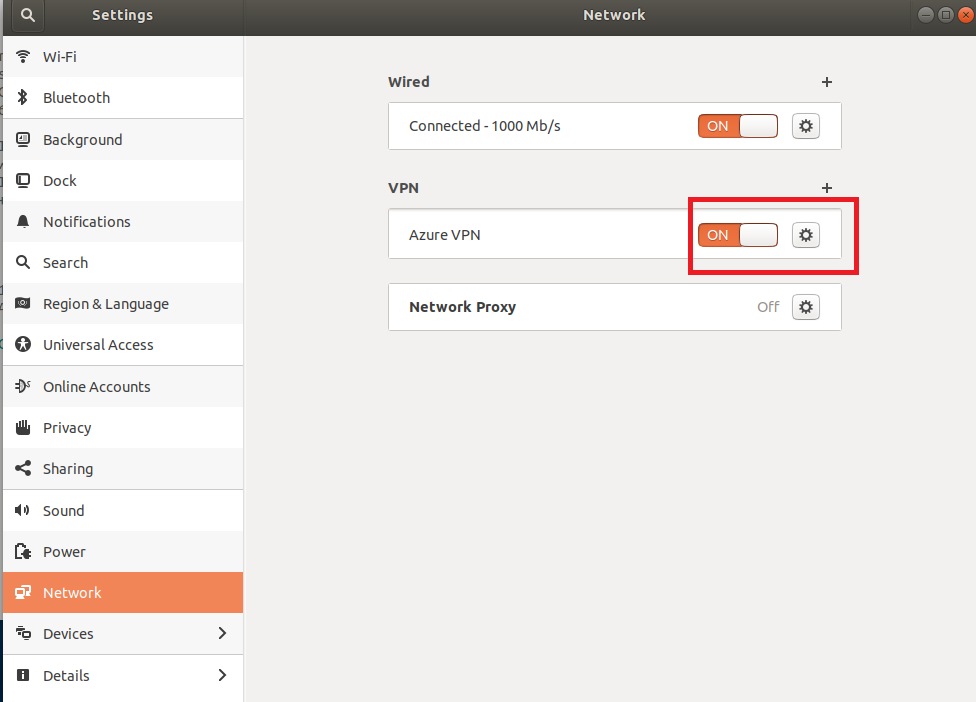
CLI steps
This section walks you through the configuration using the strongSwan CLI.
From the VPN client profile configuration files Generic folder, copy or move the VpnServerRoot.cer to /etc/ipsec.d/cacerts.
Copy or move the files you generated to /etc/ipsec.d/certs and /etc/ipsec.d/private/ respectively. These files are the client certificate and the private key, they need to be located in their corresponding directories. Use the following commands:
sudo cp ${USERNAME}Cert.pem /etc/ipsec.d/certs/ sudo cp ${USERNAME}Key.pem /etc/ipsec.d/private/ sudo chmod -R go-rwx /etc/ipsec.d/private /etc/ipsec.d/certsRun the following command to take note of your hostname. You’ll use this value in the next step.
hostnamectl --staticOpen the VpnSettings.xml file and copy the
<VpnServer>value. You’ll use this value in the next step.Adjust the values in the following example, then add the example to the /etc/ipsec.conf configuration.
conn azure keyexchange=ikev2 type=tunnel leftfirewall=yes left=%any # Replace ${USERNAME}Cert.pem with the key filename inside /etc/ipsec.d/certs directory. leftcert=${USERNAME}Cert.pem leftauth=pubkey leftid=%client # use the hostname of your machine with % character prepended. Example: %client right= #Azure VPN gateway address. Example: azuregateway-xxx-xxx.vpn.azure.com rightid=% #Azure VPN gateway FQDN with % character prepended. Example: %azuregateway-xxx-xxx.vpn.azure.com rightsubnet=0.0.0.0/0 leftsourceip=%config auto=add esp=aes256gcm16Add the secret values to /etc/ipsec.secrets.
The name of the PEM file must match what you have used earlier as your client key file.
: RSA ${USERNAME}Key.pem # Replace ${USERNAME}Key.pem with the key filename inside /etc/ipsec.d/private directory.Run the following commands:
sudo ipsec restart sudo ipsec up azure
Azure VPN Client
Important
The Azure VPN Client for Linux is retiring on 31 August, 2026. After this date, the client will no longer be supported. For more information, please see the Azure VPN Client for Linux Retirement overview and migration guide for VPN Gateway and Virtual WAN.
This section helps you connect to your Azure virtual network (VNet) from the Azure VPN Client for Linux using VPN Gateway point-to-site (P2S) Certificate authentication. The Azure VPN Client for Linux requires the OpenVPN tunnel type.
While it's possible that the Azure VPN Client for Linux might work on other Linux distributions and releases, the Azure VPN Client for Linux is only supported on the following releases:
- Ubuntu 20.04
- Ubuntu 22.04
Connection requirements
To connect to Azure using the Azure VPN Client and certificate authentication, each connecting client requires the following items:
- The Azure VPN Client software must be installed and configured on each client.
- The client must have the correct certificates installed locally.
Workflow
The workflow for this article is:
- Generate and install client certificates.
- Locate and view the VPN client profile configuration files contained in the VPN client profile configuration package that you generated.
- Download and configure the Azure VPN Client for Linux.
- Connect to Azure.
Generate certificates
For certificate authentication, a client certificate must be installed on each client computer. The client certificate you want to use must be exported with the private key, and must contain all certificates in the certification path. Additionally, for some configurations, you'll also need to install root certificate information.
Generate the client public certificate data and private key in .pem format using the following commands. To run the commands, you need to have the public Root certificate caCert.pem and the private key of Root certificate caKey.pem. For more information, see Generate and export certificates - Linux - OpenSSL.
Note
Microsoft recommends that you use the most secure authentication flow available. The authentication flow described in this procedure requires a very high degree of trust in the application, and carries risks that aren't present in other flows. You should only use this flow when other more secure flows, such as managed identities, aren't viable.
export PASSWORD="password"
export USERNAME=$(hostnamectl --static)
# Generate a private key
openssl genrsa -out "${USERNAME}Key.pem" 2048
# Generate a CSR
openssl req -new -key "${USERNAME}Key.pem" -out "${USERNAME}Req.pem" -subj "/CN=${USERNAME}"
# Sign the CSR using the CA certificate and key
openssl x509 -req -days 365 -in "${USERNAME}Req.pem" -CA caCert.pem -CAkey caKey.pem -CAcreateserial -out "${USERNAME}Cert.pem" -extfile <(echo -e "subjectAltName=DNS:${USERNAME}\nextendedKeyUsage=clientAuth")
View Azure VPN Client profile configuration files
When you generate and download a VPN client profile configuration package, all the necessary configuration settings for VPN clients are contained in a VPN client profile configuration zip file. The VPN client profile configuration files are specific to the P2S VPN gateway configuration for the virtual network. If there are any changes to the P2S VPN configuration after you generate the files, such as changes to the VPN protocol type or authentication type, you need to generate new VPN client profile configuration files and apply the new configuration to all of the VPN clients that you want to connect.
Locate and unzip the VPN client profile configuration package you generated and downloaded (listed in the Prerequisites). Open the AzureVPN folder. In this folder, you'll see either the azurevpnconfig_cert.xml file or the azurevpnconfig.xml file, depending on whether your P2S configuration includes multiple authentication types. The .xml file contains the settings you use to configure the VPN client profile.
If you don't see either file, or you don't have an AzureVPN folder, verify that your VPN gateway is configured to use the OpenVPN tunnel type and that certificate authentication is selected.
Download the Azure VPN Client
Add the Microsoft repository list and install the Azure VPN Client for Linux using the following commands:
# install curl utility
sudo apt-get install curl
# Install Microsoft's public key
curl -sSl https://packages.microsoft.com/keys/microsoft.asc | sudo tee /etc/apt/trusted.gpg.d/microsoft.asc
# Install the production repo list for focal
# For Ubuntu 20.04
curl https://packages.microsoft.com/config/ubuntu/20.04/prod.list | sudo tee /etc/apt/sources.list.d/microsoft-ubuntu-focal-prod.list
# Install the production repo list for jammy
# For Ubuntu 22.04
curl https://packages.microsoft.com/config/ubuntu/22.04/prod.list | sudo tee /etc/apt/sources.list.d/microsoft-ubuntu-jammy-prod.list
sudo apt-get update
sudo apt-get install microsoft-azurevpnclient
For more information about the repository, see Linux Software Repository for Microsoft Products.
Configure the Azure VPN Client profile
Open the Azure VPN Client.
On the bottom left of the page of the Linux VPN client, select Import.
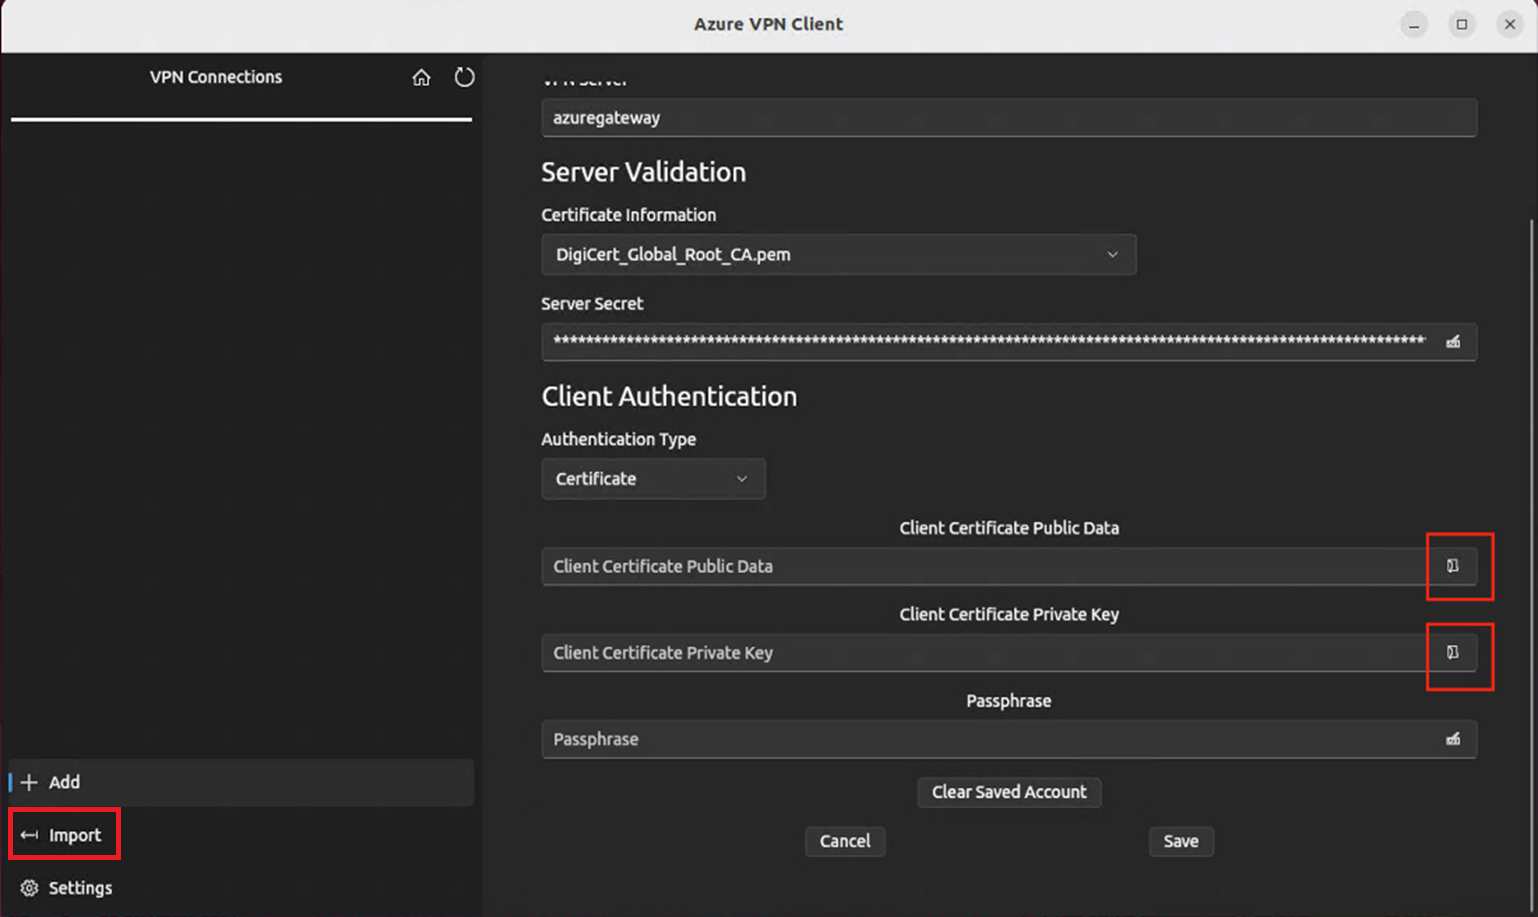
In the window, navigate to either the azurevpnconfig.xml or azurevpnconfig_cert.xml file, select it, then select Open.
To add Client Certificate Public Data, use the file picker and locate the related .pem files.
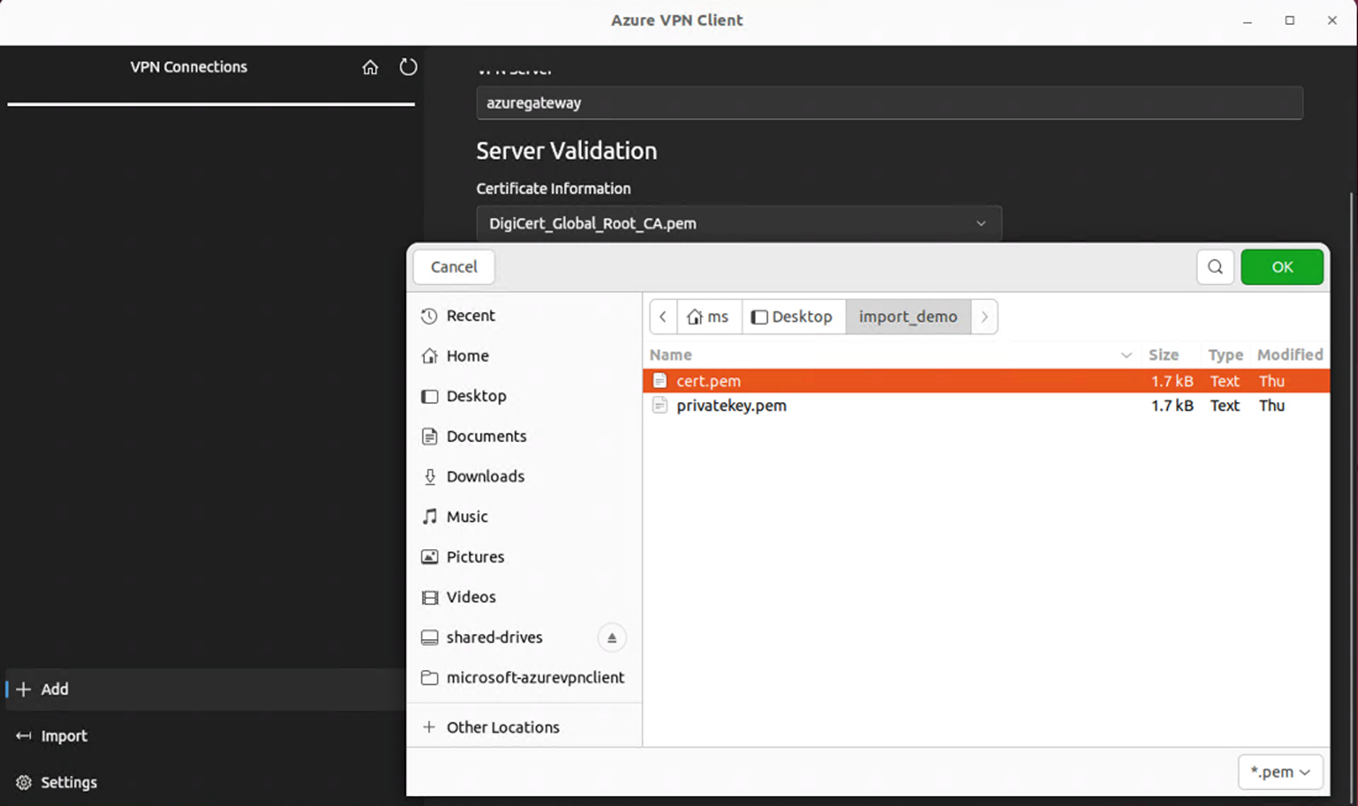
To add the Client Certificate Private Key, use the picker and select the certificate files path in the text boxes for the private key, with file extension .pem.
After the import validates (imports with no errors), select Save.
In the left pane, locate the VPN connection profile you created. Select Connect.
When the client is successfully connected, the status shows as Connected with a green icon.
You can view the connection logs summary in the Status Logs on the main screen of the VPN client.

Uninstall the Azure VPN Client
If you want to uninstall the Azure VPN Client, use the following command in the terminal:
sudo apt remove microsoft-azurevpnclient
OpenVPN client
This section helps you connect to your Azure virtual network (VNet) using VPN Gateway point-to-site (P2S) and Certificate authentication from Linux using an OpenVPN client.
Connection requirements
To connect to Azure using the OpenVPN client using certificate authentication, each connecting client requires the following items:
- The Open VPN Client software must be installed and configured on each client.
- The client must have the correct certificates installed locally.
Workflow
- Install the OpenVPN client.
- View the VPN client profile configuration files contained in the VPN client profile configuration package that you generated.
- Configure the OpenVPN client.
- Connect to Azure.
About certificates
For certificate authentication, a client certificate must be installed on each client computer. The client certificate you want to use must be exported with the private key, and must contain all certificates in the certification path. Additionally, for some configurations, you'll also need to install root certificate information.
The OpenVPN client in this section uses certificates exported with a .pfx format. You can export a client certificate easily to this format using the Windows instructions. See Export a client certificate - pfx. If you don't have a Windows computer, as a workaround, you can use a small Windows VM to export certificates to the needed .pfx format. At this time, the OpenSSL Linux instructions we provide only result in the .pem format.
Configuration steps
This section helps you configure Linux clients for certificate authentication that uses the OpenVPN tunnel type. To connect to Azure, download the OpenVPN client and configure the connection profile.
Note
OpenVPN Client version 2.6 is not yet supported.
Open a new Terminal session. You can open a new session by pressing 'Ctrl + Alt + t' at the same time.
Enter the following command to install needed components:
sudo apt-get install openvpn sudo apt-get -y install network-manager-openvpn sudo service network-manager restartNext, go to the VPN client profile folder and unzip to view the files.
Export the P2S client certificate you created and uploaded to your P2S configuration on the gateway. For steps, see VPN Gateway point-to-site.
Extract the private key and the base64 thumbprint from the .pfx. There are multiple ways to do this. Using OpenSSL on your computer is one way.
openssl pkcs12 -in "filename.pfx" -nodes -out "profileinfo.txt"The profileinfo.txt file contains the private key and the thumbprint for the CA, and the Client certificate. Be sure to use the thumbprint of the client certificate.
Open profileinfo.txt in a text editor. To get the thumbprint of the client (child) certificate, select the text including and between "-----BEGIN CERTIFICATE-----" and "-----END CERTIFICATE-----" for the child certificate and copy it. You can identify the child certificate by looking at the subject=/ line.
Open the vpnconfig.ovpn file and find the section in the following example. Replace everything between "cert" and "/cert".
# P2S client certificate # please fill this field with a PEM formatted cert <cert> $CLIENTCERTIFICATE </cert>Open the profileinfo.txt in a text editor. To get the private key, select the text including and between "-----BEGIN PRIVATE KEY-----" and "-----END PRIVATE KEY-----" and copy it.
Open the vpnconfig.ovpn file in a text editor and find this section. Paste the private key replacing everything between "key" and "/key".
# P2S client root certificate private key # please fill this field with a PEM formatted key <key> $PRIVATEKEY </key>Don't change any other fields. Use the filled in configuration in client input to connect to the VPN.
To connect using the command line, type the following command:
sudo openvpn --config <name and path of your VPN profile file>&To disconnect using command line, type the following command:
sudo pkill openvpnTo connect using the GUI, go to system settings.
Select + to add a new VPN connection.
Under Add VPN, pick Import from file….
Browse to the profile file and double-click or pick Open.
Select Add on the Add VPN window.
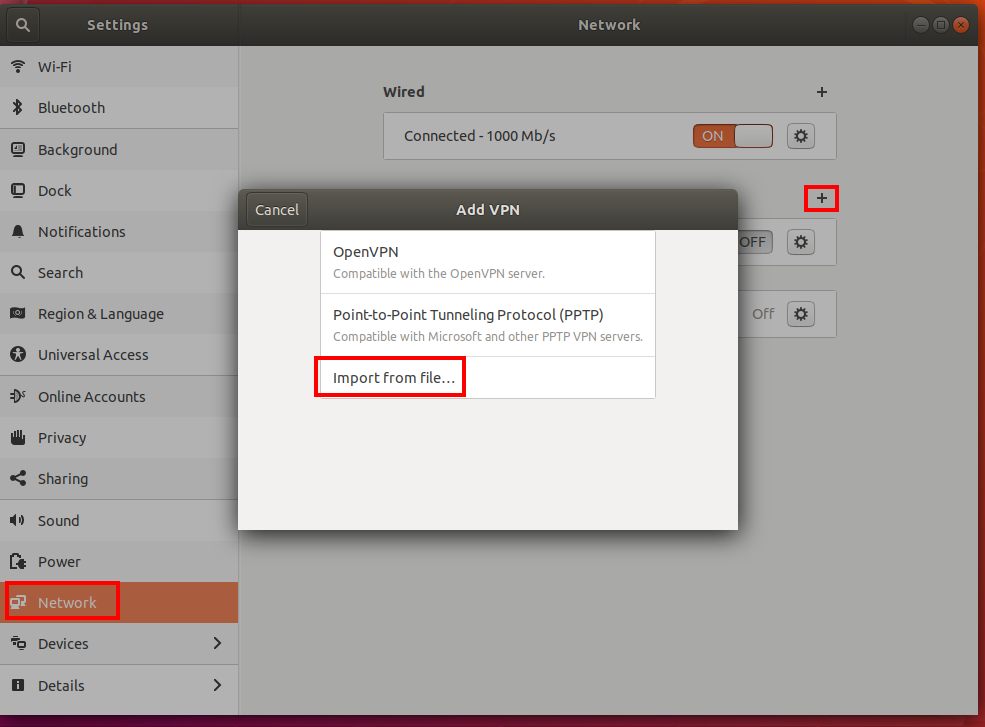
You can connect by turning the VPN ON on the Network Settings page, or under the network icon in the system tray.
iOS
This section helps you connect to your Azure virtual network (VNet) using VPN Gateway point-to-site (P2S) and Certificate authentication on iOS using an OpenVPN client.
Connection requirements
To connect to Azure using the OpenVPN client using certificate authentication, each connecting client requires the following items:
- The Open VPN Client software must be installed and configured on each client.
- The client must have a client certificate that's installed locally.
Workflow
- Install the OpenVPN client.
- View the VPN client profile configuration files contained in the VPN client profile configuration package that you generated.
- Configure the OpenVPN client.
- Connect to Azure.
Generate client certificates
For certificate authentication, a client certificate must be installed on each client computer. The client certificate you want to use must be exported with the private key, and must contain all certificates in the certification path. Additionally, for some configurations, you'll also need to install root certificate information.
For information about working with certificates, see Point-to site: Generate certificates - Linux.
Configure the OpenVPN client
The following example uses OpenVPN Connect from the App Store.
Important
Only iOS 11.0 and above is supported with OpenVPN protocol.
Note
OpenVPN Client version 2.6 is not yet supported.
Install the OpenVPN client (version 2.4 or higher) from the App Store. Version 2.6 is not yet supported.
If you haven't already done so, download the VPN client profile package from the Azure portal.
Unzip the profile. Open the vpnconfig.ovpn configuration file from the OpenVPN folder in a text editor.
Fill in the P2S client certificate section with the P2S client certificate public key in base64. In a PEM formatted certificate, you can open the .cer file and copy over the base64 key between the certificate headers.
Fill in the private key section with the P2S client certificate private key in base64. See Export your private key on the OpenVPN site for information about how to extract a private key.
Don't change any other fields.
E-mail the profile file (.ovpn) to your email account that is configured in the mail app on your iPhone.
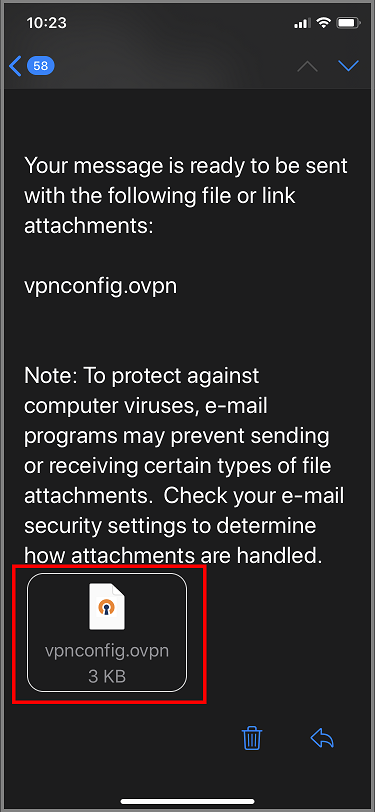
Open the e-mail in the mail app on the iPhone, and tap the attached file.
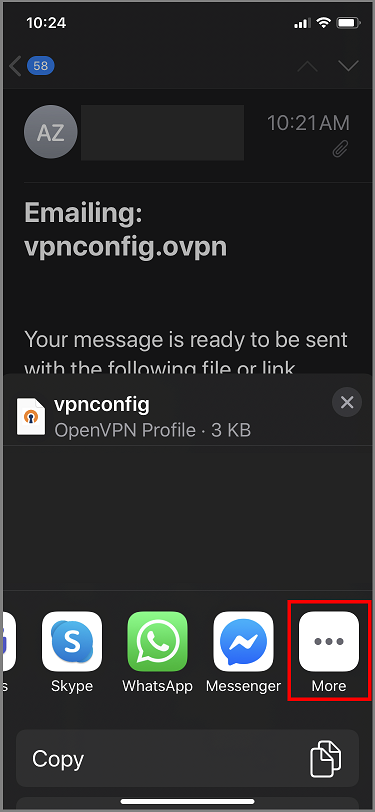
Tap More if you don't see Copy to OpenVPN option.
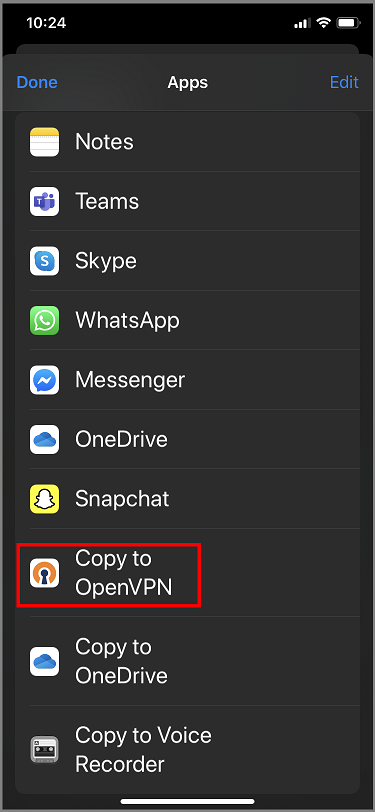
Tap Copy to OpenVPN.
Tap on ADD in the Import Profile page
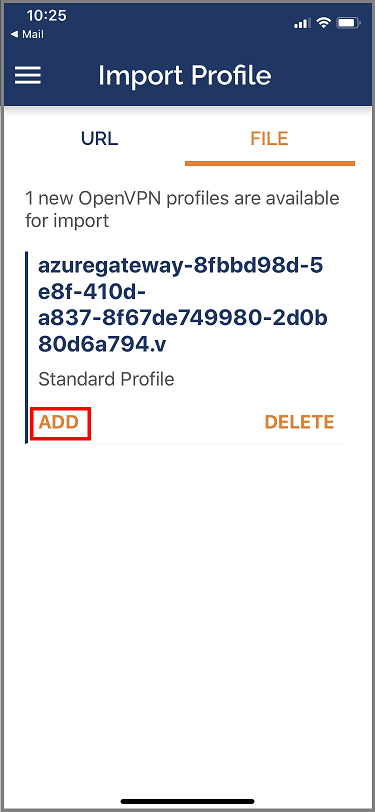
Tap on ADD in the Imported Profile page

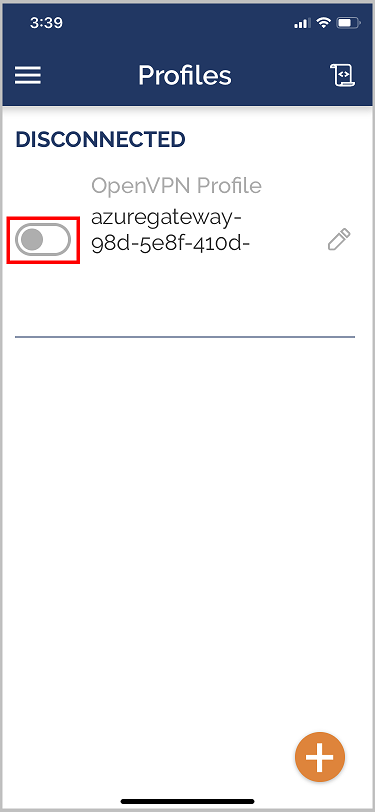
Launch the OpenVPN app and slide the switch in the Profile page right to connect
Next steps
Follow up with any additional server or connection settings. See Point-to-site configuration steps.