Bilješka
Pristup ovoj stranici zahtijeva provjeru vjerodostojnosti. Možete pokušati da se prijavite ili promijenite direktorije.
Pristup ovoj stranici zahtijeva provjeru vjerodostojnosti. Možete pokušati promijeniti direktorije.
Note
Try our new APIs using MS Graph security API. Find out more at: Use the Microsoft Graph security API - Microsoft Graph | Microsoft Learn.
Learn how to configure Azure Event Hubs so that your event hub namespace can ingest events from Microsoft Defender XDR. This article walks you through registering the required resource provider, creating a Microsoft Entra app registration, setting up an Event Hubs namespace with the correct permissions, and configuring Microsoft Defender XDR to stream event data to your event hubs.
Set up the required Resource Provider in the Event Hubs subscription
Register the resource provider in your Azure subscription for Event Hubs.
- Sign in to the Azure portal.
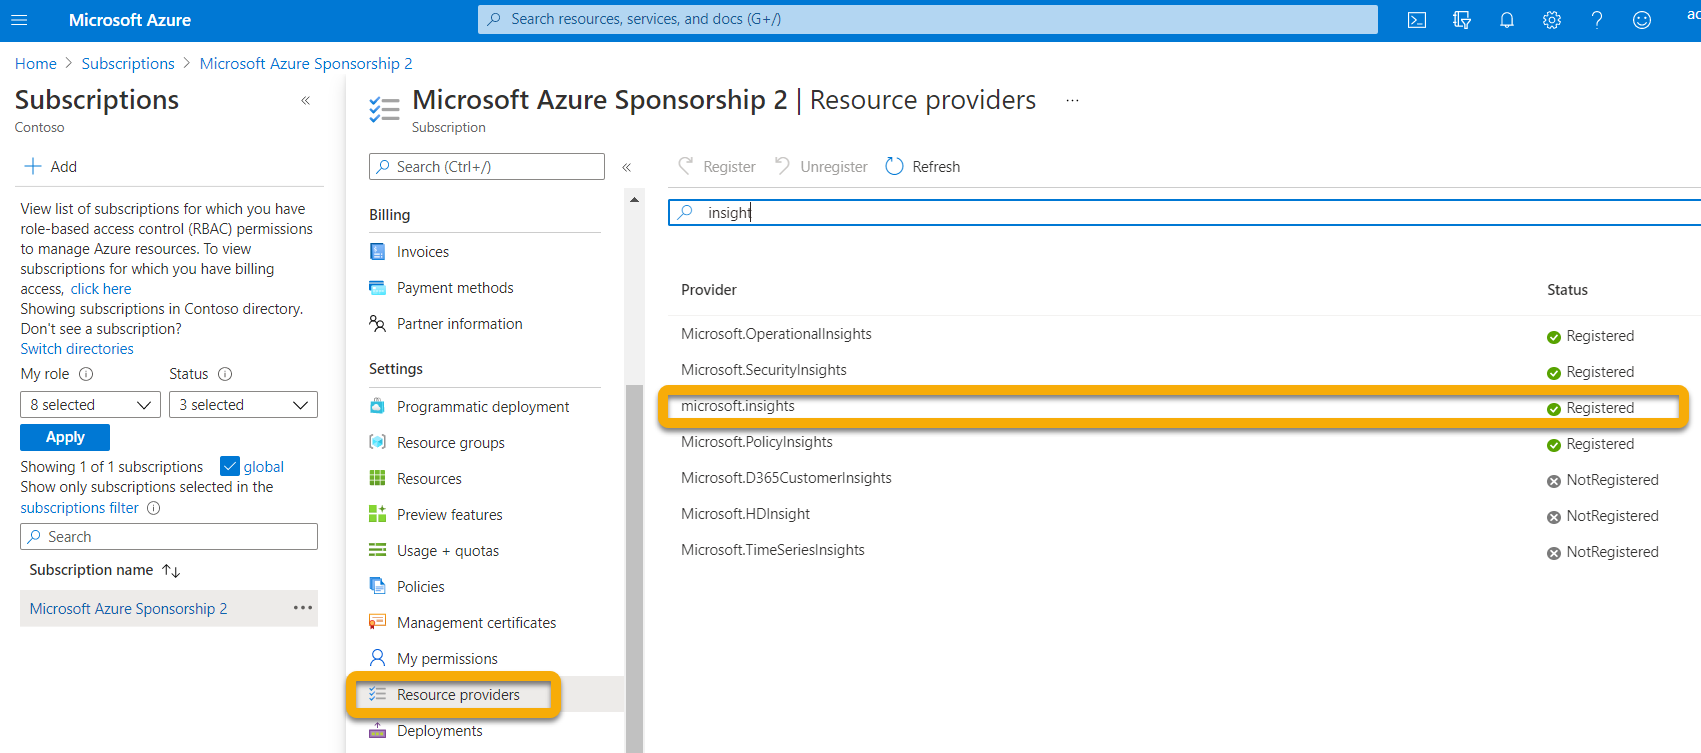
- Select Subscriptions > { Select the subscription the event hubs will be deployed to } > Resource providers.
- Check that Microsoft.Insights is registered. If not, register it.
Set up Microsoft Entra App Registration
A service principal is the identity your app uses to access Azure resources. When you create an app registration, Azure automatically creates a service principal for it.
Note
You need the Administrator role, or Microsoft Entra ID must allow non-admins to register apps. You also need an Owner or User Access Administrator role to assign a role to the service principal. For more information, see Create a Microsoft Entra app & service principal in the portal - Microsoft identity platform.
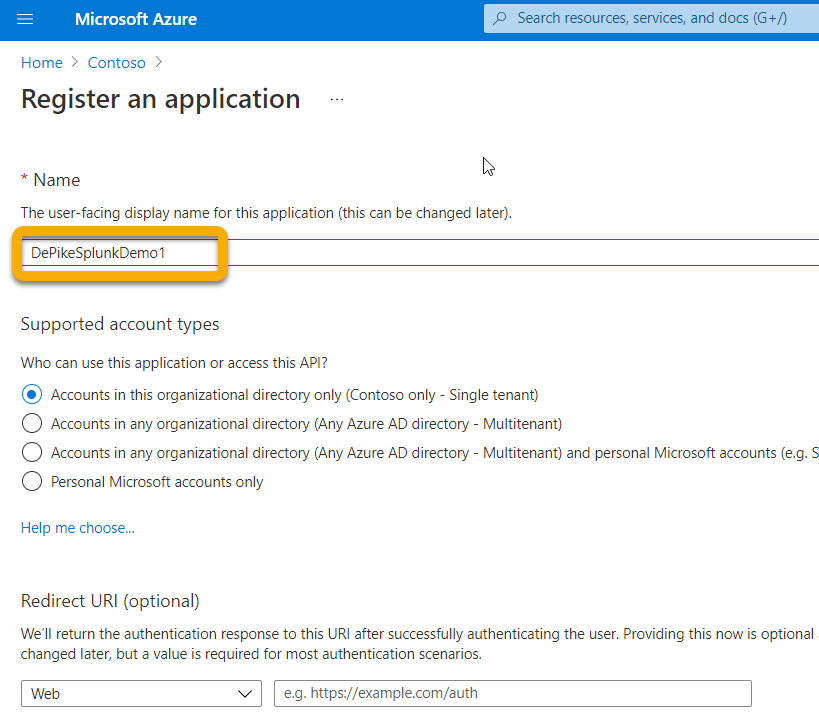
Create a new registration in Microsoft Entra ID > App registrations > New registration. This step also creates a service principal.
Fill out the form with just the Name. No Redirect URI is required.
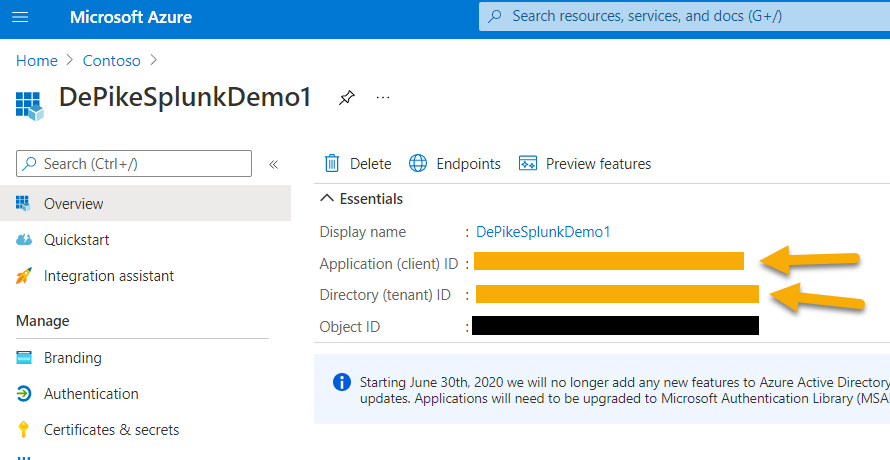
Create a secret by clicking on Certificates & secrets > New client secret:
Warning
You can view this client secret only once. Copy and save it before leaving this page.
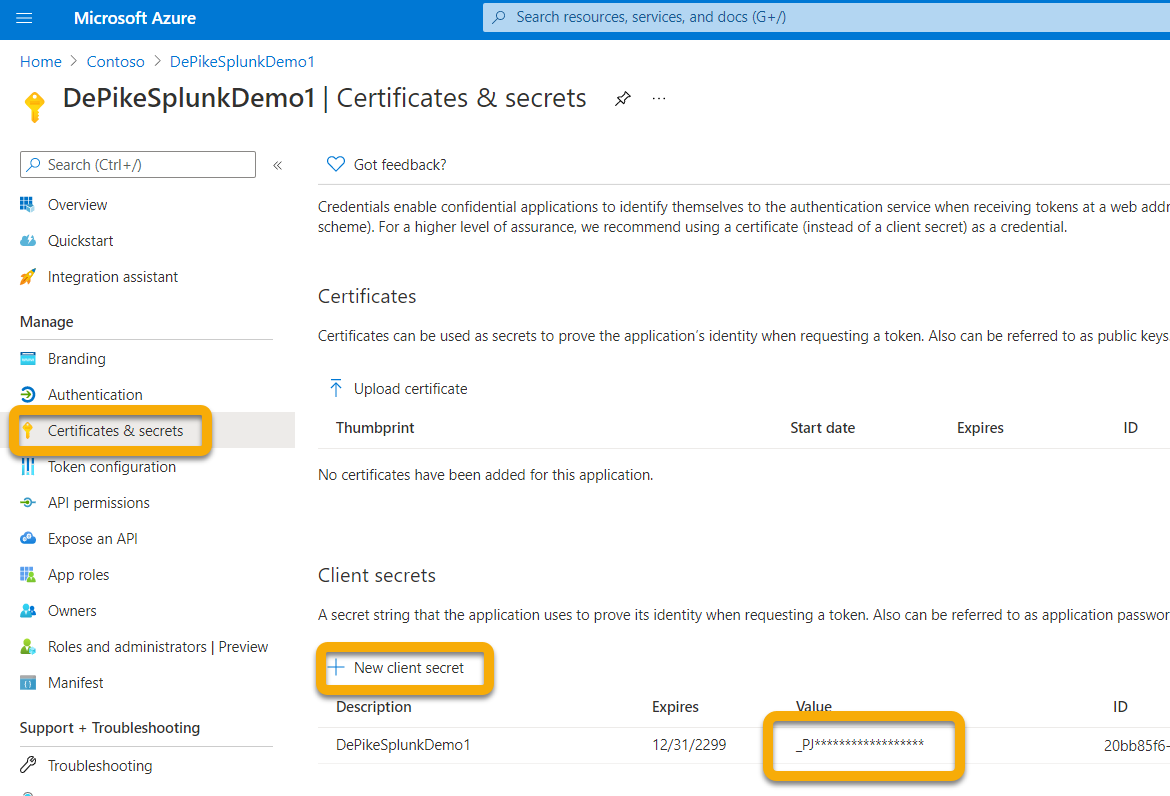
Microsoft Graph APIs use this client secret to authenticate your app registration.
Set up Event Hubs namespace
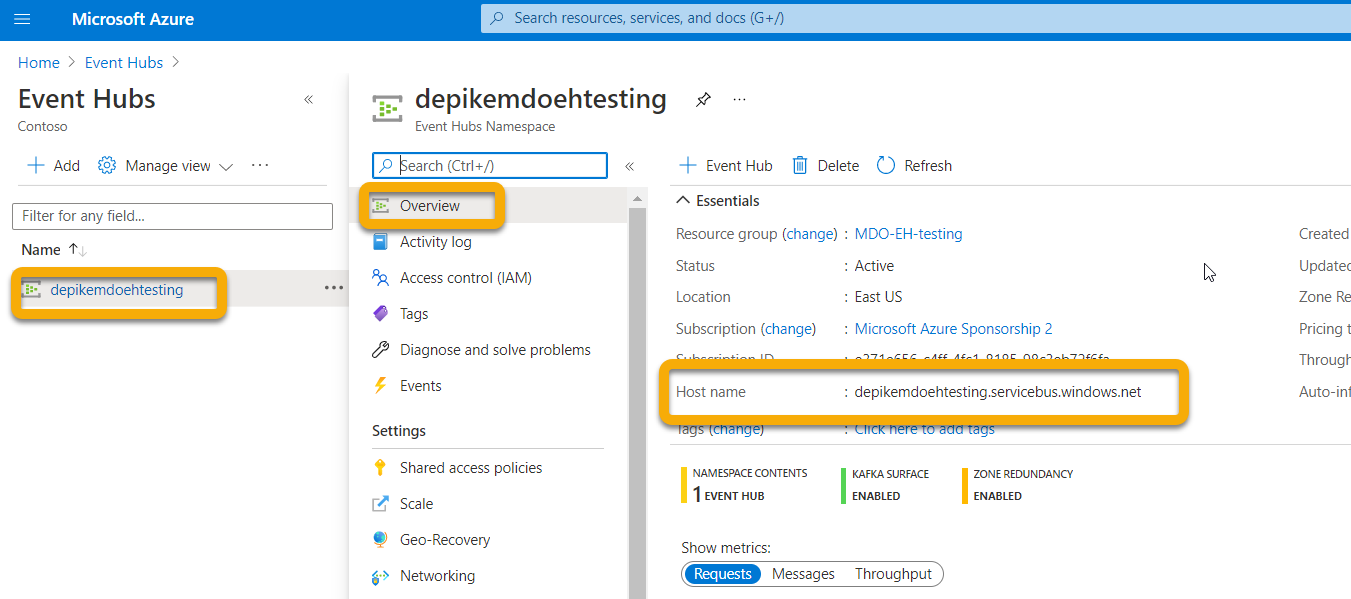
Create an Event Hubs namespace and capture its Resource ID for use in the Microsoft Defender XDR export configuration.
Create an Event Hubs Namespace:
Go to Event Hub > Add. Select the pricing tier, throughput units, and Auto-Inflate settings for your expected load. Auto-Inflate requires standard pricing. For more information, see Pricing - Event Hubs | Microsoft Azure.
Note
You can use an existing event hub. However, throughput and scaling apply at the namespace level. Microsoft recommends placing each event hub in its own namespace.
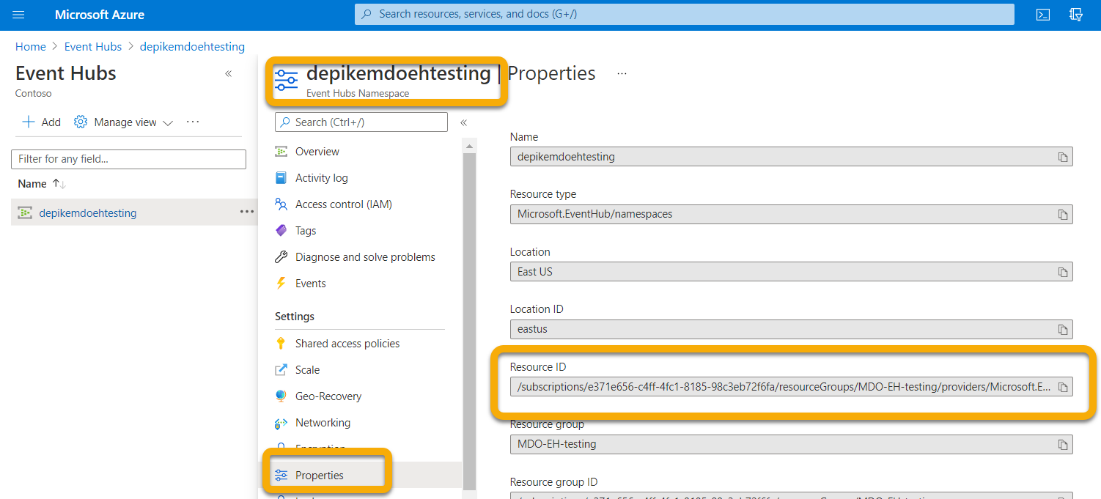
Get the Resource ID for this namespace. Go to your Event Hubs namespace page > Properties. Copy the Resource ID value and save it for the Microsoft 365 configuration.
Add role assignments for Event Hubs namespace access
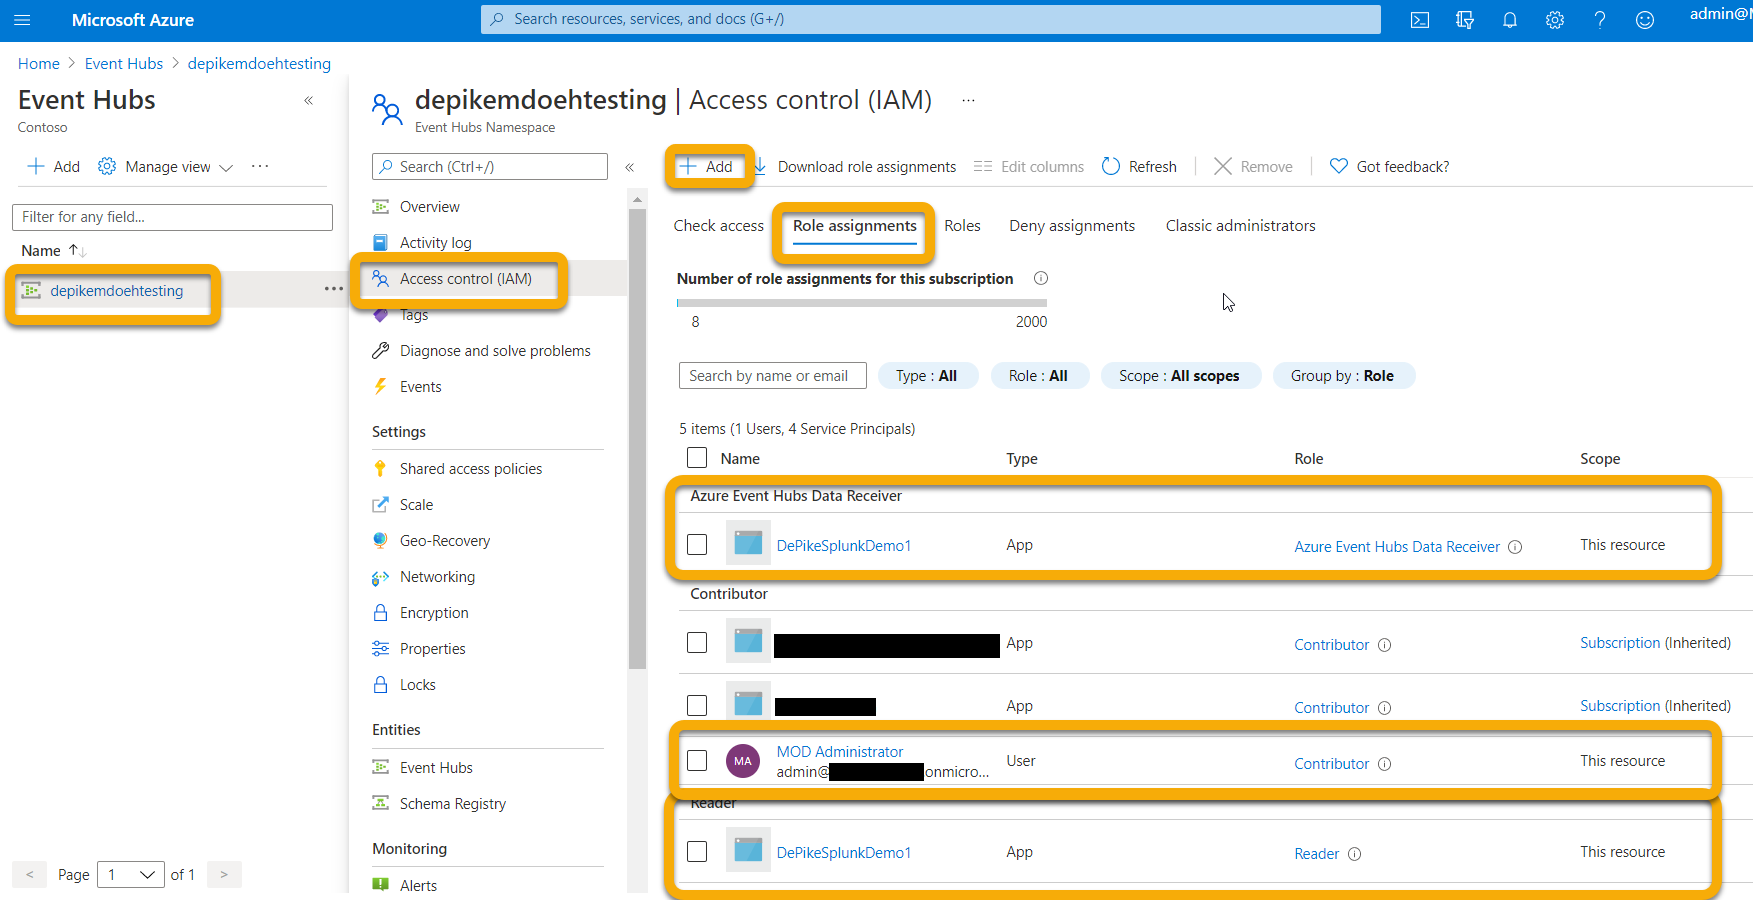
You're required to add permissions to the following roles to entities that are involved in Event Hubs data management:
- Contributor: The permissions related to this role are added to entity who logs in to the Microsoft Defender portal.
- Reader and Azure Event Hub data Receiver: The permissions related to these roles are assigned to the entity who is already assigned the role of a Service Principal and logs in to the Microsoft Entra application.
To ensure that these roles are added, perform the following step:
Go to Event Hub Namespace > Access Control (IAM) > Add and verify under Role assignments.
Set up Event Hubs
You can send all selected event types to a single event hub or create a separate event hub for each event type. Choose the option that fits your needs.
Option 1:
You can create Event Hubs within your Namespace and all the Event Types (Tables) you select to export are written into this one Event Hub.
Option 2:
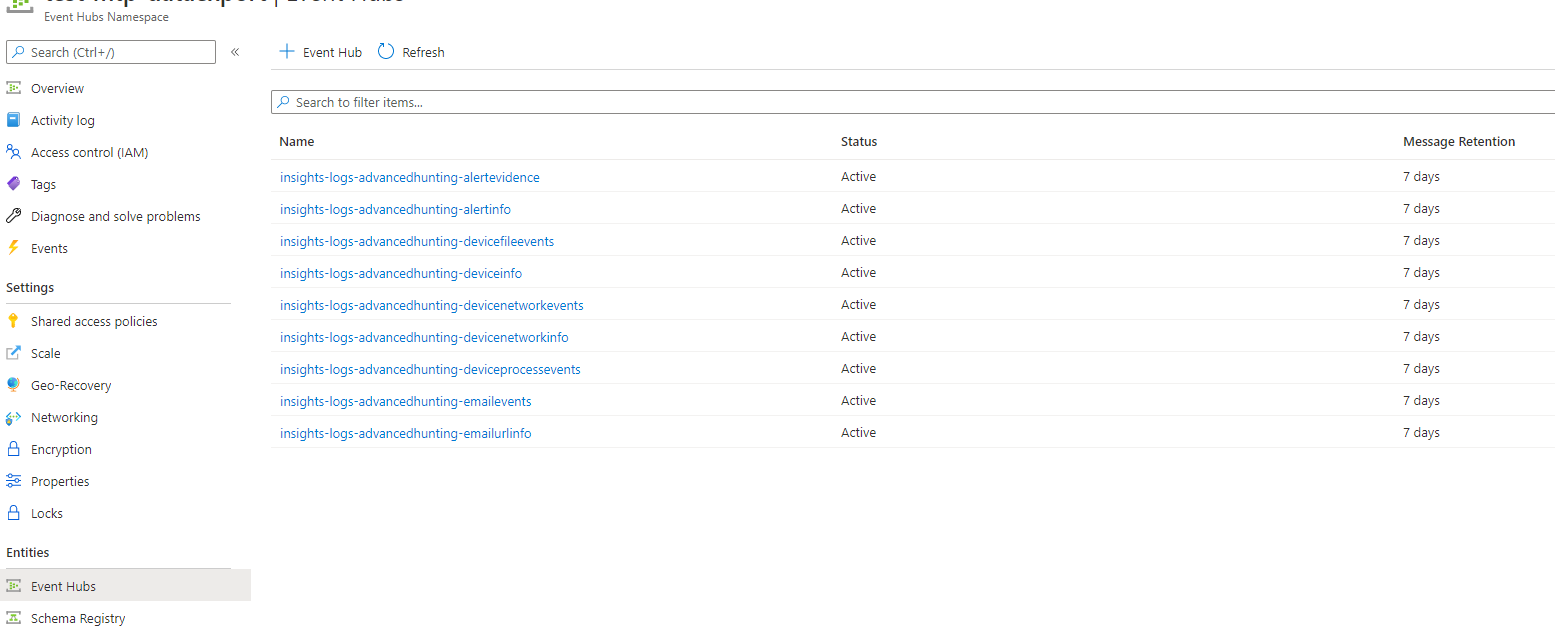
Instead of exporting all the Event Types (Tables) into one Event Hub, you can export each table into different Event Hubs inside your Event Hubs Namespace (one Event Hub per Event Type).
In this option, Microsoft Defender creates Event Hubs for you.
Note
If you are using an Event Hub Namespace that is not part of an Event Hub Cluster, you're only able to choose up to 10 Event Types (Tables) to export in each Export Settings you define, due to an Azure limitation of 10 Event Hub per Event Hub Namespace.
For example:
If you choose Option 2, don't manually create event hubs. Instead, skip to Configure Microsoft Defender XDR to export email tables to Event Hubs to set up the export in the Defender portal. Microsoft Defender XDR creates the event hubs for you.
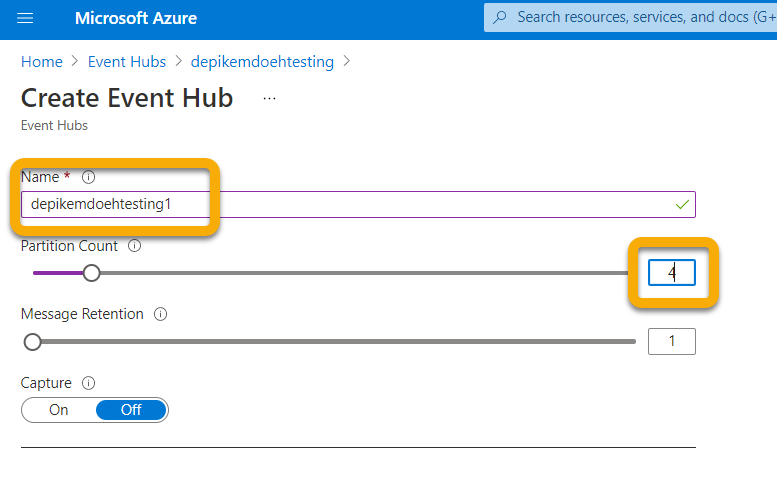
To create event hubs in your namespace, select Event Hub > + Event Hub.
A higher partition count allows more throughput. Increase this value based on your expected load. Use the default values for Message Retention (1) and Capture (Off).
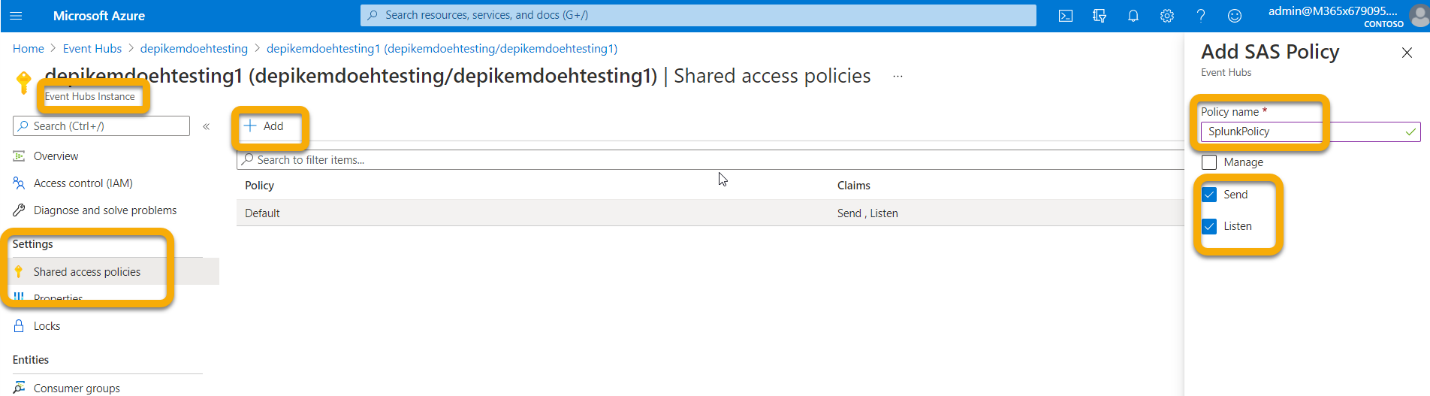
For these Event Hubs (not namespace), you need to configure a Shared Access Policy with Send, Listen Claims. Click on your Event Hub > Shared access policies > + Add and then give it a Policy name (not used elsewhere) and check Send and Listen.
Configure Microsoft Defender XDR to export email tables to Event Hubs
After your Event Hubs namespace and event hubs are set up, configure Microsoft Defender XDR to export event data through Event Hubs.
Set up Microsoft Defender XDR to send email tables to Splunk through Event Hubs
Use the following steps to configure Microsoft Defender XDR to export email tables to Splunk through Event Hubs.
Before you begin, make sure your account has the following roles:
- Contributor role (or higher) at the Event Hubs Namespace resource level for the event hubs you're exporting to. Without this role, an error occurs when you try to save the export settings.
- Security Admin role on the tenant tied to Microsoft Defender XDR and Azure.
Sign in to Microsoft Defender XDR.
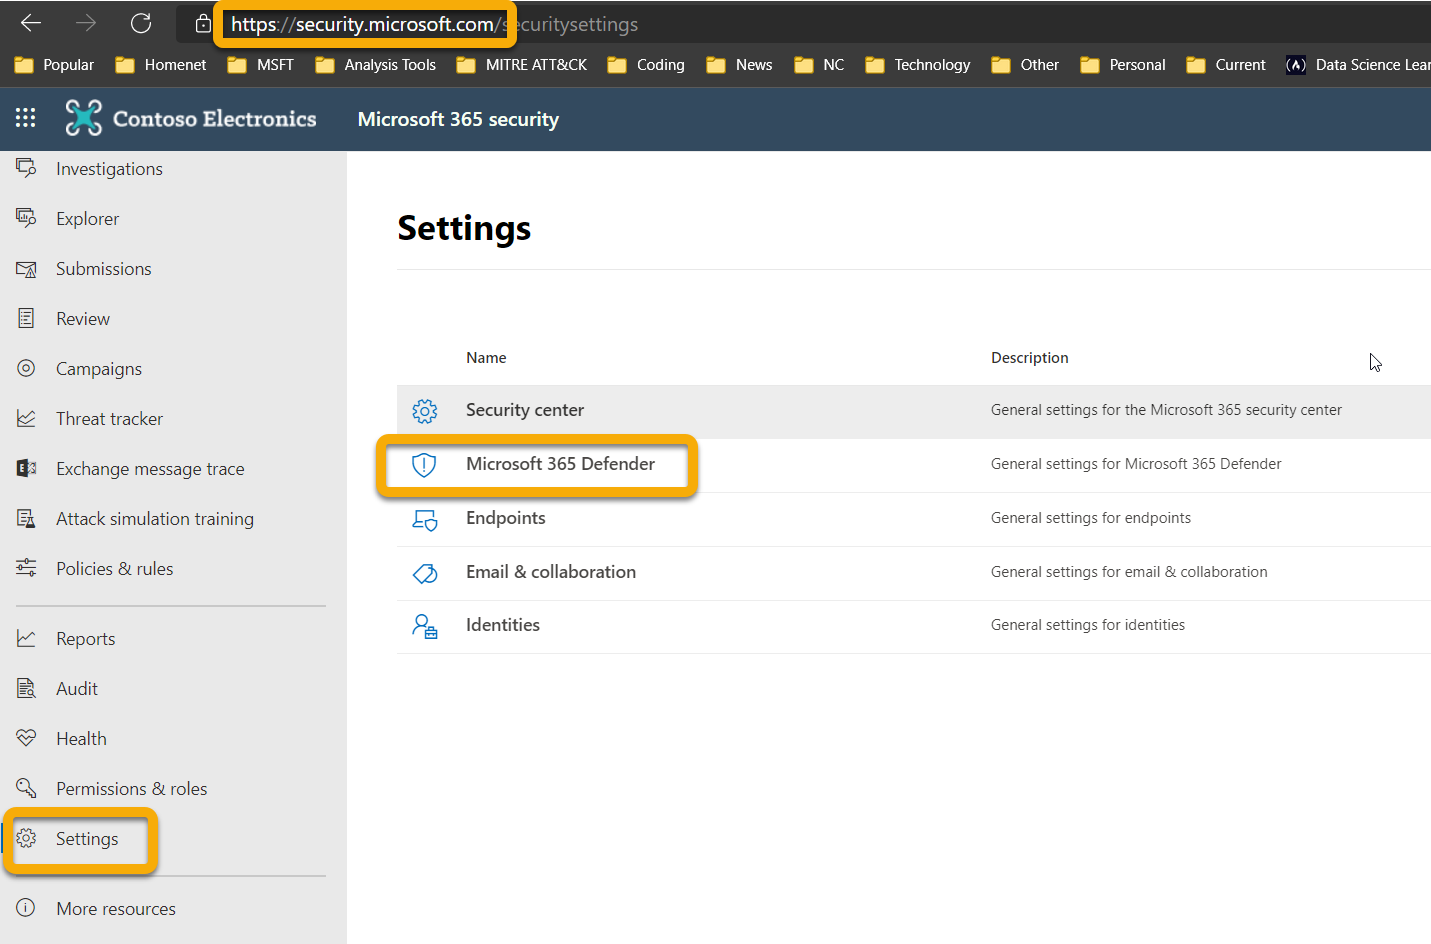
Click on Raw Data Export > +Add.
Use the Event Hubs namespace Resource ID you recorded in Set up Event Hubs namespace, the event hub name, and the client secret from Set up Microsoft Entra App Registration.
Name: This value is local and should be whatever works in your environment.
Forward events to event hub: Select this checkbox.
Event-Hub Resource ID: Enter the Event Hubs namespace Resource ID you recorded in Set up Event Hubs namespace.
Event-Hub name: If you created an event hub in your namespace during Set up Event Hubs, paste that event hub name here.
If you choose to let Microsoft Defender XDR create Event Hubs per Event Types (Tables) for you, leave the Event-Hub name field empty.
Event Types: Select the Advanced Hunting tables that you want to forward to the Event Hubs and then on to your custom app. Alert tables are from Microsoft Defender XDR, Devices tables are from Microsoft Defender for Endpoint (EDR), and Email tables are from Microsoft Defender for Office 365. Email Events records all Email Transactions. The URL (Safe Links), Attachment (Safe Attachments), and Post Delivery Events (ZAP) are also recorded and can be joined to the Email Events on the NetworkMessageId field.
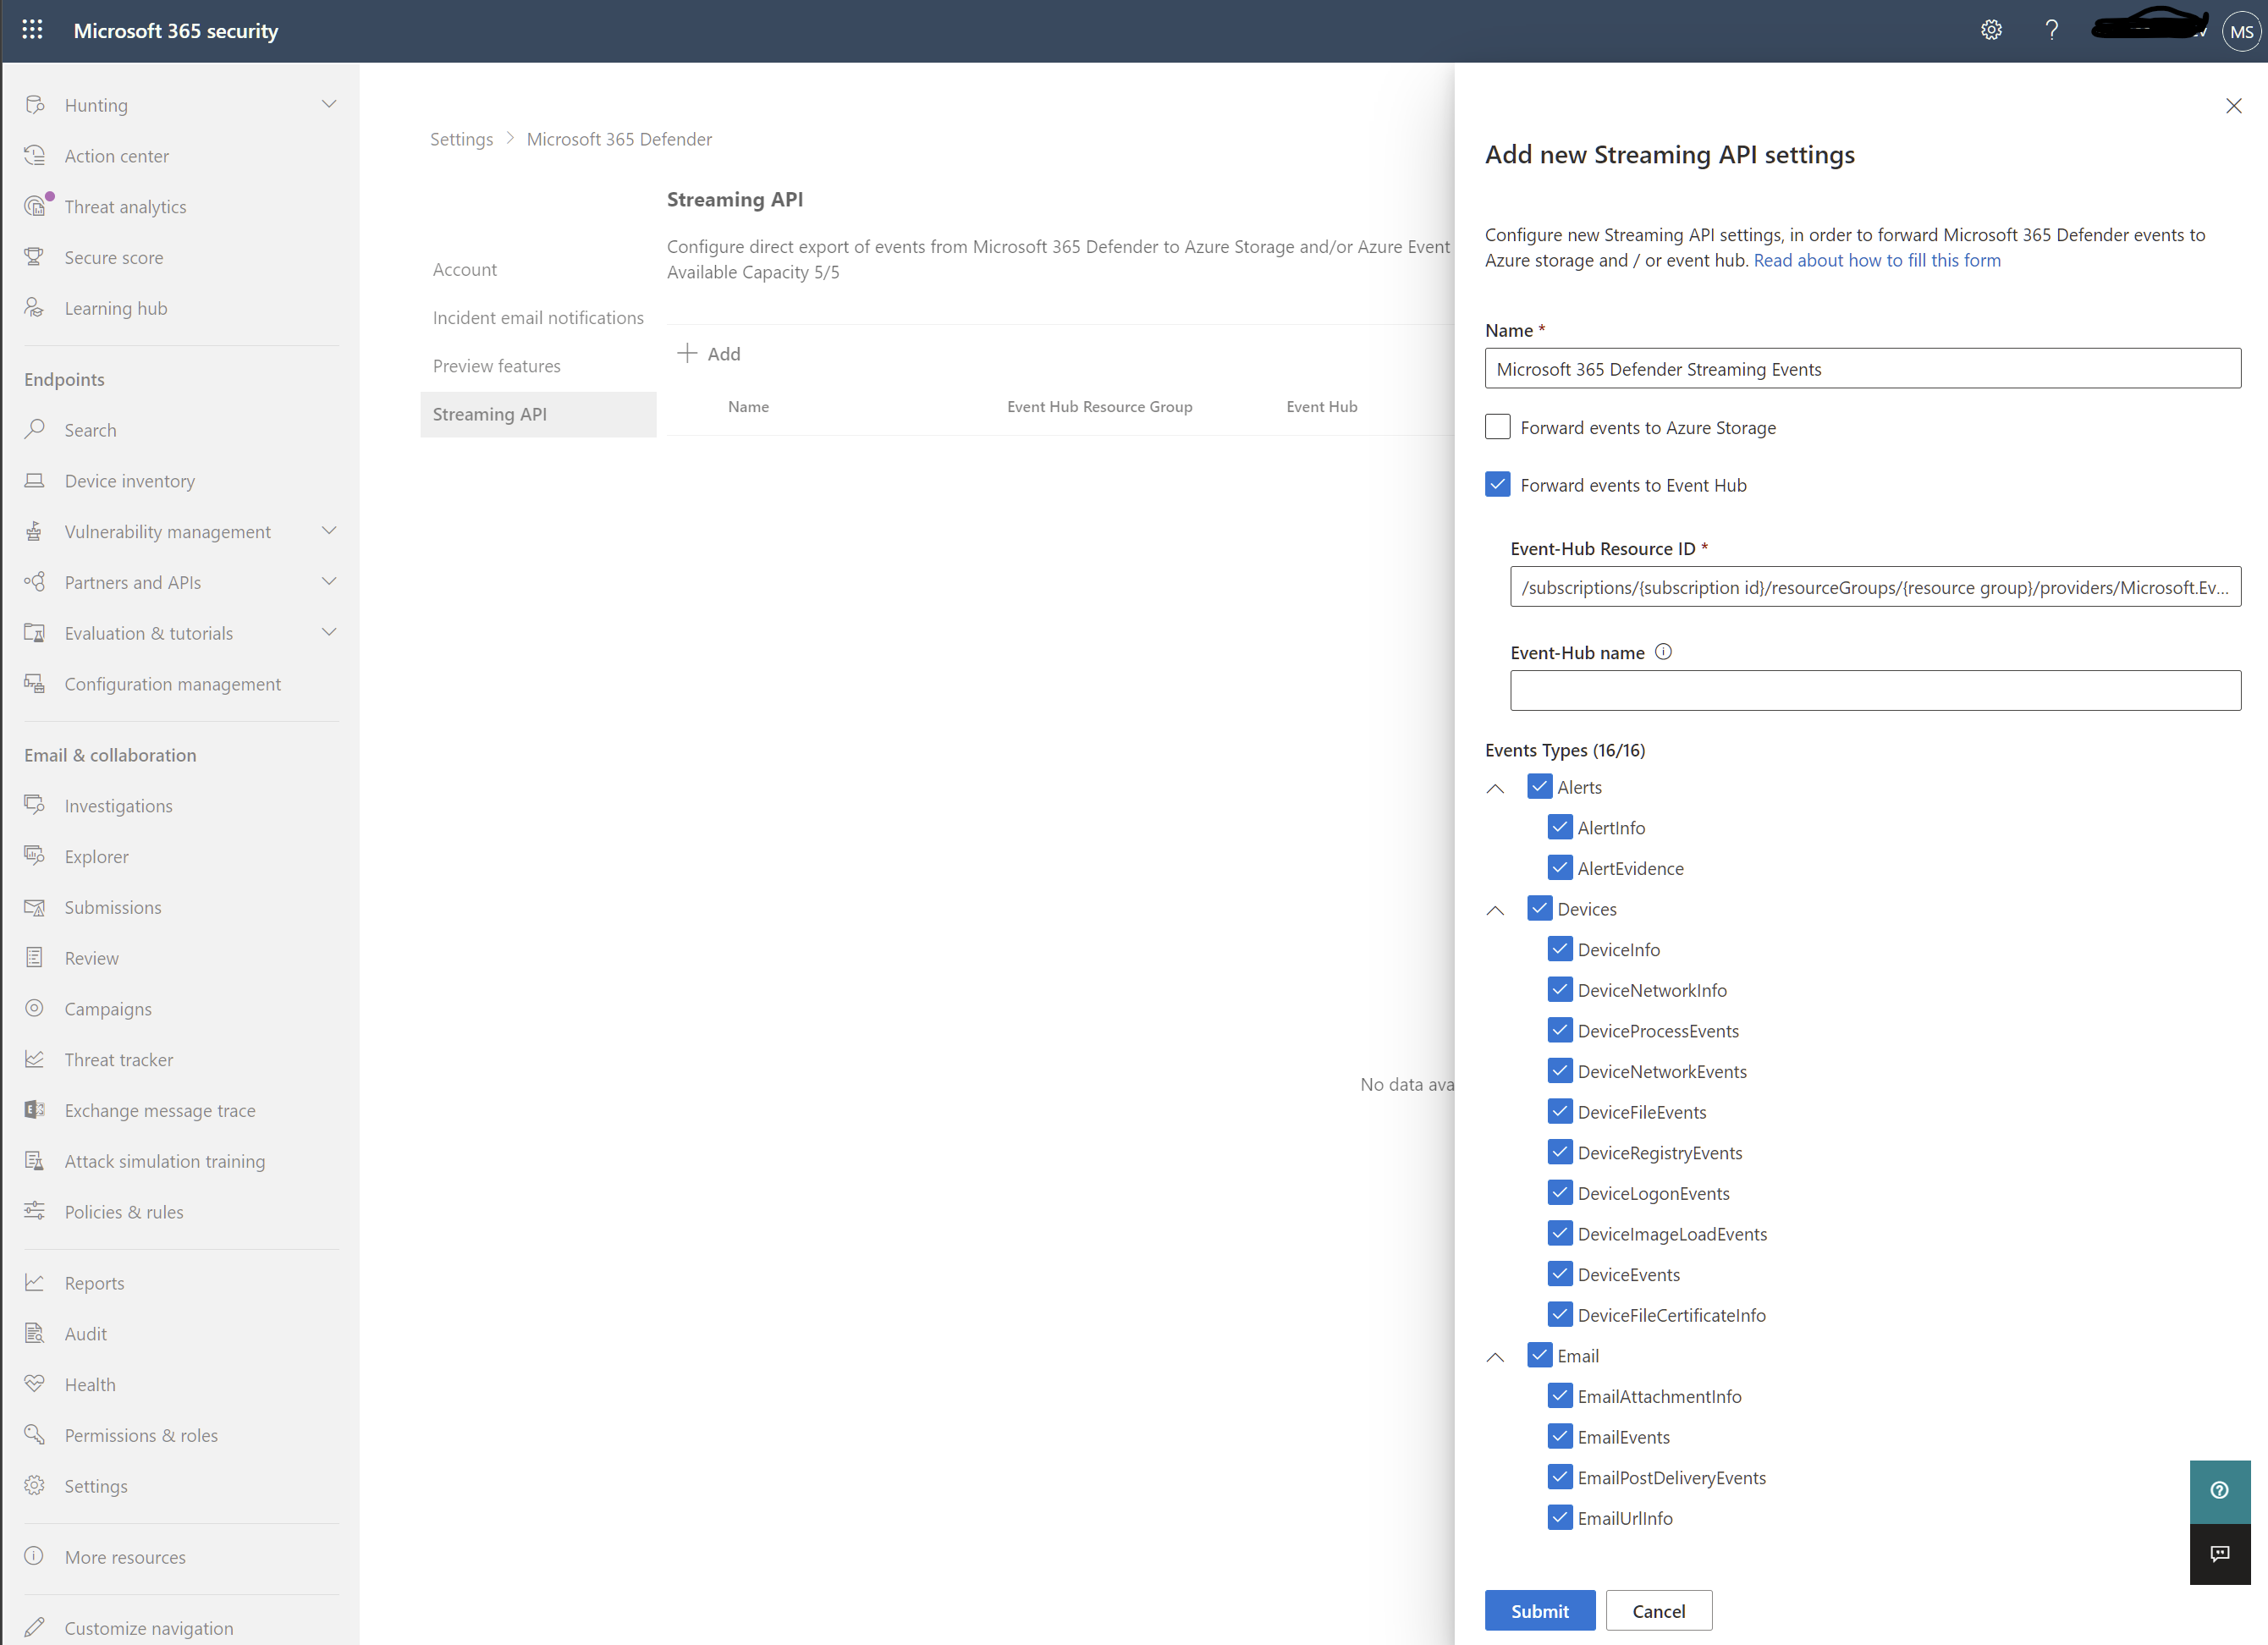
Make sure to click Submit.
Verify event export to Event Hubs
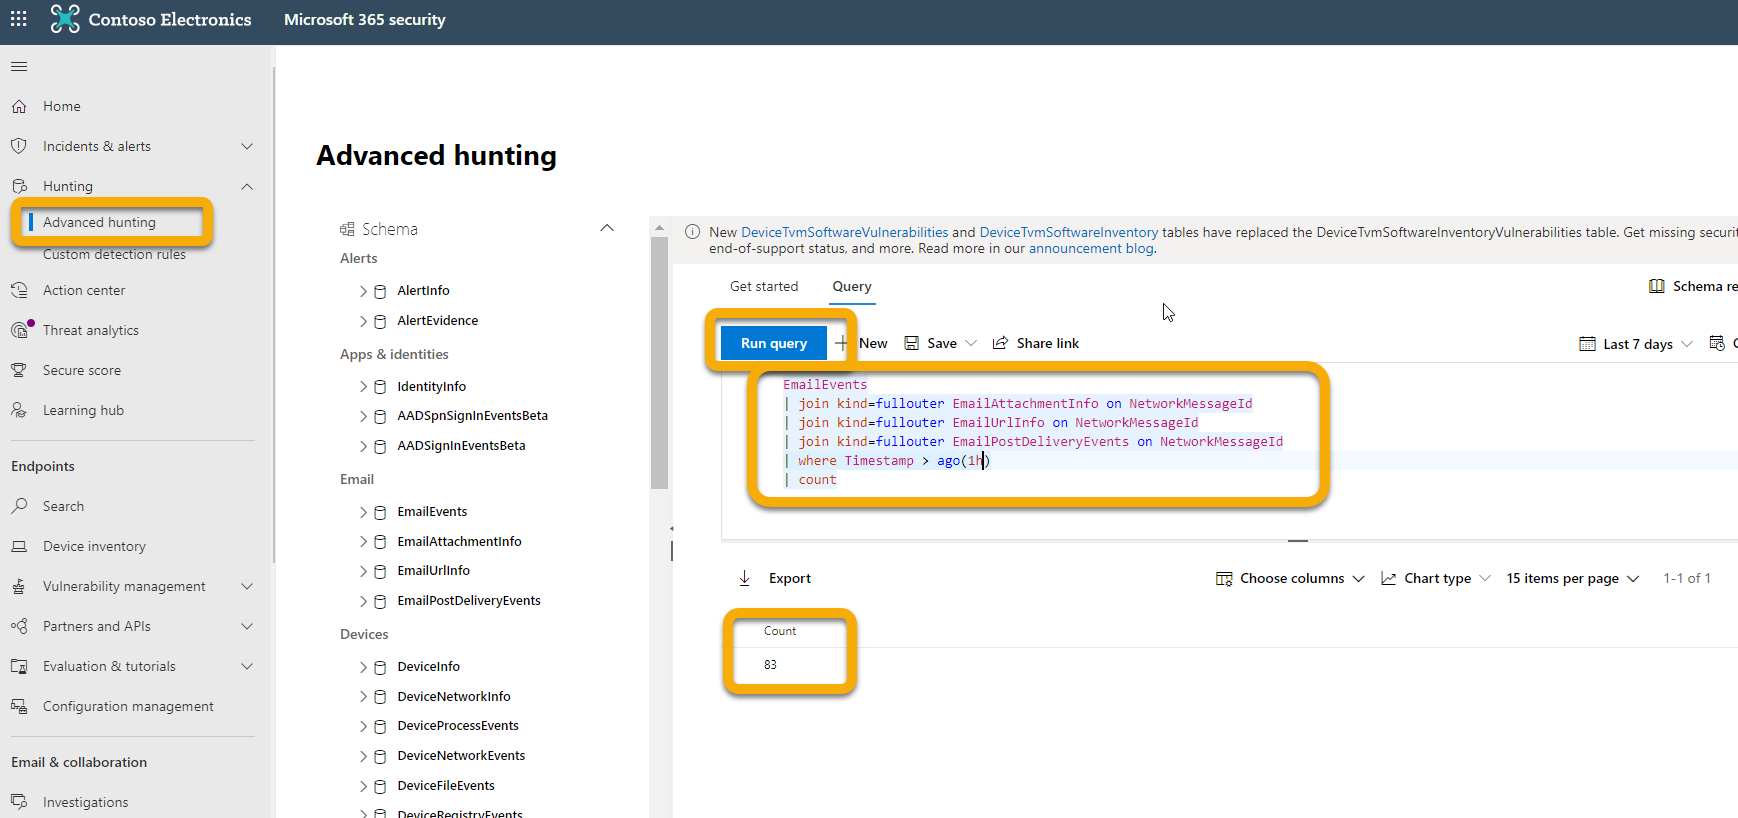
You can verify that events are being sent to the Event Hubs by running a basic Advanced Hunting query. The query uses the EmailEvents, EmailAttachmentInfo, EmailUrlInfo, and EmailPostDeliveryEvents Advanced Hunting tables to confirm that email-related data is flowing through the export pipeline. Select Hunting > Advanced Hunting > Query and enter the following query. This query uses full outer joins to correlate email events with attachment, URL, and post-delivery details by NetworkMessageId, giving you a count of all email activity in the last hour:
EmailEvents
|join kind=fullouter EmailAttachmentInfo on NetworkMessageId
|join kind=fullouter EmailUrlInfo on NetworkMessageId
|join kind=fullouter EmailPostDeliveryEvents on NetworkMessageId
|where Timestamp > ago(1h)
|count
This query shows you how many emails were received in the last hour joined across all the other tables. The query result also shows whether events are available that could be exported to the Event Hubs. If this count shows 0, then you won't see any data going out to the Event Hubs.
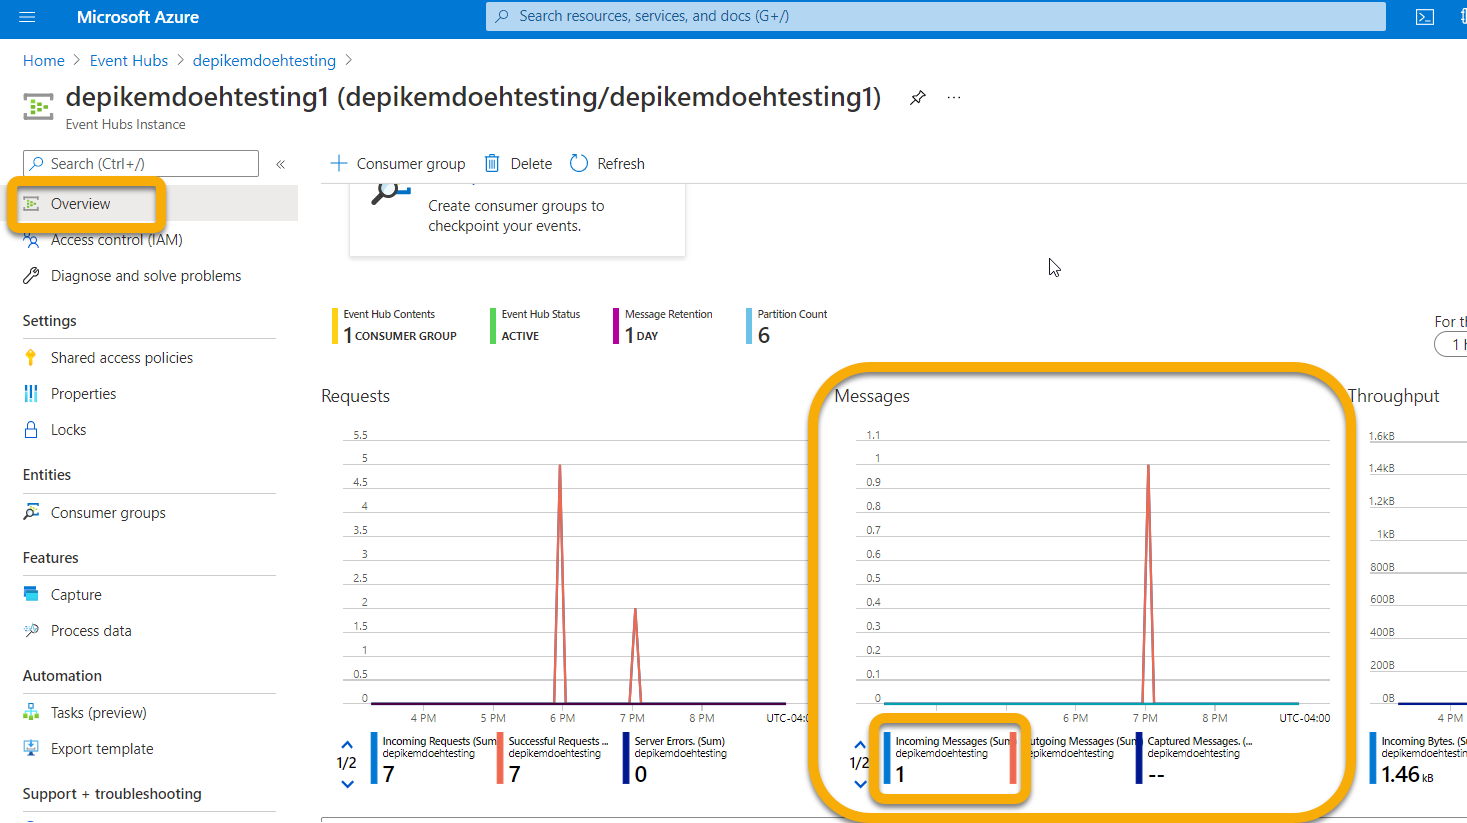
Once you've verified there's data to export, you can view the Event Hubs page to verify that messages are incoming. Exported messages can take up to one hour to appear in Event Hubs.
- In Azure, go to Event Hub > Click on the Namespace > Event Hub > Click on the Event Hub.
- Under Overview, scroll down and in the Messages graph you should see Incoming Messages. If you don't see any results, then there are no messages for your custom app to ingest.
Related content
Tip
Do you want to learn more? Engage with the Microsoft Security community in our Tech Community: Microsoft Defender XDR Tech Community.