Bilješka
Pristup ovoj stranici zahtijeva provjeru vjerodostojnosti. Možete pokušati da se prijavite ili promijenite direktorije.
Pristup ovoj stranici zahtijeva provjeru vjerodostojnosti. Možete pokušati promijeniti direktorije.
Overview
In an Exchange Hybrid environment, the management of Exchange attributes for directory-synchronized users is restricted in Exchange Online (EXO). Organizations are required to utilize their on-premises Exchange Server, sometimes referred as Last Exchange Server (LES), to modify these attributes within Active Directory (AD), synchronizing any changes to the cloud through Cloud Sync or Connect Sync. As a result, although mailboxes are located in the cloud, organizations remain dependent on their on-premises Exchange Server for managing cloud mailboxes by executing Exchange Server cmdlets that update on-premises Active Directory, which then synchronizes the updates to the cloud.
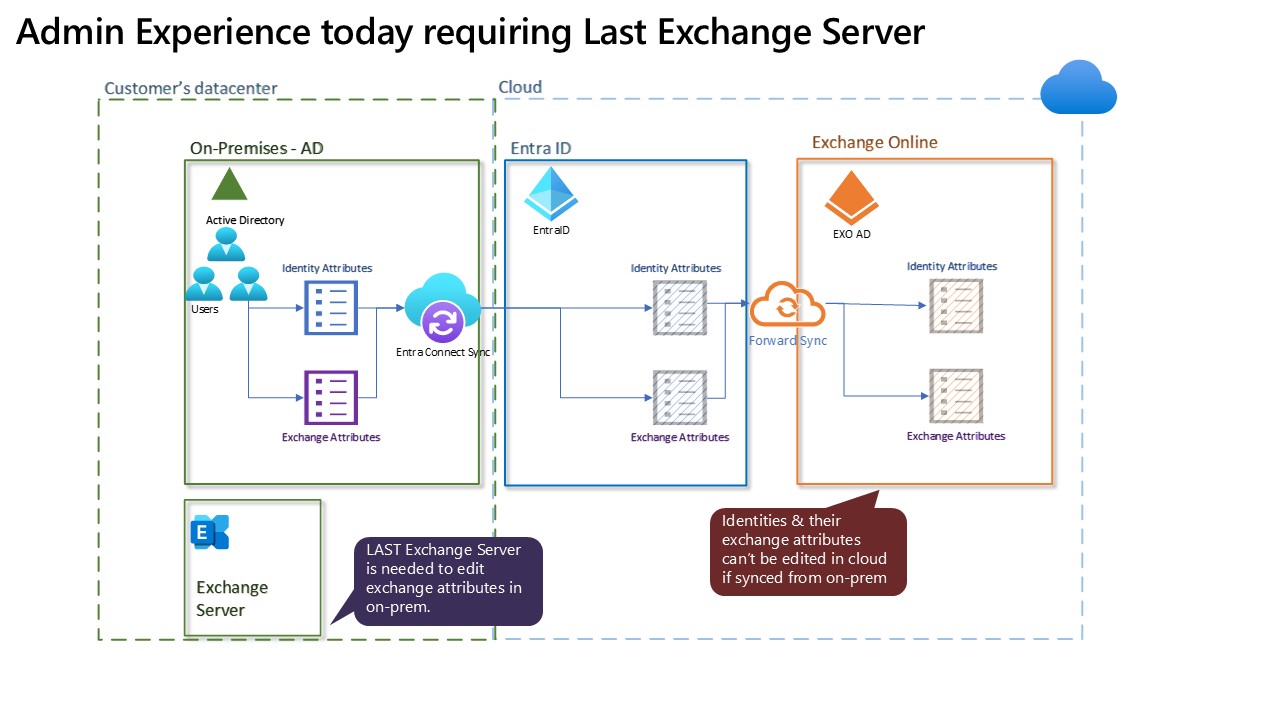
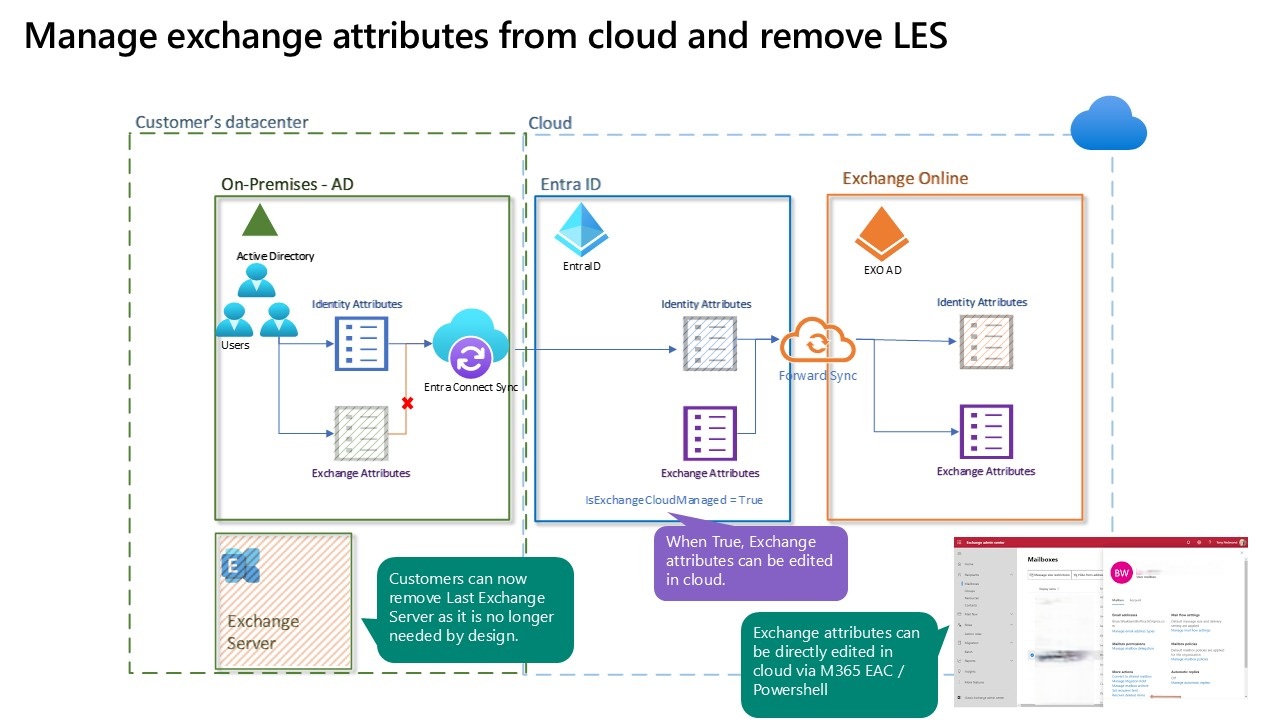
A new capability in Exchange Online now allows administrators to manage Exchange attributes for directory-synchronized users with mailboxes hosted in the cloud. With this update, the Source of Authority (SOA) for Exchange-specific attributes can be transferred to the cloud, while the SOA for identity-related attributes remains under the control of the on-premises Active Directory. After moving the SOA for Exchange attributes to the cloud, these details can be managed using EXO PowerShell, the Microsoft 365 Admin Center, or the Exchange Admin Center, whereas identity attributes are still modified through on-premises Active Directory only. This document provides detailed instructions for activating this feature for users whose mailboxes are located in the cloud, as well as the process of shifting the SOA for Exchange attributes to the cloud environment.
Note
Exchange-attribute SOA transfer applies only to user objects with mailboxes in Exchange Online. To manage mail-enabled groups or mail contacts from the cloud, use Group SOA transfer or Contact SOA transfer.
After a user's Exchange attribute SOA is transferred to the cloud, editing the user's first name and last name requires using on-premises Active Directory. To modify Exchange attributes such as HiddenFromAddressListsEnabled or CustomAttribute(x), administrators need to use Exchange Online PowerShell or Microsoft 365 Exchange Admin Center (EAC).
Modifications to designated Exchange attributes can also be written back to on-premises Active Directory through Microsoft Entra Cloud Sync. For configuration details, see How to enable Exchange attribute writeback.
Relationship to object-level Source of Authority
Cloud-based management of Exchange attributes transfers only Exchange-attribute SOA to Exchange Online. The SOA for identity attributes remains in on-premises Active Directory, and the user remains directory-synchronized.
For organizations that later plan to reduce or remove their dependency on on-premises Active Directory, object-level SOA transfer is a separate next step. For example, an organization can first transfer Exchange-attribute SOA to the cloud and decommission its last Exchange Server while continuing to use Active Directory for identity management. It can later transfer object-level SOA for users, groups, and contacts to Microsoft Entra ID as part of a broader plan to decommission on-premises Active Directory.
Object-level SOA transfer for users, groups, and contacts is generally available. For configuration guidance, see Configure user Source of Authority, Configure Group Source of Authority, and Configure Contact SOA.
Feature Availability
This feature was delivered in two phases:
Phase 1 (GA) provides per-mailbox control for cloud management of Exchange attributes. Administrators can transfer Exchange-attribute SOA for an individual mailbox to the cloud by setting IsExchangeCloudManaged to true. A mailbox can be returned to on-premises Exchange-attribute management by setting IsExchangeCloudManaged to false. Support is available in Commercial (Global) tenants, as well as in GCCH, DoD, and Gallatin environments.
Phase 2 (GA) adds writeback support for designated Exchange attributes through Microsoft Entra Cloud Sync. Changes to supported Exchange properties made in the cloud are automatically synchronized back to on-premises Active Directory. For example, changes to a proxy address in Exchange Online are reflected on-premises. The supported writeback set now includes the mail attribute. Writeback requires Microsoft Entra Cloud Sync and supports up to 600,000 cloud-managed mailboxes per tenant. Support is available in Commercial (Global) tenants, as well as in GCCH, DoD, and Gallatin environments. For configuration guidance, see How to enable Exchange attribute writeback.
Identity, Exchange Attributes and Writeback
The following table identifies which attributes can be edited after Exchange attribute SOA is transferred to the cloud and which changes are written back to on-premises Active Directory.
| No. | Attribute | Type | Can be edited in EXO | Writeback to On-prem | Cmdlet to modify | Parameter |
|---|---|---|---|---|---|---|
| 1 | accountEnabled | Identity | No | |||
| 2 | C | Identity | No | |||
| 3 | Cn | Identity | No | |||
| 4 | Co | Identity | No | |||
| 5 | company | Identity | No | |||
| 6 | countryCode | Identity | No | |||
| 7 | department | Identity | No | |||
| 8 | displayName | Identity | No | |||
| 9 | facsimiletelephonenumber | Identity | No | |||
| 10 | givenName | Identity | No | |||
| 11 | homePhone | Identity | No | |||
| 12 | info | Identity | No | |||
| 13 | Initials | Identity | No | |||
| 14 | l | Identity | No | |||
| 15 | mailNickname | Identity | No | |||
| 16 | manager | Identity | No | |||
| 17 | mobile | Identity | No | |||
| 18 | msDS-HABSeniorityIndex | Identity | No | |||
| 19 | msDS-PhoneticDisplayName | Identity | No | |||
| 20 | objectSID | Identity | No | |||
| 21 | otherFacsimileTelephone | Identity | No | |||
| 22 | otherHomePhone | Identity | No | |||
| 23 | otherTelephone | Identity | No | |||
| 24 | pager | Identity | No | |||
| 25 | physicalDeliveryOfficeName | Identity | No | |||
| 26 | postalCode | Identity | No | |||
| 27 | pwdLastSet | Identity | No | |||
| 28 | sn | Identity | No | |||
| 29 | sourceAnchor | Identity | No | |||
| 30 | st | Identity | No | |||
| 31 | streetAddress | Identity | No | |||
| 32 | telephoneAssistant | Identity | No | |||
| 33 | telephoneNumber | Identity | No | |||
| 34 | title | Identity | No | |||
| 35 | usageLocation | Identity | No | |||
| 36 | userPrincipalName | Identity | No | |||
| 37 | wWWHomePage | Identity | No | |||
| 38 | altRecipient | Exchange | Yes | No | Set-Mailbox | ForwardingAddress |
| 39 | authoring | Exchange | Yes | No | Set-Mailbox | AcceptMessagesOnlyFrom |
| 40 | dLMemRejectPerms | Exchange | Yes | No | Set-Mailbox | RejectMessagesFromDLMembers |
| 41 | dLMemSubmitPerms | Exchange | Yes | No | Set-Mailbox | AcceptMessagesOnlyFromDLMembers |
| 42 | extensionAttribute1 | Exchange | Yes | Yes | Set-Mailbox | CustomAttribute1 |
| 43 | extensionAttribute10 | Exchange | Yes | Yes | Set-Mailbox | CustomAttribute10 |
| 44 | extensionAttribute11 | Exchange | Yes | Yes | Set-Mailbox | CustomAttribute11 |
| 45 | extensionAttribute12 | Exchange | Yes | Yes | Set-Mailbox | CustomAttribute12 |
| 46 | extensionAttribute13 | Exchange | Yes | Yes | Set-Mailbox | CustomAttribute13 |
| 47 | extensionAttribute14 | Exchange | Yes | Yes | Set-Mailbox | CustomAttribute14 |
| 48 | extensionAttribute15 | Exchange | Yes | Yes | Set-Mailbox | CustomAttribute15 |
| 49 | extensionAttribute2 | Exchange | Yes | Yes | Set-Mailbox | CustomAttribute2 |
| 50 | extensionAttribute3 | Exchange | Yes | Yes | Set-Mailbox | CustomAttribute3 |
| 51 | extensionAttribute4 | Exchange | Yes | Yes | Set-Mailbox | CustomAttribute4 |
| 52 | extensionAttribute5 | Exchange | Yes | Yes | Set-Mailbox | CustomAttribute5 |
| 53 | extensionAttribute6 | Exchange | Yes | Yes | Set-Mailbox | CustomAttribute6 |
| 54 | extensionAttribute7 | Exchange | Yes | Yes | Set-Mailbox | CustomAttribute7 |
| 55 | extensionAttribute8 | Exchange | Yes | Yes | Set-Mailbox | CustomAttribute8 |
| 56 | extensionAttribute9 | Exchange | Yes | Yes | Set-Mailbox | CustomAttribute9 |
| 57 | legacyExchangeDN | Exchange | Yes | No | Not editable in cloud by default. | |
| 58 | Exchange | Yes | Yes | Set-Mailbox | WindowsEmailAddress | |
| 59 | msExchArchiveGUID | Exchange | Yes | No | Enable-Mailbox | Archive |
| 60 | msExchArchiveName | Exchange | Yes | No | Set-Mailbox | ArchiveName |
| 61 | msExchAssistantName | Exchange | Yes | No | Set-User | AssistantName |
| 62 | msExchAuditAdmin | Exchange | Yes | No | Set-Mailbox | AuditAdmin |
| 63 | msExchAuditDelegate | Exchange | Yes | No | Set-Mailbox | AuditDelegate |
| 64 | msExchAuditDelegateAdmin | Exchange | Yes | No | Set-Mailbox | AuditDelegate |
| 65 | msExchAuditOwner | Exchange | Yes | No | Set-Mailbox | AuditOwner |
| 66 | msExchBlockedSendersHash | Exchange | Yes | No | Set-MailboxJunkEmailConfiguration | BlockedSendersAndDomains |
| 67 | msExchBypassAudit | Exchange | Yes | No | Set-MailboxAuditBypassAssociation | AuditBypassEnabled |
| 68 | msExchDelegateListLink | Exchange | Yes | No | Add-MailboxPermission | AccessRights, User, InheritanceType |
| 69 | msExchELCExpirySuspensionEnd | Exchange | Yes | No | Set-Mailbox | EndDateForRetentionHold |
| 70 | msExchELCExpirySuspensionStart | Exchange | Yes | No | Set-Mailbox | StartDateForRetentionHold |
| 71 | msExchELCMailboxFlags | Exchange | Yes | No | Set-Mailbox | SingleItemRecoveryEnabled, LitigationHoldEnabled, RetentionHoldEnabled, |
| 72 | msExchEnableModeration | Exchange | Yes | No | Set-Mailbox | ModerationEnabled |
| 73 | msExchExtensionCustomAttribute1 | Exchange | Yes | Yes | Set-Mailbox | ExtensionCustomAttribute1 |
| 74 | msExchExtensionCustomAttribute2 | Exchange | Yes | Yes | Set-Mailbox | ExtensionCustomAttribute2 |
| 75 | msExchExtensionCustomAttribute3 | Exchange | Yes | Yes | Set-Mailbox | ExtensionCustomAttribute3 |
| 76 | msExchExtensionCustomAttribute4 | Exchange | Yes | Yes | Set-Mailbox | ExtensionCustomAttribute4 |
| 77 | msExchExtensionCustomAttribute5 | Exchange | Yes | Yes | Set-Mailbox | ExtensionCustomAttribute5 |
| 78 | msExchHideFromAddressLists | Exchange | Yes | No | Set-Mailbox | HiddenFromAddressListsEnabled |
| 79 | msExchImmutableID | Exchange | Yes | No | Set-Mailbox | ImmutableId |
| 80 | msExchLitigationHoldDate | Exchange | Yes | No | Set-Mailbox | LitigationHoldDate |
| 81 | msExchLitigationHoldOwner | Exchange | Yes | No | Set-Mailbox | LitigationHoldOwner |
| 82 | msExchMailboxAuditEnable | Exchange | Yes | No | Set-Mailbox | AuditEnabled |
| 83 | msExchMailboxAuditLogAgeLimit | Exchange | Yes | No | Set-Mailbox | AuditLogAgeLimit |
| 84 | msExchMailboxGuid | Exchange | Yes | No | Not editable in cloud by default. | |
| 85 | msExchModeratedByLink | Exchange | Yes | No | Set-Mailbox | ModeratedBy |
| 86 | msExchModerationFlags | Exchange | Yes | No | Set-Mailbox | SendModerationNotifications, ByPassModerationFromSendersOrMembers, ModerationEnabled |
| 87 | msExchRecipientDisplayType | Exchange | Yes | Yes | Set-Mailbox | Type |
| 88 | msExchRecipientTypeDetails | Exchange | Yes | Yes | Set-Mailbox | Type |
| 89 | msExchRemoteRecipientType | Exchange | Yes | No | Set-Mailbox | RemoteRecipientType |
| 90 | msExchRequireAuthToSendTo | Exchange | Yes | No | Set-Mailbox | RequireAllSendersAreAuthenticated |
| 91 | msExchResourceCapacity | Exchange | Yes | No | Set-Mailbox | ResourceCapacity |
| 92 | msExchResourceDisplay | Exchange | Yes | No | Set-Mailbox | ResourceCustom |
| 93 | msExchResourceMetaData | Exchange | Yes | No | Set-Mailbox | ResourceCustom |
| 94 | msExchResourceSearchProperties | Exchange | Yes | No | Set-Mailbox | ResourceCustom |
| 95 | msExchRetentionComment | Exchange | Yes | No | Set-Mailbox | RetentionComment |
| 96 | msExchRetentionURL | Exchange | Yes | No | Set-Mailbox | RetentionUrl |
| 97 | msExchSafeRecipientsHash | Exchange | Yes | No | Set-MailboxJunkEmailConfiguration | Reserved for internal use |
| 98 | msExchSafeSendersHash | Exchange | Yes | No | Set-MailboxJunkEmailConfiguration | TrustedSendersAndDomains |
| 99 | msExchSenderHintTranslations | Exchange | Yes | No | Set-Mailbox | MailTipTranslations |
| 100 | msExchUserHoldPolicies | Exchange | Yes | No | Set-Mailbox | LitigationHoldEnabled |
| 101 | proxyAddresses | Exchange | Yes | Yes | Set-Mailbox | EmailAddresses and WindowsEmailAddress |
| 102 | publicDelegates | Exchange | Yes | No | Set-Mailbox | GrantSendOnBehalfTo |
| 103 | unauthOrig | Exchange | Yes | No | Set-Mailbox | RejectMessagesFrom |
| 104 | userCertificate | Exchange | Yes | No | Set-Mailbox | UserCertificate |
| 105 | userSMIMECertificates | Exchange | Yes | No | Set-Mailbox | UserSMimeCertificate |
Prerequisites
Before transferring the SOA from on-premises to Exchange Online, certain prerequisites must be met.
Microsoft Entra Connect
To enable this feature, install the latest version of Entra Connect Sync. Download and install version 2.5.190.0 or higher of the Entra Connect Sync build prior to use. For detailed instructions on upgrading from older versions, refer to the Microsoft Entra Connect: Upgrade from a previous version to the latest documentation. If you use an older version of Entra Connect Sync than 2.5.190.0, the sync client will try to push Exchange attributes of already SOA transferred mailboxes to Entra ID but will fail. Upgrading to newer version will resolve this issue.
To confirm successful installation of the Entra Connect Sync build, navigate to Programs within the Control Panel and verify that the Microsoft Entra Connect Sync version is 2.5.190.0 or higher. Alternatively, this information may be obtained using PowerShell:
(Get-ADSyncGlobalSettings).Parameters['Microsoft.Synchronize.ServerConfigurationVersion']
Microsoft Entra Cloud Sync
In addition to Microsoft Entra Connect, this feature is now supported through Microsoft Entra Cloud Sync.
Important
To enable Exchange attribute writeback (Phase 2), installation and configuration of Microsoft Entra Cloud Sync is mandatory. Organizations that already use Microsoft Entra Connect Sync are not required to uninstall or replace it. Cloud Sync is installed in addition to Connect Sync. The two coexist side by side. Connect Sync continues to handle your directory synchronization exactly as before, while Cloud Sync handles only the Exchange attribute writeback. There is no impact to your existing mailboxes, users, or sync configuration.
To download and install the Cloud Sync provisioning agent, follow Install the Microsoft Entra provisioning agent.
After installation, confirm:
- Version (on the local server): The agent is 1.1.1107.0 or later, which is required for Exchange attribute writeback. Navigate to
C:\Program Files\Microsoft Azure AD Connect Provisioning Agent, right-clickAADConnectProvisioningAgent.exe, then select Properties > Details. - Registration (in the Microsoft Entra admin center): The agent appears with status Active under Microsoft Entra admin center > Identity > Hybrid management > Microsoft Entra Connect > Cloud Sync > Agents.
Role requirements
To successfully manage the IsExchangeCloudManaged property, your account needs to belong to one of the following built-in roles, which are designed to provide the appropriate administrative rights:
- (Recommended) Exchange Administrator or
- Hybrid Identity Administrator or
- Global Administrator
How to transfer Exchange attributes SOA to the cloud
A new parameter, IsExchangeCloudManaged, has been added for Exchange Online users. This property indicates whether a directory-synchronized user's Exchange attributes are managed in the cloud or on-premises. By default, the IsExchangeCloudManaged value is set to false. Note that this parameter is applicable only to mailboxes with a user whose IsDirSynced status is true. It should not be used together with any other parameters.
Important
After updating a directory-synchronized user's mailbox attributes on-premises with Set-RemoteMailbox, or after completing a mailbox move from on-premises Exchange to Exchange Online, allow for the usual Connect Sync or Cloud Sync cycle plus 24 hours before switching the user's Exchange attributes to cloud managed. For example, if your synchronization takes 6 hours, wait 30 hours in total.
For a mailbox move, first confirm that the move completed and that the on-premises recipient is a remote mailbox. Allow the post-move Exchange attributes to synchronize from on-premises Active Directory to Microsoft Entra ID, and start the additional 24-hour waiting period only after that synchronization completes. Keep IsExchangeCloudManaged set to false during this period. Transferring Exchange-attribute SOA before the post-move values finish synchronizing can cause stale cloud recipient-type values to overwrite the correct remote-mailbox values in Active Directory when Exchange attribute writeback runs.
To configure Exchange attributes for a directory-synchronized user's mailbox to be managed in the cloud, change the user's parameter value to true. To accomplish this, open an Exchange Online PowerShell session and execute the following command for a mailbox that is located in the cloud.
Set-Mailbox -Identity <User> -IsExchangeCloudManaged $true
The status of this change can be verified by executing the following cmdlet:
Get-Mailbox -Identity <User> | Format-List Identity, IsExchangeCloudManaged
When IsExchangeCloudManaged is set to true for a mailbox synced via Entra Connect Sync, Exchange Attributes stop updating from on-premises. You can then edit these attributes directly in the cloud, which was previously restricted.
Set-Mailbox -Identity <User> -CustomAttribute1 "ModifiedInTheCloud"
To find all users whose Exchange attribute SOA has been transferred to the cloud, retrieve the accounts where the IsExchangeCloudManaged property is set to true. You can use the following command:
Get-Mailbox | Where-Object { $_.IsDirSynced -eq $true -and $_.IsExchangeCloudManaged -eq $true }
How to enable Exchange attribute writeback
After transferring the Exchange attribute SOA to the cloud, configure Microsoft Entra Cloud Sync to write back supported Exchange attributes to on-premises Active Directory. The configuration is performed in the Microsoft Entra admin center and requires the Hybrid Identity Administrator role.
Important
Exchange attribute writeback configurations created on or after August 3, 2026 include the Mail to mail mapping by default. Configurations created before this date aren't updated automatically. If you enabled writeback before August 3, 2026, follow the instructions in Frequently Asked Questions to add mail attribute writeback to your existing configuration.
Note
Before proceeding, ensure that the Cloud Sync provisioning agent is installed and verified, as described in Microsoft Entra Cloud Sync.
Create the synchronization configuration
Sign in to the Microsoft Entra admin center.
On the left pane, scroll down to Entra Connect, expand it, and select Cloud Sync.
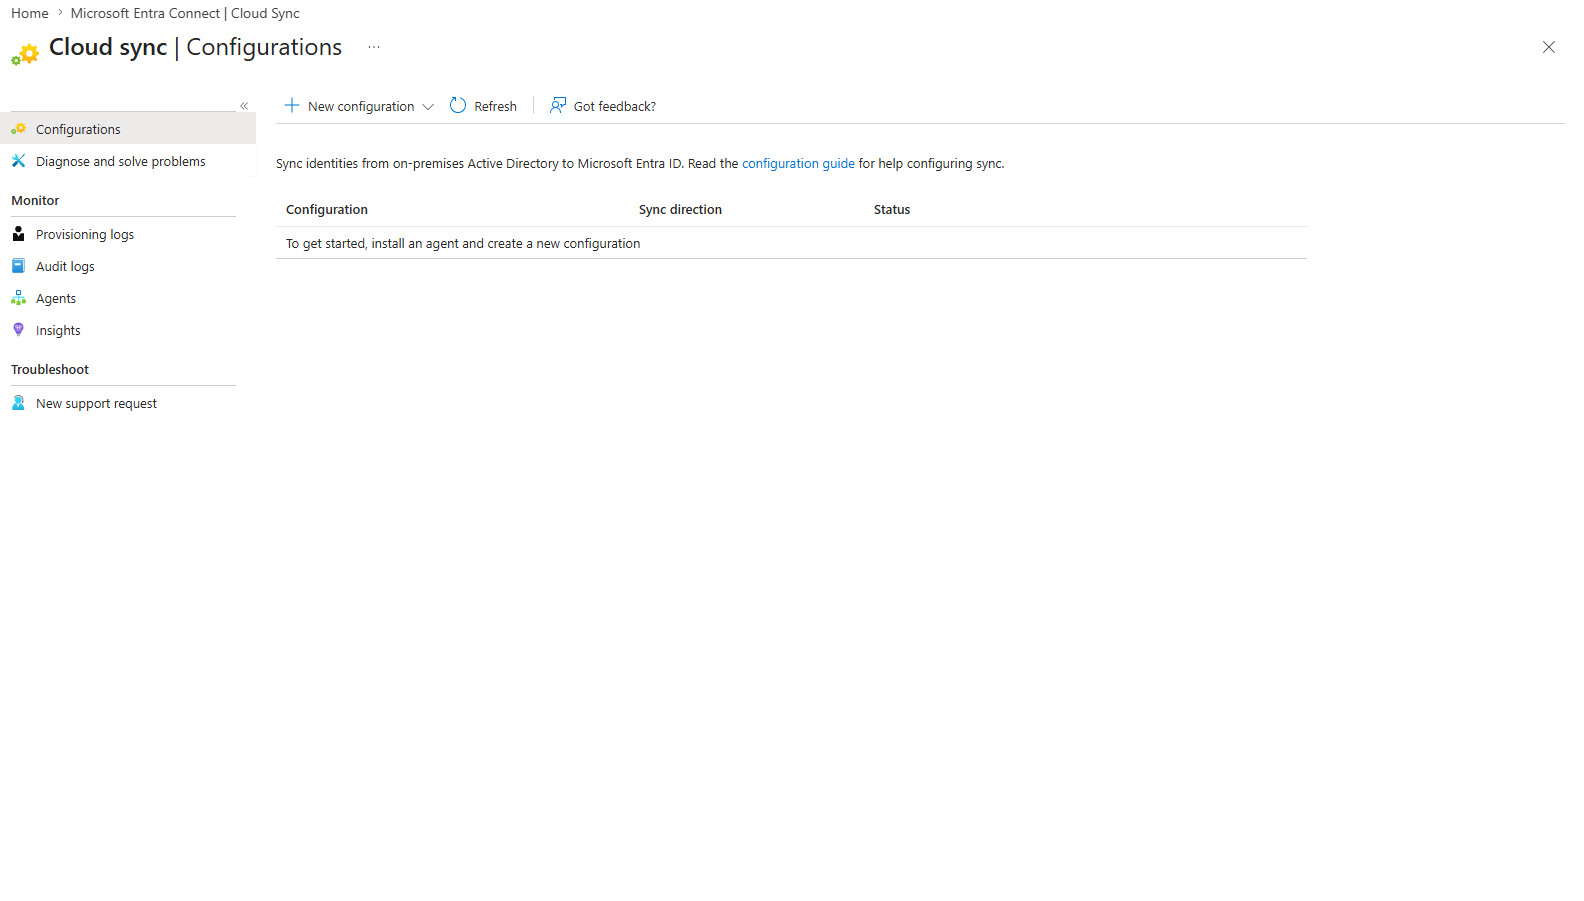
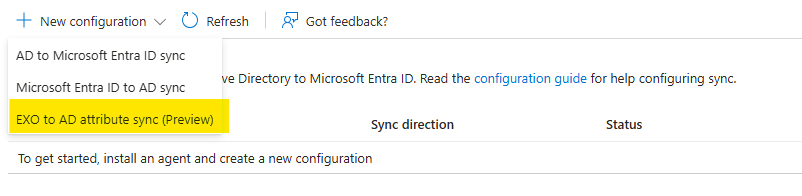
On the Cloud sync | Configurations page, select the New configuration dropdown, and then select EXO to AD attribute sync (Preview).
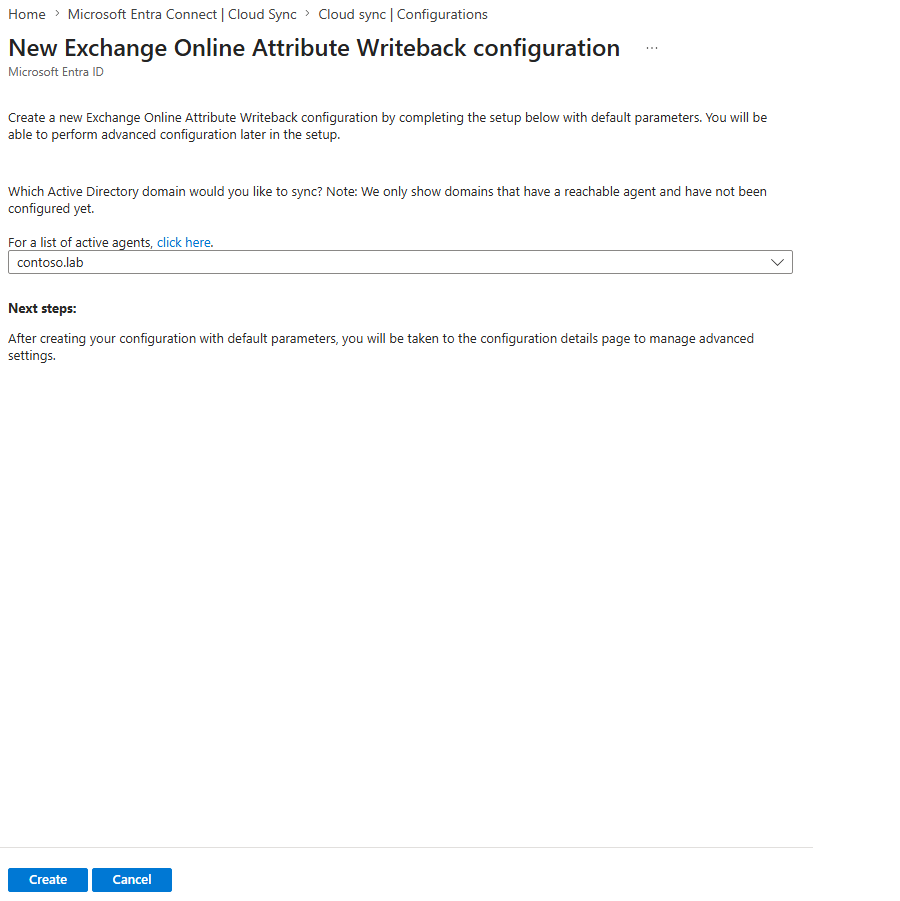
On the New Exchange Online Attribute Writeback configuration page, verify that the agent matches the domain you want to configure sync for, and then select Create. Job creation might take a few minutes.
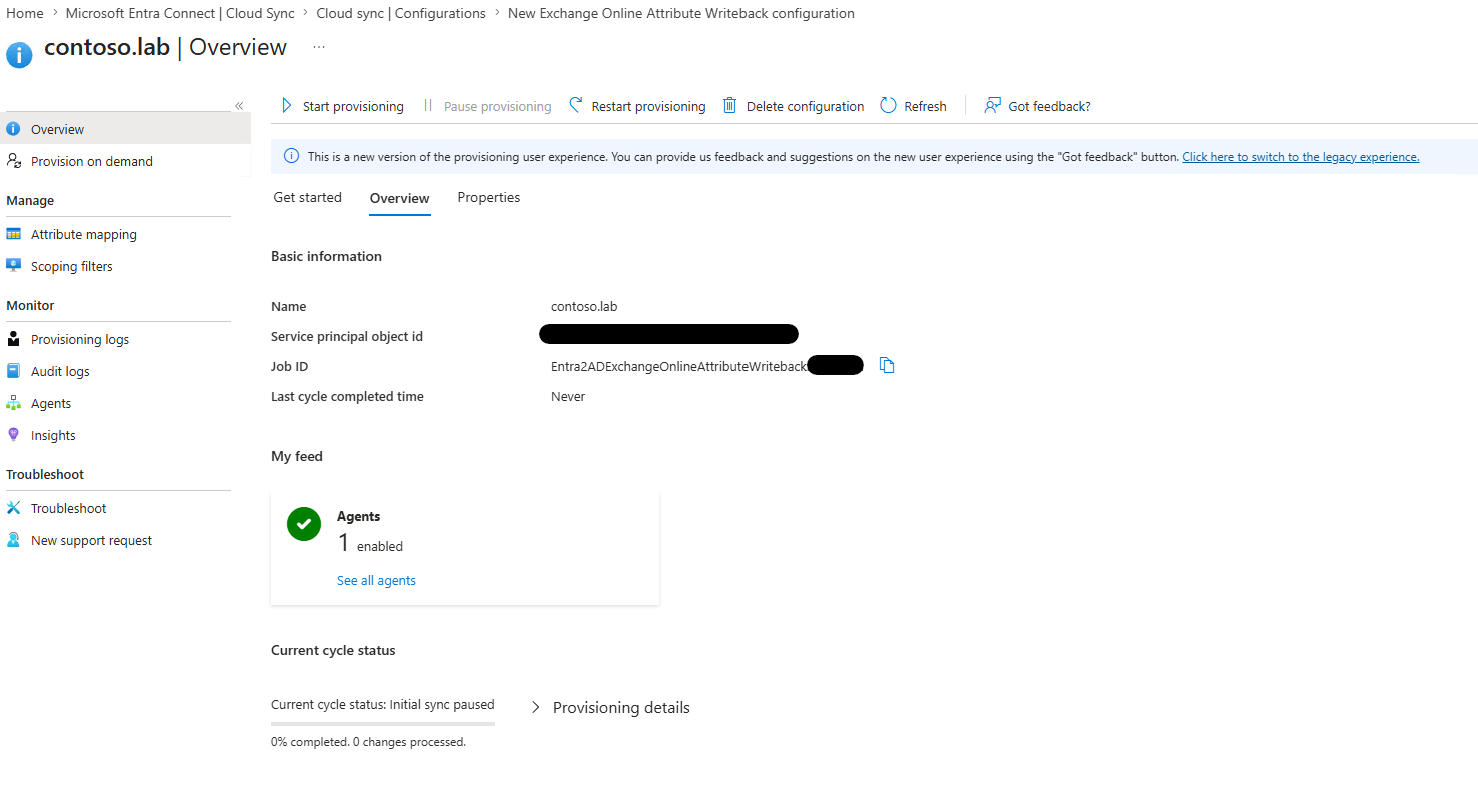
After the job is created, the Overview page for the new configuration opens automatically. To return to this page later, select the configuration name on the Cloud sync | Configurations page.
Start the synchronization job
On the Overview tab, select Start provisioning, and then select Yes to confirm.

Note
Allow a few minutes for the initial sync cycle to begin.
Manage the synchronization job
The job's status appears in the Status column on the Cloud sync | Configurations page. Selecting the link in that column opens a sidebar with additional details. Opening the configuration provides further insights on the Overview tab, including:
- Provisioning logs: View individual sync operations from the left menu.
- Audit logs: View configuration changes from the left menu.
To pause the job, select Pause provisioning on the Overview tab.
To delete the job, select Delete configuration on the Overview tab. This action leaves the configuration without a job inside. To delete the entire configuration, select the ... menu for the configuration on the Cloud sync | Configurations page, and then select Delete configuration.
To view or edit attribute mappings or scoping, open the configuration and select the Attribute Mappings or Scoping filters tab.
Provision on demand
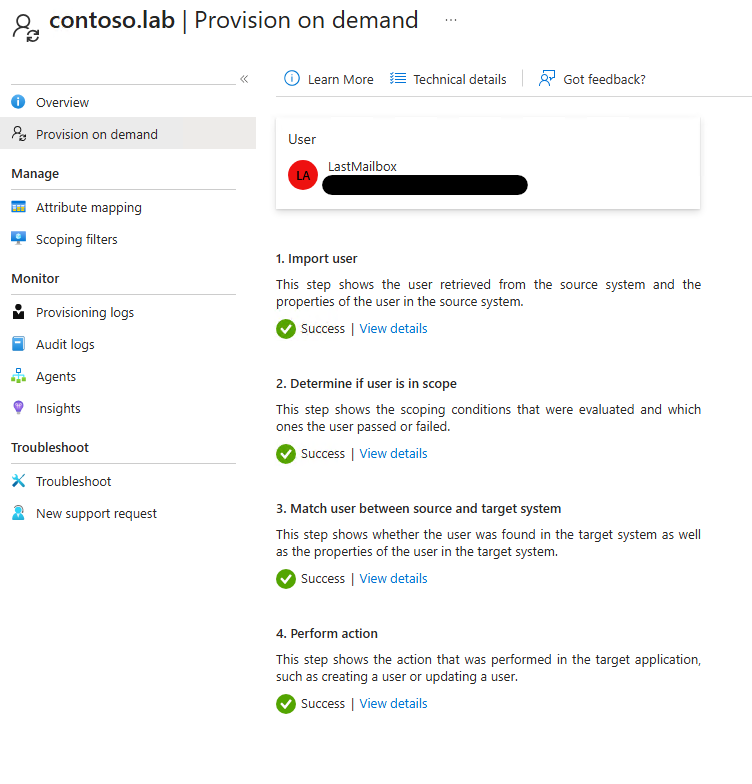
To trigger an immediate sync for a specific user instead of waiting for the next sync cycle, use Provision on demand.
From the configuration's left menu, select Provision on demand.
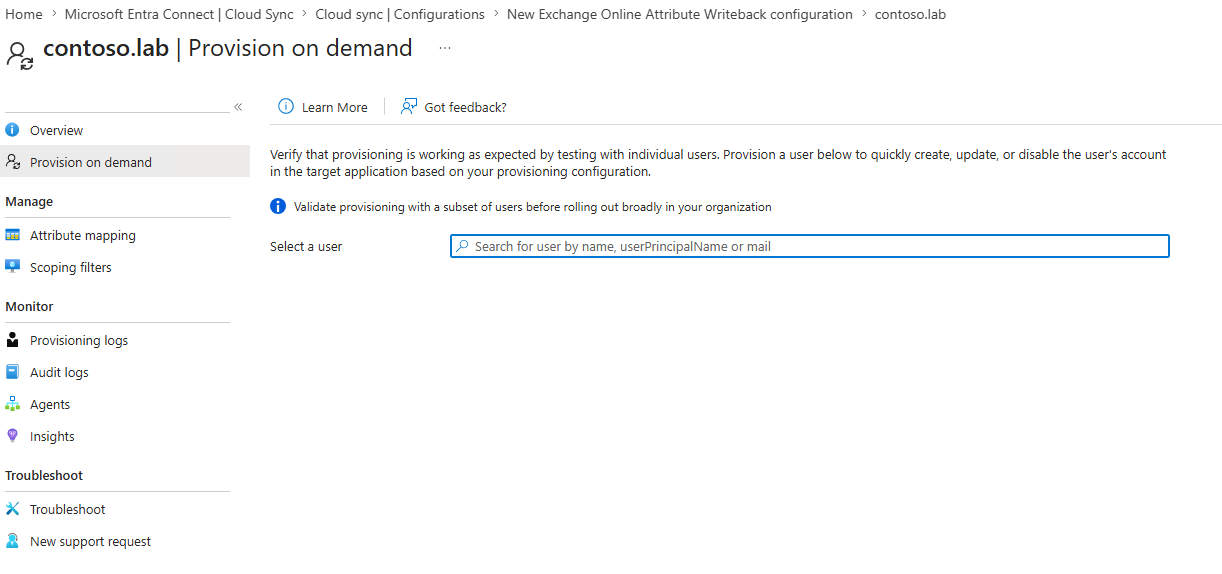
Search for the user or group, and then select Provision.
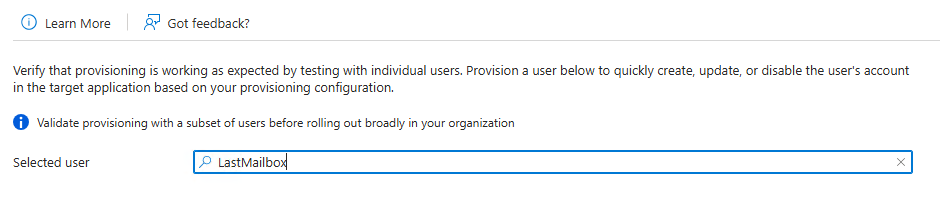
After the provisioning request completes, the result is displayed.
Verify writeback is working
After the synchronization job is running, verify writeback for an existing cloud-managed mailbox:
In Exchange Online PowerShell, modify a writeback-enabled attribute on the mailbox:
Set-Mailbox -Identity <User> -CustomAttribute1 "TestValue_$(Get-Date -Format 'yyyyMMdd_HHmmss')"Wait for the next sync cycle (approximately 20 minutes), or use Provision on demand for an immediate sync.
In on-premises Exchange Management Shell, confirm that the value reached on-premises Active Directory:
Get-RemoteMailbox -Identity <User> | Format-List CustomAttribute1The value should match the value set in Exchange Online.
How to transfer Exchange attributes SOA back to on-premises
To change the management of a user's Exchange attributes from cloud-managed to on-premises-managed, set IsExchangeCloudManaged to false. After this setting is updated, the next synchronization cycle will update the user's cloud Exchange attributes with the values from the on-premises environment.
Prior to implementing this change, ensure that any modifications made in the Cloud which must be retained in the on-premises Active Directory are properly backed up. Utilize cmdlets such as Get-Mailbox and Get-User to save relevant values, allowing for manual restoration to the on-premises environment when required.
The following command transfers the SOA for a mailbox back to on-premises-managed:
Set-Mailbox -Identity <User> -IsExchangeCloudManaged $false
How to create new mailboxes
Note
This section describes the workflow when tenant-wide SOA is not enabled.
New mailboxes may continue to be created using the on-premises New-RemoteMailbox cmdlet, which provisions mailboxes in the cloud, until the final Exchange Server is decommissioned or shut down. However, as the objective of this feature is to accelerate the decommissioning process for the last Exchange Server, the recommended approach for creating new mailboxes is outlined here:
- Create an Active Directory user in the on-premises environment and assign the required identity attributes. If a custom source anchor is used, ensure the property is assigned in the on-premises Active Directory.
- Entra Connect Sync will then synchronize the identity to the cloud.
- Use the Microsoft 365 Admin Center to assign an Exchange Online license to the user. This action provisions a mailbox in Exchange Online.
- Finally, use Set-Mailbox to set
IsExchangeCloudManagedtotrue. This transfers the SOA for this user to the cloud.
How to delete an existing mailbox
To delete a user and their mailbox, the process requires removing the user from on-premises Active Directory, even if the attributes are managed in the cloud. When the deletion is synchronized to the cloud through Entra Connect Sync, the user's mailbox is also deleted from the cloud.
How to enable the feature at a tenant level
It's also possible to enable this feature at the tenant level. Tenant-wide SOA was introduced to streamline the configuration process by setting IsExchangeCloudManaged to true by default for newly created mailboxes. This behavior simplifies mailbox management in the cloud by removing the dependency on an on-premises Exchange Server. Note that this doesn't affect mailboxes that were already migrated to Exchange Online. To enable cloud management for these mailboxes, follow the steps outlined in How to transfer Exchange attributes SOA to the cloud.
Warning
Enable tenant-wide Exchange attribute SOA only after all on-premises mailboxes have been migrated to Exchange Online and you no longer create Exchange mailboxes, mail-enabled users, or remote mailboxes on-premises.
Enabling tenant-wide SOA earlier is unsupported. If a new on-premises Exchange recipient is created after the setting is enabled, or an existing recipient later enters synchronization scope, only its identity attributes are synchronized to Microsoft Entra ID. The cloud object is created as a regular Microsoft Entra user with IsExchangeCloudManaged set to true and isn't provisioned in Exchange Online as the expected MailUser. As a result, onboarding the on-premises mailbox to Exchange Online can't proceed because the required MailUser doesn't exist. There is also no direct self-service way to return the user's Exchange-attribute SOA to on-premises management, because IsExchangeCloudManaged can currently be changed only on a mailbox in Exchange Online, while the affected cloud object is a regular Microsoft Entra user.
Disabling tenant-wide SOA changes the default for users synchronized in the future, but doesn't automatically clear IsExchangeCloudManaged from users already affected. Disable the tenant-wide setting and contact Microsoft Support for recovery assistance. Don't continue mailbox provisioning or migration for affected users until the issue is resolved.
When tenant-wide SOA is enabled, user accounts associated with newly created mailboxes are synchronized to Microsoft Entra ID without Exchange-related attributes. To provision these users with cloud mailboxes, an appropriate Exchange Online plan must be assigned. After the mailbox is provisioned, it is managed in the cloud by default, eliminating the need to explicitly opt in each mailbox, as described in How to transfer Exchange attributes SOA to the cloud.
Ensure that one of the following roles is assigned:
Also, ensure that you are using a supported version of Microsoft Entra Connect, as described in the Prerequisites section. Microsoft Entra Cloud Sync also supports this feature.
To enable this feature, Connect to Exchange Online, and then run the following command:
Set-OrganizationConfig -ExchangeAttributesCloudManagedByDefault
To confirm that the feature is enabled, run the following command:
Get-OrganizationConfig | Format-List BlockExchangeProvisioningFromOnPremEnabled
The following output is displayed: BlockExchangeProvisioningFromOnPremEnabled : True
To disable the feature, run the following command. Note that this change does not affect users that were created in Exchange Server and synchronized to the cloud while the feature was enabled:
Set-OrganizationConfig -ExchangeAttributesServerManagedByDefault
To confirm that the feature is disabled, run the following command:
Get-OrganizationConfig | Format-List BlockExchangeProvisioningFromOnPremEnabled
The following output is displayed: BlockExchangeProvisioningFromOnPremEnabled : False
Frequently Asked Questions
I enabled Exchange attribute writeback during Public Preview. How do I add writeback for the mail attribute?
Configurations created after general availability include the Mail to mail mapping automatically. Existing configurations created during Public Preview aren't updated automatically.
Open your Exchange Online attribute writeback configuration in the Microsoft Entra admin center.
In the left menu, select Attribute mapping.
Look for a direct mapping from the Microsoft Entra ID source attribute Mail to the Active Directory target attribute mail. If the mapping is already present, no further action is required.
Important
Restoring the default mappings removes customized attribute mappings and scoping filters and restarts the synchronization job. Record any custom configuration before restoring the defaults, and reapply it after the restore completes.
If the mapping isn't present, you likely enabled writeback during Public Preview. Select Restore default mappings, and then select Yes to add the Mail to mail mapping to the configuration.
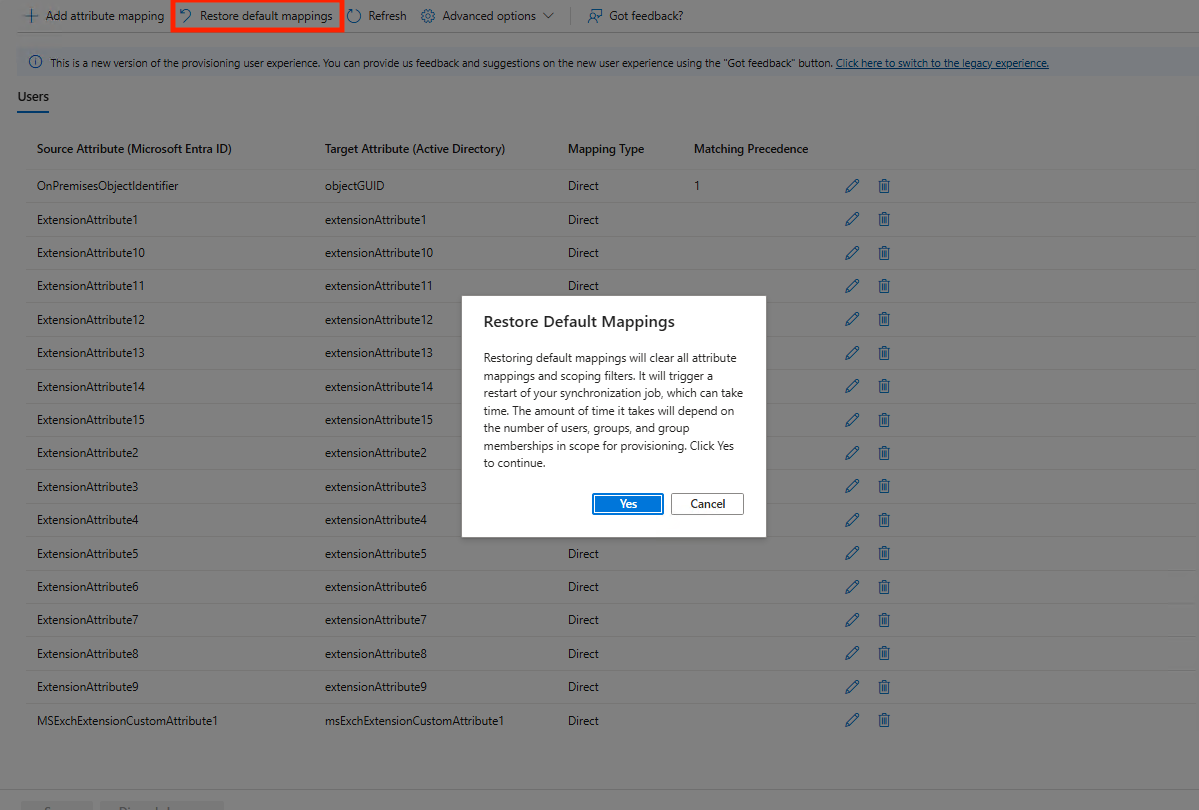
After the synchronization job restarts, verify that the Mail to mail direct mapping appears in the attribute mapping list.
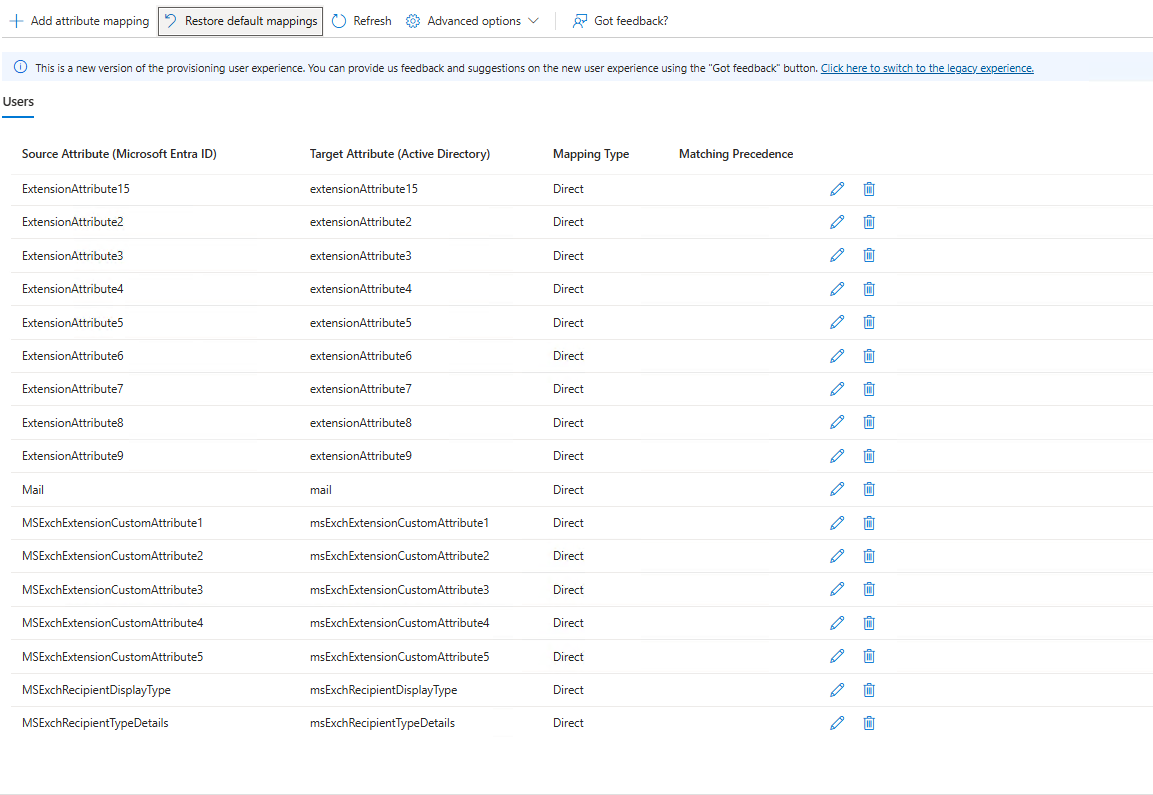
Changes to WindowsEmailAddress in Exchange Online are now written back to the mail attribute in on-premises Active Directory.
I enabled tenant-wide Exchange attribute SOA before all on-premises mailboxes were migrated. What should I do?
Stop creating or synchronizing additional on-premises Exchange recipients and disable the tenant-wide setting:
Set-OrganizationConfig -ExchangeAttributesServerManagedByDefault
Disabling the setting changes the default for users synchronized in the future, but it doesn't automatically clear IsExchangeCloudManaged from users that are already affected. Don't continue mailbox provisioning or migration for those users. Contact Microsoft Support for recovery assistance.
What happens if I try to offboard a user's mailbox while IsExchangeCloudManaged is true?
Before migrating a mailbox back on-premises, set IsExchangeCloudManaged to false. If the property remains true, Exchange attributes are treated as cloud-managed and updates from on-premises are blocked, which breaks synchronization during offboarding.
Is this feature applicable if I use a third-party identity management solution?
Yes. Confirm with your identity management solution provider whether the product currently supports cloud-based management and writeback of Exchange attributes, or whether support is planned.
How do I create a shared mailbox when tenant-wide SOA is enabled?
Use one of the following methods:
- Create the shared or equipment mailbox directly in Exchange Online without creating a corresponding user in on-premises Active Directory.
- Create and synchronize an on-premises user, temporarily assign an Exchange Online license to provision the mailbox, and then convert it to a shared or equipment mailbox.