Bilješka
Pristup ovoj stranici zahtijeva provjeru vjerodostojnosti. Možete pokušati da se prijavite ili promijenite direktorije.
Pristup ovoj stranici zahtijeva provjeru vjerodostojnosti. Možete pokušati promijeniti direktorije.
Applies to:  SQL Server
SQL Server compiles and links a dynamic-link library (DLL) for every natively compiled table and stored procedure, containing the native implementation of those objects in C code. While In-Memory OLTP DLLs are generated dynamically, the files can present challenges in environments where code integrity enforcement is required.
What is HkDllGen?
In SQL Server 2022 (16.x) Cumulative Update 17 and later versions, the In-Memory OLTP feature includes the Hekaton DLL generator, or HkDllGen. Without HkDllGen, SQL Server generates C source inside sqlservr.exe and launches the compiler, which invokes the linker to create the In-Memory OLTP DLL. With external generation enabled, SQL Server exports serialized object metadata and launches the Microsoft-signed hkdllgen.exe. HkDllGen validates and imports that metadata, generates the C source in its own process, and launches the compiler and linker.
To enforce code integrity for these DLLs, use AppLocker to designate the Microsoft-signed hkdllgen.exe as a managed installer and enable Managed Installer trust in the App Control for Business policy, formerly Windows Defender Application Control (WDAC). Windows then records that the generated DLLs came from the HkDllGen process tree, allowing App Control to trust them based on their managed installer origin.
HkDllGen is the first step toward meeting regulatory requirements that include code integrity for In-Memory OLTP. In this scenario, code integrity ensures that Windows can establish a trusted origin for each generated DLL and evaluate that trust when SQL Server loads it. The generated DLL isn't Authenticode-signed. Windows trusts it based on how it was created.
How does a managed installer work?
A managed installer uses a special rule collection in AppLocker to designate binaries that your organization trusts as an authorized source for application installation. When one of these trusted binaries runs, Windows monitors the binary's process (and any child processes it launches) and watches for files being written to disk. As files are written, a claim or tag is added to the file as originating from a managed installer.
The origin claim is a kernel-managed extended attribute. It isn't an Authenticode signature and doesn't change the generated DLL's publisher or signing status.
By using AppLocker, App Control for Business (formerly Windows Defender Application Control, or WDAC) can be configured to trust files that a managed installer installs by adding the Enabled:Managed Installer option to an App Control policy. When you set that option, App Control checks for managed installer origin information when determining whether to allow a binary to run. As long as there are no deny rules for the binary, App Control allows it to run based purely on its managed installer origin. AppLocker also controls the execution of executable files that it designates as a managed installer, but it doesn't offer a chain of trust for executables and DLLs like WDAC. This article walks through how to designate and configure the HkDllGen process as a managed installer that both AppLocker and WDAC can use.
Enable the Hekaton DLL generator
Example
This example enables the Hekaton DLL generator by using sp_configure with the external xtp dll gen util enabled option. Create a test database and a test memory-optimized table.
Create a test database.
USE master;
GO

EXECUTE sp_configure 'external xtp dll gen util enabled', 1;
RECONFIGURE;
GO

CREATE DATABASE HekatonDbForTesting ON
PRIMARY (
    NAME = N'HekatonDbForTesting_Data',
    FILENAME = N'<path-to-data-directory>\HekatonDbForTesting_Data.mdf'
),
FILEGROUP [HekatonDbForTestin_XTP_FG] CONTAINS MEMORY_OPTIMIZED_DATA (
    NAME = HekatonDbForTesting_XTP_CHKPOINT,
    FILENAME = N'<path-to-data-directory>\HekatonDbForTesting_XTP_CHKPOINT'
)
LOG ON (
    NAME = N'HekatonDbForTesting_log',
    FILENAME = N'<Path_To_Log_Directory>\HekatonDbForTesting_Log.ldf'
);
GO
Create a test table within the test database.
USE HekatonDbForTesting;
GO

CREATE TABLE dbo.TestCustomerTable
(
    CustomerId INT NOT NULL
        PRIMARY KEY NONCLUSTERED HASH WITH (BUCKET_COUNT = 1000000),
    FirstName NVARCHAR (50) NOT NULL,
    LastName NVARCHAR (50) NOT NULL
)
WITH (MEMORY_OPTIMIZED = ON, DURABILITY = SCHEMA_AND_DATA);
GO
A
.genfile is created alongside each DLL generated through HkDllGen in the<path-to-data-directory>\xtp\<database_id>subdirectory. This file captures HkDllGen output and is normally zero length after a successful compilation. Its presence indicates that the external generator was invoked. The generated DLLs aren't Authenticode-signed. For Windows to trust the generated DLLs based on their origin, you need Managed Installer tracking and an App Control policy.
Existing DLLs don't gain managed installer origin information retroactively. Generate a new DLL after managed installer tracking is active when validating the policy.
Steps to create In-Memory OLTP AppLocker and managed installer policies
You can't use the AppLocker policy creation UI in GPO Editor (gpedit.msc) or the AppLocker PowerShell cmdlets to create rules for the managed installer rule collection. However, you can use an XML or text editor to convert an EXE rule collection policy into a managed installer rule collection.
Important
You need an AppLocker policy before you add the Hekaton DLL generation executable to a server's AppLocker Control policy configuration. Without a policy, Windows Defender might block basic operating system functions. For more information about creating, testing, and maintaining application control policies, see the AppLocker deployment guide.
The remaining examples in this article apply to Windows Server 2022 and Windows 11 and later versions.
To verify that at least an exe rule collection exists within the server's AppLocker Control policy configuration, run the following PowerShell command:
Get-AppLockerPolicy -Effective
Or, run the following command to save the output of the effective policies to an XML file for viewing:
Get-AppLockerPolicy -Effective -Xml > effective_app_policy.xml
The following steps walk through the process of creating and applying a policy that you can apply to a local server. A managed installer policy that is generated using these steps can be merged into a GPO-wide policy and distributed to all SQL Server instances within an environment, or applied to a single server's local policy. You should work with a domain administrator to apply the Code Integrity policy from the domain level.
Use New-AppLockerPolicy to make an EXE rule for the file you're designating as a managed installer. This example creates a rule for Hekaton DLL generator by using the Publisher rule type, but you can use any AppLocker rule type. You might need to reformat the output for readability.
# Change the current working path of the PowerShell command line or ISE to
# something other than the default (that is, C:\Temp). Retrieve SQL Server Path.
$sqlPathParams = @{
   Path = 'HKLM:\SOFTWARE\Microsoft\MSSQLServer\Setup'
   Name = 'SQLPath'
}
$SQLPath = Get-ItemProperty @sqlPathParams

$joinPathParams = @{
   Path = $SQLPath.SQLPath
   ChildPath = 'Binn\xtp'
}
$FullPath = Join-Path @joinPathParams

# Set an environment variable for the In-memory OLTP Path.
[System.Environment]::SetEnvironmentVariable('SQLPathWithXtp', $FullPath, 'Process')

# Generate an AppLocker Policy for hkdllgen.exe in the current working directory.
# The Get-AppLockerFileInformation cmdlet extracts the executable's publisher
# information, and generates a hash for the binary.
$hkDllGenPath = Join-Path -Path $env:SQLPathWithXtp -ChildPath 'hkdllgen.exe'

$newPolicyParams = @{
   RuleType = 'Publisher'
   User = 'Everyone'
   Xml = $true
}
Get-ChildItem -Path $hkDllGenPath |
Get-AppLockerFileInformation |
New-AppLockerPolicy @newPolicyParams > AppLocker_HkDllGen_Policy.xml
Manually edit the
AppLocker_HkDllGen_Policy.xmland change the following attribute values:RuleCollection TypetoManagedInstallerEnforcementModetoAuditOnlyBinaryVersionRange LowSectionto"*"andHighSectionto"*"
Change:
<RuleCollection Type="Exe" EnforcementMode="NotConfigured">to:
<RuleCollection Type="ManagedInstaller" EnforcementMode="AuditOnly">Change:
<BinaryVersionRange LowSection="2022.160.4175.1" HighSection="2022.160.4175.1"/>to:
<BinaryVersionRange LowSection="*" HighSection="*"/>Deploy the AppLocker managed installer configuration policy. You can either import the AppLocker policy and deploy it with Group Policy, or use a script to deploy the policy with the
Set-AppLockerPolicycmdlet as shown in the following PowerShell command.#Enable the AppLocker Policy and merge with the existing policy that exists on the system. Set-AppLockerPolicy -XmlPolicy .\AppLocker_HkDllGen_Policy.xml -Merge -ErrorAction SilentlyContinueIf you deploy the AppLocker policy with a PowerShell script, use the
appidtel.exeutility from an Administrative command prompt to configure the AppLocker Application Identity service and AppLocker filter driver.appidtel.exe start [-mionly]
Enable the managed installer option in the Windows Defender Application Control for Business Wizard
For Windows Defender Application Control (WDAC) to trust the DLLs that are generated by the hkdllgen.exe process, specify the Enabled: Managed Installer option in your App Control policy. Define this setting by using the Set-RuleOption cmdlet with Option 13.
Generate a code integrity policy file from one of the WDAC Base Policy Wizard template base policies.
Starting with the Default Windows policy provides fewer options, which are removed in this guide. For more information about the Default Windows Mode and Allow Microsoft Mode policies, see the Example App Control for Business base policies article.
Base template policy
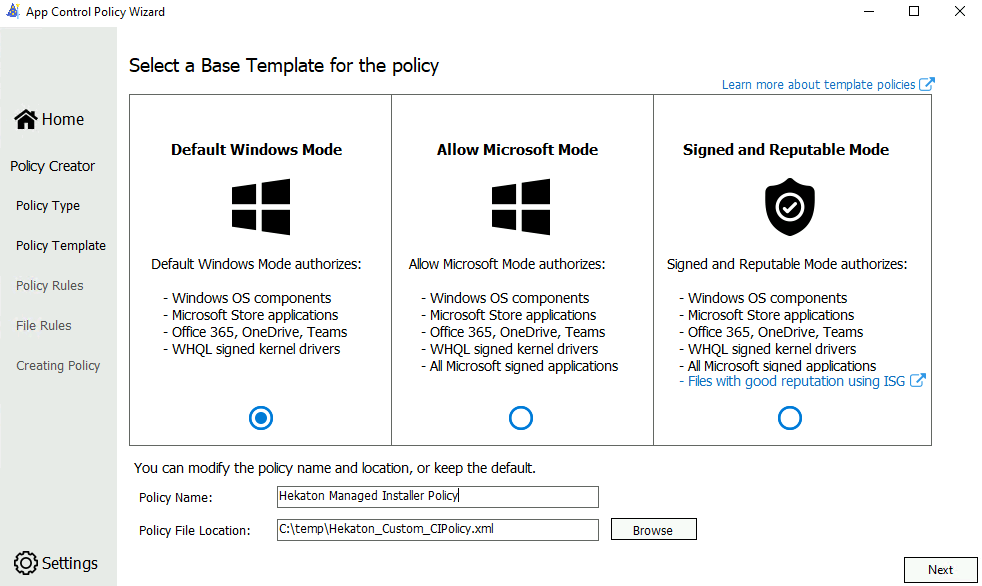
After you select the Windows policy base template, name the policy and choose where to save the App Control policy on disk.
Select a policy type
Choose the Multiple Policy Format and Base Policy as the policy type.

Configure policy template
Enable only the Managed Installer, Update Policy without Rebooting, Unsigned System Integrity Policy, and User Mode Code Integrity policy rule options. Disable the other policy rule options. To change the settings, select the slider button next to the policy rule titles.
The following table describes each policy rule, starting with the left-most column. The Policy rules article provides a more detailed description of each policy rule.
| Rule option | Description |
|---|---|
| Managed Installer | Use this option to automatically allow applications installed by a software distribution solution, such as the Hekaton DLL generator, that is defined as a managed installer. |
| Update Policy without Rebooting | Use this option to allow future App Control for Business policy updates to apply without requiring a system reboot. |
| Unsigned System Integrity Policy | Allows the policy to remain unsigned. When this option is removed, the policy must be signed and have UpdatePolicySigners added to the policy to enable future policy modifications. |
| User Mode Code Integrity | App Control for Business policies restrict both kernel-mode and user-mode binaries. By default, only kernel-mode binaries are restricted. Enabling this rule option validates user mode executables and scripts. |
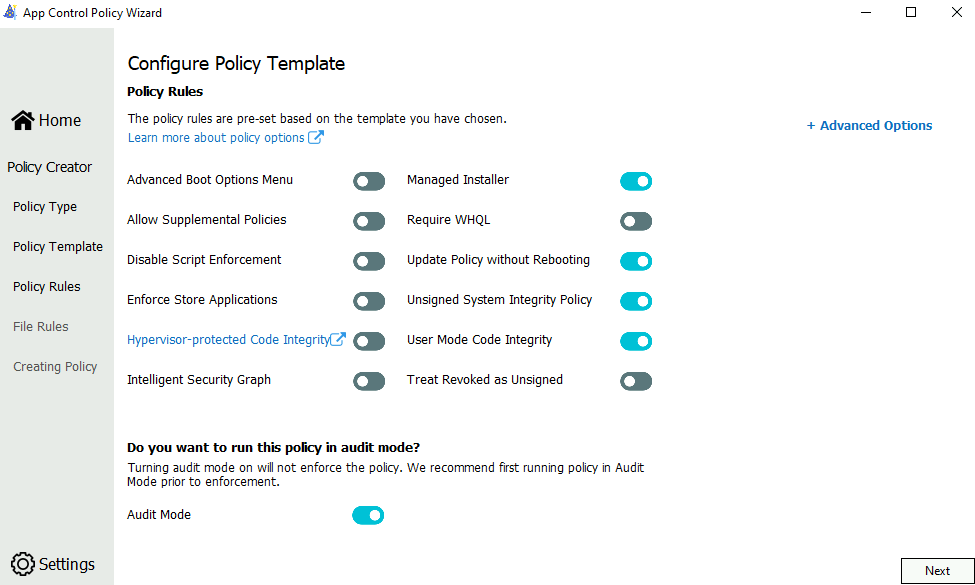
You should enable Audit Mode initially, because it allows you to test new App Control for Business policies before you enforce them. With audit mode, no application is blocked. Instead, the policy logs an event whenever an application outside the policy starts. For this reason, all templates have Audit Mode enabled by default.
File rules
Remove all Policy Signing Rules from the list.
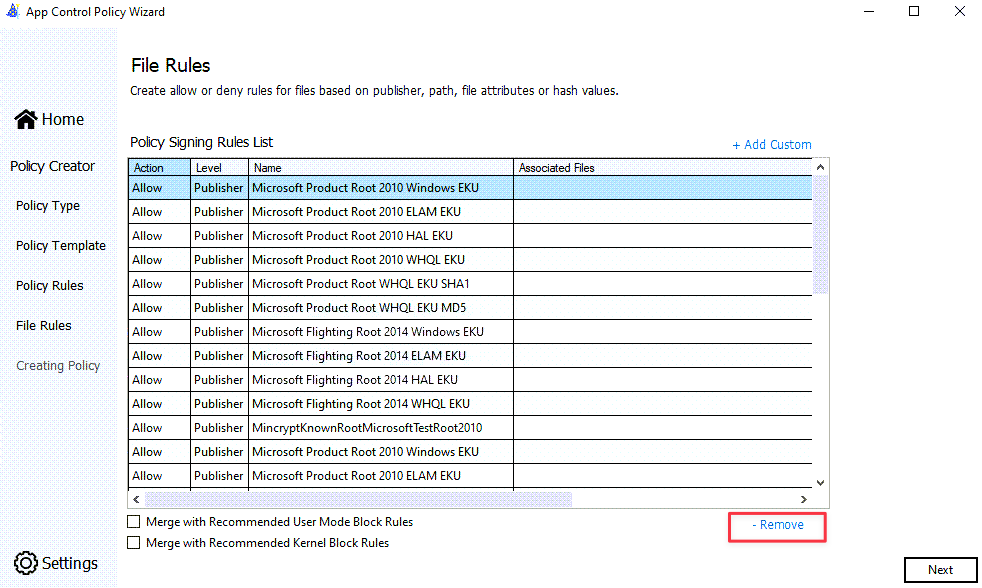
(Optional) Add a Custom Publisher allow rule for hkdllgen.exe. This rule uses information from the executable's existing Microsoft code-signing certificate to identify and allow matching versions of HkDllGen.
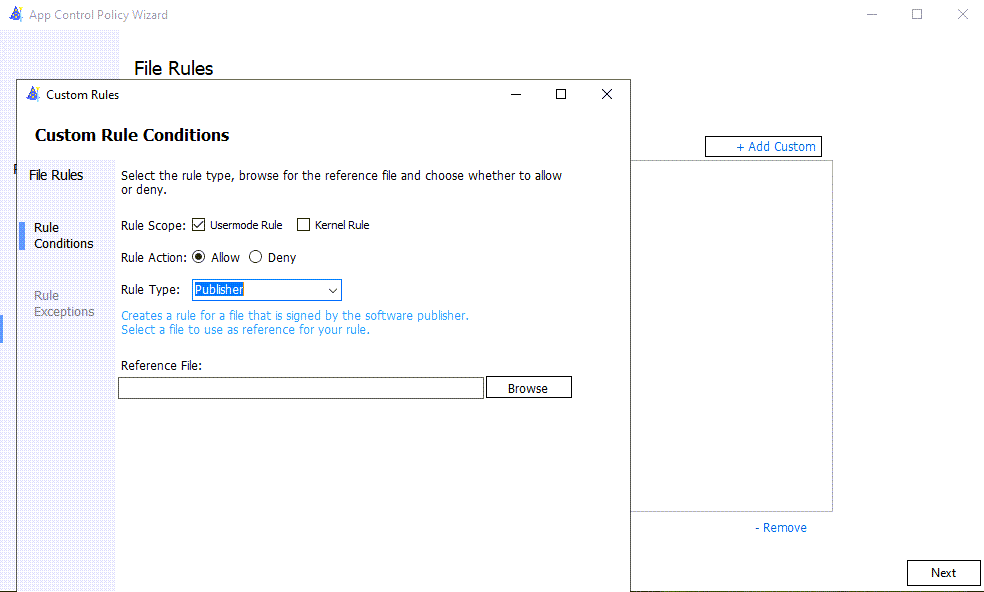
The Publisher file rule type uses properties in the code signing certificate chain to base file rules.
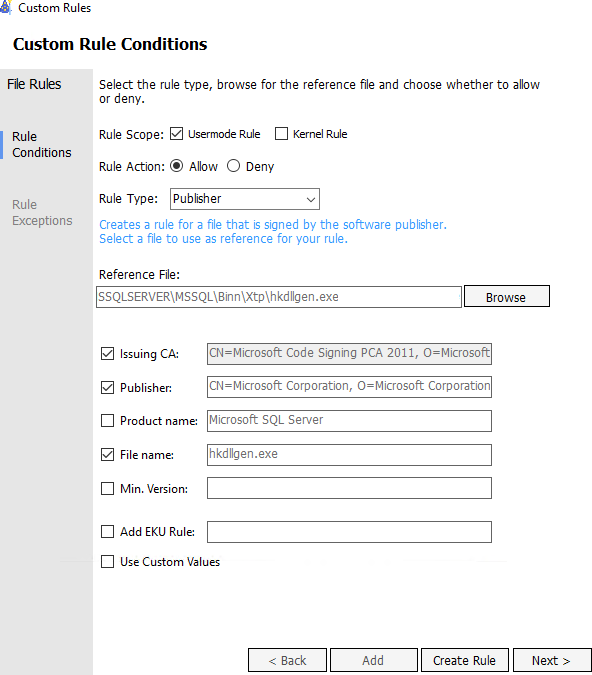
After you select Create Rule, a single Policy Signing rule should exist.

Deploy your App Control policy. See Deploying App Control for Business policies.
After the policy is created, the new policy is written to the path that was chosen as the policy file location. The new binary version of the policy file name includes the policy version at the end of the file name. You can copy the <policy>.cip file to the C:\Windows\System32\CodeIntegrity\CiPolicies\Active subdirectory on the SQL Server instance.
Manually deploy a Code Integrity policy
To create a more streamlined Code Integrity policy, you can edit a more generic <policy>.xml file that you generate after completing the WDAC App Control Policy Wizard. This scenario can arise if you don't run the WDAC App Control Policy Wizard on a SQL Server, but from a workstation. For example, a less customized Code Integrity policy file might look like:
<?xml version="1.0" encoding="utf-8"?>
<SiPolicy xmlns:xsi="http://www.w3.org/2001/XMLSchema-instance" xmlns:xsd="http://www.w3.org/2001/XMLSchema" xmlns="urn:schemas-microsoft-com:sipolicy" PolicyType="Base Policy">
  <VersionEx>10.0.5.0</VersionEx>
  <PlatformID>{XXXXXXXX-XXXX-XXXX-XXXX-XXXXXXXXXXXX}</PlatformID>
  <PolicyID>{XXXXXXXX-XXXX-XXXX-XXXX-XXXXXXXXXXXX}</PolicyID>
  <BasePolicyID>{XXXXXXXX-XXXX-XXXX-XXXX-XXXXXXXXXXXX}</BasePolicyID>
  <Rules>
    <Rule>
      <Option>Enabled:Unsigned System Integrity Policy</Option>
    </Rule>
    <Rule>
      <Option>Enabled:UMCI</Option>
    </Rule>
    <Rule>
      <Option>Enabled:Audit Mode</Option>
    </Rule>
    <Rule>
      <Option>Enabled:Managed Installer</Option>
    </Rule>
    <Rule>
      <Option>Enabled:Update Policy No Reboot</Option>
    </Rule>
  </Rules>
  <EKUs>
    <!--EKU ID-->
  </EKUs>
  <FileRules>
    <!--FileAttrib ID -->
  </FileRules>
  <Signers />
  <SigningScenarios>
    <SigningScenario ID="ID_SIGNINGSCENARIO_KMCI" FriendlyName="Kernel Mode Signing Scenario" Value="131">
      <ProductSigners />
    </SigningScenario>
    <SigningScenario ID="ID_SIGNINGSCENARIO_UMCI" FriendlyName="User Mode Signing Scenario" Value="12">
      <ProductSigners />
    </SigningScenario>
  </SigningScenarios>
  <UpdatePolicySigners />
  <HvciOptions>0</HvciOptions>
</SiPolicy>
This example doesn't have a signed publisher rule and assumes that the policy file uses a local working directory (for example, C:\Temp) with a file name of Hekaton_Custom_CIPolicy.xml.
$policyPath = 'C:\Temp\Hekaton_Custom_CIPolicy.xml'

# Create Windows Defender Application Control (WDAC)
# policy and set Option 13 (Enabled:Managed Installer)
# and Option 16 (Enabled:Update Policy No Reboot)
$policyIdParams = @{
    FilePath = $policyPath
    PolicyName = 'Hekaton Managed Installer Policy'
    ResetPolicyID = $true
}
Set-CIPolicyIdInfo @policyIdParams

$option13Params = @{
    FilePath = $policyPath
    Option = 13
}
Set-RuleOption @option13Params

$option16Params = @{
    FilePath = $policyPath
    Option = 16
}
Set-RuleOption @option16Params

# Retrieve the Policy ID from the App Control policy XML.
# Code Integrity uses this ID as the binary file name.
[xml]$AppControlPolicy = Get-Content -Path $policyPath
$PolicyID = $AppControlPolicy.SiPolicy.PolicyID
$PolicyBinary = $PolicyID + '.cip'

# Convert the App Control policy XML to binary format and
# save it into the Active Code Integrity path.
$convertParams = @{
    XmlFilePath = $policyPath
    BinaryFilePath = "C:\Windows\System32\CodeIntegrity\CiPolicies\Active\$PolicyBinary"
}
ConvertFrom-CIPolicy @convertParams
To apply the policy without rebooting the server and check the status of Code Integrity, run this PowerShell script:
# Refresh the Code Integrity policy without a reboot of the system
$updateCiParams = @{
    Namespace  = 'root\Microsoft\Windows\CI'
    ClassName  = 'PS_UpdateAndCompareCIPolicy'
    MethodName = 'Update'
    Arguments  = @{ FilePath = "C:\Windows\System32\CodeIntegrity\CiPolicies\Active\$PolicyBinary" }
}
Invoke-CimMethod @updateCiParams

# View the current status of WDAC Code Integrity. If WDAC is in Audit mode
# the "UserModeCodeIntegrityPolicyEnforcementStatus" has a value of "1"
# for Audit mode. A value of "0" mean that Code Integrity is not active.
$deviceGuardParams = @{
    ClassName = 'Win32_DeviceGuard'
    Namespace = 'root\Microsoft\Windows\DeviceGuard'
}
Get-CimInstance @deviceGuardParams | Format-List *codeintegrity*
Verify that the Hekaton DLLs generated are trusted by Code Integrity
After the AppLocker Managed Installer rule and required AppLocker services are active, generate a new In-Memory OLTP DLL through HkDllGen. Windows tracks the HkDllGen process tree and adds a $KERNEL.SMARTLOCKER.ORIGINCLAIM extended attribute to files created by that process tree.
When App Control is operating in audit or enforcement mode with Enabled:Managed Installer, Code Integrity can trust the generated DLL based on its managed installer origin. To verify that the extended attribute was added, select a newly generated DLL from the \Data\xtp\<database_id> folder and run the following command from an elevated command prompt:
fsutil file queryea "D:\SQL\MSSQL17.MSSQLSERVER\MSSQL\DATA\xtp\5\xtp_t_5_64719283_196202718557591_1.dll"
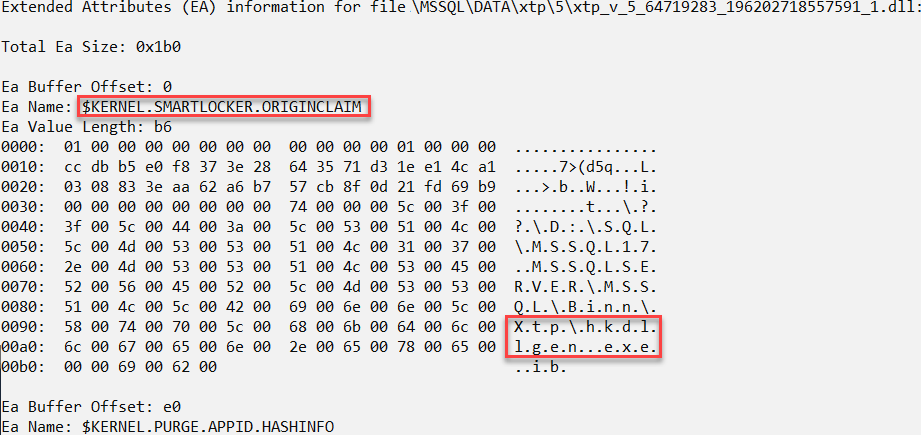
The presence of $KERNEL.SMARTLOCKER.ORIGINCLAIM alone doesn't confirm that the file has a managed installer origin. The same extended attribute can record Intelligent Security Graph origin and how trust was inherited. In the first data row, 00 at the start of the second ULONG identifies Managed Installer origin, while 01 identifies Intelligent Security Graph origin. To evaluate the remaining origin-claim values, see the Managed Installer and ISG technical reference.
Remove Managed Installer feature
To remove the Managed Installer feature from the device, remove the Managed Installer AppLocker policy from the device by following the instructions in Delete an AppLocker rule: Clear AppLocker policies on a single system or remote systems.