Bemærk
Adgang til denne side kræver godkendelse. Du kan prøve at logge på eller ændre mapper.
Adgang til denne side kræver godkendelse. Du kan prøve at ændre mapper.
Note
For information about automatically applying a sensitivity label to data stored outside Microsoft 365 and in the data map, see Labeling in Microsoft Purview Data Map.
Tip
Start here — pick your task
- I'm setting up my first auto-labeling policy. Review the Prerequisites for auto-labeling policies first, then follow Creating an auto-labeling policy.
- I'm deciding between labeling in Office apps and an auto-labeling policy. See Compare auto-labeling for Office apps with auto-labeling policies.
- My simulation results look wrong or incomplete. See Learn about simulation mode — the caveats cover the most common causes (12-hour completion window, single-policy scope, files modified after the run, and the sensitive info type created-after-modification rule).
- A specific file wasn't labeled and I expected it to be. Open the policy's Labeled items tab and switch to the Failed view to see the failure reason. For the full list of reasons and fixes, see Resolve auto-labeling failures in SharePoint and OneDrive files.
- I'm hitting a limit (100,000 files/day, 100 policies, 100 locations, or 4,000,000 files in simulation). See How to configure auto-labeling policies for SharePoint, OneDrive, and Exchange, and Use PowerShell for auto-labeling policies when you need to configure more than 100 locations.
- Auto-labeling isn't available in my region. The Auto-labeling page isn't visible in unsupported regions. See Azure dependency availability by country/region.
- I want to set a default label for Teams meetings, sites, groups, or Microsoft 365 Copilot. This article covers files and emails. For container-level default labels (including Teams instant meetings and Meet Now), see Use sensitivity labels with Microsoft Teams, Microsoft 365 groups, and SharePoint sites. For Copilot default labels, see Considerations for Microsoft 365 Copilot.
When you create a sensitivity label, you can automatically assign that label to Microsoft 365 items such as files and emails when the data matches conditions that you specify.
This ability to apply sensitivity labels to content automatically is important because:
You don't need to train your users when to use each of your classifications.
You don't need to rely on users to classify all content correctly.
Users no longer need to know about your policies—they can instead focus on their work.
There are two different methods for automatically applying a sensitivity label to content in Microsoft 365:
Client-side labeling when users edit documents or compose (also reply or forward) emails: Use a label that's configured for auto-labeling for files and emails (includes Word, Excel, PowerPoint, and Outlook).
This method supports recommending a label to users, as well as automatically applying a label. But in both cases, the user decides whether to accept or reject the label, to help ensure the correct labeling of content. This client-side labeling has minimal delay for documents because the label can be applied even before the document is saved. However, not all client apps support auto-labeling.
For configuration instructions, see How to configure auto-labeling for Office apps on this page.
Service-side labeling when content is already saved (in SharePoint or OneDrive) or emailed (processed by Exchange Online): Use an auto-labeling policy.
You might also hear this method referred to as auto-labeling for data at rest (documents in SharePoint and OneDrive) and data in transit (email that is sent or received by Exchange). For Exchange, it doesn't include emails at rest (mailboxes).
Auto-labeling policies run in the service, so they don't depend on which app version a user has installed. They're available across your organization from the moment you turn a policy on, which makes them suitable for labeling at scale. Because the user doesn't interact with the labeling process, auto-labeling policies don't support recommended labeling — instead, run the policy in simulation before you turn it on to help ensure correct labeling.
For configuration instructions, see How to configure auto-labeling policies for SharePoint, OneDrive, and Exchange on this page.
Auto-labeling for SharePoint and OneDrive
- PDF documents and Office files for Word (.docx), PowerPoint (.pptx), and Excel (.xlsx) are supported.
- These files can be auto-labeled at rest before or after the auto-labeling policies are created. Files can't be auto-labeled if they're part of an open session (the file is open).
- Currently, attachments to list items aren't supported and won't be auto-labeled.
- Maximum of 100,000 automatically labeled files in your tenant per day.
- Maximum of 100 auto-labeling policies per tenant, each targeting up to 100 locations (SharePoint sites or OneDrive individual users or groups) when you specify specific locations by using the Included or Excluded options. If you keep the default configuration of All, this configuration is exempt from the 100 locations maximum.
- Existing values for modified, modified by, and the date aren't changed as a result of auto-labeling policies—for both simulation mode and when labels are applied.
- When the label applies encryption, the Rights Management issuer and Rights Management owner is the account that last modified the file.
Auto-labeling for Exchange
- PDF attachments and Office attachments are scanned for the conditions you specify in your auto-labeling policy. When there's a match, the email is labeled but not the attachment.
- For PDF files, if the label applies encryption, these files are encrypted by using Message encryption when your tenant is enabled for PDF attachments.
- For these Office files, Word, PowerPoint, and Excel are supported. If the label applies encryption and these files are unencrypted, they're now encrypted by using Message encryption. The encryption settings are inherited from the email.
- To label and protect emails that contain Teams voicemail messages, see the configuration instructions in Enable protected voicemail in your organization.
- If you have Exchange mail flow rules or Microsoft Purview Data Loss Prevention (DLP) policies that apply IRM encryption: When content is identified by these rules or policies and an auto-labeling policy, the label is applied. If that label applies encryption, the IRM settings from the Exchange mail flow rules or DLP policies are ignored. However, if that label doesn't apply encryption, the IRM settings from the mail flow rules or DLP policies are applied in addition to the label.
- Email that has IRM encryption with no label will be replaced by a label with any encryption settings when there's a match by using auto-labeling.
- Incoming email is labeled when there's a match with your auto-labeling conditions. For this outcome to apply to senders outside your organization, the Exchange location must be set to All included and None excluded. If the label is configured for encryption:
- That encryption is always applied when the sender is from your organization.
- By default, that encryption isn't applied when the sender is outside your organization but can be applied by configuring Additional settings for email and specifying a Rights Management owner.
- When the label applies encryption, the Rights Management issuer and Rights Management owner is the person who sends the email when the sender is from your own organization. When the sender is outside your organization, you can specify a Rights Management owner for incoming email that's labeled and encrypted by your policy.
- If the label is configured to apply content markings with variables, be aware that for incoming email, this configuration can result in displaying the names of people outside your organization.
- PDF documents and Office files for Word (.docx), PowerPoint (.pptx), and Excel (.xlsx) are supported.
Note
For some new customers, we're offering the automatic configuration of default auto-labeling settings for both client-side labeling and service-side labeling. Even if you're not eligible for this automatic configuration, you might find it useful to reference their configuration. For example, you can manually configure existing labels and create your own auto-labeling policies with the same settings to help accelerate your labeling deployment.
For more information, see Default labels and policies for Microsoft Purview Information Protection.
Compare auto-labeling for Office apps with auto-labeling policies
Use the following table to help you identify the differences in behavior for the two complementary automatic labeling methods:
| Feature or behavior | Label setting: Auto-labeling for files and emails | Policy: Auto-labeling |
|---|---|---|
| App dependency | Yes (minimum versions) | No * |
| Restrict by location | No | Yes |
| Conditions: Sharing options and additional options for email | No | Yes |
| Conditions: Exceptions | No | Yes |
| Conditions: Nested rule logic (AND/OR/NOT) | No | Yes |
| Support for PDF files | No | Yes |
| Support for images | No | Yes |
| Recommendations, policy tooltip, and user overrides | Yes | No |
| Simulation mode | No | Yes |
| Exchange attachments checked for conditions | No | Yes |
| Apply visual markings | Yes | Yes (email only) |
| Override IRM encryption applied without a label | Yes if the user has the minimum usage right of Export | Yes (email only) |
| Label incoming email | No | Yes |
| Assign a Rights Management owner for emails sent from another organization | No | Yes |
| Replace manually applied label that has lower priority | No | Yes (configurable) |
| Remove existing label in SharePoint or OneDrive | No | Yes |
* Auto-labeling isn't currently available in all regions because of a backend Azure dependency. If your tenant can't support this functionality, the Auto-labeling page isn't visible in the Microsoft Purview portal. For more information, see Azure dependency availability by country.
Licensing and where to find each surface
Auto-labeling is gated by license, and the two surfaces (client-side and service-side) appear in different places in the portal. If you expect to see auto-labeling and it isn't there, verify the license first.
| Surface | Configured in | Included with |
|---|---|---|
| Client-side auto-labeling (Office apps) | Sensitivity label configuration → Auto-labeling for files and emails page | Microsoft 365 E5, Microsoft 365 E5 Compliance, Microsoft 365 E5 Information Protection & Governance, Azure Information Protection Premium P2 (standalone) |
| Service-side auto-labeling (SharePoint, OneDrive, Exchange) | Microsoft Purview portal → Information Protection → Policies → Auto-labeling policies | Same E5 / P2-tier SKUs as above |
| Container-level default labels (Teams, groups, sites) | Documented in Use sensitivity labels with Microsoft Teams, Microsoft 365 groups, and SharePoint sites | Not covered on this page |
For the authoritative, per-SKU feature matrix (including current entitlements for Microsoft 365 Business Premium, Frontline, Education, and Government clouds), see Microsoft 365 licensing guidance for security and compliance.
Common licensing symptoms:
- You have E3 or Business Premium. Auto-labeling of files and emails isn't included at this SKU. Sensitivity labels and manual labeling are — auto-labeling requires an E5 / P2-tier add-on.
- You have E5 but don't see auto-labeling policies in the portal. Confirm you're in the Microsoft Purview portal (not the legacy Compliance Center), that your role includes Compliance Administrator or Compliance Data Administrator, and that your region supports auto-labeling (Azure dependency availability by country).
- You have E5 and see the page, but saving a new policy fails with "No matching database is available." This is a known transient backend condition. Retry the save; if it fails repeatedly over 24 hours, open a support case with the policy configuration.
How multiple conditions are evaluated when they apply to more than one label
The labels are ordered for evaluation according to their position that you specify in the Microsoft Purview portal: The label positioned first has the lowest position (least sensitive, so lowest priority) and the label positioned last has the highest position (most sensitive, so highest priority). The label with the highest order number is selected.
This behavior is also true for service-side auto-labeling (auto-labeling policies) when sublabels share the same parent label: If after evaluation and ordering, more than one sublabel from the same parent label meets the auto-labeling conditions, the sublabel with the highest order number is selected and applied.
However, the behavior is a little different for client-side auto-labeling (auto-labeling settings in the label). If multiple sublabels from the same parent label match the conditions:
If a file is not already labeled, the highest order sublabel that's configured for automatic labeling is always selected, rather than the highest order sublabel that's configured for recommended labeling. If none of these sublabels are configured for automatic labeling but only recommended labeling, the highest order sublabel is selected and recommended.
If a file is already labeled with a sublabel from the same parent, no action is taken and the existing sublabel remains. This behavior applies even if the existing sublabel was a default label or automatically applied.
For more information about label priority, see Label priority (order matters).
Considerations for label configurations
The following considerations apply to both client-side labeling and service-side labeling.
Don't configure a parent label to be applied automatically or recommended
If you're using parent labels with sublabels, rather than label groups: You can't apply a parent label (a label with sublabels) to content. Make sure that you don't configure a parent label to be auto-applied or recommended in Office apps, and don't select a parent label for an auto-labeling policy. If you do, the parent label won't be applied to content.
To use automatic labeling with sublabels that have parent labels, make sure you publish both the parent label and the sublabel.
For more information about parent labels, label groups, and sublabels, see Sublabels that use parent labels or label groups.
Label scoping that excludes files or emails
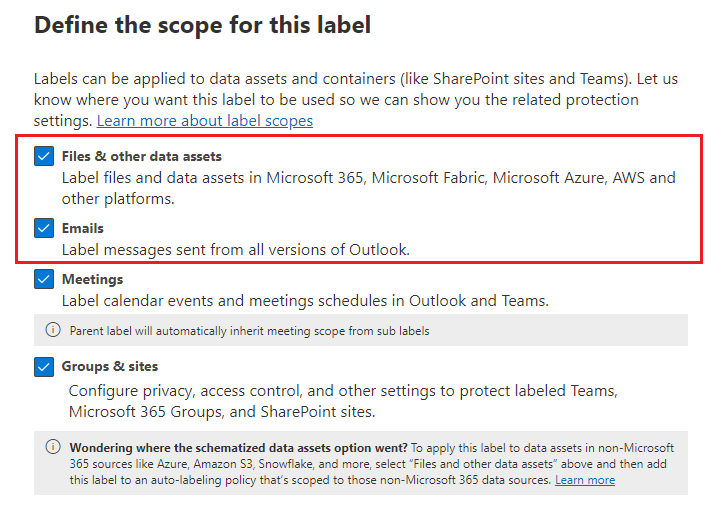
To automatically apply a sensitivity label to content, the label's scope must include Files & other data assets to automatically apply a label to documents, and Emails to automatically apply a label to emails.
For more information when you select just one of these label scopes, see Scope labels to just files or emails.
Will an existing label be overridden?
An auto-labeling policy that applies a sensitivity label won't remove an existing sensitivity label to leave content unlabeled. However, for SharePoint and OneDrive, an auto-labeling policy configured to automatically remove a label can remove the selected label, including when the label was manually applied, and leave the content unlabeled.
Default behavior whether automatic labeling will override an existing label:
When content has been manually labeled, that label won't be replaced by automatic labeling.
Automatic labeling will replace a lower priority sensitivity label that was automatically applied, but not a higher priority label.
Tip
For example, the sensitivity label at the top of the list in the Microsoft Purview portal is named Public with an order number (priority) of 0, and the sensitivity label at the bottom of the list is named Highly Confidential with an order number (priority of 4). The Highly Confidential label can override the Public label but not the other way around.
For auto-labeling policies that apply a sensitivity label, you can select a setting to override a manually applied label that has lower priority. This setting isn't required for an auto-labeling policy configured to automatically remove a label.
| Existing label | Override with label setting: Auto-labeling for files and emails | Override with policy: Auto-labeling |
|---|---|---|
| Manually applied, lower priority | No | No by default, but configurable |
| Manually applied, higher priority | No | No |
| Automatically applied or default label, lower priority | Yes * | Yes |
| Automatically applied or default label, higher priority | No | No |
* There's an exception for sublabels that share the same parent label
The configurable setting for auto-labeling policies is on the Additional label settings page.
How to configure auto-labeling for Office apps
Tip
Looking for auto-labeling policies for SharePoint, OneDrive, or Exchange (service-side auto-labeling for files at rest and emails in transit)? Skip ahead to How to configure auto-labeling policies for SharePoint, OneDrive, and Exchange. The section on this page is for client-side auto-labeling in Word, Excel, PowerPoint, and Outlook.
Check the minimum versions required for automatic labeling in Office apps.
The auto-labeling settings for Office apps are available when you create or edit a sensitivity label. Make sure the label scope Files & other data assets is selected to auto-label documents, and Emails is selected to auto-label emails. For example:
As you move through the configuration, you see the Auto-labeling for files and emails page where you can choose from a list of sensitive info types or trainable classifiers:

When this sensitivity label is automatically applied, the user sees a notification in their Office app. For example:

Because of a timing issue, auto-labeling for Office apps might not trigger if you also use mandatory labeling. For details, see the additional information for configuring the policy setting Require users to apply a label to their email and documents.
Configuring sensitive info types for a label
When you select the Sensitive info types option, you see the same list of sensitive information types as when you create a data loss prevention (DLP) policy. So you can, for example, automatically apply a Highly Confidential label to any content that contains customers' personal information, such as credit card numbers, social security numbers, or passport numbers:
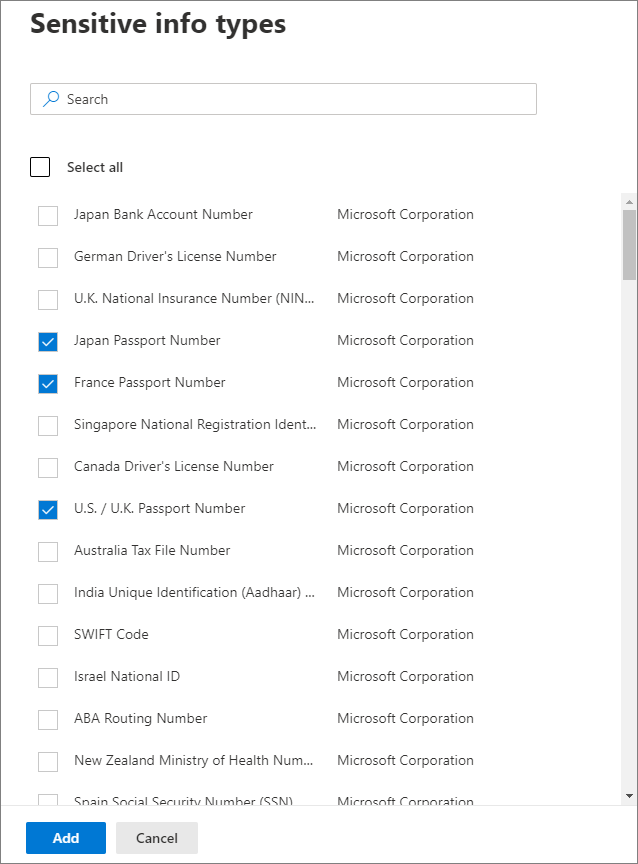
Similarly to when you configure DLP policies, you can then refine your condition by changing the instance count and match accuracy. For example:
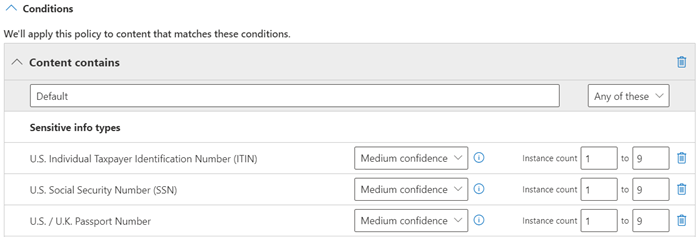
You can learn more about confidence levels from the DLP documentation: More on confidence levels
Important
Sensitive information types have two different ways of defining the max unique instance count parameters. To learn more, see Instance count supported values for SIT.
Also similarly to DLP policy configuration, you can choose whether a condition must detect all sensitive information types, or just one of them. And to make your conditions more flexible or complex, you can add groups and use logical operators between the groups.
Custom sensitive information types with Exact Data Match
You can configure a sensitivity label to use exact data match based sensitive information types for custom sensitive information types. However, currently, you must also specify at least one sensitive information type that doesn't use EDM. For example, one of the built-in sensitive information types, such as Credit card number.
If you configure a sensitivity label with only EDM for your sensitive information type conditions, the auto-labeling setting is automatically turned off for the label.
Configuring trainable classifiers for a label
If you use this option with Microsoft 365 Apps for Windows version 2106 or lower, or Microsoft 365 Apps for Mac version 16.50 or lower, make sure you've published in your tenant at least one other sensitivity label that's configured for auto-labeling and the sensitive info types option. This requirement isn't necessary when you use later versions on these platforms.
When you select the Trainable classifiers option, select one or more of the pretrained or custom trainable classifiers:
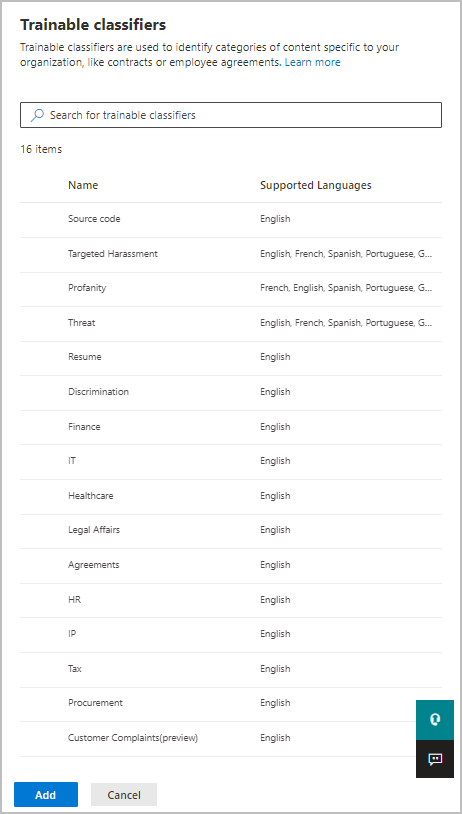
The available pretrained classifiers are often updated, so there might be more entries to select than the ones displayed in this screenshot.
For more information about these classifiers, see Learn about trainable classifiers.
Recommend that the user applies a sensitivity label
If you prefer, you can recommend to your users that they apply the label. With this option, your users can accept the classification and any associated protection, or dismiss the recommendation if the label isn't suitable for their content.

When you use built-in labeling with the desktop versions of Word, users have an additional option to Show sensitive content with the recommended label prompt. When they select this button, the Editor pane steps the user through each detection. The user can then remove the sensitive data or leave it with a better understanding of why the sensitivity label was recommended. When they have this extra information, users have more confidence to select the Apply sensitivity button. For example:

This example shows the default recommended label prompt, but as with automatic labeling, you can customize this text to be more meaningful or specific for your users. For example, include your organization's name or reference your IT department to increase visibility and give users more confidence that this isn't a generic message that might not be applicable to them.
Tip
Although recommending a sensitivity label interrupts a user's workflow, it's a very efficient way to educate users in the moment about sensitive data that they work with. To see this in action, watch the video: Automatically Classify & Protect Documents & Data
Recommended labeling is particularly powerful when it's coupled with this option to step the users through each instance of sensitive content that's detected. It can lead to more accurate labeling, not just for the immediate item, but also for future items that require manual labeling, or for modified items that might now need relabeling.
When automatic or recommended labels are applied
Not all Office apps support automatic and recommended labeling. For more information, see Support for sensitivity label capabilities in apps.
Other considerations:
You can't use automatic labeling for documents and emails that were previously manually labeled, or previously automatically labeled with a higher sensitivity. Remember, you can only apply a single sensitivity label to a document or email (in addition to a single retention label).
You can't use recommended labeling for documents or emails that were previously labeled with a higher sensitivity. When the content's already labeled with a higher sensitivity, the user won't see the prompt with the recommendation and policy tip.
For recommended labels in the desktop versions of Word, the sensitive content that triggered the recommendation is flagged so that users can review and remove the sensitive content instead of applying the recommended sensitivity label.
For details about how these labels are applied in Office apps, example screenshots, and how sensitive information is detected, see Automatically apply or recommend sensitivity labels to your files and emails in Office.
Convert your label settings into an auto-labeling policy
If the label includes sensitive info types for the configured conditions, you'll see an option at the end of the label creation or editing process to automatically create an auto-labeling policy that's based on the same auto-labeling settings.
However, if the label contains trainable classifiers as a label condition:
When the label conditions contain just trainable classifiers, you won't see the option to automatically create an auto-labeling policy.
When the label conditions contain trainable classifiers and sensitivity info types, an auto-labeling policy will be created for just the sensitive info types.
Although an auto-labeling policy is automatically created for you by auto-populating the values that you would have to select manually if you created the policy from scratch, you can still view and edit the values before they are saved.
By default, all locations for SharePoint, OneDrive, and Exchange are included in the auto-label policy, and when the policy is saved, it runs in simulation mode. There's no check that you've enabled sensitivity labels for Office files in SharePoint and OneDrive, which is one of the prerequisites for auto-labeling to apply to content in SharePoint and OneDrive.
How to configure auto-labeling policies for SharePoint, OneDrive, and Exchange
Note
Don't use Exchange auto-labeling policies to send encrypted emails for mass mailing distributions. These policies aren't designed for this purpose and can result in sending failures and non-delivery receipts. For this scenario, the label setting to automatically send emails is more suitable.
Make sure you're aware of the prerequisites before you configure auto-labeling policies. Use the Pre-flight checklist to confirm each one in a single scan, then review the full Prerequisites for auto-labeling policies below for details.
Pre-flight checklist
Before you create an auto-labeling policy, confirm each item below. Missing any one of them typically causes the policy to run without labeling any files, with no error surfaced in the portal. Each item links to the full guidance further down this article.
- [ ] Auditing is turned on for Microsoft 365. Required for simulation. See Turn audit log search on or off.
- [ ] Sensitivity labels are enabled for Office files in SharePoint and OneDrive. Required before any label can be applied to files in those locations. See Enable sensitivity labels for Office files in SharePoint and OneDrive.
- [ ] Auto-labeling is available in your region. If the Auto-labeling page isn't visible in the Microsoft Purview portal, your tenant is in an unsupported region. See Azure dependency availability by country.
- [ ] Your rule includes at least one non-EDM sensitive information type. A rule that uses only exact data match (EDM) sensitive information types silently disables auto-labeling on the label. See Custom sensitive information types with Exact Data Match.
- [ ] The label you plan to apply is not a parent label. Parent labels (labels that have sublabels) can't be applied to content. If you select one, the policy will run but nothing will be labeled. See Don't configure a parent label to be applied automatically or recommended.
- [ ] The label's scope matches your target content. To label files, the label scope must include Files & other data assets. To label emails, it must include Emails. See Label scoping that excludes files or emails.
- [ ] If the label applies encryption to SharePoint or OneDrive content: the label is configured with Assign permissions now, and User access to content expires is set to Never. See the encryption details in Prerequisites for auto-labeling policies.
- [ ] The files you expect to be labeled were created or modified after the sensitive information types were created or modified. Auto-labeling only evaluates content that was created or modified after the SIT was created or last modified. To classify older unchanged files, run on-demand classification.
- [ ] You have the roles required to review simulation results. Viewing file contents in the source view requires the Data Classification Content Viewer role (included in the Content Explorer Content Viewer, Information Protection, and Information Protection Investigators role groups). Global admins don't have this role by default.
- [ ] You have the roles required to turn the policy on after simulation. Turning a policy from Ready to turn on to On requires Compliance Administrator or Compliance Data Administrator. Without one of these roles, the Turn on policy button appears greyed out even after a successful simulation.
When every item is confirmed, continue to Prerequisites for auto-labeling policies for the full details, then to Creating an auto-labeling policy.
Prerequisites — detailed reference
Every prerequisite for an auto-labeling policy is listed below. Confirm each item before you configure a policy — missing any one typically causes the policy to run without labeling any files, with no in-portal error surfaced.
Simulation mode:
- Auditing for Microsoft 365 must be turned on. If you need to turn on auditing or you're not sure whether auditing is already on, see Turn audit log search on or off.
- To view file or email contents in the source view, you must have the Data Classification Content Viewer role, which is included in the Content Explorer Content Viewer role group, or Information Protection and Information Protection Investigators role groups. Without the required role, you don't see the preview pane when you select an item from the Items to review tab. Global admins don't have this role by default.
To auto-label files in SharePoint and OneDrive:
- You have enabled sensitivity labels for Office files in SharePoint and OneDrive.
- At the time the auto-labeling policy runs, the file mustn't be open by another process or user. A file that's checked out for editing falls into this category, and similarly, all files in a library that's configured to require documents to be checked out.
- Optional but recommended, you run on-demand classification to extend classification to files that haven't been classified or modified for a long time, have never been classified, or need updated classification on previously classified files.
- If you plan to use sensitive information types:
- The sensitive information types you select will apply only to content that's created or modified after these information types are created or modified. This restriction applies to all custom sensitive information types and any new built-in information types.
- To test new custom sensitive information types, create them before you create your auto-labeling policy, and then create new documents with sample data for testing.
- If you plan to use document properties as a condition (Document property is), this option uses SharePoint managed properties in the same way as they are used for DLP policies. Use exact string matches; regex patterns aren't supported. For more information about managed properties as a search method, see Manage the search schema in SharePoint.
- If you have an auto-labeling policy configured to replace a manually applied label but another active auto-labeling policy is configured to apply a label without this option, the label won't be replaced. Because simulation shows the result of one policy, simulation results for the replace label policy show the label as replaced but the conflict is resolved when all policies run.
- If you have an auto-labeling policy configured to remove a label but another active auto-labeling policy is configured to apply a label and the conditions are matched, the label will be applied rather than removed. Because simulation shows the result of one policy, simulation results for the label removal policy show the label as removed but the conflict is resolved when all policies run.
- If you choose to remove a label that applies encryption, encryption is automatically removed with the label.
One or more sensitivity labels created and published (to at least one user) that you can select for your auto-labeling policies. For these labels:
- It doesn't matter if the auto-labeling in Office apps label setting is turned on or off, because that label setting supplements auto-labeling policies, as explained in the introduction.
- If the labels you select are configured to use visual markings (headers, footers, watermarks), these markings aren't applied to documents when you use auto-labeling.
- If the labels apply encryption:
- When the auto-labeling policy includes locations for SharePoint or OneDrive, the label must be configured for the Assign permissions now setting, and User access to content expires must be set to Never.
- When the auto-labeling policy is just for Exchange, the label can be configured for either Assign permissions now or Let users assign permissions (for the Do Not Forward or Encrypt-Only options). You can't auto-apply a label that's configured to apply S/MIME protection.
Scoping a policy with users and groups
When you scope an auto-labeling policy to specific users or groups instead of All, the group type you choose and its membership lifecycle both affect whether a newly added user is protected by the policy.
Supported group types for auto-labeling policy scope:
- Mail-enabled security groups. Supported. Static and, in most cases, dynamic membership.
- Distribution groups. Supported for Exchange location scoping.
- Microsoft 365 groups. Supported.
Group types that are not supported (or partially supported) as policy targets:
- Mail-disabled security groups. Not supported as an auto-labeling policy target. A policy that references one may save but won't evaluate its members. Convert to a mail-enabled security group or list members individually.
- Dynamic distribution groups (Exchange dynamic distribution groups, not Entra dynamic-membership groups). Not supported — their membership is resolved at message send time, not at policy configuration time.
- Nested groups. Membership expansion depth is limited. Deeply nested memberships (a member of a group that is a member of another group referenced by the policy) may not resolve reliably. Where policy coverage matters, reference the innermost group directly.
Propagation lag when membership changes.
When you add a user to a group that scopes an auto-labeling policy, that user is not immediately in scope. The service resolves group membership on its own cadence — typically minutes to hours for mail-enabled groups, and up to several hours for Entra dynamic groups depending on the rule complexity and tenant size. Until propagation completes, the new member's content isn't evaluated by the policy, and no error is surfaced. If a new hire must be protected on day one, either add them directly to the policy scope alongside the group, or use the All location scope where feasible.
For file locations (SharePoint sites, OneDrive accounts) rather than user/group scope, similar propagation delays can apply between when a site is added to the policy and when its files are first crawled — plan for at least 24 hours before you troubleshoot missing labels on a newly added location.
Learn about simulation mode
Simulation mode is supported for auto-labeling policies and woven into the workflow. You can't automatically label documents and emails, or remove labels, until your policy has run at least one simulation.
Important
What "simulation mode" does — and doesn't — do
Simulation is designed to evaluate and log matches without applying (or removing) labels. It is not a fully silent dry run. Before you run a simulation, know these behaviors that customers frequently misdiagnose as bugs:
- Simulation still generates activity alerts. If a Microsoft Purview alert policy is configured on auto-labeling or sensitive-information-type activity, matches surfaced during simulation trigger those alerts. To avoid mass alert email while validating a policy, temporarily scope or disable the alert policy for the simulation window.
- Policy management is greyed out for roughly 24 hours after a policy is created. During this window, the Turn on policy, Edit, and Delete actions on a newly-created policy are unavailable while the backend finishes provisioning. This is normal — wait 24 hours, then refresh.
- A duplicated policy lands in simulation by default and doesn't notify you. Duplicating an existing policy creates a new policy in simulation regardless of the source policy's state. If you expect the duplicate to inherit the source's active state, it won't.
- Simulation and DLP share the same test-mode surface. Some Items to review views can mix auto-labeling and DLP results and can fail to load if either signal is under load. If a view returns an error, retry a few hours later before you open a support case.
- Simulation limits are documented separately. Item caps (100 per site displayed, 50,000-record CSV export ceiling, 4,000,000-item scan limit), 12-hour target completion time, and stall-detection guidance are in Limits for auto-labeling policies.
Simulation mode supports up to 4,000,000 matched files. If more than this number of files are matched from an auto-labeling policy, you can't turn on the policy to apply the labels. In this case, you must reconfigure the auto-labeling policy so that fewer files are matched, and rerun simulation. This maximum of 4,000,000 matched files applies to simulation mode only and not to an auto-labeling policy that's already turned on to apply sensitivity labels.
Note
Simulation results can differ from what happens when the policy is turned on:
- Simulation shows the result of a single policy. When more than one auto-labeling policy applies to the same content (for example, one policy replaces an existing label and another applies a label without that option), the conflict is resolved only when all policies run—so the enforced result can differ from any single policy's simulation.
- Auto-labeling applies your selected sensitive information types only to content created or modified after those information types were created or modified. To classify older files that haven't changed, run on-demand classification.
- For Exchange, simulation evaluates email that's sent and received during the run, so email results aren't consistent unless the same messages are sent and received again.
Workflow for an auto-labeling policy:
Create and configure an auto-labeling policy.
Run the policy in simulation mode, which can take 12 hours to complete. The completed simulation triggers an email notification that's sent to the user configured to receive activity alerts.
Review the results, and if necessary, refine your policy. For example, you might need to edit the policy rules to reduce false positives, or remove some sites so that the number of matched files doesn't exceed 4,000,000. Rerun simulation mode and wait for it to complete again.
Repeat step 3 as needed.
Deploy in production.
The simulated deployment runs like the WhatIf parameter for PowerShell, for a specific point in time. You see results reported as if the auto-labeling policy had applied your selected label, using the rules that you defined. You can then refine your rules for accuracy if needed, and rerun the simulation. However, because auto-labeling for Exchange applies to emails that are sent and received, rather than emails stored in mailboxes, don't expect results for email in a simulation to be consistent unless you can send and receive the exact same email messages.
Simulation mode also lets you gradually increase the scope of your auto-labeling policy before deployment. For example, you might start with a single location, such as a SharePoint site, with a single document library. Then, with iterative changes, increase the scope to multiple sites, and then to another location, such as OneDrive.
Finally, you can use simulation mode to provide an approximation of the time needed to run your auto-labeling policy, to help you plan and schedule when to run it without simulation mode.
Note
If the simulation results don't include files that you expect, based on your configured auto-policy conditions and the current file contents, it might be because the files were updated after the simulation ran. Check if the files were updated and run simulation again to confirm they will be labeled.
Creating an auto-labeling policy
Sign in to the Microsoft Purview portal > Solutions > Information Protection > Policies > Auto-labeling policies.
Note
If you don't see the option for auto-labeling, this functionality isn't currently available in your region because of a backend Azure dependency. For more information, see Azure dependency availability by country.
Select + Create auto-labeling policy. Choose whether you want to apply a sensitivity label, or remove a label. Then follow the instructions according to the option you chose.
For the page Choose info you want this label applied to: Select one of the categories, such as Financial, and then select a corresponding regulation, such as Canadian Financial Data. You can refine your search by using the template search or dropdown box for countries or regions. Or, select Custom > Custom policy if the templates don't meet your requirements. Select Next.
For the page Name your auto-labeling policy: Provide a unique name, and optionally a description to help identify the automatically applied label, locations, and conditions that identify the content to label.
For the Choose a label to auto-apply page: Select + Choose a label, select and add a label from the Choose a sensitivity label pane, and then select Next.
For the page Assign admin units: If your organization is using administrative units in Microsoft Entra ID, auto-labeling policies for Exchange and OneDrive can be automatically restricted to specific users and auto-labeling policies for SharePoint can be automatically restricted to the specific sites configured for the selected administrative units. If your account has been assigned administrative units, you must select one or more administrative units.
If you don't want to restrict the policy by using administrative units, or your organization hasn't configured administrative units, keep the default of Full directory.
Note
If you are editing an existing policy and change the administrative units, you must now reconfigure the locations in the next step.
For the page Choose locations where you want to apply the label: Select and specify locations for Exchange, SharePoint, and OneDrive. If you don't want to keep the default of All included for your chosen locations, select the link to choose specific instances to include, or select the link to choose specific instances to exclude. Then select Next.

Note
For organizations that are using administrative units and selected in the policy:
- For SharePoint, you can't use the Included or Excluded options and must use the All default selection.
- For Exchange and OneDrive, you can use the Included or Excluded options, but see and can select only users from the administrative units selected in the previous step.
If you use the Included or Excluded options:
For the Exchange location, the policy is applied according to the sender address of the recipients specified. Most of the time, you'll want to keep the default of All included with None excluded. This configuration is suitable even if you're testing for a subset of users. Instead of specifying your subset of users here, use the advanced rules in the next step to configure conditions to include or exclude recipients in your organization. Otherwise, when you change the default settings here:
- If you change the default of All included and instead, choose specific users or groups, email sent from outside your organization will be exempt from the policy.
- If you keep the default of All included but specify users or groups to exclude, email that these excluded users send will be exempt from the policy, but not email that they receive.
For the OneDrive location, you must specify users or groups. Previously, you had to specify sites by URLs. Any existing OneDrive URL sites in auto-labeling policies will continue to work but before you can specify new OneDrive locations, or for restricted admins, you must first delete any existing site URLs. Groups supported: distribution groups, Microsoft 365 groups, mail-enabled security groups, and security groups.
For the Set up common or advanced rules page: Keep the default of Common rules to define rules that identify content to label across all your selected locations. If you need different rules per location, including some rules that are only available for Exchange, or SharePoint sites and OneDrive accounts, select Advanced rules. Then select Next.
The rules use conditions that include sensitive information types, trainable classifiers, sharing options, and other conditions:
- To select a sensitive information type or trainable classifier as a condition, under Content contains, select Add, and then choose Sensitive info types or Trainable classifiers.
- To select sharing options as a condition, under Content is shared, choose either only with people inside my organization or with people outside my organization.
- Other conditions that you can select:
- Attachment or file extension is
- Attachment or document name contains words or phrases
- Attachment or document property is
- Attachment or document size equals or is greater than
If your location is Exchange and you selected Advanced rules, there are additional conditions that you can select:
- Sender IP address is
- Recipient domain is
- Recipient is
- Attachment is password protected
- Any email attachment's content could not be scanned
- Any email attachment's content didn't complete scanning
- Header matches patterns
- Subject matches patterns
- Recipient address contains words
- Recipient address matches patterns
- Sender address matches patterns
- Sender domain is
- Recipient is a member of
- Sender is
If your location is SharePoint sites or OneDrive accounts and you selected Advanced rules, there is one other condition that you can select:
- Document created by
Depending on your previous choices, you'll now have an opportunity to create new rules by using conditions and exceptions.
The configuration options for sensitive information types are the same as those you select for auto-labeling for Office apps. If you need more information, see Configuring sensitive info types for a label.
When you've defined all the rules you need, and confirmed their status is on, select Next to move on to choosing a label to auto-apply.
Specify optional configurations on the Additional label settings page:
Emails only: Applicable for both incoming and outgoing emails. When you select this setting, an existing sensitivity label will always be overriden for emails if the sensitivity label you chose for the policy has a higher priority. Use this setting to override manually labeled emails with a higher priority label when sensitive content is detected.
All locations: Applicable for emails and for files in SharePoint and OneDrive. When you select this setting, an existing sensitivity label will always be overriden if the sensitivity label you chose for the policy has a higher priority. Use this setting to override manually labeled emails and files with a higher priority label when sensitive content is detected.
Apply encryption to email received from outside your organization: This option is visible only when the selected sensitivity label applies encryption. If you then select this option to apply encryption to email received from outside your organization, you must assign a Rights Management owner. This configuration ensures that an authorized person in your organization has Full Control usage rights for these emails sent from your outside your organization and now encrypted. This role might be needed to later remove the encryption, or assign different usage rights for users in your organization.
For Assign a Rights Management owner, specify a single user by an email address that's owned by your organization. Don't specify a mail contact, a shared mailbox, or any group type, because these aren't supported for this role.
For the Decide if you want to test out the policy now or later page: Select Run policy in simulation mode if you're ready to run the auto-labeling policy now, in simulation mode. Then decide whether to automatically turn on the policy if it's not edited for 7 days:

If you're not ready to run simulation, select Leave policy turned off.
For the Summary page: Review the configuration of your auto-labeling policy and make any changes that you need, and complete the configuration.
Now on the Information protection > Auto-labeling page, you see your auto-labeling policy in the Simulation or Off section, depending on whether you chose to run it in simulation mode or not. Select your policy to see the details of the configuration and status (for example, Policy simulation is still running). For policies in simulation mode, select the Items to review tab to see which emails or documents matched the rules that you specified.
You can modify your policy directly from this interface:
For a policy in the Off section, select the Edit policy button.
For policy in the Simulation section, select the Edit policy option at the top of the page, from either tab.

When you're ready to run the policy without simulation, select the Turn on policy option.
Note
Files with no content (i.e. zero bytes in size) may not be labeled.
Auto-labeling policies run continuously until they're deleted. For example, new and modified files will be included with the current policy settings.
Removing or downgrading sensitivity labels with an auto-labeling policy
An auto-labeling policy can also be used to remove a sensitivity label from files that match its conditions — for example, to strip an encryption-enforcing label before content is migrated, shared externally, or reclassified. This mode is powerful, and it also has documented behaviors that customers frequently misdiagnose as a bug when a large removal run appears to do nothing after activation.
Before you turn on a removal or downgrade policy, know these behaviors:
- Simulation matches items that activation won't remove. Simulation reports every file that matches the policy's conditions. On activation, the service only re-evaluates files whose state has recently changed (new, modified, or explicitly re-crawled). Files that matched in simulation but haven't been touched since aren't re-evaluated on the next policy pass. To force a full re-scan of a location, run on-demand classification after activation.
- A removal policy can't override the file's currently applied label if that label enforces encryption. If the current label protects the file with encryption, the service applies the same overwrite rules as any other auto-labeling policy — see Will an existing label be overridden?. Remove the encryption from the label first (or downgrade to a non-encrypting label), then run the removal policy.
- After cross-tenant migration, the source-tenant label often isn't recognized in the target tenant. The label's tenant-scoped identity moves with the file's metadata but the target tenant's label set doesn't include it, so a target-tenant removal policy can't find the label to strip. Republish the label in the target tenant (or use PowerShell to strip metadata directly) before you run a removal policy.
- A conflicting active policy that applies a label wins. If another auto-labeling policy has conditions that match the same files and applies a label, the label-apply wins over the label-remove even when both simulate as removals. See the Prerequisites — detailed reference note beginning "If you have an auto-labeling policy configured to remove a label" for the full conflict-resolution behavior.
- Removing a label that applies encryption also removes the encryption. This is intentional but frequently surprising to admins who expected the file to become "unlabeled but still protected." Plan for this — if you need to keep encryption, downgrade to a non-encrypting label instead of removing.
To create a removal policy, use the Automatically remove label only tab in Creating an auto-labeling policy above.
Monitoring your auto-labeling policy
After your auto-labeling policy is turned on, you can view the labeling progress for files in your chosen SharePoint and OneDrive locations. Emails aren't included in the labeling progress because they're automatically labeled as they're sent.
The labeling progress includes the files to be labeled or unlabeled by the policy, the affected files for the last seven days, and the total files affected. Because of the maximum of labeling 100,000 files a day, this information provides you with visibility into the current labeling progress for your policy and how many files are still to be labeled.
When you first turn on your policy, you initially see a value of 0 for files to be labeled until the latest data is retrieved. This progress information updates every 48 hours, so you can expect to see the most current data about every other day. When you select an auto-labeling policy, you can see more details about the policy in a flyout pane, which includes the labeling progress by the top 10 sites. The information on this flyout pane might be more current than the aggregated policy information displayed on the Auto-labeling main page. To have visibility on all auto-labeling policy progress, use activity explorer for the most up to date information for files and emails that were auto-labeled.
You can also see the results of your auto-labeling policy by using content explorer when you have the appropriate permissions:
- Content Explorer List Viewer role group lets you see a file's label but not the file's contents.
- Content Explorer Content Viewer role group, and Information Protection and Information Protection Investigators role groups let you see the file's contents.
However currently, restricted admins won't be able to see labeling activities for OneDrive in activity explorer.
Tip
You can also use content explorer to identify locations that have documents with sensitive information, but are unlabeled. Using this information, consider adding these locations to your auto-labeling policy, and include the identified sensitive information types as rules.
Policy-level labeling activity for SharePoint and OneDrive
For auto-labeling policies that are turned on and target SharePoint and OneDrive, you can monitor them right from the main Auto-labeling page and use the per-policy review pages. Use these pages to monitor day-to-day labeling activity, spot-check labeled files, and investigate labeling failures.
To view the review pages, you need one of the following roles:
- Compliance Administrator
- Compliance Data Administrator
- Information Protection Admin
- Information Protection Analyst
To see the matched text inside a file from the Contextual summary tab, you also need the Data Classification Content Viewer role.
To open these pages, from Information Protection > Auto-labeling, select the name of an auto-labeling policy. Most data on the review pages reflects activity from the last 30 days.
The policy Overview page shows labeled and failed file counts, a daily activity trend chart, the top labels applied, and the top sites where labeling occurred. A Labeling failures card surfaces the total failure count and the top three failure reasons so you can quickly identify whether the policy needs attention.
From the Labeled items tab, you can toggle between a Labeled view (a sample of successfully labeled files) and a Failed view (files the policy couldn't label, grouped by failure reason). Select any item to open a details flyout pane that includes a file preview, file properties, and a Contextual summary tab that explains in plain language why the file matched or why labeling failed.
Labeling failures generally fall into two categories: labeling failures, where the file matched the policy but the label couldn't be written (often due to file format, existing protection, or label configuration), and system failures, which are transient infrastructure errors that are typically retried automatically. For the full list of failure reasons and recommended actions, see Resolve auto-labeling failures in SharePoint and OneDrive files.
Why was — or wasn't — a specific file labeled?
If you expected a file to be labeled by an active auto-labeling policy and it wasn't, or a file was labeled and you didn't expect it, work through these checks in order. When the Failed view on the Labeled items tab shows a failure reason for the file, start there.
- Is the file open, checked out, or in a check-out-required library? Auto-labeling skips files that are open in another session. Close the file (or check it in) and wait for the next policy pass. Files in a library configured to require documents to be checked out fall into this category.
- Is the file a supported format, and was it modified after your policy was created? Auto-labeling for SharePoint and OneDrive supports PDFs and modern Office files (
.docx,.pptx,.xlsx). Legacy Office formats (.xls,.ppt,.pfile), generic file types, and other non-supported extensions are silently skipped and appear asfileExtensionNotSupportedin the Failed view. Additionally, pre-existing at-rest files aren't automatically re-scanned when a new policy is turned on — new uploads label immediately, but existing files require on-demand classification to be picked up. - Was the file created or modified before your sensitive information type was created or modified? Auto-labeling only evaluates content that was created or modified after the SIT was created or last modified. To classify older unchanged files, run on-demand classification, then wait for the next policy pass.
- Does the policy apply a parent label? A label with sublabels can't be applied to content, so the policy will run without labeling anything. See Don't configure a parent label to be applied automatically or recommended and select a sublabel or non-parent label instead.
- Does the file already have a higher-priority label? Auto-labeling never overrides a manually applied label of any priority, and never overrides an automatically applied label of higher priority. Confirm the current label in content explorer. See Will an existing label be overridden? for the full matrix.
- Does the label apply encryption, and are its encryption prerequisites met? For SharePoint and OneDrive locations, the label must be configured with Assign permissions now and User access to content expires set to Never. If either is missing, the file matches the rule but the label can't be written. See Prerequisites for auto-labeling policies.
- Is the failure reason a system failure? In the Failed view, messages that mention Application Request Queue Full, Authentication Concurrency Limit Reached, Service Unavailable, or TaskCanceled are transient backend conditions in the Microsoft 365 Substrate. These are automatically retried by the auto-labeling service — no customer action is required. Microsoft Graph
assignSensitivityLabeloperations that remain innotStartedstatus for more than 24 hours fall into this category — the API is asynchronous and retries transparently. If the same file keeps failing across multiple retries over more than 24 hours, open a Microsoft support case. - Was the label recently added, changed, or applied at scale? Files in SharePoint and OneDrive are re-evaluated only after the search index picks up the change. For large tenants (100+ sites) this can take up to several days after a bulk label update or a large reindex. Confirm the site's crawl status before troubleshooting individual files.
- Was the file labeled when you didn't expect it? Check the policy's Labeled items tab for which policy applied the label and which rule matched. If the file type is a video, Clipchamp project (
.mp4), or PDF, confirm your rule's file-type scope is intentional — these formats are matched by default when the rule condition is met. To remove an auto-applied label, the file must be re-processed by a policy whose highest-priority matching rule no longer targets that file, or the label must be manually removed by a user with sufficient permissions.
If none of the above apply, the file may have been updated after the last policy pass. Confirm the file's last-modified time and wait for the next pass. For the full list of per-file failure reasons and recommended actions, see Resolve auto-labeling failures in SharePoint and OneDrive files.
Monitoring your daily labeling volume
To see how all auto-labeling policies in your tenant are tracking against the 100,000 files-per-day throughput limit, use the main Auto-labeling page. The total daily files labeled across all policies displays at the top of the page.
Use this number when you're planning a new policy or troubleshooting whether the tenant is approaching its labeling limit.
Use PowerShell for auto-labeling policies
You can use Security & Compliance PowerShell to create and configure auto-labeling policies. This means you can fully script the creation and maintenance of your auto-labeling policies, which also provides a more efficient method of specifying multiple locations for SharePoint and OneDrive.
Before you run the commands in PowerShell, you must first connect to Security & Compliance PowerShell.
To create a new auto-labeling policy:
New-AutoSensitivityLabelPolicy -Name <AutoLabelingPolicyName> -SharePointLocation "<SharePointSiteLocation>" -ApplySensitivityLabel <Label> -Mode TestWithoutNotifications
This command creates an auto-labeling policy for a SharePoint site that you specify. For a OneDrive location, use the OneDriveLocation parameter, instead.
To add more sites to an existing auto-labeling policy:
$spoLocations = @("<SharePointSiteLocation1>","<SharePointSiteLocation2>")
Set-AutoSensitivityLabelPolicy -Identity <AutoLabelingPolicyName> -AddSharePointLocation $spoLocations -ApplySensitivityLabel <Label> -Mode TestWithoutNotifications
This command specifies the new SharePoint URLs in a variable that is then added to an existing auto-labeling policy. To add OneDrive locations instead, use the AddOneDriveLocation parameter with a different variable, such as $OneDriveLocations.
To create a new auto-labeling policy rule:
New-AutoSensitivityLabelRule -Policy <AutoLabelingPolicyName> -Name <AutoLabelingRuleName> -ContentContainsSensitiveInformation @{"name"= "00aa00aa-bb11-cc22-dd33-44ee44ee44ee"; "mincount" = "2"} -Workload SharePoint
For an existing auto-labeling policy, this command creates a new policy rule to detect the sensitive information type of U.S. social security number (SSN), which has an entity ID of 00aa00aa-bb11-cc22-dd33-44ee44ee44ee. To find the entity IDs for other sensitive information types, refer to Sensitive information type entity definitions.
For more information about the PowerShell cmdlets that support auto-labeling policies, their available parameters and some examples, see the following cmdlet help:
- Get-AutoSensitivityLabelPolicy
- New-AutoSensitivityLabelPolicy
- New-AutoSensitivityLabelRule
- Remove-AutoSensitivityLabelPolicy
- Remove-AutoSensitivityLabelRule
- Set-AutoSensitivityLabelPolicy
- Set-AutoSensitivityLabelRule
Tips to increase labeling reach
Although auto-labeling is one of the most efficient ways to classify, label, and protect Office and PDF files that your organization owns, check whether you can supplement it with any of the following methods to increase your labeling reach:
For SharePoint document libraries, you can apply a default sensitivity label for new and edited files. For more information, see Configure a default sensitivity label for a SharePoint document library.
With Microsoft Syntex, you can apply a sensitivity label to a document understanding model, so that identified documents in a SharePoint document library are automatically labeled.
For Outlook messages, you can apply a sensitivity label based on attachments that are labeled.
When you use the Microsoft Purview Information Protection client:
- For files in on-premises data stores, such as network shares and SharePoint Server libraries: Use the scanner to discover sensitive information in these files and label them appropriately. If you're planning to migrate or upload these files to SharePoint in Microsoft 365, use the scanner to label the files before you move them to the cloud.
Encourage manual labeling after providing users with training which sensitivity labels to apply. When you're confident that users understand which label to apply, consider configuring a default label and mandatory labeling as policy settings.
Additionally, consider marking new files as sensitive by default in SharePoint to prevent guests from accessing newly added files until at least one DLP policy scans the content of the file.