Bemærk
Adgang til denne side kræver godkendelse. Du kan prøve at logge på eller ændre mapper.
Adgang til denne side kræver godkendelse. Du kan prøve at ændre mapper.
Applies to:  SQL Server 2016 (13.x) and later versions
Azure SQL Database
Azure SQL Managed Instance
SQL database in Microsoft Fabric
SQL Server 2016 (13.x) and later versions
Azure SQL Database
Azure SQL Managed Instance
SQL database in Microsoft Fabric
A system-versioned temporal table keeps every previous version of every row in its history table. The history table might increase your database size more than regular tables under the following conditions:
- You retain historical data for a long period of time.
- You have an update or delete heavy data modification pattern.
A large, ever-growing history table might become a problem, both because of storage costs and the performance tax it imposes on temporal queries. Developing a data retention policy for the history table is an important part of planning and managing the lifecycle of every temporal table.
Plan a data retention policy
To manage temporal table data retention, first determine the required retention period for each temporal table. Your retention policy, in most cases, should be part of the business logic of the application that uses the temporal tables. For example, applications in data audit and time travel scenarios have firm requirements about how long historical data must be available for online querying.
After you determine your data retention period, develop a plan for managing historical data. Decide how and where you store your historical data, and how to delete historical data that is older than your retention requirements.
Every approach in this article acts on the column that corresponds to the end of period in the current table, which is the ValidTo column in the examples that follow. The end of period value for each row determines the moment when the row version becomes closed, that is, when it lands in the history table. For example, the condition ValidTo < DATEADD (DAY, -30, SYSUTCDATETIME()) matches historical data that is more than 30 days old.
Choose one of the following approaches to act on those rows:
| Approach | How it works | When to use it |
|---|---|---|
| Temporal history retention policy | You set a retention period for each table, and a background task deletes aged rows automatically. | The simplest option, when you can delete aged history outright. |
| Table partitioning | A sliding window switches the oldest partition out of the history table, so you can archive it or discard it. | When you want to archive historical data before you remove it, or want partition elimination for temporal queries. |
| Custom cleanup script | A scheduled script disables system versioning, deletes aged rows in small chunks, and then re-enables system versioning. | When a retention policy isn't available for your table, and partitioning isn't viable. |
The partitioning and custom cleanup examples in this article use the samples from the Create a system-versioned temporal table article.
Use a temporal history retention policy
Applies to: SQL Server 2017 (14.x) and later versions, Azure SQL Database, Azure SQL Managed Instance, and SQL database in Microsoft Fabric.
You can configure temporal history retention at the individual table level, which lets you create flexible aging policies. To enable temporal retention, set HISTORY_RETENTION_PERIOD during table creation or a schema change.
After you define the retention policy, the Database Engine runs a scheduled background task that finds and transparently removes historical rows whose end of period value is older than the retention period.
How to configure retention policy
Before you configure retention policy for a temporal table, check whether temporal historical retention is enabled at the database level:
SELECT is_temporal_history_retention_enabled,
       name
FROM sys.databases;
The database flag is_temporal_history_retention_enabled defaults to ON, but you can change it by using the ALTER DATABASE statement. The Database Engine also sets it to OFF automatically after a point-in-time restore (PITR) operation, as described in Point-in-time restore considerations. To enable temporal history retention cleanup for your database, run the following statement. Replace <myDB> with the database you want to alter:
ALTER DATABASE [<myDB>]
    SET TEMPORAL_HISTORY_RETENTION ON;
Important
You can configure retention for temporal tables even if is_temporal_history_retention_enabled is OFF, but the Database Engine doesn't trigger automatic cleanup for aged rows in that case.
You can configure the retention policy during table creation by specifying a value for the HISTORY_RETENTION_PERIOD parameter:
CREATE TABLE dbo.WebsiteUserInfo
(
    UserID INT NOT NULL PRIMARY KEY CLUSTERED,
    UserName NVARCHAR (100) NOT NULL,
    PagesVisited INT NOT NULL,
    ValidFrom DATETIME2 (0) GENERATED ALWAYS AS ROW START,
    ValidTo DATETIME2 (0) GENERATED ALWAYS AS ROW END,
    PERIOD FOR SYSTEM_TIME (ValidFrom, ValidTo)
)
WITH (
    SYSTEM_VERSIONING = ON (
        HISTORY_TABLE = dbo.WebsiteUserInfoHistory,
        HISTORY_RETENTION_PERIOD = 6 MONTHS
    )
);
With that policy in place, rows in dbo.WebsiteUserInfoHistory become eligible for cleanup when they satisfy the following condition:
ValidTo < DATEADD (MONTH, -6, SYSUTCDATETIME())
You can specify the retention period in DAYS, WEEKS, MONTHS, or YEARS. If you leave out HISTORY_RETENTION_PERIOD, the retention defaults to INFINITE. You can also use the INFINITE keyword explicitly.
In some scenarios, you might want to configure retention after table creation or change the previously configured value. In that case, use the ALTER TABLE statement:
ALTER TABLE dbo.WebsiteUserInfo
    SET (SYSTEM_VERSIONING = ON (HISTORY_RETENTION_PERIOD = 9 MONTHS));
Important
Setting SYSTEM_VERSIONING to OFF doesn't preserve the retention period value. Setting SYSTEM_VERSIONING to ON without an explicit HISTORY_RETENTION_PERIOD results in INFINITE retention.
To review the current state of the retention policy, use the following sample. This query joins the temporal retention enablement flag at the database level with retention periods for individual tables:
SELECT DB.is_temporal_history_retention_enabled,
       SCHEMA_NAME(T1.schema_id) AS TemporalTableSchema,
       T1.name AS TemporalTableName,
       SCHEMA_NAME(T2.schema_id) AS HistoryTableSchema,
       T2.name AS HistoryTableName,
       T1.history_retention_period,
       T1.history_retention_period_unit_desc
FROM sys.tables AS T1
    OUTER APPLY (
        SELECT is_temporal_history_retention_enabled
        FROM sys.databases
        WHERE name = DB_NAME()
) AS DB
    LEFT OUTER JOIN sys.tables AS T2
        ON T1.history_table_id = T2.object_id
WHERE T1.temporal_type = 2;
How the Database Engine deletes aged rows
The cleanup process depends on the index layout of the history table. You can configure a finite retention policy only on history tables with a clustered rowstore (B-tree) or clustered columnstore index. A background task performs aged data cleanup for all temporal tables with a finite retention period.
Note
Documentation uses the term B-tree generally in reference to indexes. In rowstore indexes, the Database Engine implements a B+ tree. This does not apply to columnstore indexes or indexes on memory-optimized tables. For more information, see the SQL Server and Azure SQL index architecture and design guide.
B-tree rowstore index
The rowstore clustered index must start with the column corresponding to the end of the SYSTEM_TIME period. If such an index doesn't exist, you can't configure a finite retention period:
Msg 13765, Level 16, State 1
Setting finite retention period failed on system-versioned temporal table
'dbo.WebsiteUserInfo' because the history table 'dbo.WebsiteUserInfoHistory'
does not contain required clustered index. Consider creating a clustered
columnstore or B-tree index starting with the column that matches end of
SYSTEM_TIME period, on the history table.
The default history table already has a compliant clustered index. If you try to drop that index on a history table with a finite retention period, the operation fails with the following error:
Msg 13766, Level 16, State 1
Cannot drop the clustered index 'WebsiteUserInfoHistory.IX_WebsiteUserInfoHistory'
because it is being used for automatic cleanup of aged data. Consider setting HISTORY_RETENTION_PERIOD to INFINITE on the corresponding system-versioned
temporal table if you need to drop this index.
Cleanup logic for the rowstore clustered index deletes aged rows in smaller chunks (up to 10,000), minimizing pressure on the database log and I/O subsystem. Although cleanup logic uses the required B-tree index, it can't guarantee the deletion order for rows older than the retention period. Don't take any dependency on the cleanup order in your applications.
Clustered columnstore index
The cleanup task for the clustered columnstore removes entire row groups at once. Each row group typically contains one million rows. This method is more efficient, especially when your workload generates historical data at a high pace.

Data compression and retention cleanup make the clustered columnstore index a good choice for scenarios when your workload rapidly generates a large amount of historical data. That pattern is typical for intensive transactional processing workloads that use temporal tables for change tracking and auditing, trend analysis, or Internet of Things (IoT) data ingestion.
Cleanup on the clustered columnstore index works optimally when historical rows arrive in ascending order (ordered by the end-of-period column). This condition is always the case when only the SYSTEM_VERSIONING mechanism populates the history table. If rows in the history table aren't ordered by the end-of-period column (which might happen when you migrate existing historical data), re-create the clustered columnstore index on top of a properly ordered B-tree rowstore index to achieve optimal performance.
Avoid rebuilding the clustered columnstore index on a history table with a finite retention period, because rebuilding might change the row-group ordering that the system-versioning operation naturally imposes. If you need to rebuild the clustered columnstore index on the history table, re-create it on top of a compliant B-tree index to preserve the row-group ordering necessary for regular data cleanup. Take the same approach if you create a temporal table with an existing history table that has a clustered columnstore index without guaranteed data order:
/* Create B-tree ordered by the end-of-period column */
CREATE CLUSTERED INDEX IX_WebsiteUserInfoHistory
    ON WebsiteUserInfoHistory(ValidTo) WITH (DROP_EXISTING = ON);
GO

/* Re-create the clustered columnstore index */
CREATE CLUSTERED COLUMNSTORE INDEX IX_WebsiteUserInfoHistory
    ON WebsiteUserInfoHistory WITH (DROP_EXISTING = ON);
When you configure a finite retention period for a history table with a clustered columnstore index, you can't create additional nonclustered B-tree indexes on that table:
CREATE NONCLUSTERED INDEX IX_WebHistNCI
    ON WebsiteUserInfoHistory(UserName);
The previous statement fails with the following error:
Msg 13772, Level 16, State 1
Cannot create non-clustered index on a temporal history table 'WebsiteUserInfoHistory' since it has finite retention period and clustered columnstore index defined.
Query tables with retention policy
All queries on the temporal table automatically filter out historical rows that match the finite retention policy, to avoid unpredictable and inconsistent results. The cleanup task deletes aged rows at any point in time and in arbitrary order.
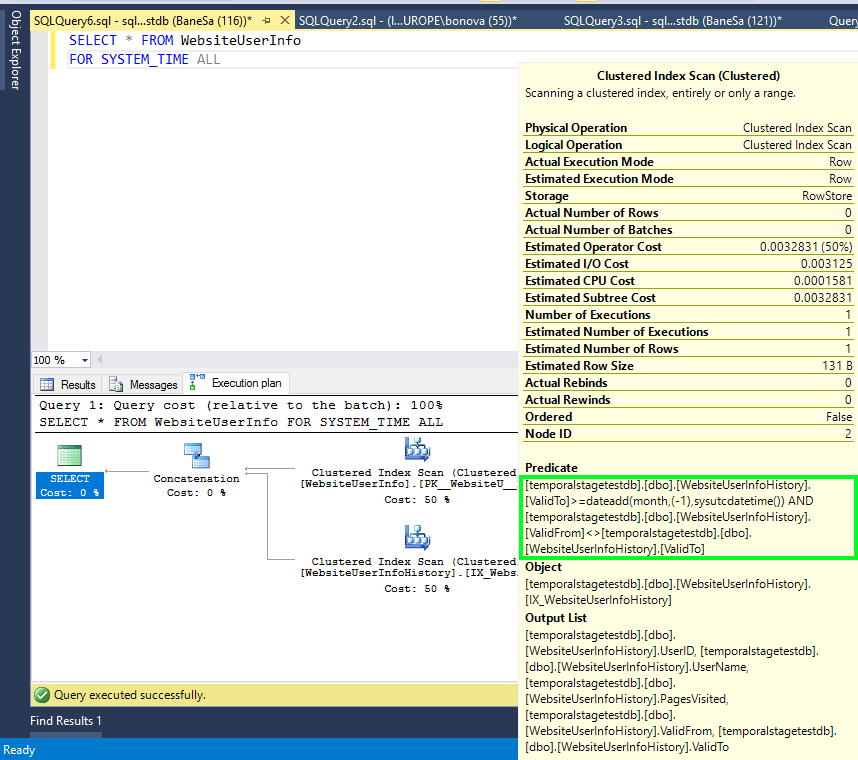
The following screenshot shows the query plan for a basic query. This example assumes a one-MONTH retention period on the WebsiteUserInfo table:
SELECT *
FROM dbo.WebsiteUserInfo FOR SYSTEM_TIME ALL;
The query plan includes an extra filter on the end-of-period column (ValidTo) in the Clustered Index Scan operator (highlighted in the following image) on the history table.
If you query the history table directly, you might see rows older than the specified retention period, but without any guarantee of repeatable query results. The following screenshot shows the query plan for a query on the history table without extra filters:

Don't rely on business logic that reads the history table beyond the retention period, because you might get inconsistent or unexpected results. Use temporal queries with the FOR SYSTEM_TIME clause to analyze data in temporal tables.
Point-in-time restore considerations
When you restore a database to a specific point in time, the new database has temporal retention disabled at the database level (is_temporal_history_retention_enabled set to OFF). This behavior lets you inspect historical rows older than the retention period before the cleanup task removes them. To resume automatic cleanup on the restored database, set TEMPORAL_HISTORY_RETENTION back to ON.
Note
A database created in the Premium tier on Azure SQL Database retains backups for up to 35 days, so you can restore it to a point in time anywhere in that window. For a temporal table with a one-month retention period, that lets you inspect historical rows up to 65 days old by querying the history table directly on the restored database.
Use table partitioning
Partitioned tables and indexes can make large tables more manageable and scalable. By using the table partitioning approach, you can implement custom data cleanup or offline archival based on a time condition. Table partitioning also gives you performance benefits when querying temporal tables on a subset of data history, by using partition elimination.
Use table partitioning to implement a sliding window to move out the oldest portion of the historical data from the history table, and keep the size of the retained part constant by age. A sliding window maintains data in the history table equal to the required retention period. The history table supports switching data out while SYSTEM_VERSIONING is ON, which means you can clean a portion of the history data without introducing a maintenance window or blocking your regular workloads.
Note
To perform partition switching, your clustered index on the history table must be aligned with the partitioning schema (it has to contain ValidTo). The default history table contains a clustered index that includes the ValidTo and ValidFrom columns, which is optimal for partitioning, inserting new history data, and typical temporal querying. For more information, see Temporal tables.
A sliding window requires two sets of tasks:
- A partitioning configuration task
- Recurring partition maintenance tasks
For this illustration, assume that you want to keep historical data for six months and that you want to keep every month of data in a separate partition. Also, assume that you activated system-versioning in September 2023.
A partitioning configuration task creates the initial partitioning configuration for the history table. For this example, you create the same number of partitions as the size of the sliding window, in months, plus one extra empty partition. This configuration ensures that the system can store new data correctly when you first start the recurring partition maintenance task. It also guarantees that you never split partitions that contain data, which avoids expensive data movements. Define the partition function with RANGE LEFT rather than RANGE RIGHT. For more information, see Performance considerations with table partitioning later in this article.
The following picture shows the initial partitioning configuration to keep six months of data.

The first and last partitions are open on the lower and upper boundaries, respectively, to ensure that every new row has a destination partition regardless of the value in the partitioning column. Over time, new rows in the history table land in higher partitions. When the sixth partition fills up, you reach the targeted retention period. At this point, start the recurring partition maintenance task for the first time. Schedule it to run periodically, once per month in this example.
The following picture illustrates the recurring partition maintenance tasks.

Each run of the recurring maintenance task performs the following steps:
SWITCH OUT: Create a staging table and then switch a partition between the history table and the staging table by using the ALTER TABLE statement with theSWITCH PARTITIONargument.ALTER TABLE [<history table>] SWITCH PARTITION 1 TO [<staging table>];After the partition switch, you can optionally archive the data from the staging table, and then either drop or truncate the staging table to prepare for the next maintenance cycle.
MERGE RANGE: Merge the empty partition1with partition2by using the ALTER PARTITION FUNCTION statement withMERGE RANGE. When you use this function to remove the lowest boundary, you effectively merge the empty partition1with the former partition2to form a new partition1. The other partitions also effectively change their ordinals.SPLIT RANGE: Create a new empty partition7by using the ALTER PARTITION FUNCTION statement withSPLIT RANGE. When you use this function to add a new upper boundary, you effectively create a separate partition for the upcoming month.
Use Transact-SQL to create partitions on history table
Use the following Transact-SQL script to create the partition function, the partition schema, and recreate the clustered index to be partition-aligned with the schema. For this example, you create a six-month sliding window with monthly partitions, beginning September 2023.
BEGIN TRANSACTION;

/*Create partition function*/
CREATE PARTITION FUNCTION [fn_Partition_DepartmentHistory_By_ValidTo](DATETIME2 (7))
    AS RANGE LEFT FOR VALUES (
        N'2023-09-30T23:59:59.999',
        N'2023-10-31T23:59:59.999',
        N'2023-11-30T23:59:59.999',
        N'2023-12-31T23:59:59.999',
        N'2024-01-31T23:59:59.999',
        N'2024-02-29T23:59:59.999'
    );

/*Create partition scheme*/
CREATE PARTITION SCHEME [sch_Partition_DepartmentHistory_By_ValidTo]
    AS PARTITION [fn_Partition_DepartmentHistory_By_ValidTo]
    TO (
        [PRIMARY],
        [PRIMARY],
        [PRIMARY],
        [PRIMARY],
        [PRIMARY],
        [PRIMARY],
        [PRIMARY]
    );

/*Re-create index to be partition-aligned with the partitioning schema*/
CREATE CLUSTERED INDEX [ix_DepartmentHistory] ON [dbo].[DepartmentHistory] (
    ValidTo ASC,
    ValidFrom ASC
)
WITH (
    PAD_INDEX = OFF,
    STATISTICS_NORECOMPUTE = OFF,
    SORT_IN_TEMPDB = OFF,
    DROP_EXISTING = ON,
    ONLINE = OFF,
    ALLOW_ROW_LOCKS = ON,
    ALLOW_PAGE_LOCKS = ON,
    DATA_COMPRESSION = PAGE
)
ON [sch_Partition_DepartmentHistory_By_ValidTo] (ValidTo);

COMMIT TRANSACTION;
Use Transact-SQL to maintain partitions in sliding window scenario
Use the following Transact-SQL script to maintain partitions in the sliding window scenario. For this example, you switch out the partition for September 2023 by using MERGE RANGE, and then add a new partition for March 2024 by using SPLIT RANGE.
BEGIN TRANSACTION;

/* (1) Create staging table */
CREATE TABLE [dbo].[staging_DepartmentHistory_September_2023]
(
    DeptID INT NOT NULL,
    DeptName VARCHAR (50) COLLATE SQL_Latin1_General_CP1_CI_AS NOT NULL,
    ManagerID INT NULL,
    ParentDeptID INT NULL,
    ValidFrom DATETIME2 (7) NOT NULL,
    ValidTo DATETIME2 (7) NOT NULL
) ON [PRIMARY]
WITH (DATA_COMPRESSION = PAGE);

/* (2) Create index on the same filegroups as the partition to switch out */
CREATE CLUSTERED INDEX [ix_staging_DepartmentHistory_September_2023]
ON [dbo].[staging_DepartmentHistory_September_2023](
    ValidTo ASC,
    ValidFrom ASC
)
WITH (
    PAD_INDEX = OFF,
    SORT_IN_TEMPDB = OFF,
    DROP_EXISTING = OFF,
    ONLINE = OFF,
    ALLOW_ROW_LOCKS = ON,
    ALLOW_PAGE_LOCKS = ON
)
ON [PRIMARY];

/* (3) Create constraints matching the partition to switch out */
ALTER TABLE [dbo].[staging_DepartmentHistory_September_2023] WITH CHECK
    ADD CONSTRAINT [chk_staging_DepartmentHistory_September_2023_partition_1]
            CHECK (ValidTo <= N'2023-09-30T23:59:59.999');

ALTER TABLE [dbo].[staging_DepartmentHistory_September_2023]
    CHECK CONSTRAINT [chk_staging_DepartmentHistory_September_2023_partition_1];

/* (4) Switch partition to staging table */
ALTER TABLE [dbo].[DepartmentHistory]
    SWITCH PARTITION 1 TO [dbo].[staging_DepartmentHistory_September_2023]
    WITH (
        WAIT_AT_LOW_PRIORITY (
            MAX_DURATION = 0 MINUTES, ABORT_AFTER_WAIT = NONE
        )
    );

/* (5) [Commented out] Optionally archive the data and drop staging table
      INSERT INTO [ArchiveDB].[dbo].[DepartmentHistory]
      SELECT * FROM [dbo].[staging_DepartmentHistory_September_2023];
      DROP TABLE [dbo].[staging_DepartmentHIstory_September_2023];
*/

/* (6) merge range to move lower boundary one month ahead */
ALTER PARTITION FUNCTION [fn_Partition_DepartmentHistory_By_ValidTo]()
    MERGE RANGE (N'2023-09-30T23:59:59.999');

/* (7) Create new empty partition for "April and after"
by creating new boundary point and specifying NEXT USED file group*/
ALTER PARTITION SCHEME [sch_Partition_DepartmentHistory_By_ValidTo]
    NEXT USED [PRIMARY];

ALTER PARTITION FUNCTION [fn_Partition_DepartmentHistory_By_ValidTo]()
    SPLIT RANGE (N'2024-03-31T23:59:59.999');

COMMIT TRANSACTION;
However, the optimal solution is to regularly run a generic Transact-SQL script every month without modification. You can generalize the previous script to act on your provided parameters (the lower boundary that needs to merge, and the new boundary created by the partition split). To avoid creating a staging table every month, create one beforehand and reuse it by changing the check constraint to match the partition that you switch out. For more information, see how to fully automate the sliding window scenario.
Performance considerations with table partitioning
Perform the MERGE RANGE and SPLIT RANGE operations in a way that avoids data movement, because data movement can cause significant performance overhead. For more information, see Modify a partition function.
When you create the partition function as RANGE LEFT, the specified values are the upper boundaries of the partitions. When you use RANGE RIGHT, the specified values are the lower boundaries of the partitions. When you use the MERGE RANGE operation to remove a boundary from the partition function definition, the underlying implementation also removes the partition that contains the boundary. If that partition isn't empty, MERGE RANGE moves the data to the resulting partition.
The following diagram describes the RANGE LEFT and RANGE RIGHT options:

In a sliding window scenario, you always remove the lowest partition boundary.
RANGE LEFTcase: The lowest partition boundary belongs to partition1, which is empty (after partition switch out), soMERGE RANGEdoesn't cause any data movement.RANGE RIGHTcase: The lowest partition boundary belongs to partition2, which isn't empty because switching out empties only partition1. In this case,MERGE RANGEcauses data movement, moving data from partition2to partition1. To avoid this data movement,RANGE RIGHTin the sliding window scenario needs to have partition1, which is always empty. This requirement means that if you useRANGE RIGHT, you should create and maintain one extra partition compared to theRANGE LEFTcase.
Conclusion: Partition management is easier when you use RANGE LEFT in a sliding partition, and it avoids data movement. However, defining partition boundaries with RANGE RIGHT is slightly easier, because you don't have to deal with date and time check issues.
Use a custom cleanup script
When a retention policy isn't available for your table, and table partitioning isn't viable, you can delete the data from the history table by using a custom cleanup script. This process is possible only when SYSTEM_VERSIONING = OFF. To avoid data inconsistency, perform cleanup either during a maintenance window (when workloads that modify data aren't active), or within a transaction (effectively blocking other workloads). This operation requires CONTROL permission on current and history tables.
The cleanup logic is the same for every temporal table, so you can automate it through a generic stored procedure. Use SQL Server Agent or a different tool to schedule that procedure to run every day, iterating over every temporal table for which you want to limit data history.
The following diagram illustrates how to organize your cleanup logic for a single table to reduce the effect on the running workloads.

Here are some high-level guidelines for implementing the process:
Delete historical data in every temporal table in several iterations of small chunks. Start from the oldest rows and move to the most recent. Avoid deleting all rows in a single transaction, as the previous diagram shows. While no single chunk size works for all scenarios, deleting more than 10,000 rows in a single transaction might impose a significant penalty.
Implement every iteration as an invocation of a generic stored procedure, which removes a portion of data from the history table.
Calculate how many rows you need to delete for an individual temporal table every time you invoke the process. Based on the result and the number of iterations you want, determine dynamic split points for every procedure invocation.
Plan a delay between iterations for a single table, to reduce the effect on applications that access the temporal table.
The following stored procedure deletes the data for a single temporal table. It discovers the history table and the end of period column from the catalog views, and then runs three statements inside a transaction: SET SYSTEM_VERSIONING = OFF, DELETE FROM <history_table>, and SET SYSTEM_VERSIONING = ON. Review this code carefully, and adjust it before you apply it in your environment.
In SQL Server 2016 (13.x), the first two steps must run in separate EXECUTE statements, or SQL Server generates an error similar to the following example:
Msg 13560, Level 16, State 1, Line XXX
Cannot delete rows from a temporal history table '<database_name>.<history_table_schema_name>.<history_table_name>'.
DROP PROCEDURE IF EXISTS usp_CleanupHistoryData;
GO

CREATE PROCEDURE usp_CleanupHistoryData (
    @temporalTableSchema SYSNAME,
    @temporalTableName SYSNAME,
    @cleanupOlderThanDate DATETIME2
)
AS
DECLARE @disableVersioningScript AS NVARCHAR (MAX) = '';
DECLARE @deleteHistoryDataScript AS NVARCHAR (MAX) = '';
DECLARE @enableVersioningScript AS NVARCHAR (MAX) = '';
DECLARE @historyTableName AS SYSNAME;
DECLARE @historyTableSchema AS SYSNAME;
DECLARE @periodColumnName AS SYSNAME;

/* Generate script to discover history table name and
end of period column for given temporal table name */
EXECUTE sp_executesql N'
    SELECT @hst_tbl_nm = t2.name,
           @hst_sch_nm = s2.name,
           @period_col_nm = c.name
    FROM sys.tables AS t1
         INNER JOIN sys.tables AS t2
             ON t1.history_table_id = t2.object_id
         INNER JOIN sys.schemas AS s1
             ON t1.schema_id = s1.schema_id
         INNER JOIN sys.schemas AS s2
             ON t2.schema_id = s2.schema_id
         INNER JOIN sys.periods AS p
             ON p.object_id = t1.object_id
         INNER JOIN sys.columns AS c
             ON p.end_column_id = c.column_id
            AND c.object_id = t1.object_id
    WHERE t1.name = @tblName
          AND s1.name = @schName',
    N'@tblName sysname,
    @schName sysname,
    @hst_tbl_nm sysname OUTPUT,
    @hst_sch_nm sysname OUTPUT,
    @period_col_nm sysname OUTPUT',
@tblName = @temporalTableName,
@schName = @temporalTableSchema,
@hst_tbl_nm = @historyTableName OUTPUT,
@hst_sch_nm = @historyTableSchema OUTPUT,
@period_col_nm = @periodColumnName OUTPUT;

IF @historyTableName IS NULL
   OR @historyTableSchema IS NULL
   OR @periodColumnName IS NULL
    THROW 50010, 'History table cannot be found. Either specified table is not system-versioned temporal or you have provided incorrect argument values.', 1;

SET @disableVersioningScript = @disableVersioningScript +
    'ALTER TABLE [' + @temporalTableSchema + '].[' + @temporalTableName + ']
    SET (SYSTEM_VERSIONING = OFF)';

SET @deleteHistoryDataScript = @deleteHistoryDataScript +
    ' DELETE FROM [' + @historyTableSchema + '].[' + @historyTableName + ']
    WHERE [' + @periodColumnName + '] < ' + '''' +
    CONVERT (VARCHAR (128), @cleanupOlderThanDate, 126) + '''';

SET @enableVersioningScript = @enableVersioningScript +
    ' ALTER TABLE [' + @temporalTableSchema + '].[' + @temporalTableName + ']
    SET (SYSTEM_VERSIONING = ON (HISTORY_TABLE = [' + @historyTableSchema + '].[' +
    @historyTableName + '], DATA_CONSISTENCY_CHECK = OFF )); ';

BEGIN TRANSACTION;
    EXECUTE (@disableVersioningScript);
    EXECUTE (@deleteHistoryDataScript);
    EXECUTE (@enableVersioningScript);
COMMIT TRANSACTION;
Related content
- Temporal tables
- Get started with system-versioned temporal tables
- Temporal table system consistency checks
- Partition with temporal tables
- Temporal table considerations and limitations
- Temporal table security
- System-versioned temporal tables with memory-optimized tables
- Temporal table metadata views and functions