Note
Access to this page requires authorization. You can try signing in or changing directories.
Access to this page requires authorization. You can try changing directories.
In this quickstart, you create a Stream Analytics job by using Azure Stream Analytics tools for Visual Studio. The example job reads streaming data from an IoT hub device. You define a job that calculates the average temperature when the value is over 27° and writes the resulting output events to a new file in blob storage.
Prerequisites
Before you begin, make sure that you have the following prerequisites in place.
Note
For the best local development experience, use Stream Analytics tools for Visual Studio Code. Stream Analytics tools for Visual Studio 2019 (version 2.6.3000.0) has known feature gaps and doesn't get further improvements. Visual Studio and Visual Studio Code tools don't support jobs in the China East, China North, Germany Central, and Germany NorthEast regions.
An Azure account with an active subscription. If you don't have an Azure subscription, create a free account.
Visual Studio 2019. The Enterprise (Ultimate/Premium), Professional, and Community editions work, but the Express edition doesn't.
Stream Analytics tools for Visual Studio installed.
Prepare the input data
Before you define the Stream Analytics job, prepare the data that you later configure as the job input. To prepare the input data, complete the following steps:
Sign in to the Azure portal.
Select Create a resource > Internet of Things > IoT Hub.
In the IoT Hub pane, enter the following information:
Setting Suggested value Description Subscription <Your subscription> Select the Azure subscription that you want to use. Resource group asaquickstart-resourcegroup Select Create New and enter a new resource-group name for your account. IoT Hub Name MyASAIoTHub Select a name for your IoT hub. Region <Select the region that's closest to your users> Select a geographic location where you can host your IoT hub. Use the location that's closest to your users. Tier Free For this quickstart, select Free if it's still available on your subscription. If the free tier is unavailable, choose the lowest tier available. For more information, see IoT Hub pricing. 
Select Review + create. Review your IoT hub information and select Create. Your IoT hub might take a few minutes to create. Monitor the progress in the Notifications pane.
After the deployment completes, select Go to resource to navigate to the IoT hub page for your IoT hub.
On the IoT Hub page, select Devices under Device management on the left navigation menu.
On the Devices page, select + Add device on the toolbar.

On the Create a device page, enter a name for the device, and select Save.

After you create the device, open it from the IoT devices list. If you don't see the device yet, refresh the page.

Copy the Primary connection string and save it to a notepad to use later.

Create blob storage
In this section, you create an Azure Storage account and a blob container to store the output events from your job.
From the upper-left corner of the Azure portal, select Create a resource > Storage > Storage account.
In the Create storage account pane, enter a storage account name, location, and resource group. Choose the same location and resource group as the IoT Hub you created. Then select Review + create to create the account.

After you create your storage account, select the Blob service tile on the Overview pane.

On the Blob service page, select + Container on the toolbar.
On the New container page, enter a name for your container, such as container1. Leave the Public access level as Private (no anonymous access) and select Create.

Create a Stream Analytics project
Create a Stream Analytics project in Visual Studio to define the job's inputs, outputs, and query.
Start Visual Studio.
Select File > New Project.
In the templates list, select Stream Analytics, and then select Azure Stream Analytics Application.
Enter the project Name, Location, and Solution name, and select Create.

Notice the elements in an Azure Stream Analytics project.
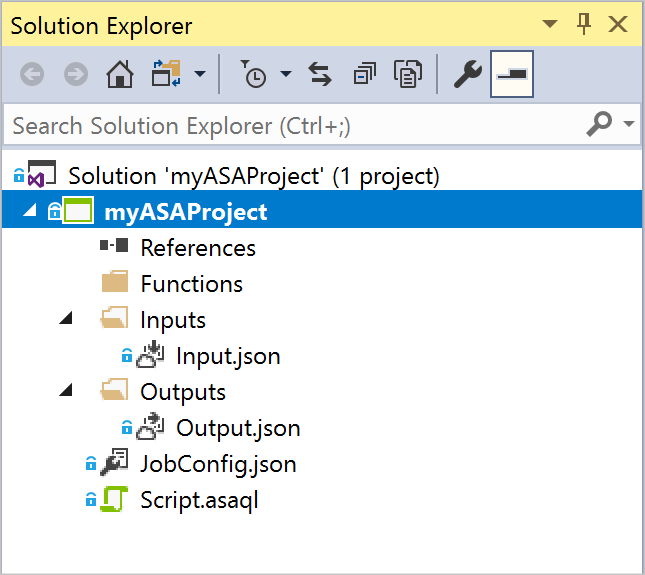
Choose the required subscription
Connect Visual Studio to the Azure subscription that contains the resources you created.
- In Visual Studio, on the View menu, select Server Explorer.
- Select and hold (or right-click) Azure, select Connect to Microsoft Azure Subscription, and then sign in with your Azure account.
Define input
Configure the job input to read streaming data from the IoT hub you created.
In Solution Explorer, expand the Inputs node and open Input.json.
Fill out the Stream Analytics Input Configuration with the following values:
Setting Suggested value Description Input Alias Input Enter a name to identify the job's input. Source Type Data Stream Choose the appropriate input source: Data Stream or Reference Data. Source IoT Hub Choose the appropriate input source. Resource Choose data source from current account Choose to enter data manually or select an existing account. Subscription <Your subscription> Select the Azure subscription that has the IoT hub you created. IoT Hub MyASAIoTHub Choose or enter the name of your IoT hub. IoT hub names appear automatically if you create them in the same subscription. Leave other options to default values and select Save to save the settings.

Define output
Configure the job output to write the results to your blob storage container.
In Solution Explorer, expand the Outputs node and open Output.json.
Fill out the Stream Analytics Output Configuration with the following values:
Setting Suggested value Description Output Alias Output Enter a name to identify the job's output. Sink Data Lake Storage Gen 2/Blob Storage Choose the appropriate sink. Resource Provide data source settings manually Choose to enter data manually or select an existing account. Subscription <Your subscription> Select the Azure subscription that has the storage account you created. The storage account can be in the same or in a different subscription. This example assumes that you created a storage account in the same subscription. Storage Account asaquickstartstorage Choose or enter the name of the storage account. Storage account names appear automatically if you create them in the same subscription. Container container1 Select the existing container that you created in your storage account. Path Pattern output Enter the name of a file path to create within the container. Leave other options to default values and select Save to save the settings.
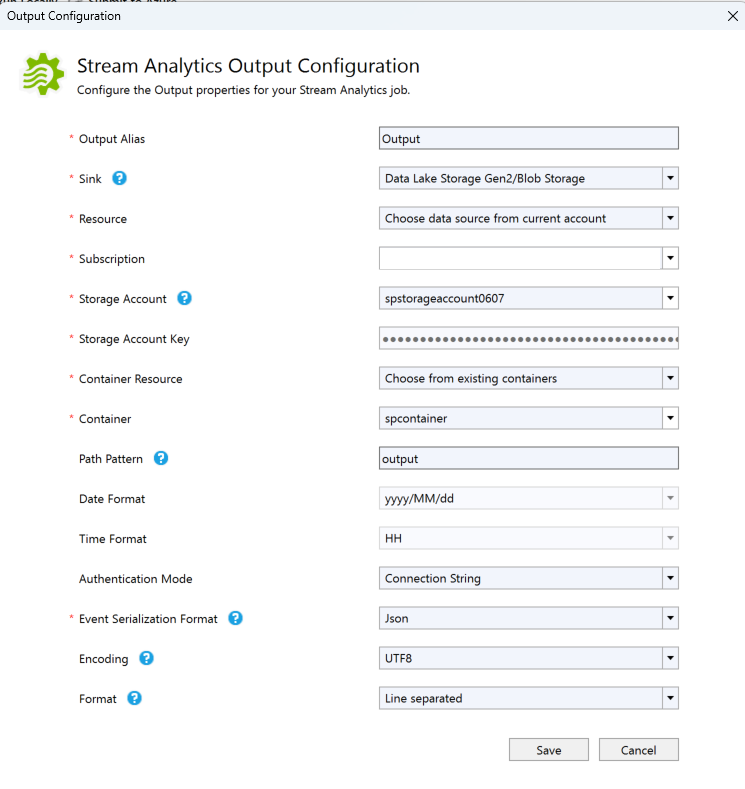
Define the transformation query
Define a query that filters the streaming data and sends the results to the output.
Open Script.asaql from Solution Explorer in Visual Studio.
Add the following query:
SELECT *
INTO Output
FROM Input
WHERE Temperature > 27
Submit a Stream Analytics query to Azure
Submit the query to Azure to create the Stream Analytics job.
In the Query Editor, select Submit To Azure in the script editor.
In the Submit Job window, select Create a New Azure Stream Analytics job.
Enter a Job Name.
Choose the Azure Subscription.
Choose the Resource Group.
Keep the default value for Cluster.
Select the Location you used at the beginning of the quickstart.
Select Submit.

Run the IoT simulator
Run the Raspberry Pi simulator to send sample sensor data to your IoT hub.
Open the Raspberry Pi Azure IoT Online Simulator in a new browser tab or window.
Replace the placeholder in line 15 with the Azure IoT Hub device connection string you saved in a previous section.
Select Run. The output should show the sensor data and messages sent to your IoT hub.

Start the Stream Analytics job and check output
Start the job and verify that it processes input events and writes output to blob storage.
When you create your job, the job view opens automatically. Select the green arrow button to start the job.

Change the Job output start mode to JobStartTime and select Start.

The job status changes to Running, and input and output events appear. This change might take a few minutes. Select the Refresh button on the toolbar to refresh metrics.

To view results, on the View menu, select Cloud Explorer, and go to the storage account in your resource group. Under Blob Containers, open container1, and then the output file path.


Clean up resources
When you no longer need them, delete the resource group, the streaming job, and all related resources. Deleting the job stops billing for the streaming units it consumes. If you plan to use the job in the future, stop it and restart it later when you need it. If you don't plan to use this job again, use the following steps to delete all resources that this quickstart created:
- From the left menu in the Azure portal, select Resource groups, and then select the name of the resource you created.
- On your resource group page, select Delete, type the name of the resource to delete in the text box, and then select Delete.