Note
Access to this page requires authorization. You can try signing in or changing directories.
Access to this page requires authorization. You can try changing directories.
Copilot Autofix is an AI-powered feature of GitHub Advanced Security for Azure DevOps that generates suggested fixes for code scanning alerts. When CodeQL identifies a vulnerability or coding error, you can generate a fix for the alert directly from the Advanced Security tab. Copilot Autofix uses the Copilot coding agent to produce the fix and opens a pull request with the proposed change, so you can review, edit, and merge it through your normal pull request workflow.
Note
This feature is in limited public preview. Microsoft isn't currently accepting additional users for the preview.
Functionality might change or be removed without notice. Preview features have no Service Level Agreement (SLA) and limited support.
GitHub Advanced Security for Azure DevOps works with Azure Repos. To use GitHub Advanced Security with GitHub repositories, see GitHub Advanced Security.
Prerequisites
| Category | Requirements |
|---|---|
| Permissions | - To view a summary of all alerts for a repository: Contributor permissions for the repository. - To dismiss alerts in Advanced Security: Project administrator permissions. - To manage permissions in Advanced Security: Member of the Project Collection Administrators group or Advanced Security: manage settings permission set to Allow. |
For more information about Advanced Security permissions, see Manage Advanced Security permissions.
- Code scanning configured for your repository, using either default setup or advanced setup.
- At least one CodeQL code scanning alert.
About Copilot Autofix
Copilot Autofix combines the analysis power of CodeQL with the large language model that powers the Copilot coding agent. When you generate a fix for a supported code scanning alert, Copilot Autofix analyzes the alert and the surrounding code, then opens a pull request that contains:
- A suggested code change that addresses the underlying vulnerability.
- A description of the alert being fixed, including the alert ID, severity, and a summary of the change.
Because the suggested fix considers the broader context of your code base, the change can span more than the single line where the alert was raised, and can include changes to other files where needed.
Note
Data handled by Copilot Autofix isn't used to train large language models (LLMs).
Important
Copilot Autofix suggestions are generated by an AI model and aren't guaranteed to be correct, complete, or secure. Always review the pull request carefully, validate that it resolves the alert without introducing new issues, and test your changes before you merge them.
Supported languages
Copilot Autofix supports the same languages that CodeQL analyzes for code scanning, including C/C++, C#, Go, Java/Kotlin, JavaScript/TypeScript, Python, Ruby, and Swift. For the current list of CodeQL-supported languages, see Language and query support.
Billing
Copilot Autofix is included with your GitHub Advanced Security for Azure DevOps license. Generating a fix consumes AI credits from your organization's Azure billing meter.
Each fix generation consumes tokens, which include input tokens for the code context sent to the model, output tokens for the suggested change, and cached tokens that reuse existing context.
To keep billing simple, these tokens are converted into a standard unit called a GitHub AI credit, where 1 credit equals $0.01 USD. The charges are billed to the Azure subscription linked to your Azure DevOps organization and appear as a separate meter in Azure Cost Management.
The cost of each fix varies with the size of the surrounding code context and the complexity of the change.
To monitor your daily charges, go to Subscription > Cost Management > Cost analysis in the Azure portal.
Enable Copilot Autofix
You can enable Copilot Autofix at the organization, project, or repository level. When you enable Autofix at a broader scope, the setting applies to all repositories within that scope. Choose where to configure Autofix based on the repositories you want the setting to apply to:
| Scope | Where to configure Autofix |
|---|---|
| Organization | Select Organization settings > Repositories to enable Autofix for all repositories in the organization. |
| Project | Select Project settings > Repositories > All Repositories to enable Autofix for all repositories in the project. |
| Repository | Select Project settings > Repositories, and then select a repository to enable Autofix for only that repository. |
To enable Copilot Autofix:
- Sign in to your Azure DevOps organization (
https://dev.azure.com/{yourorganization}). - Go to the settings page for the organization, project, or repository scope that you want to configure.
- In the Advanced Security section, open the Code Security features panel.
- Select the Autofix for code scanning alerts checkbox to create automatic fixes for code scanning alerts, generated by the Copilot coding agent.
- Select Apply to save your changes.

CodeQL must already be running and generating alerts for the repository. For more information, see Set up code scanning and Configure GitHub Advanced Security features.
Generate a fix for an alert
After you enable Copilot Autofix, you can generate a fix from any supported code scanning alert.
- Select Repos > Advanced Security.
- Select the Code scanning tab, and then select an alert to open its detail view.
- Review the alert's Location, Description, and Recommendation to understand the finding.
- Select Generate fix.

While Copilot Autofix works on the fix, the alert detail view shows that the fix is in progress. Copilot Autofix opens a pull request when the fix is ready.

Copilot Autofix generates the fix and opens a pull request from a branch named copilot-autofix/.... The pull request is labeled with a Copilot Autofix tag, which you can use to identify Autofix pull requests in the pull requests list.
For CodeQL alerts, the pull request appears automatically under Related pull requests on the alert detail view and continues to update as generation and completion progress, so you don't need to refresh the page.

If Copilot Autofix doesn't produce any code changes for the alert, it doesn't create a branch or a pull request, and it doesn't link a pull request on the alert detail view. In this case, remediate the alert manually. For more information, see Fix isn't available.
Review and merge the fix
The pull request that Copilot Autofix opens behaves like any other Azure Repos pull request. Its description summarizes the alert that the fix addresses.

The Copilot Autofix label identifies autofix pull requests.
- Open the pull request from the alert's Related pull requests section, or from Repos > Pull requests.
- Review the proposed change in the Files tab across all affected files.
- Edit the change if you need to match your code style, naming conventions, or project requirements.
- Approve and complete the pull request through your normal review workflow.
After the pull request merges and the next code scanning run completes, the alert closes automatically if the fix removes the underlying vulnerability.
Tip
A generated fix is a starting point, not a final answer. Treat the pull request like any other change: review it, test it, and request additional reviewers as needed before you merge.
Troubleshoot Copilot Autofix
A fix was generated but couldn't be committed or pushed
Copilot Autofix uses noreply@dev.azure.com as the commit author email. If a commit author email validation policy doesn't allow this address, Copilot Autofix can generate the code change but can't commit or push it to create the pull request.
The alert detail view shows an error that identifies the blocked commit author email.
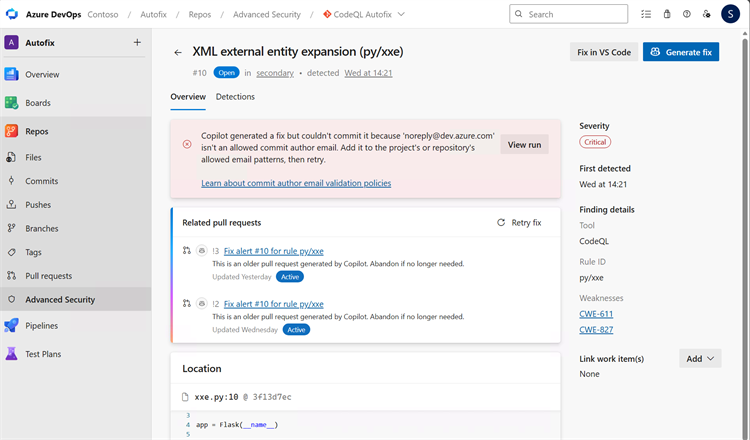
Add noreply@dev.azure.com to the allowed email patterns in the commit author email validation policy:
- Select Project settings > Repositories.
- Select All Repositories to update the project-level policy, or select the repository that has the policy.
- Select Policies.
- Under Repository Policies, find Commit author email validation.
- Add
noreply@dev.azure.comto the allowed email patterns. - Return to the code scanning alert and select Retry fix.

A run fails
If a Copilot Autofix run can't complete, the alert shows a prominent failure state so you can quickly see that the run didn't succeed. From the failure state, you can retry the run to generate a new fix.

A run can fail for transient reasons, or when the run doesn't produce a usable code change. Retry the run to generate the fix again.
Fix isn't available
Copilot Autofix can't generate a fix for every alert. A fix might not be available when:
- The alert type isn't currently supported by Copilot Autofix.
- Copilot determines that the alert could be a false positive.
- A custom query or a third-party tool, rather than CodeQL, generates the alert.
- Copilot Autofix runs but doesn't produce any code changes. In this case, no branch or pull request is created.
If Copilot Autofix determines that the alert could be a false positive and doesn't produce any changes, the alert detail view shows the result. You can review the run or retry the fix.

When a fix isn't available, use the Recommendation and Example sections of the alert to remediate it or dismiss the alert manually. For more information, see Alert details.