Note
Access to this page requires authorization. You can try signing in or changing directories.
Access to this page requires authorization. You can try changing directories.
This article shows you how to migrate on-premises VMware or Azure VMware Solution (AVS) VMs to Azure, using the Migration and modernization tool, with agentless migration. You can also migrate VMware VMs using agent-based migration. Compare the methods.
Note
Tutorials show you the simplest deployment path for a scenario so that you can quickly set up a proof-of-concept. Tutorials use default options where possible, and don't show all possible settings and paths.
In this tutorial, you learn how to:
- Ensure the prerequisites for agentless migration execution are met, including appliance setup, discovery and required permissions.
- Start migration Execution.
- Track and monitor migrations.
- Run a test migration to make sure everything's working as expected.
- Run a full VM migration.
If you don't have an Azure subscription, create a free account before you begin.
Prerequisites
Before you begin this tutorial, you should:
- Complete the first tutorial to prepare Azure and VMware for migration.
- We recommend that you complete the second tutorial to assess VMware VMs before migrating them to Azure, but you don't have to.
- Go to the already created project or create a new project
- Verify permissions for your Azure account - Your Azure account needs permissions to create a VM, and write to an Azure managed disk.
- For the required Azure Migrate built‑in roles and permission details to create a project and run discovery, assessments, and migrations, see Prepare Azure accounts for Azure Migrate.
Note
If you're planning to upgrade your Windows operating system, Azure Migrate may download the Windows SetupDiag for error details in case upgrade fails. Ensure the VM created in Azure post the migration has access to SetupDiag. In case there's no access to SetupDiag, you may not be able to get detailed OS upgrade failure error codes but the upgrade can still proceed.
Set up the Azure Migrate appliance
The Migration and modernization tool runs a lightweight VMware VM appliance that's used for discovery, assessment, and agentless migration of VMware VMs. If you follow the assessment tutorial, you've already set up the appliance. If you didn't, set it up now, using one of these methods:
- OVA template: Set up on a VMware VM using a downloaded OVA template.
- Script: Set up on a VMware VM or physical machine, using a PowerShell installer script. This method should be used if you can't set up a VM using an OVA template, or if you're in Azure Government.
After creating the appliance, you check that it can connect to Azure Migrate: Server Assessment, configure it for the first time, and register it with the Azure Migrate project.
Execute migrations
After setting up the appliance and completing discovery, you can begin replication of VMware VMs to Azure.
- You can run up to 500 replications simultaneously.
- In the portal, you can select up to 10 VMs at once for migration. To migrate more machines, add them to groups in batches of 10.
Note
Azure Migrate doesn't support agentless migration of VMware VMs with VMDK containing non-ASCII characters.
Enable replication as follows:
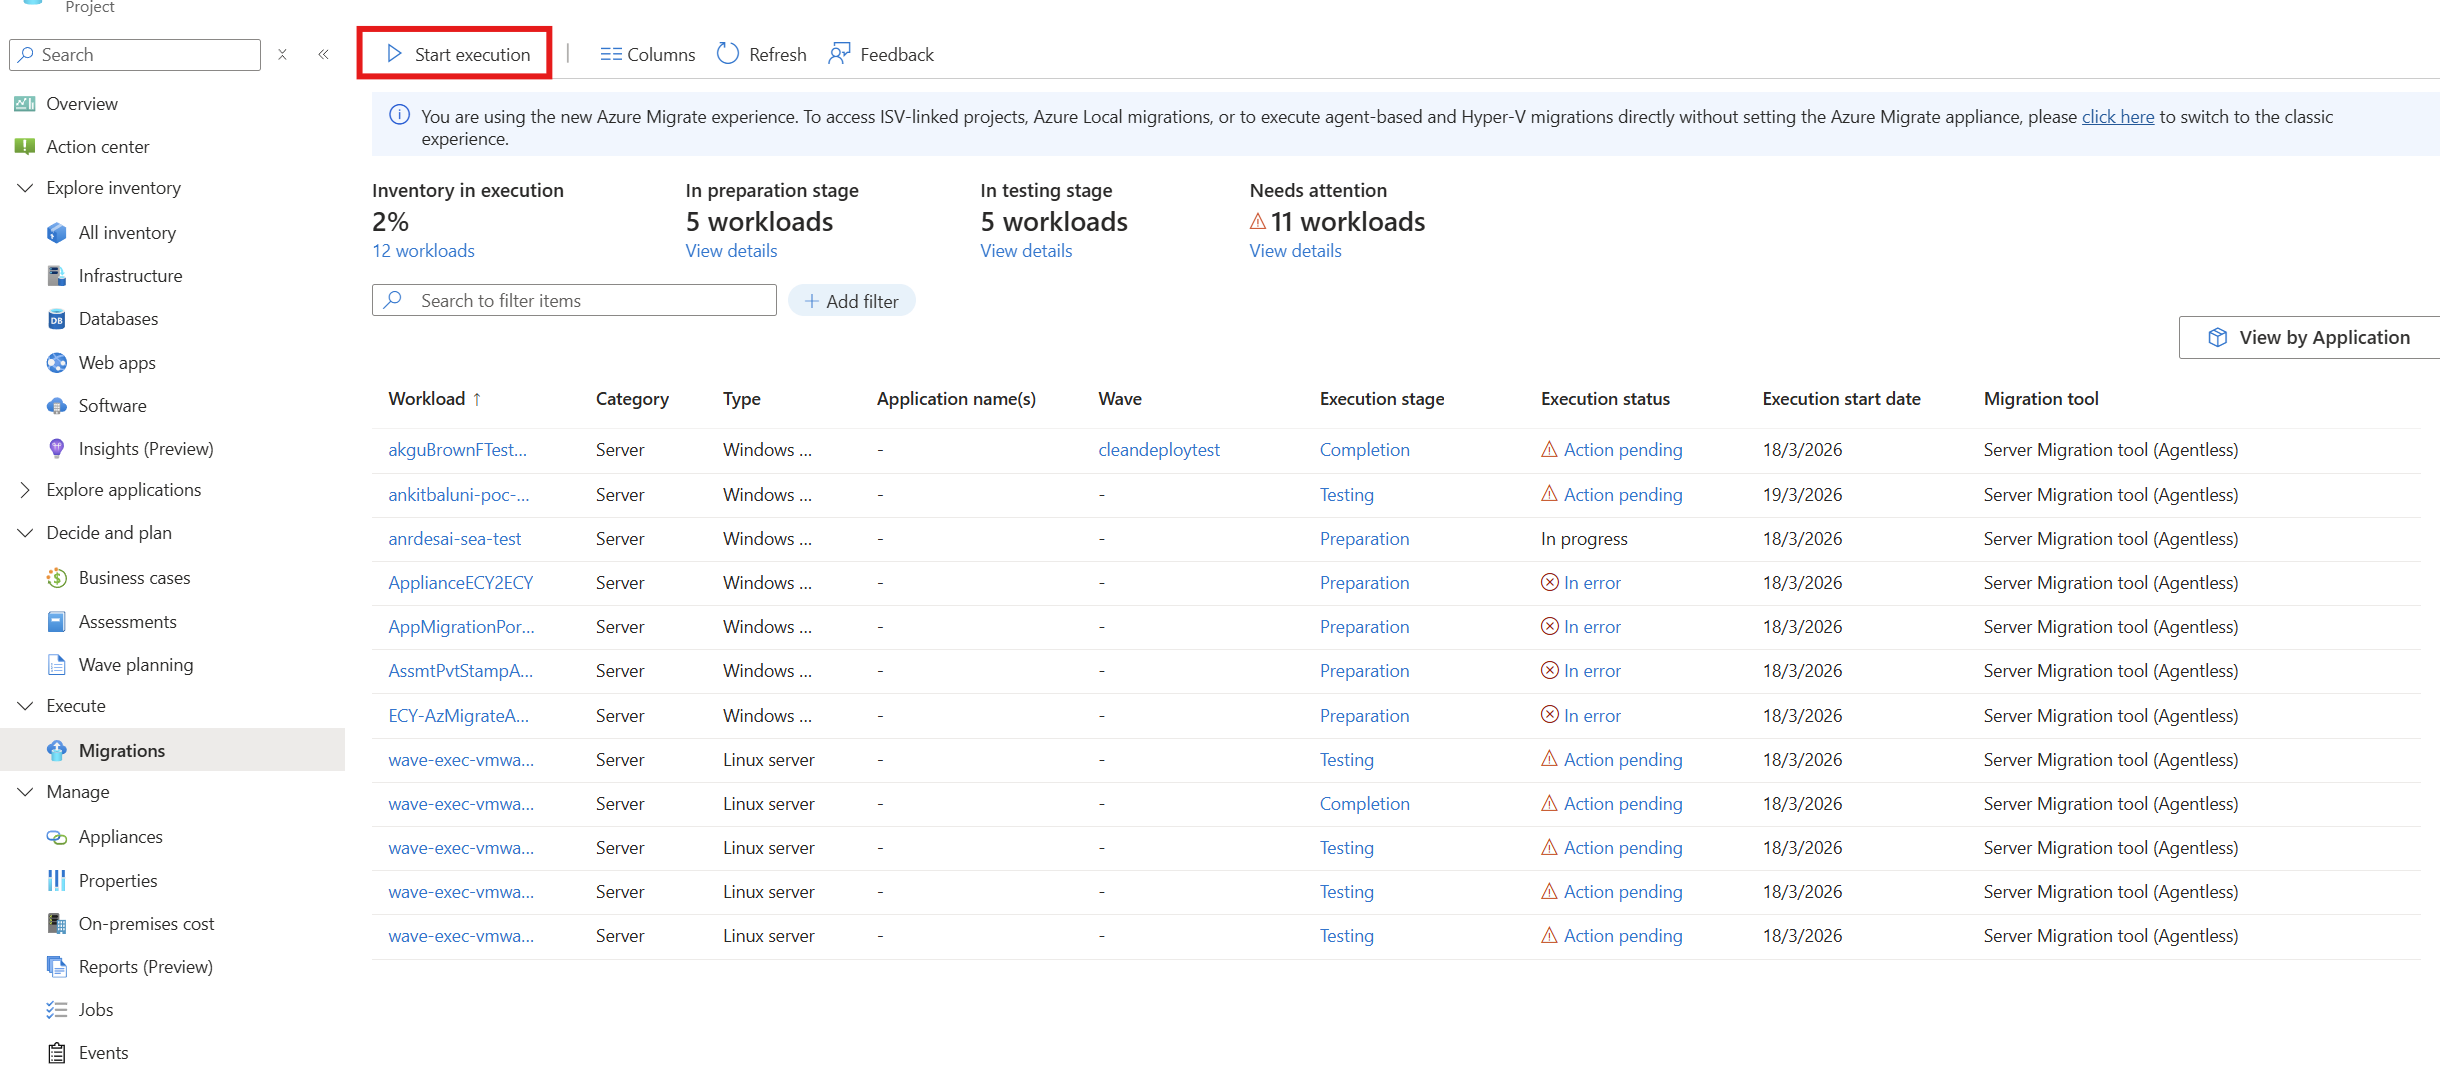
In the Azure Migrate project > Execute > Migration, select Start execution.
In Specify intent, > What do you want to migrate, select Servers or Virtual Machines(VM). Under Where do you want to migrate to, select Azure VM.
In How will you select workloads, select one of the following options under Azure migrate appliance sources,
- From all inventory to manually select servers
- From an assessment to use an existing assessment
In Discovery method, select the appliance that matches your source environment (VMware vSphere in this case). Under Migration mode, select Agentless migration.

In Workloads,
- Select the Target VM security type.
- Azure Migrate supports migration to Trusted Launch Virtual Machines (TVMs). By default, it migrates eligible VMs as TVMs. These VMs provide enhanced security features such as secure boot and virtual TPM at no extra cost.
- You can also migrate eligible machines to Confidential virtual machines (Preview) Learn more. If you select Confidential virtual machines, only eligible servers are available for selection and the rest are greyed out.
- Then, select the machines you want to replicate and migrate and click Next.
- Select the Target VM security type.
In Target settings, select the subscription, target region, and Storage account.
- Storage account: Keep the default option to use the cache storage account that the portal automatically creates for the project. To use a different storage account for replication, select it from the drop-down list.
Note
- If you use private endpoint as the connectivity method for the Azure Migrate project, grant the Recovery Services vault access to the cache storage account. Learn more
- To replicate by using ExpressRoute with private peering, create a private endpoint for the cache storage account. Learn more
- After you start the first replication of a VM, the target region and storage account can't be changed. The default option selected in the drop-down list is used to create a new storage account. If no option is selected, the storage account is created in the final step of enabling replication.
Azure Hybrid Benefit: Apply Azure Hybrid Benefit and save up to 76% compared to pay-as-you-go costs by using an eligible Windows Server and or Enterprise Linux license. Select Check boxes applicable to your license (Windows Server license or Enterprise Linux license).
Virtual network: Select the Azure virtual network and subnet that the Azure VMs join after migration.
Availability options: Select one of the following options:
- Availability Zone – Pins the migrated machine to a specific Availability Zone in the region. Use this option to distribute machines that are part of a multinode application tier across Availability Zones. If you select this option, specify the Availability Zone for each selected machine on the Compute tab. This option is available only if the selected target region supports Availability Zones.
- Availability Set – Places the migrated machine in an Availability Set. The selected target resource group must contain one or more availability sets.
- No infrastructure redundancy required– Select this option if you don't require Availability Zones or Availability Sets for the migrated machines.
In Security Details,
If the selected target security type is Standard or Trusted Launch virtual machines:
- Secure boot is enabled by default (recommended). You can choose to remove this option. Then, proceed to Disk encryption type selection.
If the selected target security type is Confidential virtual machines:
- You can optionally choose to confidentially encrypt the OS disks. This encryption provides an additional layer of encryption that binds the disk encryption keys to the virtual machine's TPM and makes the disk content accessible only to the VM.
- To enable this encryption, select the Confidential compute encryption option and proceed to OS disk encryption type selection. Otherwise, proceed to Disk encryption type selection.
- Under OS disk encryption type, select one of the following options:
- Encryption at rest with platform-managed key (default, if you didn't select Confidential compute encryption)
- Confidential encryption with platform-managed key (available, if you selected Confidential compute encryption)
- Confidential encryption with customer-managed key (available, if you selected Confidential compute encryption)
Note
Confidential OS Disk encryption isn't supported for RHEL and Rocky Linux VMs. If OS disk encryption is required, remove these VMs from the selection.
Disk encryption type, select:
- Encryption-at-rest with platform-managed key
- Encryption-at-rest with customer-managed key
- Double encryption with platform-managed and customer-managed keys
Note
- To replicate VMs with customer-managed keys (CMK), create a disk encryption set under the target resource group. A disk encryption set object maps managed disks to a Key Vault that contains the CMK to use for SSE.
- The seed disk is created in Azure during replication/staging before cutover. Encrypting it protects data right from the first write while it resides in Azure. The Disk encryption type setting applies to both seed disks and the managed disks after final migration.
In Compute, review the VM name, size, OS disk type, and availability configuration (if selected in the previous step). Ensure that the VMs conform to Azure requirements.
- VM size: If you're using assessment recommendations, the VM size dropdown shows the recommended size. Otherwise, Azure Migrate picks a size based on the closest match in the Azure subscription. Alternatively, pick a manual size in Azure VM size.
- OS disk: Specify the OS (boot) disk for the VM. The OS disk is the disk that has the operating system bootloader and installer.
- Availability Zone: Specify the Availability Zone to use.
- Availability Set: Specify the Availability Set to use.
- Capacity reservation: If you already have a capacity reservation for the VM SKU in the target subscription and location, specify it here for this deployment. Capacity reservations ensure that the required VM SKU is available when you start migration. You can associate a reservation now or skip this step and configure it later during the migration. The capacity reservation for the SKU can be in any resource group within the target subscription and location.Learn more.
Note
If you want to select a different availability option for a set of virtual machines, go to step 1 and repeat the steps by selecting different availability options after starting replication for one set of virtual machines.
In Disks, specify whether the VM disks should be replicated to Azure, and select the disk type (Premium SSD v2, Ultra Disk, Standard SSD, Standard HDD, or Premium SSD) for the replicated disks. Then, select Next.
Note
To optimize costs and enhance performance, you can now migrate to Premium SSD v2 as data disk.
In Tags, choose to add tags to your Virtual machines, Disks, and NICs.
In Review and start execution, review the settings, and then select Review and start execution to start the initial replication for the servers.


Note
If Azure connectivity is disrupted or apppliance services are unavailable for more than 90 minutes, replication cycles resets from 0%.
Track migrations
In Azure Migrate project, go to Execute > Migrations. Use View by applications or View by workloads to switch how items are grouped.

Replication occurs as follows:
- When the Start Replication job finishes successfully, the machines begin their initial replication to Azure.
- During initial replication, a VM snapshot is created. Disk data from the snapshot is replicated to replica managed disks (seed disks) in Azure.
- After initial replication finishes, delta replication begins. Incremental changes to the source disks are periodically replicated to the replica disks in Azure and the VM is ready for migration in delta replication.
Execution progress is shown in Execution stage and Execution status:
- Execution stage: Preparation, Testing, or Completion.
- Execution status: In progress, In error, Action pending, or Completed.
Execution progress is tracked across three stages in the Execution stage:
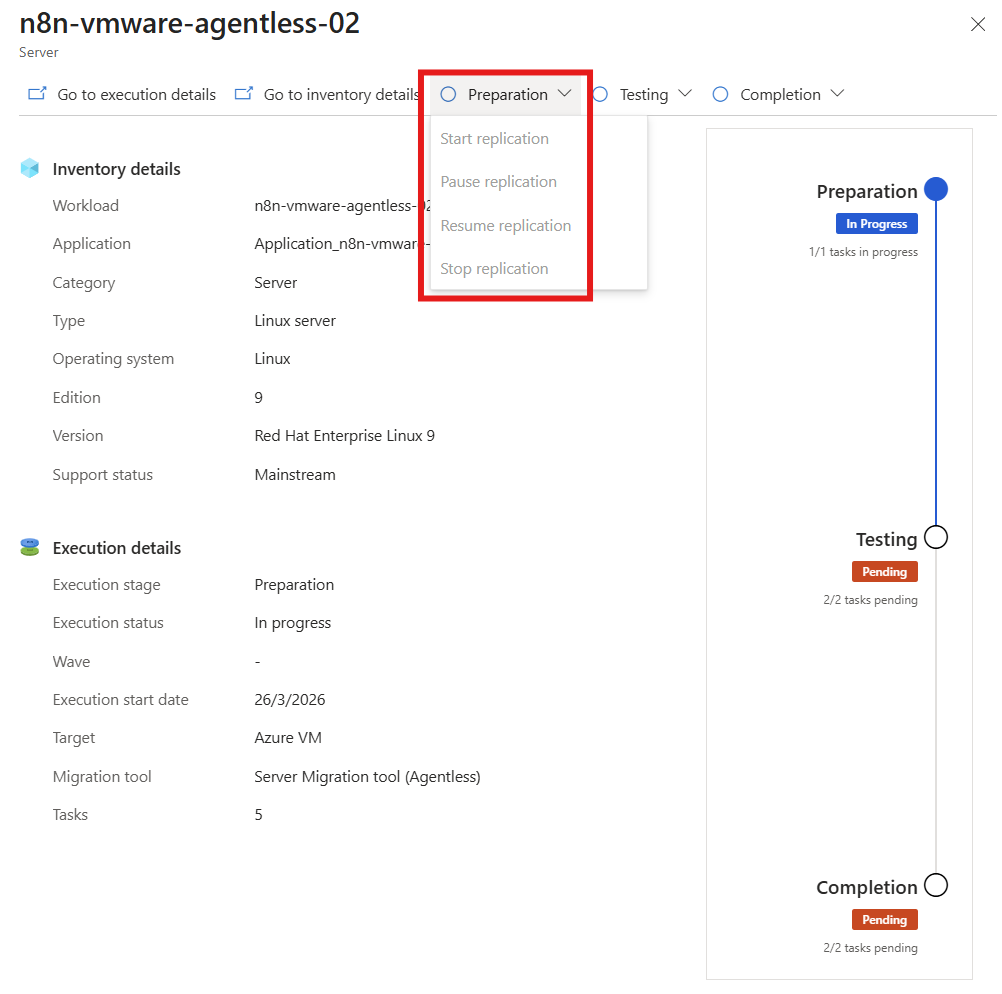
Preparation:
- Servers that are enabled for replication remain in the Preparation stage while initial replication (data replication) is in progress.
- You can perform Stop replication and Start replication operations in this stage if required by using the drop-downs available in the server drill-down blade.
- After initial replication is complete, the servers move to the Testing stage.
Testing:
- Servers for which initial replication is complete and delta replication is in progress move to the Testing phase.
- You can choose to perform test migrations on a test virtual network before the actual migration (recommended).
- You can skip the Testing stage and start migration directly by using the actions available in the Completion drop-down menu.
Completion:
- Servers for which test migrations are completed or skipped move to this stage. You can perform final migrations (Cutover) for these servers.
- After migration is completed, perform Complete migration to clean up the migration resources by using the drop-downs available in the server drill-down blade.


Monitor and expedite migrations
Use PowerShell to view Time Remaining across all stages of server migration in Azure Migrate. This helps you monitor replication progress and plan cutover accurately. You can use PowerShell, Windows PowerShell, or Cloud Shell on Azure portal.
Open the Azure portal, and then select the Cloud Shell at the top. Select PowerShell when prompted.
Run this command in Azure Cloud Shell to monitor the migration status of the server you need.
Get-AzMigrateServerMigrationStatus -ProjectName "<your-project-name>" -ResourceGroupName "<your-resource-group>" -MachineName "<your-server-name>"Replace
your-project-name,your-resource-group, andyour-server-namewith the actual Azure Migrate project, resource group, and server name.You run this command and get the following output:
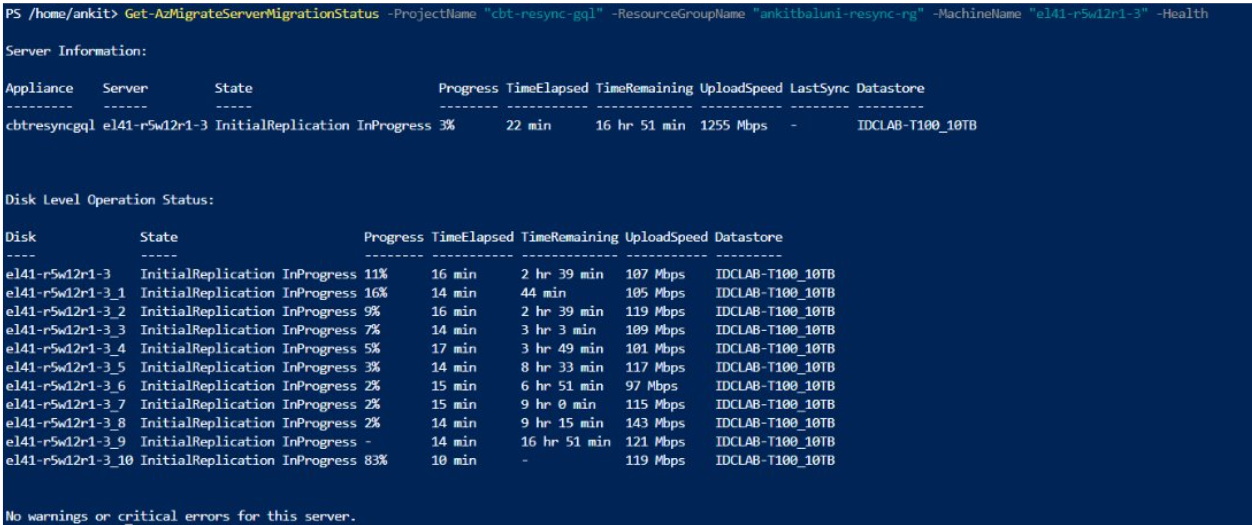
The output shows the server replication status, disk progress, time left, upload speed, and datastore details.
Run the command with the
Expediteflag. This retrieves appliance operating parameters and a prioritized list of recommended actions to help reduce the remaining migration time for the specified server.Get-AzMigrateServerMigrationStatus -ProjectName "<your-project-name>" -ResourceGroupName "<your-resource-group>" -MachineName "<your-server-name>" -ExpediteYou get the following output:


You can run the command without
-MachineNameto view migration status and time remaining for all servers in the project. For example:Get-AzMigrateServerMigrationStatus -ProjectName "<your-project-name>" -ResourceGroupName "<your-resource-group>"Replace
your-project-nameandyour-resource-groupwith the actual Azure Migrate project and resource group names.You run this command and get the following output:

If there's a problem with replication or cutover, the
-Healthflag shows errors, possible causes, and recommended actions to troubleshoot the migration.

Get-AzMigrateServerMigrationStatus -ProjectName "<your-project-name>" -ResourceGroupName "<your-resource-group>" - MachineName "<your-server-name>" -Health
- You run this command and get the following output:

- To view the migration status, time remaining, and health details for all servers connected to that appliance, run the command with only
-ApplianceName.
Get-AzMigrateServerMigrationStatus -ProjectName "<your-project-name>" -ResourceGroupName "<your-resource-group>" - ApplianceName "<your-appliance-
Replace
your-project-name,your-resource-group, andyour-appliance-namewith the actual values from your Azure Migrate setup.Run this command to get the following output:

Note
You can run the above commands in Azure Cloud Shell. You can also use PowerShell or Windows PowerShell on any Windows machine. A machine refers to any Windows PC, not an appliance, or server, as long as it has access to the Azure Migrate project.
Run a test migration
When delta replication begins, you can run a test migration for the VMs, before running a full migration to Azure. We highly recommend that you do this at least once for each machine, before you migrate it.
- Running a test migration checks that migration works as expected, without impacting the source (on-premises or AVS) machines, which remain operational, and continue replicating.
- Test migration simulates the migration by creating an Azure VM using replicated data (usually migrating to a non-production VNet in your Azure subscription).
- You can use the replicated test Azure VM to validate the migration, perform app testing, and address any issues before full migration.
Do a test migration as follows:
In Azure Migrate project, Under Execute > Migrations > select the server for which you wish to do test migration by clicking on the server name under Workloads column.
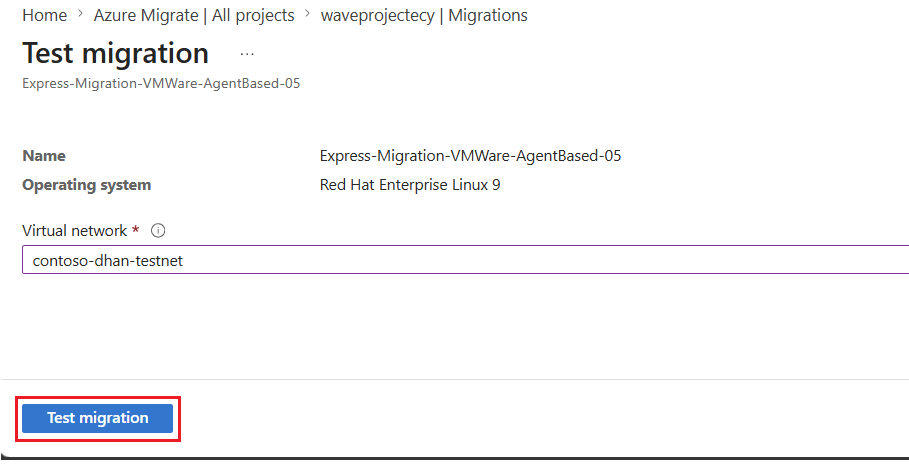
In the drill-down blade, under Testing drop-down, select Start test migration.

In Test migration, select the Azure VNet in which the Azure VM will be located during testing. We recommend you use a non-production VNet.
Select the subnet to associate with each Network Interface Cards (NICs) of themigrated VM.
You have an option to upgrade the Windows Server OS during test migration. To upgrade, select the Upgrade available option. In the pane that appears, select the target OS version that you want to upgrade to and select Apply. Learn more.
Select the Test migration to start the job. Monitor the job status in the portal under Execution status. After the test migration completes, clean up the test resources by navigating to the server and selecting Clean up test migration from the Testing drop-down.
Note
You can now register your servers running SQL server with SQL VM RP to take advantage of automated patching, automated backup and simplified license management using SQL IaaS Agent Extension.
- Select the server under Workloads column in Execute> Migrations page. In Compute and Network settings, select checkbox associated with register with SQL IaaS extension.
- Select Azure Hybrid benefit for SQL Server if you have SQL Server instances that are covered with active Software Assurance or SQL Server subscriptions and you want to apply the benefit to the machines you're migrating.hs.


Migrate VMs
After you've verified that the test migration works as expected, you can migrate the source (on-premises or AVS) machines.
- In Azure Migrate project, Under Execute > Migrations > select the server for which you wish to do final migration by clicking on the server name under Workloads column.
- In the drill-down blade, under Completion drop-down, select Migrate.

- In Migrate > Shut down virtual machines and perform a planned migration with no data loss, select Yes > OK.
- By default Azure Migrate shuts down the source (on-premises or AVS) VM, and runs an on-demand replication to synchronize any VM changes that occurred since the last replication occurred. This ensures no data loss.
- If you don't want to shut down the VM, select No
- You have an option to upgrade the Windows Server OS during migration. To upgrade, select the Upgrade available option. In the pane that appears, select the target OS version that you want to upgrade to and select Apply. Learn more.
- If you already have a capacity reservation for the VM SKU in the target subscription and location, specify it here for this deployment. Capacity reservations ensure that the required VM SKU is available when you start migration. The capacity reservation for the SKU can be in any resource group within the target subscription and location. Learn more.
- A migration job starts for the server. Track the job in Azure notifications.
- After the job finishes, you can view and manage the server from the Migrations page which will be tracked under Completion stage.
Complete the migration
After the migration is done, in the drill-down page of the server, under Completion drop-down, select Complete migration. This stops replication for the source (on-premises or AVS) machine, and cleans up replication state information for the VM.

We automatically install the VM agent for Windows VMs and Linux during migration.
Verify and troubleshoot any Windows activation issues on the Azure VM.
Perform any post-migration app tweaks, such as updating host names, database connection strings, and web server configurations.
Perform final application and migration acceptance testing on the migrated application now running in Azure.
Cut over traffic to the migrated Azure VM instance.
Remove the source (on-premises or AVS) VMs from your local VM inventory.
Remove the source (on-premises or AVS) VMs from local backups.
Update any internal documentation to show the new location and IP address of the Azure VMs.

Post-migration best practices
- For increased resilience:
- Keep data secure by backing up Azure VMs using the Azure Backup service. Learn more.
- Keep workloads running and continuously available by replicating Azure VMs to a secondary region with Site Recovery. Learn more.
- For increased performance:
- By default, data disks are created with host caching set to "None". Review and adjust data disk caching to your workload needs. Learn more.
- For increased security:
- Lock down and limit inbound traffic access with Microsoft Defender for Cloud - Just in time administration.
- Manage and govern updates on Windows and Linux machines with Azure Update Manager.
- Restrict network traffic to management endpoints with Network Security Groups.
- Deploy Azure Disk Encryption to help secure disks, and keep data safe from theft and unauthorized access.
- Read more about securing IaaS resources, and visit the Microsoft Defender for Cloud.
- For monitoring and management:
- Consider deploying Microsoft Cost Management to monitor resource usage and spending.
Next steps
Investigate the cloud migration journey in the Azure Cloud Adoption Framework.