Bilješka
Pristup ovoj stranici zahtijeva provjeru vjerodostojnosti. Možete pokušati da se prijavite ili promijenite direktorije.
Pristup ovoj stranici zahtijeva provjeru vjerodostojnosti. Možete pokušati promijeniti direktorije.
This article shows how to configure settings for $convert-data by using the Azure portal to convert health data into FHIR® R4.
Default templates
Microsoft publishes a set of predefined sample Liquid templates from the FHIR Converter project to support FHIR data conversion. These templates help you get started with your data conversion workflow. Customize and host your own templates to support your own data conversion requirements. For information on customized templates, see Customize templates.
The default templates are hosted in a public container registry and require no further configurations or settings for your FHIR service.
To access and use the default templates for your conversion requests, ensure that when invoking the $convert-data operation, the templateCollectionReference request parameter has the appropriate value based on the type of data input.
Warning
Microsoft releases default templates under the MIT License and doesn't support them.
The default templates help you get started with your data conversion workflow. These default templates aren't intended for production and might change when Microsoft releases updates for the FHIR service. To have consistent data conversion behavior across different versions of the FHIR service host your own copy of the templates in an Azure Container Registry (ACR) instance. Use ACR to host your custom templates and support versioning.
For more information on hosting your own templates, see Host your own templates.
Customize templates
Use the FHIR Converter Visual Studio Code extension to customize templates for your specific requirements. The extension provides an interactive editing experience and makes it easy to download Microsoft-published templates and sample data.
Note
The FHIR Converter extension for Visual Studio Code supports HL7v2, C-CDA, and JSON Liquid templates. It doesn't currently support FHIR STU3 to FHIR R4 Liquid templates.
Use the default templates as a starting point, and add your customizations. To avoid unintended conversion results, follow these guidelines when updating the templates.
Author the template so that it yields a valid structure for a FHIR bundle resource.
For example, the Liquid templates should have a format such as the following code:
<liquid assignment line 1 >
<liquid assignment line 2 >
.
.
<liquid assignment line n >
{
    "resourceType": "Bundle",
    "type": "xxx",
    <...liquid code...>
    "identifier":
    {
        "value":"xxxxx",
    },
    "id":"xxxx",
    "entry": [
	<...liquid code...>
   ]
}
The overall template follows the structure and expectations for a FHIR bundle resource, with the FHIR bundle JSON at the root of the file. If you add custom fields to the template that aren't part of the FHIR specification for a bundle resource, the conversion request could fail. However, the converted result could potentially have unexpected output, and wouldn't yield a valid FHIR bundle resource that the FHIR service can persist as is.
For example, consider the following code:
<liquid assignment line 1 >
<liquid assignment line 2 >
.
.
<liquid assignment line n >
{
   “customfield_message”: “I will have a message here”,
    “customfield_data”: {
      "resourceType": "Bundle",
      "type": "xxx",
      <...liquid code...>
      "identifier":
      {
        "value":"xxxxx",
      },
       "id":"xxxx",
       "entry": [
	  <...liquid code...>
    ]
  }
}
In the example code, two example custom fields customfield_message and customfield_data aren't FHIR properties per the specification, and the FHIR bundle resource seems to be nested under customfield_data (that is, the FHIR bundle JSON isn't at the root of the file). This template doesn't align with the expected structure around a FHIR bundle resource. The conversion request might succeed by using the provided template. However, the returned converted result could potentially have unexpected output (due to certain post conversion processing steps being skipped). It wouldn't be considered a valid FHIR bundle (since it's nested and has non FHIR specification properties) and attempting to persist the result in your FHIR service fails.
Host your own templates
Host your own copy of templates in an Azure Container Registry (ACR) instance. Use ACR to host your custom templates and support versioning.
To host your own templates and use them for $convert-data operations, follow these seven steps:
- Create an Azure Container Registry instance
- Push the templates to your Azure Container Registry instance
- Enable Azure Managed identity in your FHIR service instance
- Provide Azure Container Registry access to the FHIR service managed identity
- Register the Azure Container Registry server in the FHIR service
- Configure the Azure Container Registry firewall for secure access
- Verify the $convert-data operation
Step 1: Create an Azure Container Registry instance
Read the Introduction to container registries in Azure and follow the instructions for creating your own ACR instance. Place your ACR instance in the same resource group as your FHIR service.
Step 2: Push the templates to your Azure Container Registry instance
After you create an ACR instance, use the FHIR Converter: Push Templates command in the FHIR Converter extension to push your custom templates to your ACR instance. Alternatively, you can use the Template Management CLI tool for this purpose.
To maintain different versions of custom templates in your Azure Container Registry, push the image containing your custom templates into your ACR instance with different image tags.
- For more information about ACR registries, repositories, and artifacts, see About registries, repositories, and artifacts.
- For more information about image tag best practices, see Recommendations for tagging and versioning container images.
To reference specific template versions in the API, use the exact image name and tag that contains the versioned template to be used. For the API parameter templateCollectionReference, use the appropriate image name + tag (for example: <RegistryServer>/<imageName>:<imageTag>).
Step 3: Enable Azure Managed identity in your FHIR service instance
Go to your instance of the FHIR service in the Azure portal, and then select the Identity option.
Change the Status to On and select Save to enable the system-managed identity in the FHIR service.
Step 4: Provide Azure Container Registry access to the FHIR service managed identity
In your resource group, go to your Container Registry instance, and then select the Access control (IAM) tab.
Select Add > Add role assignment. If the Add role assignment option is unavailable, ask your Azure administrator to grant you the permissions for performing this task.
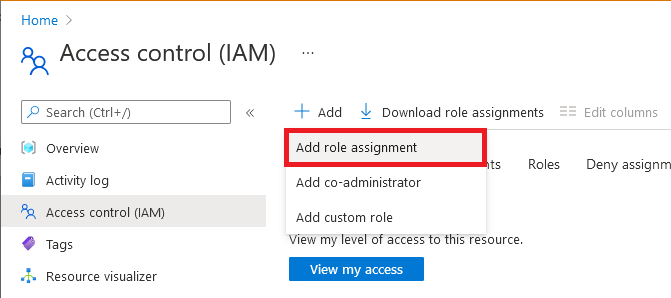
On the Role pane, select the AcrPull role.

On the Members tab, select Managed identity, and then Select members.
Select your Azure subscription.
Select System-assigned managed identity, and then select the FHIR service you're working with.
On the Review + assign tab, select Review + assign to assign the role.

For more information about assigning roles in the Azure portal, see Azure built-in roles.
Step 5: Register the Azure Container Registry server in the FHIR service
Register the ACR server by using the Azure portal.
To use the Azure portal:
- In your FHIR service instance, under Transfer and transform data, select Artifacts. You see a list of currently registered Azure Container Registry servers.
- Select Add and then, in the dropdown list, select your registry server.
- Select Save.
You can register up to 20 ACR servers in the FHIR service.
Note
It might take a few minutes for the registration to take effect.
Important
When registering an Azure Container Registry (ACR) image in the FHIR service:
- If you specify a digest, the service uses only the image with the exact digest.
- If you don't specify a digest, the service can resolve the image by using both tagging and digest.
Step 6: Configure the Azure Container Registry firewall for secure access
Secure ACR by using the built-in firewall. The best method depends on your particular use case. For more information, see:
- Connect privately to an Azure container registry using Azure Private Link
- Configure public IP network rules
- Azure Container Registry mitigating data exfiltration with dedicated data endpoints
- Restrict access to a container registry using a service endpoint in an Azure virtual network
- Allow trusted services to securely access a network-restricted container registry
- Configure rules to access an Azure container registry behind a firewall
- Azure IP Ranges and Service Tags – Public Cloud
Note
The FHIR service is registered as a trusted Microsoft service with Azure Container Registry.
Step 7: Verify the $convert-data operation
Call the $convert-data operation by specifying your template reference in the templateCollectionReference parameter:
<RegistryServer>/<imageName>@<imageDigest>.
You receive a bundle response that contains the health data converted into the FHIR format.
Related articles
Note
FHIR® is a registered trademark of HL7 and is used with the permission of HL7.