Bilješka
Pristup ovoj stranici zahtijeva provjeru vjerodostojnosti. Možete pokušati da se prijavite ili promijenite direktorije.
Pristup ovoj stranici zahtijeva provjeru vjerodostojnosti. Možete pokušati promijeniti direktorije.
Transport Layer Security (TLS) inspection in Microsoft Entra Internet Access uses a two-tier intermediate certificate model to issue dynamically generated leaf certificates for decrypting traffic. This bring your own certificate (BYOC) option lets you use your organization's public key infrastructure (PKI) to sign the certificate authority (CA) that serves as the Global Secure Access intermediate CA.
This article explains how to create a certificate signing request (CSR), sign it with your CA, and upload the signed certificate. If you don't want to operate your own CA for TLS inspection, see Configure TLS inspection with a Microsoft-managed certificate.
Prerequisites
To complete the steps in this process, you must have the following prerequisites in place:
- A PKI service to sign the CSR and generate an intermediate certificate for TLS inspection. For testing scenarios, you can also use a self-signed root certificate created with OpenSSL.
- A trial license for Microsoft Entra Internet Access.
- Global Secure Access prerequisites.
Create a CSR and upload your signed certificate
To create a CSR and upload the signed certificate for TLS termination:
Sign in to the Microsoft Entra admin center as a Global Secure Access Administrator.
Browse to Global Secure Access > Secure > TLS inspection policies.
Switch to the TLS inspection settings tab.
Select + Create certificate to start generating a certificate signing request.
In the Create certificate pane, fill in the following fields:
- Certificate name: This name appears in the certificate hierarchy when viewed in a browser. It must be unique, contain no spaces, and be no more than 12 characters long. You can't reuse a previous certificate name, even after you delete the certificate.
- Common name (CN): Enter a common name that identifies the intermediate certificate, for example,
Contoso TLS ICA. - Organizational Unit (OU): Enter an organization name, for example,
Contoso IT.
Select Create CSR. The
.csrfile is saved to your default download folder.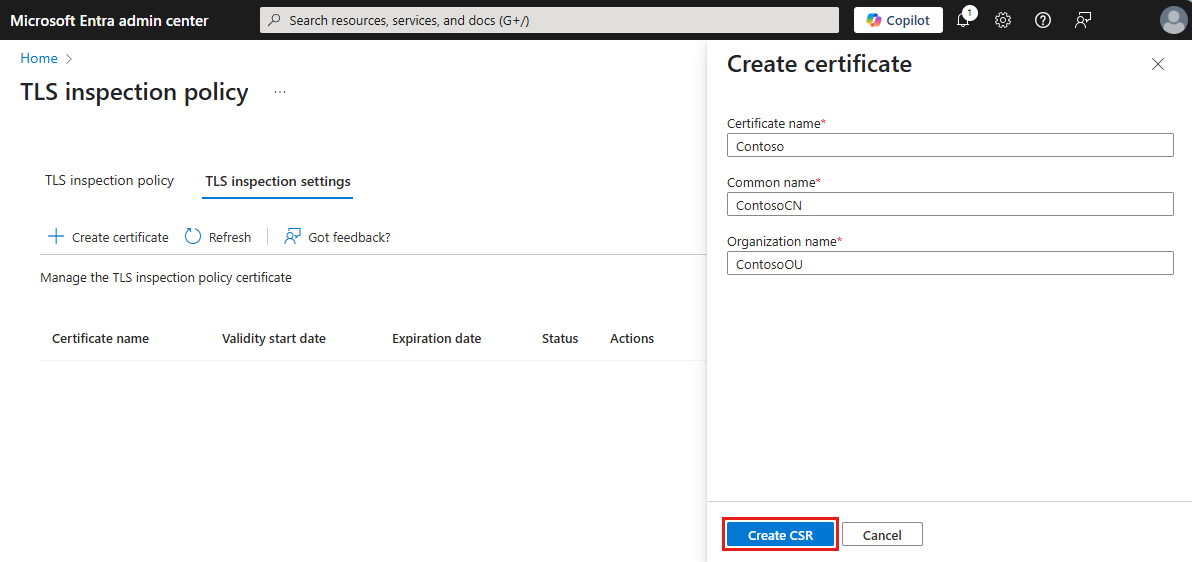
Sign the CSR using your PKI service. Make sure Server Auth is in Extended Key Usage and
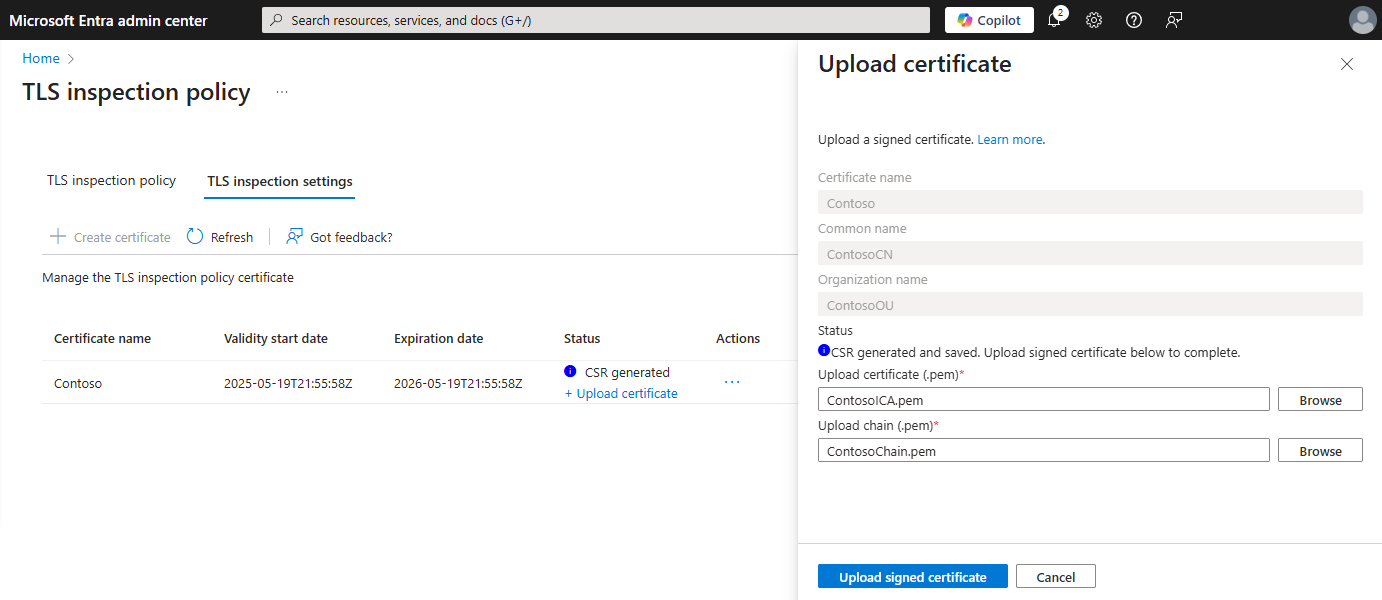
certificate authority (CA)=true,keyCertSign,cRLSign,basicConstraints=critical,CA:TRUE, andpathLenConstraint = 1are in Basic Extension. Save the signed certificate in.pemformat. If you're testing with a self-signed certificate, follow the instructions to use OpenSSL to sign the CSR.Select + Upload certificate.
In the Upload certificate form, upload the
certificate.pemandchain.pemfiles.Select Upload signed certificate.
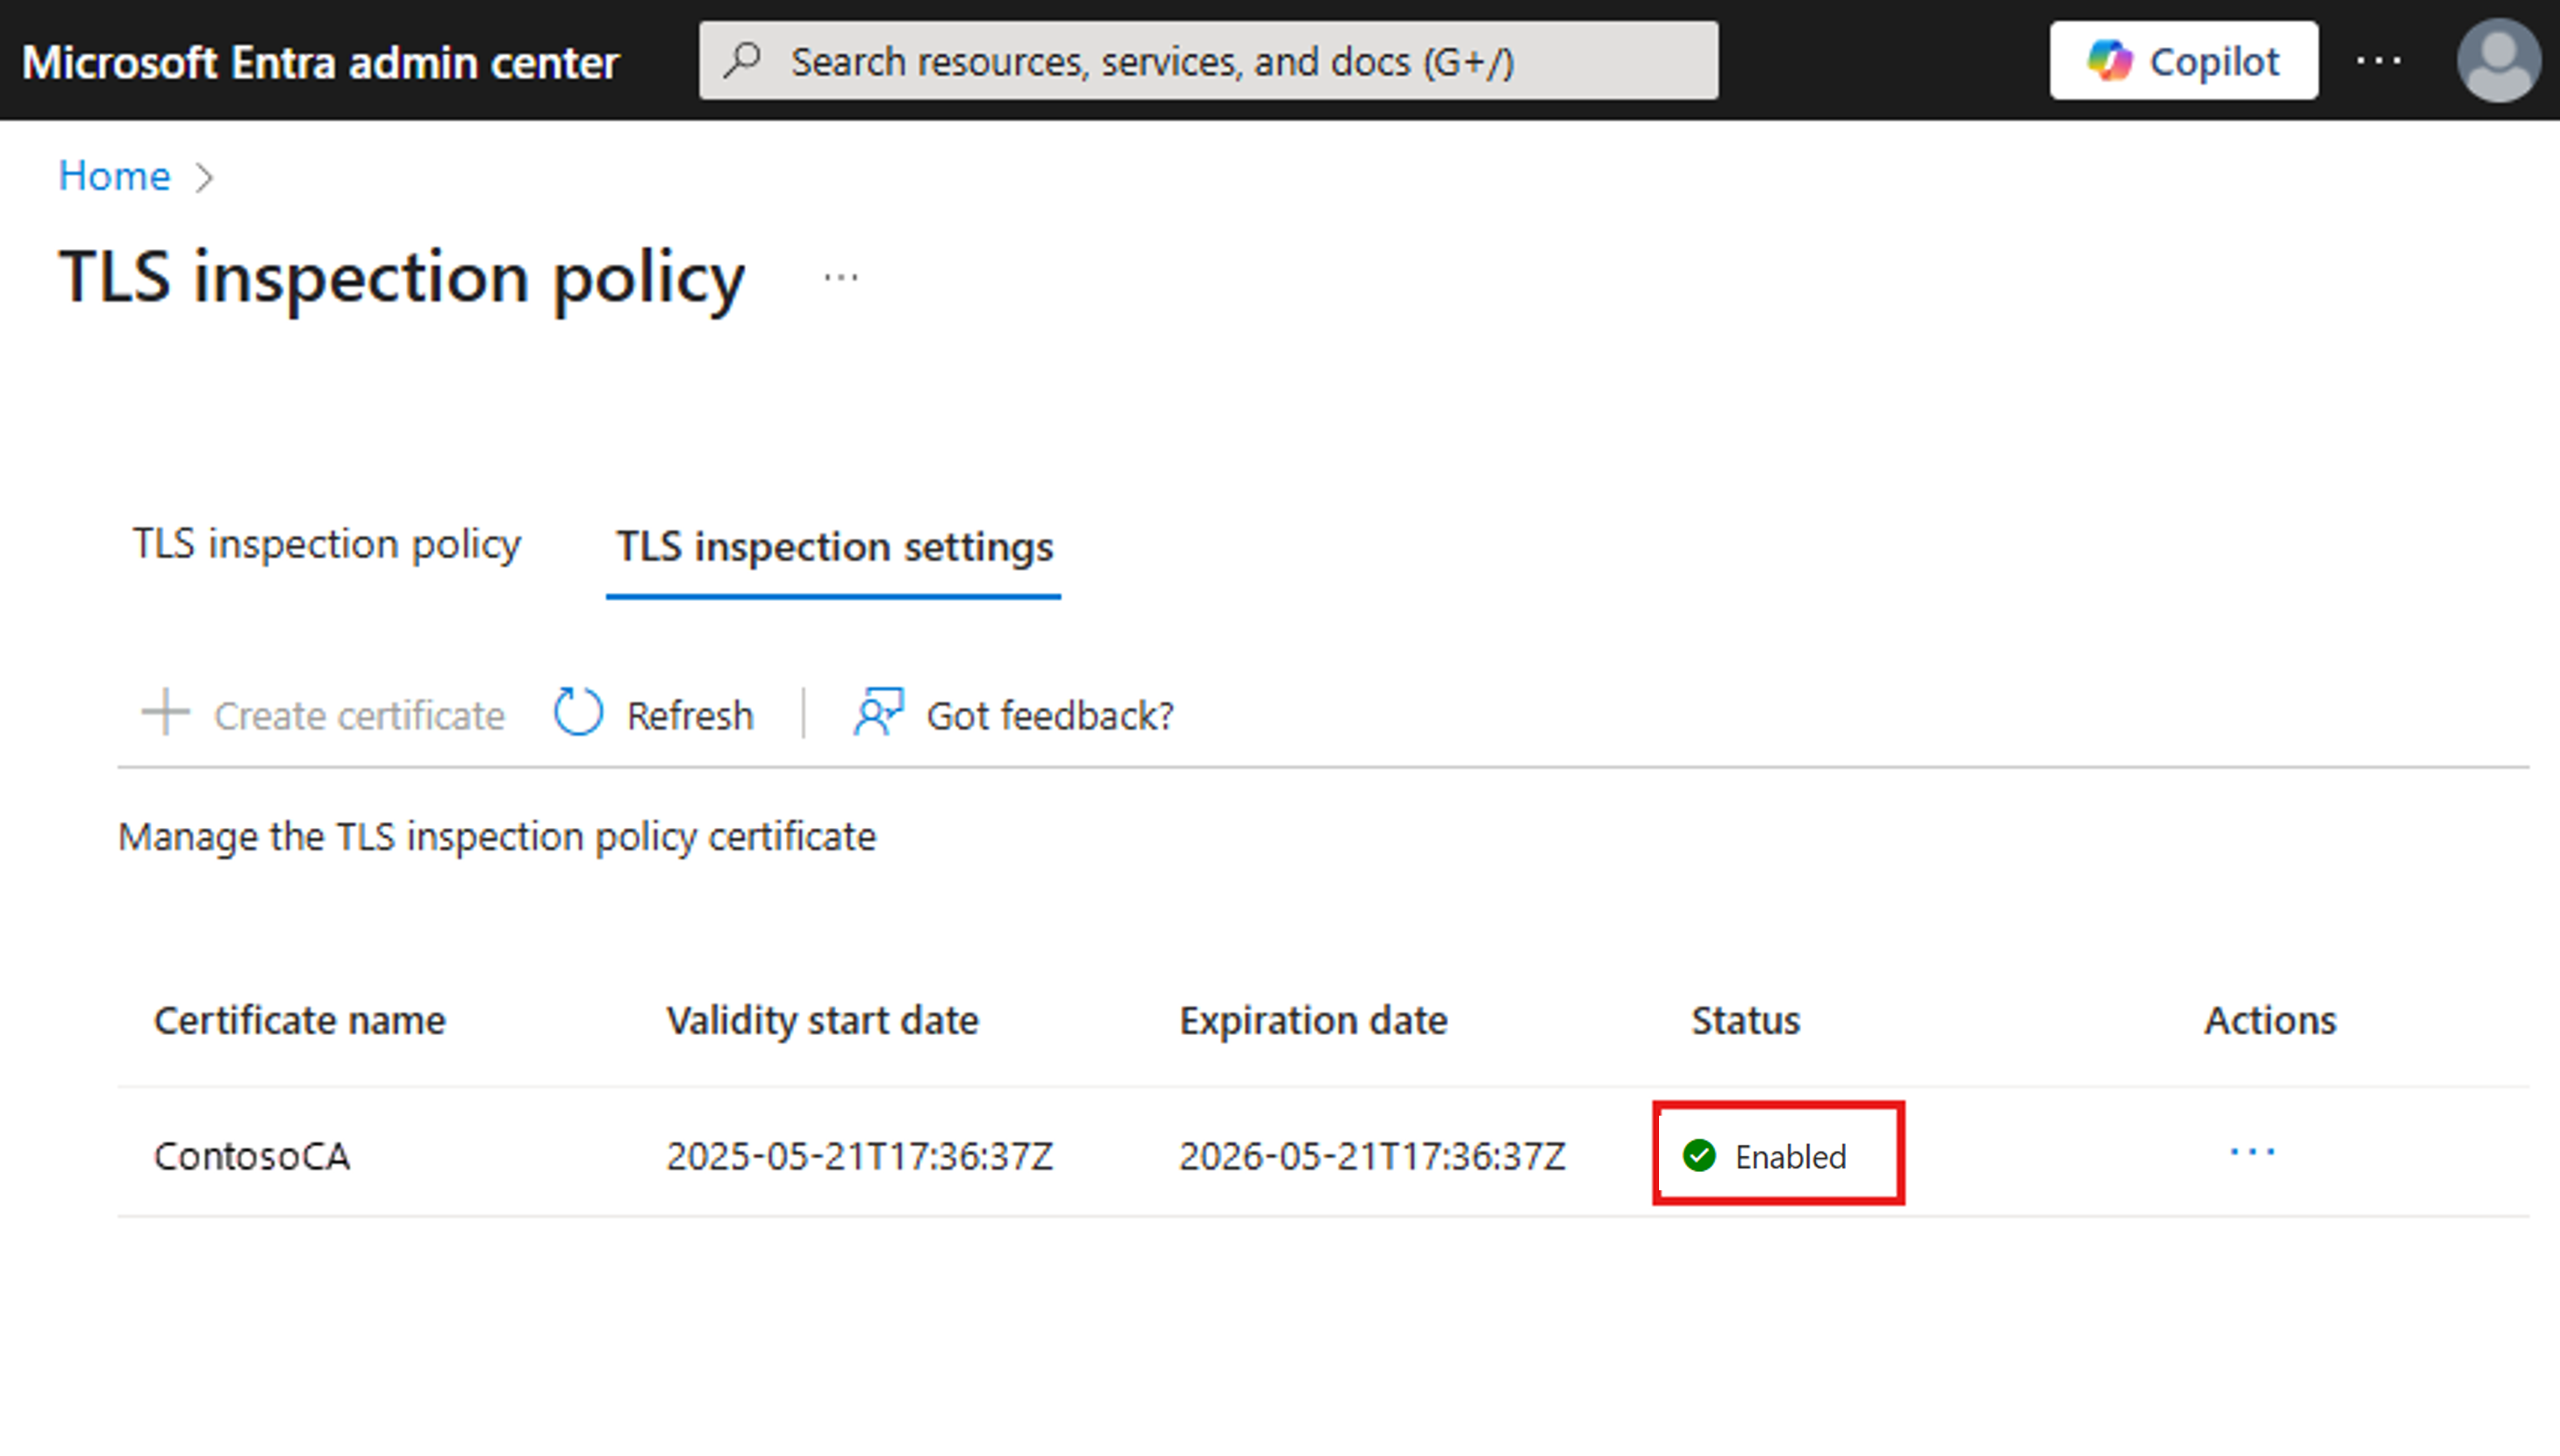
The uploaded certificate defaults to Disabled status. Set the status to Enabled. You can have one enabled certificate.
Test with a self-signed root certificate authority using OpenSSL
For testing purposes only, use a self-signed root certificate authority (CA) that you create with OpenSSL to sign the CSR.
If you don't already have one, first create an openssl.cnf file with this configuration:
[ rootCA_ext ]
subjectKeyIdentifier = hash
authorityKeyIdentifier = keyid:always,issuer
basicConstraints = critical, CA:true
keyUsage = critical, digitalSignature, cRLSign, keyCertSign

[ interCA_ext ]
subjectKeyIdentifier = hash
authorityKeyIdentifier = keyid:always,issuer
basicConstraints = critical, CA:true, pathlen:1
keyUsage = critical, digitalSignature, cRLSign, keyCertSign

[ signedCA_ext ]
subjectKeyIdentifier = hash
authorityKeyIdentifier = keyid:always,issuer
basicConstraints = critical, CA:true
keyUsage = critical, digitalSignature, cRLSign, keyCertSign
extendedKeyUsage = serverAuth

[ server_ext ]
subjectKeyIdentifier = hash
authorityKeyIdentifier = keyid:always,issuer
basicConstraints = critical, CA:false
keyUsage = critical, digitalSignature
extendedKeyUsage = serverAuth
Create a new root certificate authority and private key using the following openssl.cnf config file:
openssl req -x509 -new -nodes -newkey rsa:4096 -keyout rootCAchain.key -sha256 -days 370 -out rootCAchain.pem -subj "/C=US/ST=US/O=Self Signed/CN=Self Signed Root CA" -config openssl.cnf -extensions rootCA_extSign the CSR using the following command:
openssl x509 -req -in <CSR file> -CA rootCAchain.pem -CAkey rootCAchain.key -CAcreateserial -out signedcertificate.pem -days 370 -sha256 -extfile openssl.cnf -extensions signedCA_extUpload
signedcertificate.pemandrootCAchain.pemaccording to the steps in Create a CSR and upload your signed certificate.
Configure TLS inspection in Microsoft Entra Internet Access
The following video shows how to configure TLS inspection in Microsoft Entra Internet Access using a self-signed certificate created with OpenSSL. It also shows how to build TLS inspection policies, configure security profiles, apply web content filtering, enforce Conditional Access policies, create custom block pages, and implement threat intelligence policies.
PowerShell examples
For examples that configure a certificate authority for TLS inspection using Active Directory Certificate Services (AD CS) or OpenSSL, see: